Table of Contents
Advertisement
Quick Links
Assembly Instructions
& User's Manual
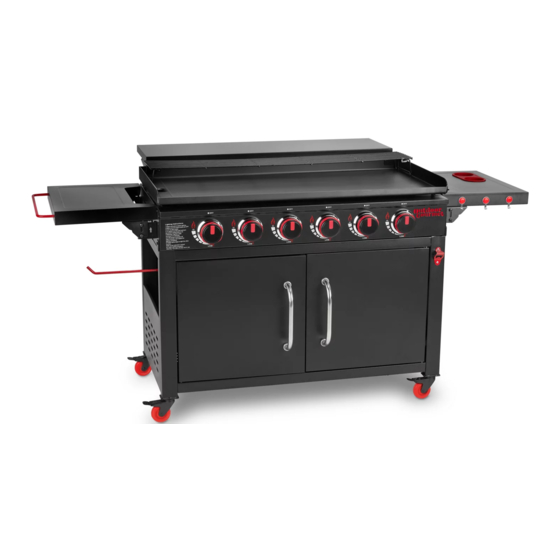
OUTDOOR GOURMET 6 BURNER 44IN GRIDDLE
MODEL NUMBER 166766
For Outdoor Use Only
Please keep this instruction manual for future reference
Customer Service: 1-888-922-2336
7:00 am to 12:00 am CST (daily)
Live Chat at: www.academy.com
Email: customerservice@academy.com
(Made in China)
Page 1 of 25
MODEL NUMBER 166766
11/27/21-Ver.1
Advertisement
Table of Contents

Subscribe to Our Youtube Channel
Related Manuals for Outdoor Gourmet 166766


Summary of Contents for Outdoor Gourmet 166766
- Page 1 Assembly Instructions & User’s Manual OUTDOOR GOURMET 6 BURNER 44IN GRIDDLE MODEL NUMBER 166766 For Outdoor Use Only Please keep this instruction manual for future reference Customer Service: 1-888-922-2336 7:00 am to 12:00 am CST (daily) Live Chat at: www.academy.com Email: customerservice@academy.com...
-
Page 2: Table Of Contents
Compare parts with package content list and hardware contents. If any part is missing or damaged do not attempt to assemble the unit. Contact customer service for replacement parts. Page 2 of 25 MODEL NUMBER 166766 11/27/21-Ver.1... -
Page 3: Warnings
The pressure regulator and hose assembly supplied with this appliance must be used. Replacement pressure regulator and hose assemblies must be those specified by the appliance manufacturer. Failure to follow these instructions could result in fire, explosion or burn hazard which could cause property damage, personal injury, or death. Page 3 of 25 MODEL NUMBER 166766 11/27/21-Ver.1... - Page 4 If a leak is detected at any time STOP. If you cannot stop a gas leak, immediately close LP tank valve, leave area of appliance, and call LP gas supplier or your fire department. Page 4 of 25 MODEL NUMBER 166766 11/27/21-Ver.1...
- Page 5 This will not affect safety or use of appliance. NOTE: If you cannot complete connection, disconnect regulator, and repeat step 5 and 6. If you are still unable to complete the connection, do not use this regulator! Page 5 of 25 MODEL NUMBER 166766 11/27/21-Ver.1...
- Page 6 Brush soapy solution onto all weld seams and entire valve area. If “growing” bubbles appear, do not use or move the LP tank, contact an LP gas supplier or your fire department. Page 6 of 25 MODEL NUMBER 166766 11/27/21-Ver.1...
- Page 7 All cleaning and maintenance should only be done when the appliance is cool and with the fuel supply turned off at the LP tank. DO NOT clean any part in a self-cleaning oven. The extreme heat will damage the finish. Refer to the Care & Maintenance section for details on cleaning and maintaining the appliance. Page 7 of 25 MODEL NUMBER 166766 11/27/21-Ver.1...
-
Page 8: Product Diagram
PRODUCT DIAGRAM Expanded view showing all component locations and hardware placements for reference. Page 8 of 25 MODEL NUMBER 166766 11/27/21-Ver.1... -
Page 9: Parts List
Bottle Holder Side Shelf Stay Side Shelf Stay Side Shelf Bracket Side Shelf (L) Side Shelf (R) Towel Rack Tool Hook ( In Blister Box) Griddle Warming Rack Hose Clamp Serving Shelf Support Page 9 of 25 MODEL NUMBER 166766 11/27/21-Ver.1... - Page 10 Serving Shelf Support Serving Shelf Lid Handle Grease Tray Grease Tray Handle Grease Tray Face Page 10 of 25 MODEL NUMBER 166766 11/27/21-Ver.1...
-
Page 11: Hardware List
Ensure all hardware listed is present prior to assembly. If any hardware is missing or damaged, please contact customer service immediately. (GG) Hose Clamp TOOLS REQUIRED Collect and have ready these required tools prior to beginning assembly. Adjustable Wrench Phillips Screwdriver Two Persons Page 11 of 25 MODEL NUMBER 166766 11/27/21-Ver.1... -
Page 12: Assembly Procedures
Connect Door Magnet (4) to Frame Base & 3) as shown, finger tighten. Assembly as shown. Screw casters to frame sides as shown, Attach Cabinet Back (5) to Frame completely tighten. Assembly as shown. Finger tighten. Page 12 of 25 MODEL NUMBER 166766 11/27/21-Ver.1... - Page 13 Tank Bracket as shown in image. Tighten Completely. Add Fence Rail (10) to Frame Assembly as Attach Cabinet Door Handles (11) to shown. Finger Tighten. Cabinet Door (13) and Door Handle Inserts (12) as shown. Tighten Completely. Page 13 of 25 MODEL NUMBER 166766 11/27/21-Ver.1...
- Page 14 (12) as shown. Tighten Completely. Attach the Bottle Opener (15) to the Add the Paper Towel Holder (16) to the Frame Assembly as shown. inner bracket on the Frame Assembly as shown. Page 14 of 25 MODEL NUMBER 166766 11/27/21-Ver.1...
- Page 15 Add the Protector Bracket (19) to the Frame Add Side Shelf Brackets (20 & 21) to Frame Assembly as shown. Tighten completely. Assembly as shown, tighten completely. Tighten all bolts on Frame Assembly at this time. Page 15 of 25 MODEL NUMBER 166766 11/27/21-Ver.1...
- Page 16 Remove bolts and washers from Towel Rack Add Shelf Supports (23 & 24) to Side Shelf (21) and align to Left Side Shelf Assembly, (Left) (27) as shown, tighten completely. Bolt in place as shown, tighten completely. Page 16 of 25 MODEL NUMBER 166766 11/27/21-Ver.1...
- Page 17 Add studs to griddle (29) underside as shown. Place Griddle (29) on Frame Assembly Add nuts to studs as shown. (This allows for placing studs in predrilled holes in Fire Box. griddle adjustment and leveling) (Two persons required) Page 17 of 25 MODEL NUMBER 166766 11/27/21-Ver.1...
- Page 18 Bolt Serving Shelf Supports (32&33) to Serving Shelf (34) as shown. Tighten completely. Lid covering appliance for storage Lid hanging on back of firebox while preheating and cooking Page 18 of 25 MODEL NUMBER 166766 11/27/21-Ver.1...
- Page 19 Bolt Lid Handles (36) to Lid (35) as shown. Tighten completely. Bolt grease tray handle (39) through Grease Tray Face (38) to Grease Tray (37) and tighten bolts completely. Place in firebox accordingly. Page 19 of 25 MODEL NUMBER 166766 11/27/21-Ver.1...
- Page 20 Page 20 of 25 MODEL NUMBER 166766 11/27/21-Ver.1...
-
Page 21: Trouble Shooting
LP tank and wait one minute. Reconnect the tank has been tripped. regulator control valve to the LP tank valve and slowly open the LP tank valve until it is fully open. Page 21 of 25 MODEL NUMBER 166766 11/27/21-Ver.1... -
Page 22: Care & Maintenance
13. Cover in warm-hot soapy water, gently scrub it down. Let it sit for around a half hour to let the soap loosen the grease. 14. Gently wipe off the soapy water and all remaining grease. 15. Rinse with cloth and cold water. Repeat as needed, rinsing the cloth. Page 22 of 25 MODEL NUMBER 166766 11/27/21-Ver.1... -
Page 23: Operating Instructions
Use spatulas rather than a fork when turning the food on the griddle. Less juice will be lost that way. A timer can help you keep from over-cooking the food. 10. Use insulated protective mitts or potholders when working around a griddle in operation. Page 23 of 25 MODEL NUMBER 166766 11/27/21-Ver.1... -
Page 24: Sample Recipe
Shut off the heat to the griddle and pour over the remaining sauce. Stir to toss with the noodles, meat, and vegetables. Serve while hot. Page 24 of 25 MODEL NUMBER 166766 11/27/21-Ver.1... -
Page 25: Warranty Information
3. Follow the Customer Service Representative’s instructions exactly. If a return is necessary, it must be packed carefully and shipped prepaid. Should you encounter any problems, Customer Service: 1-888-922-2336 7:00 am to 12:00 am CST (daily) Live Chat at: www.academy.com Email: customerservice@academy.com Page 25 of 25 MODEL NUMBER 166766 11/27/21-Ver.1...
Need help?
Do you have a question about the 166766 and is the answer not in the manual?
Questions and answers