Table of Contents
Advertisement
Quick Links
Advertisement
Table of Contents

Subscribe to Our Youtube Channel
Related Manuals for Silex technology DS-700AC


Summary of Contents for Silex technology DS-700AC
- Page 1 DS-700AC User's Manual...
- Page 2 Copyright© 2021 silex technology, Inc. All rights reserved. WA106490XB...
-
Page 3: Table Of Contents
1-3. Notes on Use ............................6 1-4. Product Information and Customer Services ................7 Product Information ..........................7 Customer Support Center .........................7 2. About DS-700AC ................. 9 2-1. Package Contents ..........................10 2-2. Features ..............................11 2-3. Specifications ............................14 2-3-1. Hardware Specifications ......................14 2-3-2. - Page 4 5-1. Configuration via a Network Cable (Recommended) ............42 5-1-1. Necessary Items ......................... 42 5-1-2. Start Setup ........................... 43 Connect a network cable to and power on DS-700AC ............43 Configure the network settings from your PC ................ 44 5-1-3. Enable the new settings ......................50 5-2.
- Page 5 7. Using USB Devices Connected to DS-700AC ......73 7-1. Using USB Devices in Windows ....................74 7-1-1. Starting SX Virtual Link ......................74 7-1-2. Connecting / Disconnecting to / from a USB device ............ 75 7-1-3. Finishing SX Virtual Link......................76 7-1-4.
- Page 6 Conditions to start ECO Mode ....................142 Conditions to finish ECO Mode ....................142 8-5-2. Resetting to Factory Defaults .....................143 Resetting using the push switch on DS-700AC ..............143 Resetting from the Web page .....................144 8-5-3. Rebooting DS-700AC ......................146 Manual reboot at the unit side ....................146 Remote reboot from the Web page ..................146...
- Page 7 8-8. Uninstalling Application on Windows ..................174 8-8-1. Uninstalling SX Virtual Link ....................174 8-8-2. Uninstalling SX Virtual Link Lite ..................176 9. Troubleshooting ..............179 9-1. Useful Information .........................180 9-2. Q&A ..............................183 9-2-1. Problems During Setup ......................183 9-2-2. Problems While Using DS-700AC ..................186...
- Page 8 Blank page...
-
Page 9: Introduction
1. Introduction Introduction Thank you for purchasing the USB Device Server "DS-700AC". This manual provides information on how to configure and use DS-700AC. Please read the 1-2. Safety Instructions carefully before using DS-700AC. -
Page 10: Introduction
DS-700AC User's Manual 1-1. Introduction About the notation This manual provides information on how to configure and use DS-700AC. Please read the Safety Instructions carefully before using DS-700AC. This symbol indicates important information that needs to be observed when operating DS-700AC. Make sure to read this information for safe and proper use. -
Page 11: Safety Instructions
This page provides the safety instructions for safe use of DS-700AC. To ensure safe and proper use, please read the following information carefully before using DS-700AC. The safety instructions include important information on safe handling of DS- 700AC and on general safety issues. - Page 12 DS-700AC User's Manual Warning - In the following cases, turn off the connected devices and unplug the AC plug of this product from a power outlet. Failure to follow these instructions may cause fire or an electrical shock. - When this product emits a strange smell, smoke or sound or becomes too hot to touch.
- Page 13 1. Introduction Caution - Use the AC adaptor supplied with this product. Other AC adaptors may cause malfunction. - Do not place any objects on the cable or bend, twist, or pull it excessively. - Do not use or store this product under the following conditions. - It may cause malfunction.
-
Page 14: Notes On Use
Silex Technology, Inc. is not liable for any injury, fire, property damage, etc. that may arise as a result of using this product for these facilities or control systems. -
Page 15: Product Information And Customer Services
Silex Technology Customer Support. Contact Information support@silexamerica.com Europe support@silexeurope.com - Refer to the Silex Technology website ( https://www.silextechnology.com/ ) for the latest FAQ and product information. Note... - Page 16 DS-700AC User's Manual Blank page...
-
Page 17: About Ds-700Ac
2. About DS-700AC About DS-700AC... -
Page 18: Package Contents
DS-700AC User's Manual 2-1. Package Contents This page explains the items that came with DS-700AC. Following items are bundled with DS-700AC. If you find any items missing, please contact your point of purchase. - DS-700AC - AC adaptor - Setup Guide... -
Page 19: Features
This page explains the Features of DS-700AC. IEEE802.11a / b / g / n / ac for wireless LAN standard As DS-700AC supports IEEE802.11a/b/g/n/ac, various USB devices can be shared over a wireless network. The following authentication and encryption methods are supported. - Page 20 It is not required to manually connect to the device with SX Virtual Link for printing. Silex Technology shall not be liable for any loss or damage of data in data storage devices resulting from the use of DS-700AC. Silex Technology shall also not be liable for any leak, manipulation, loss, or corruption of data in data storage devices connected to DS-700AC as a result of improper use.
- Page 21 ( https://www.silextechnology.com/ ). ECO Mode If DS-700AC is not used for a specified period of time, it will switch to ECO Mode which turns off the USB Bus power. This feature allows you to save power used by USB Bus powered devices connected to DS-700AC.
-
Page 22: Specifications
DS-700AC User's Manual 2-3. Specifications 2-3-1. Hardware Specifications This page explains the hardware specification of DS-700AC. SDRAM 256MByte Memory FlashROM 32MByte USB 2.0 Hi-Speed (A Type) x 1 port Device interface USB 3.0 Super-Speed (A Type) x 1 port Push Switch... - Page 23 2. About DS-700AC Power supply AC100V adaptor, DC 12V Maximum power consumption 5.4W (excluding USB bus power) Temperature 0°C to +40°C / +32°F to +104°F Humidity 20% to 80%RH (Non-condensing) Temperature -10°C to +50°C / +14°F to +122°F Storage environment...
- Page 24 DS-700AC User's Manual Notice to US Customers Contains FCC ID: N6C-SXPCEAC2 This device complies with Part 15 of the FCC Rules. Operation is subject to the following two conditions: (1) This device may not cause harmful interference, and (2) this device must accept any interference received, including interference that may cause undesired operation.
- Page 25 2. About DS-700AC Notice to Canadian Customers CAN ICES-3 (B)/NMB-3 (B) This device contains licence-exempt transmitter(s)/receiver(s) that comply with Innovation, Science and Economic Development Canada’s licence-exempt RSS(s). Operation is subject to the following two conditions: 1. This device may not cause interference.
-
Page 26: Software Specifications
USB video converter. DS-700AC USB3.0 USB HUB About the number of connection If DS-700AC is used with a MFP as shown below, total 3 connections will be occupied (1 connection for each printer, scanner and storage features). DS-700AC USB HUB Printer………1 Connection Scanner……..1 Connection... -
Page 27: About Wireless Interference
This page explains the radio wave used by DS-700AC. DS-700AC operates at 2.4GHz and 5GHz bands. No radio license is required to use DS-700AC, however, please give attention of the followings: Do not use DS-700AC near the following devices or places. - Page 28 - Before you use DS-700AC, check that it will not interfere with other devices. - If interference occurs, stop using DS-700AC or change the wireless band. Please consider to create a wall between these devices to avoid interference. Contact us to for possible solution.
-
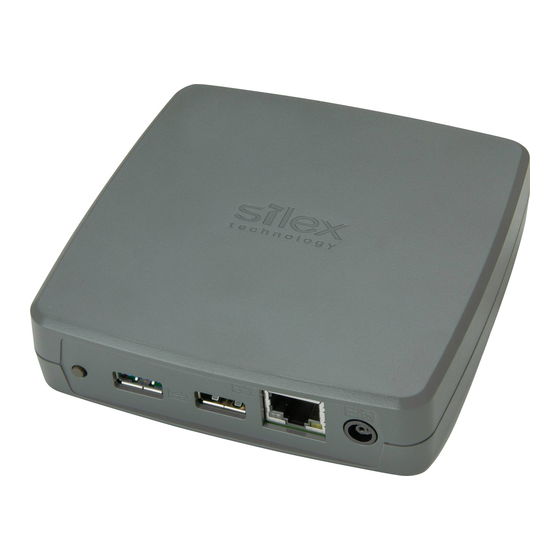
Page 29: Parts And Functions
2. About DS-700AC 2-5. Parts and Functions This page explains the parts and functions of DS-700AC. The parts name and functions are as follows: <TOP> (1) (2)(3) (1) POWER LED ON (Green) Turns on when DS-700AC is powered on. Blink (Orange) Searching for Access Points (blinks at 1 sec interval). - Page 30 If you are using USB devices that run on USB Bus power, it is recommended to avoid using two or more devices at once, so that the total power used does not exceed the maximum power capability of DS-700AC.
- Page 31 2. About DS-700AC <BOTTOM> E/A : XXXXXXXXXXXX (11) MAC Address of DS-700AC . (11) MAC Address Example) If the MAC Address is 84:25:3F:00:11:22, it is noted as "84253F001122".
- Page 32 DS-700AC User's Manual Blank page...
-
Page 33: Before You Begin
3.Before You Begin Before You Begin This page introduces the supported configuration methods for DS-700AC. -
Page 34: Supported Configuration Methods
The network cable is used only for setup. Unplug the cable when you finish the setup. If you plan to use DS-700AC in a wired network, you do not have to obtain the wireless setting information. Also, the network cable does not need to be unplugged. -
Page 35: Configuration Using The Wps Feature Of Your Wireless Router
For this configuration method, a wireless router supporting WPS is required. To see if your router supports WPS, refer to the operation manual that came with your router or contact the manufacturer. You do not need to obtain any wireless setting information beforehand, since the wireless settings are automatically configured between DS-700AC and your router. -
Page 36: Configuration Using A Usb Flash Drive
If you plan to use DS-700AC on a wireless network, please obtain your wireless setting information beforehand. - If you have access to the Web configuration page of DS-700AC, you can also configure the wireless settings from there. Note For details on how to configure the settings from the Web configuration page, refer to 8-1-1. -
Page 37: Necessary Wireless Setting Information
- If a security feature such as MAC Address filtering is enabled on your wireless router, disable it temporarily so that DS-700AC can communicate with your wireless router. For details, refer to the operation manual that came with your wireless router. - Page 38 DS-700AC User's Manual Check the wireless setting information of your wireless router as follows: The SSID is an ID that distinguishes a wireless LAN network from others. For wireless devices to communicate with each other on a wireless network, they SSID must share the same SSID.
-
Page 39: Setup Flow
For details on how to install the driver, please refer to the operation manual that came with the USB device. Collect your wireless setting information To use DS-700AC in your wireless network, DS-700AC must have the same settings as your wireless router. For details, refer to 3-2. Necessary Wireless Setting Information. -
Page 40: Setup
Refer to 5-2. Configuration via WPS for how to configure using WPS. Configuration using a USB flash drive By saving the configuration information to a USB flash drive and connecting it to DS-700AC, you can configure the network settings. Refer to 5-1. Configuration via a Network Cable (Recommended) for how to configure using a USB flash drive. -
Page 41: Prepare Other Pcs To Use Ds-700Ac
Refer to 6. Installing the Application to PC for how to install the necessary applications on your PC. - Please be sure to read the operation manual of your USB device before you connect it to DS-700AC. The connecting method and position may vary depending on the USB device to be connected. - Page 42 DS-700AC User's Manual Blank page...
-
Page 43: Software Overview
4. Software Overview Software Overview... -
Page 44: Necessary Utilities
Setting TCP/IP Device Server Setup is the configuration utility exclusively designed for Device Server products. In the TCP/IP setting window of Device Server Setup, you can configure the IP Address of DS-700AC. Get IP Address Automatically Select this to automatically assign an IP Address using the DHCP server. -
Page 45: Wireless Setting
4. Software Overview Wireless Setting After the TCP/IP setting is configured, wireless network can be selected. Enter the network key and follow the instructions on screen to configure the wireless settings. Network Key Enter the WEP Key or Pre-Shared Key of the wireless network you want to connect to. Confirm Network Key Select this to manually configure IP Address, subnet mask and default gateway. -
Page 46: What Is Sx Virtual Link
DS-700AC User's Manual 4-1-2 . What is SX Virtual Link? This page explains the application "SX Virtual Link" that is necessary to use DS-700AC. About SX Virtual Link SX Virtual Link allows you to connect your PC to a USB device that is connected to a device server. -
Page 47: Functional Overview
4. Software Overview Functional Overview - Easy to Use You only have to select the USB device in SX Virtual Link and click the Connect button. The USB device can be used from your PC as if it was directly connected to your PC. When finished using the USB device, click the Disconnect button in SX Virtual Link. -
Page 48: Downloading The Utilities
4-2 . Downloading the Utilities This page explains how to download the necessary utilities. The utilities to configure and use DS-700AC can be downloaded from our website. Access the URL below on the PC to use to configure DS-700AC. URL: https://www.silextechnology.com/... -
Page 49: Configuration
5. Configuration Configuration... -
Page 50: Configuration Via A Network Cable (Recommended)
(category 5e or above). - For a USB cable, it is recommended to use the one with a USB logo certification. - The USB3.0 port of DS-700AC does not support connection with a USB HUB, USB HUB embedded device and USB video converter. -
Page 51: Start Setup
5. Configuration 5-1-2 . Start Setup Connect a network cable to and power on DS-700AC Connect a network cable to DS-700AC and the other end to an Ethernet Hub or wireless router. DS-700AC Wireless Router Network Cable Connect an AC adapter to DS-700AC(1) and power plug to an outlet(2). -
Page 52: Configure The Network Settings From Your Pc
Note - If the POWER LED is off, DS-700AC is not powered on. Check that the AC adaptor is plugged in properly. - If the WLAN LED is on, the network cable is not connected. Check that the network cable is plugged in properly. - Page 53 5. Configuration Click Configure using the setup utility (Recommended). The User Account Control window is displayed. Click Yes. Click Yes in the message below. Device Server Setup is displayed. Click Next.
- Page 54 Select DS-700AC and click Next. - If DS-700AC is not displayed in the list, click Search. - If this does not help, refer to 9-2-1. Problems During Setup - DS-700AC is not displayed in the search Note result of the Device Server Setup in Troubleshooting.
- Page 55 5. Configuration << When obtaining an IP address automatically from a DHCP server >> Select Get IP Address Automatically and click Next. << When assigning an IP address manually >> Select Assign IP Address, enter an IP address and click Next. - The IP address used in the above screen is a sample address.
- Page 56 DS-700AC User's Manual If you plan to use DS-700AC in a wireless network, select the wireless network that you wish to connect to from a list. Enter the network key that you have checked at 3-2. Necessary Wireless Setting Information for Network Key and Confirm Network Key respectively and click Next.
- Page 57 - If an error occurs after clicking Execute, please refer to 9-2-1. Problems During Setup - Communication error occurs when configuring with Device Server Setup in Troubleshooting. Note To take effect of the settings, restart DS-700AC. Go on to 5-1-3. Enable the new settings.
-
Page 58: Enable The New Settings
AC Adaptor - If you plan to use DS-700AC on a wired network, it is not necessary to unplug the network cable. Connect the USB device that you wish to use over the network to DS-700AC using a USB cable(1) and then insert the AC plug of DS-700AC into the power outlet(2). - Page 59 - In the following cases, DS-700AC is not connected to a wireless network. - If the POWER LED is off, DS-700AC is not powered on. Check that the AC adaptor is plugged in properly. - If the WLAN LED blinks orange, DS-700AC is still searching for a wireless network. Please wait for a while.
- Page 60 DS-700AC User's Manual To use the Device Server feature, go on to install the software, "SX Virtual Link". For details on how to install SX Virtual Link, refer to 6. Installing the Application to PC. To use Print Server feature, configure the necessary settings for standard Windows printing.
-
Page 61: Configuration Via Wps
5. Configuration 5-2. Configuration via WPS This page explains the easy wireless configuration method using WPS (Wi-Fi Protected Setup) feature of your wireless router. 5-2-1 . Confirm that your wireless router supports WPS To perform the wireless configuration using WPS, you wireless router must support WPS. Please make sure that a wireless router supporting WPS is set up in your environment. -
Page 62: Start Setup
Confirm that the WLAN LED on DS-700AC blinks orange or turns green. WLAN LED turns green or blinks orange - If the WLAN LED does not blink orange or turn green, reset DS-700AC to factory defaults and start from step 1 again. - Page 63 - The name, position and shape of the WPS button will differ depending on your wireless router. For details, refer to the operation manual that came with your wireless router. - Please use only one wireless router. If two or more routers are waiting for wireless connections, DS-700AC will not be able to connect properly.
- Page 64 ○ ○ In this case, wireless configuration is complete. - Power off DS-700AC, move it to where you wish to use it and then power it on again. - Connect the USB device(s) that you wish to use over the network to DS-700AC.
-
Page 65: Configuration Via A Usb Flash Drive
This page explains how to configure the network settings using a USB flash drive. By saving the configuration information to a USB flash drive and connecting it to DS-700AC, you can configure the network settings. To save the configuration information to the USB flash drive, use the configuration utility downloaded from our website. -
Page 66: Start Setup
DS-700AC User's Manual 5-3-2 . Start Setup Save the configuration information to a USB flash drive Extract the downloaded Device Server Setup file on your desktop. Double-click Dssetup.exe to start the Device Server Setup utility. Click Device Server Configuration. Click Configure using a USB flash drive. - Page 67 5. Configuration The User Account Control window is displayed. Click Yes. Device Server Setup is displayed. Click Next. Read the software license agreement and click Yes. Insert the USB flash drive into your PC and click Next.
- Page 68 Configure the TCP/IP settings appropriate for your environment. - If you are not sure how to determine the IP address to set, refer to 9-2-1. Problems During Setup-How should I determine the way to assign an IP address to DS-700AC? Note <<...
- Page 69 Enter the wireless settings that you have checked at 3-2. Necessary Wireless Setting Information and click Next. - For details on the each setting, refer to 3-2. Necessary Wireless Setting Information. - If you will use DS-700AC on a wired network upon completing the configuration, check Skip wireless Note configuration and click Next.
- Page 70 DS-700AC User's Manual Check the settings and click Execute. - The information displayed here will differ depending on your selection. Before clicking Next, follow the instructions on the window. Remove the USB flash drive from your PC and go on to 5-3-2. Start Setup - Insert the USB flash...
-
Page 71: Insert The Usb Flash Drive Into Ds-700Ac
USB flash drive from DS-700AC until the POWER LED turns on. - If all LEDs do not turn off within 60 seconds after DS-700AC is powered on, you may have one of the following problems. Check your settings again. -
Page 72: Remove The Usb Flash Drive From Ds-700Ac
DS-700AC - In the following cases, DS-700AC is not connected to a wireless network. - If the WLAN LED blinks orange, DS-700AC is still searching for a wireless network. Please wait for a while. If the WLAN LED does not turn Green within 2-3 min, DS-700AC's wireless settings may not have been configured properly. - Page 73 5. Configuration Click Next. - If Search button is clicked, DS-700AC that can be accessed from your PC will be displayed in a list. Note Select Yes or No and click Finish. - If you plan to use the Device Server feature, click Yes.
- Page 74 DS-700AC User's Manual Blank page...
-
Page 75: Installing The Application To Pc
6. Installing the Application to PC Installing the Application to PC... -
Page 76: Installing The Application In Windows
DS-700AC User's Manual 6-1 . Installing the Application in Windows This page explains how to install the USB device connection utility "SX Virtual Link" on window environment. Install SX Virtual Link according to the instructions below. If you have completed the configuration and continue to install the application, start from 3 in this section. - Page 77 6. Installing the Application to PC SX Virtual Link Install wizard is displayed. Click Next. Read the SOFTWARE LICENSE AGREEMENT and click Yes. Select a folder to install SX Virtual Link into and click Next.
- Page 78 DS-700AC User's Manual Enter a Group Name to be displayed in the Start Menu. Click Next. Click Start to begin the installation. - When Windows Security screen is displayed, click Install.
- Page 79 6. Installing the Application to PC SX Virtual Link has been installed. Click Finish. - Restart your PC when it is required by the system. - If using a firewall function of commercial security software, please add SX Virtual Link to the exception list in your security software.
- Page 80 DS-700AC User's Manual Blank page...
-
Page 81: Using Usb Devices Connected To Ds-700Ac
7. Using USB Devices Connected to DS-700AC Using USB Devices Connected to DS-700AC... -
Page 82: Using Usb Devices In Windows
DS-700AC User's Manual 7-1. Using USB Devices in Windows This page explains how to use USB devices connected to DS-700AC after installing SX Virtual Link on Windows. 7-1-1. Starting SX Virtual Link How to start SX Virtual Link: Click the SX Virtual Link icon ( ) in the task tray. -
Page 83: Connecting / Disconnecting To / From A Usb Device
7. Using USB Devices Connected to DS-700AC 7-1-2. Connecting / Disconnecting to / from a USB device Basic usage of a USB device: Select the USB device in SX Virtual Link's main window and connect to it. When successfully connected to the USB device, PC Plug and Play will run and the USB device will become ready to use. -
Page 84: Finishing Sx Virtual Link
DS-700AC User's Manual How to disconnect: Double-click Double-click the USB device in SX Virtual Link's main window. Select the USB device and click the Disconnect button ( ) in SX Virtual Link's main Use a button window. Right-click on the USB device in SX Virtual Link's main window and click Disconnect in Right-click the menu displayed. -
Page 85: Online Help
7. Using USB Devices Connected to DS-700AC 7-1-4. Online Help SX Virtual Link has an Online Help which provides helpful information on its usage. How to access the Online Help is as follows: Start SX Virtual Link. In SX Virtual Link's main window, click the Help button ( ) and select Help from the menu displayed. - Page 86 DS-700AC User's Manual Blank page...
-
Page 87: Other Features
8. Other Features Other Features... -
Page 88: Using The Web Configuration Page
This page explains how to configure advanced settings using a Web browser. Since DS-700AC has the HTTP protocol, advanced settings can be configured or changed via a Web browser. Useful functions such as a remote restart or status monitor are available. -
Page 89: Displaying The Web Page Of Ds-700Ac
8. Other Features 8-1-1. Displaying the Web page of DS-700AC Displaying the Web page of DS-700AC There are 2 ways to display the Web page described below. Using SX Virtual Link to display the Web page Follow the instructions below to display the Web page using SX Virtual Link. - Page 90 Enter the password to configure for DS-700AC and click Submit. - When the login password is already configured, this page is not displayed. Note The login page is displayed. Enter the password you have configured for DS-700AC and click Login.
-
Page 91: Using A Web Browser To Display The Web Page
8. Other Features Using a Web browser to display the Web page Enter the IP address that is configured on DS-700AC in the address bar of the Web browser. Press the ENTER key. Example) Enter 172.25.72.57 and press the ENTER key. - Page 92 DS-700AC User's Manual About each page Status Shows the operating status of USB device and DS-700AC. Network Conf. Configures the network settings of DS-700AC. Security Configures the access control for DS-700AC. Maintenance Provides the initialization, reboot and firmware update. - By clicking Languages, you can switch the language among Japanese, English.
-
Page 93: Status Information
8-1-2. Status Information This page explains the status information page. Status Information page shows the operating status of DS-700AC and the USB devices connected to it. USB Device Status Device status page shows the operating status of the USB device connected to DS-700AC. -
Page 94: System Status
If the printer name cannot be obtained, it is displayed as ProductID(PID[0xXXXX]). Raw Port No. Displays the TCP port number for RAW mode printing with this printer. Queue Name Displays the queue name for LPR printing with this printer. System Status System status page shows the operating status of DS-700AC. - Page 95 8. Other Features <System Status> Name Details Series Name Displays a series name of DS-700AC. Product Name Displays the product name. Version Displays the version of DS-700AC. MAC Address Displays the MAC Address of DS-700AC. Host Name Displays the host name.
-
Page 96: Upnp Status
< IGD Register Information > Name Details Server Search Displays the port forwarding setting registered to IGD to search for DS-700AC. Server Connect Displays the port forwarding setting registered to IGD to connect the USB device. < IGD Port Forwarding List >... -
Page 97: Openvpn Status
8. Other Features OpenVPN Status OpenVPN Status page displays the VPN connection status and IP Address. < OpenVPN Status > Name Details Connect Status Displays the VPN connection status. IP Address Displays the VPN IP address. Displays the newest VPN log and the system time. -
Page 98: Wireless Status
DS-700AC User's Manual Wireless Status System status page shows the operating status of DS-700AC. < Wireless LAN Information > Name Details Current SSID Displays the current SSID. Current Channel Displays the current channel. Transfer Rate Displays the wireless transmission rate. -
Page 99: Network Settings
Select the type of network connection. - AUTO Automatically detects the connection type. If a network cable is connected at the time of power on, DS-700AC Network Mode will be connected to a wired network. Otherwise, DS-700AC will be AUTO connected to a wireless network. -
Page 100: Tcp/Ip Configuration
DS-700AC User's Manual TCP/IP Configuration TCP/IP Configuration page provides the IP address setting. When Network Mode is WIRELESS : < Interface Configuration > Name Details Default Enable/Disable the simultaneous operation of wireless LAN and wired Wired LAN Operation LAN. DISABLE This is displayed when Network Mode is WIRELESS. - Page 101 8. Other Features Set an IP address. When DHCP is enabled, an IP address obtained from it will be given higher priority. IP Address 0.0.0.0 When Wired LAN Operation is ENABLE, the information for both wireless LAN and wired LAN is displayed. Set a subnet mask.
- Page 102 DS-700AC User's Manual When Network Mode is other than WIRELESS : <IPv4 Configuration> Name Details Default Enable/Disable the DHCP client function. DHCP Client To assign an IP address using DHCP, the DHCP server must be running in ENABLE your subnetwork.
-
Page 103: Ntp Configuration
8. Other Features <IPv6 Configuration> Name Details Default Enable/Disable the IPv6 address. IPv6 If this setting is enabled, IPv6 communication can be established when IPv6 ENABLE address is automatically obtained. Enable/Disable the DHCPv6 client function. DHCPv6 Client If this setting is enabled, the network setting will automatically be obtained ENABLE from the DHCPv6 server. -
Page 104: Upnp Configuration
DS-700AC User's Manual UPnP Configuration UPnP Configuration page provides the UPnP functional settings. < UPnP Configuration > Name Details Default UPnP Control Enable/Disable a function to set port forwarding to IGD over UPnP. ENABLE Set an external port number to configure for IGD. This port number is External Port used for port forwarding. -
Page 105: Openvpn Configuration
8. Other Features OpenVPN Configuration OpenVPN Configuration page provides the OpenVPN functional settings. < OpenVPN Configuration > Name Details Default OpenVPN Client Enable/Disable the OpenVPN client function. DISABLE OpenVPN Import an OpenVPN client configuration file(*.ovpn). None Configuration < Registration Status > (* Displayed when the OpenVPN Client is enabled.) Name Details Shows the information of connection destination. -
Page 106: Wired Lan Configuration
DS-700AC User's Manual Wired LAN Configuration Wired LAN Configuration page provides the link speed setting. < Wired LAN Configuration > Name Details Default Select the physical network type (AUTO / 10BASE-T-Half / 10BASE-T-Full/ 100BASE-TX-Half / 100BASE-TX-Full). Link Speed In most cases, AUTO is used. -
Page 107: Wireless Lan Configuration
Detailed Configuration Users can manually configure the necessary wireless settings. Provides the Smart Wireless Setup that can configure DS-700AC using 8-digit PIN code. In Smart Wireless Setup this page, PIN code can be updated and Smart Wireless Setup can be executed using the PIN code. -
Page 108: About The Print Server Feature
DS-700AC supports the common network printing protocols, "Raw" and "LPR". When a printer is connected to DS-700AC, standard Windows printing can be used. Please note that you do not have to use SX Virtual Link for printing via the print server feature. -
Page 109: Before Using Standard Windows Printing
8-2-2. Before Using Standard Windows Printing This page explains how to configure the settings to print using standard Windows printing. Before adding a printer port, access the Web page of DS-700AC and check the destination printer port assigned to the printer connected to DS-700AC. -
Page 110: Printing Using The Lpr Port On Windows 7
DS-700AC User's Manual 8-2-3. Printing Using the LPR Port on Windows 7 This page explains how to configure the settings to print on Windows 7 using the standard LPR port. - When standard Windows printing is used, it is impossible to get printer status using the status monitor software that came with the printer or MFP. - Page 111 Select the method to add a printer. Click Add a printer using a TCP/IP address or hostname and click Next. Select TCP/IP Device for Device type and enter the IP address assigned to DS-700AC for Hostname or IP address. Clear Query the printer and automatically select the driver to use check box and click Next.
- Page 112 DS-700AC User's Manual Select a printer driver. Select the printer driver you want to use and click Next. Enter a printer name and click Next. Click Print a test page and see the result of printing. If the print result is OK, click Finish.
-
Page 113: Printing Using The Lpr Port On Windows 8/8.1/10 Or Newer
8. Other Features 8-2-4. Printing Using the LPR Port on Windows 8/8.1/10 or Newer This page explains how to configure the settings to print on Windows 8/8.1/10 or newer using the LPR port. - When standard Windows printing is used, it is impossible to get printer status using the status monitor software that came with the printer or MFP. - Page 114 Select the method to add a printer. Select Add a printer using a TCP/IP address or hostname and click Next. Select TCP/IP Device for Device type and enter the IP address assigned to DS-700AC for Hostname or IP address. Clear Query the printer and automatically select the driver to use check box and click Next.
- Page 115 8. Other Features Enter a printer name and click Next. Click Print a test page and see the result of printing. If the print result is OK, click Finish. The print setting has been completed. - If you are going to use the Raw port printing, click Finish without printing a test page. Note...
-
Page 116: Printing Using The Raw Port On Windows 7 Or Newer
DS-700AC User's Manual 8-2-5. Printing Using the Raw Port on Windows 7 or Newer This page explains how to configure the settings to print on Windows 7 or newer using the Raw port. - When standard Windows printing is used, it is impossible to get printer status using the status monitor software that came with the printer or MFP. - Page 117 8. Other Features Select Raw for Protocol, enter the port number (the one displayed on the Web page) for Port Number, and click OK. Click the General tab. Click Print Test Page, confirm that the test print is output correctly, and click OK.
-
Page 118: Wireless Configuration On Web Configuration Page
This page explains how to configure the wireless settings by selecting the Access Point to connect. Access the Web page of DS-700AC. - For how to display the Web page of DS-700AC, refer to 8-1-1. Displaying the Web page of DS-700AC. Note The login page is displayed. - Page 119 - Access Points or wireless devices are in a remote location where radio waves cannot reach. - WEP Key Index is set to 1. The Restart page is displayed. Click Restart to restart DS-700AC. The changes will take effect after restart.
-
Page 120: Detailed Wireless Configuration
This page explains how to configure the detailed wireless settings. Access the Web page of DS-700AC. - For how to display the Web page of DS-700AC, refer to 8-1-1. Displaying the Web page of DS-700AC. Note The login page is displayed. - Page 121 8. Other Features The Wireless LAN Configuration page is displayed. Click Detailed Configuration tab. The detailed wireless configuration page is displayed. Configure each setting and click Submit. Detailed Configuration Name Details Default Value Set the SSID of your wireless network. DS700-XXXXXX The SSID is an ID that distinguishes a wireless LAN network (XXXXXX is the last 6...
- Page 122 DS-700AC User's Manual Select the network authentication mode that will be used to connect to wireless devices. Open (Open System): Allows all access without authentication. For encryption mode, WEP can be used. WPA2-Personal , WPA3-Personal: Uses PSK for network authentication. For encryption mode, AES can be used.
- Page 123 8. Other Features Name Details Default Value Enable/Disable WEP encryption (ON/OFF). If WEP encryption is used, wireless communication will be encrypted using the settings for "WEP Key 1-4" and "Key Index". Select the number of the WEP key that you wish to use for encryption (1-4).
- Page 124 DS-700AC User's Manual WPA/WPA2 / WPA3 -Enterprise -Enterprise Name Details Default Value Authentication Set the EAP authentication method (EAP-TLS/EAP-TTLS/PEAP/ EAP-TLS Method EAP-FAST/LEAP). Set an EAP user name for the EAP authentication. This name is EAP User Name None used by the server to identify a client.
- Page 125 8. Other Features The Restart page is displayed. Click Restart to restart DS-700AC. The changes will take effect after restart. When the login page is displayed, the reboot is completed. Finish the Web browser.
-
Page 126: Ieee802.1X Authentication
SHA1withRSA SHA224withRSA SHA256withRSA Signature algorithm SHA384withRSA SHA512withRSA MD5withRSA Saving Format for Certificate DS-700AC supports the saving format of certificate as follows: Item Compatible standards PKCS#12 Client certificate CA certificate for server DER (Binary encoded X509) authentication PEM (BASE64-encoded text format of DER) -
Page 127: Ieee 802.1X Settings
8. Other Features IEEE 802.1X Settings Access the Web page of DS-700AC. - For how to display the Web page of DS-700AC, refer to 8-1-1. Displaying the Web page of DS-700AC. Note The login page is displayed. Enter the password for DS-700AC and click Login. - Page 128 DS-700AC User's Manual The Wireless LAN Configuration page is displayed. Click Detailed Configuration tab. The detailed wireless configuration page is displayed. Configure each setting and click Submit.
- Page 129 8. Other Features Name Details Default Value Authentication Set the EAP authentication method (EAP-TLS/EAP-TTLS/PEAP/ EAP-TLS Method EAP-FAST/LEAP). Set an EAP user name for the EAP authentication. This name is EAP User Name None used by the server to identify a client. Set an EAP password for the EAP authentication.
- Page 130 Optional Optional Auto PAC Provisioning Optional PAC File Optional The Restart page is displayed. Click Restart to restart DS-700AC. The changes will take effect after restart. When the login page is displayed, the reboot is completed. Finish the Web browser.
-
Page 131: Smart Wireless Setup
This page explains the Smart Wireless Setup which can be used when your wireless router supports the WPS (Wi-Fi Protected Setup). Access the Web page of DS-700AC. - For how to display the Web page of DS-700AC, refer to 8-1-1. Displaying the Web page of DS-700AC. Note The login page is displayed. -
Page 132: Pin Code Method
DS-700AC User's Manual Click Smart Wireless Setup tab. PIN Code Method Check the PIN code on the Web page. Keep displaying the Web page as it will be used again after you enter the PIN code on the Access Point side. - Page 133 8. Other Features Go back to the Smart Wireless Setup page of DS-700AC after the WPS is started on the Access Point. Click Smart Wireless Setup Execute. The Smart Wireless Setup will begin. When the configuration is completed, DS-700AC will be configured with the same setting as the...
- Page 134 Remove the power plug from the outlet and the network cable from DS-700AC. Connect the USB device that you wish to share over the network to DS-700AC using a USB cable and insert the power plug of DS-700AC into the outlet.
-
Page 135: Security Feature
8-4-1. USB Port Setting Access the Web page of DS-700AC. - For how to display the Web page of DS-700AC, refer to 8-1-1. Displaying the Web page of DS-700AC. Note The login page is displayed. - Page 136 USB2.0 port is used over a network. - The USB3.0 port of DS-700AC does not support connection with a USB HUB, USB HUB embedded device and USB video converter. - The USB3.0 port of DS-700AC does not support the devices with more than 16 endpoints.
-
Page 137: Using Service Management Configuration
Finish the Web browser. 8-4-2. Using Service Management Configuration Access the Web page of DS-700AC. - For how to display the Web page of DS-700AC, refer to 8-1-1. Displaying the Web page of DS-700AC. Note The login page is displayed. - Page 138 DS-700AC User's Manual The Web page of DS-700AC is displayed. From the left menu on the Web page, click Service Management. The Service Management Configuration page is displayed. Configure each setting and click Submit.
- Page 139 Name Details Default Enable/Disable access to DS-700AC using HTTP. If ENABLE is selected, access to DS-700AC is allowed, and if DISABLE is HTTP selected, it is denied. Enable * If this setting is disabled, you will not be able to access the Web page unless DS-700AC is reset to factory defaults.
-
Page 140: Filtering Accesses From A Particular Pc
- If this function is used, the communication speed may decrease since network communication is monitored. Access the Web page of DS-700AC. - For how to display the Web page of DS-700AC, refer to 8-1-1. Displaying the Web page of DS-700AC. Note The login page is displayed. - Page 141 8. Other Features The IP Filter Configuration page is displayed. Configure each setting and click Submit. To configure the IPv6 filter, click the IPv6 Filter Configuration tab. Name Details Default Set an IP address access filter (ALLOW/DENY). Filter Mode When ALLOW is set, only access from the registered IP address DENY range is allowed, and when DENY is set, access from the registered IP address range is denied.
- Page 142 DS-700AC User's Manual The Restart page is displayed. Click Restart to restart DS-700AC. The changes will take effect after restart. When the login page is displayed, the reboot is completed. Finish the Web browser.
-
Page 143: Server Certificate
This page explains how to set a self-signed certificate on Web page in order to enable configuration via HTTPS. Access the Web page of DS-700AC. - For how to display the Web page of DS-700AC, refer to 8-1-1. Displaying the Web page of DS-700AC. Note The login page is displayed. - Page 144 DS-700AC User's Manual The Server Certificate Create page is displayed. Configure each setting and click Submit. <Server Certificate Create> Name Details Default Set a server name for the server certificate (1 to 64 alphanumeric DS700-XXXXXX characters). (XXXXXX is the last Common Name * The following symbols and spaces can be used.
- Page 145 8. Other Features The Restart page is displayed. Click Restart to restart DS-700AC. The changes will take effect after restart. When the login page is displayed, the reboot is completed. Finish the Web browser.
-
Page 146: Changing Root Password
This page explains how to change the password for DS-700AC. Access the Web page of DS-700AC. - For how to display the Web page of DS-700AC, refer to 8-1-1. Displaying the Web page of DS-700AC. Note The login page is displayed. - Page 147 - Please handle the password carefully. If the password is lost, you will not be able to change the settings unless DS-700AC is reset to the factory default setting. The Restart page is displayed. Click Restart to restart DS-700AC. The changes will take effect after restart.
-
Page 148: Maintenance Feature
ECO Mode can be enabled or disabled. Also, the amount of time before switching to ECO Mode can be specified Access the Web page of DS-700AC. - For how to display the Web page of DS-700AC, refer to 8-1-1. Displaying the Web page of DS-700AC. Note The login page is displayed. - Page 149 Configure each setting and click Submit. <ECO Mode Configuration> Name Details Default If DS-700AC is idle for the specified amount of time, it will automatically switch into ECO mode. Power Save Mode When the USB device connection utility is started or DS-700AC DISABLE is accessed for a particular purpose, DS-700AC will automatically wake up from ECO mode.
-
Page 150: Conditions To Start Eco Mode
Finish the Web browser. Conditions to start ECO Mode DS-700AC will switch to ECO Mode when it is idle for a certain period of time specified by Power Save Shift Time (minutes) and the following conditions are met: - Power Save Mode is set to ENABLE. -
Page 151: Resetting To Factory Defaults
- Before you start, please make sure that no PCs are currently linked. - Do not turn off DS-700AC while resetting to factory default. - Do not press the push switch when DS-700AC is turned on again after it was reset to the factory default settings. -
Page 152: Resetting From The Web Page
DS-700AC User's Manual Resetting from the Web page Access the Web page of DS-700AC. - For how to display the Web page of DS-700AC, refer to 8-1-1. Displaying the Web page of DS-700AC. Note The login page is displayed. Enter the password for DS-700AC and click Login. - Page 153 8. Other Features The factory default configuration page is displayed. Click Yes. A confirmation message is displayed. Click OK. The factory default configuration will begin. When the login page is displayed, the factory default configuration is completed. Finish the Web browser.
-
Page 154: Rebooting Ds-700Ac
The reboot will be complete in 30 seconds. Remote reboot from the Web page Access the Web page of DS-700AC. - For how to display the Web page of DS-700AC, refer to 8-1-1. Displaying the Web page of DS-700AC. Note The login page is displayed. - Page 155 8. Other Features The Web page of DS-700AC is displayed. From the left menu on the Web page, click Maintenance - Restart. The Restart page is displayed. Click Yes. The reboot will be complete in 30 seconds.
- Page 156 DS-700AC User's Manual When the login page is displayed, the reboot is completed. Finish the Web browser.
-
Page 157: Updating Firmware
- Do not turn off DS-700AC while the firmware update is in process. Access the Web page of DS-700AC. - For how to display the Web page of DS-700AC, refer to 8-1-1. Displaying the Web page of DS-700AC. Note The login page is displayed. - Page 158 From the left menu on the Web page, click Maintenance - Firmware Update. The Firmware Update page is displayed. Click Browse to select the firmware file to be loaded to DS-700AC. Check that the file name is displayed in New firmware field and click Update.
- Page 159 8. Other Features The firmware update will begin. When the login page is displayed, the firmware update is completed. See the bottom left of the login page and check the version information is changed. Finish the Web browser.
-
Page 160: Using Usb Devices Over The Internet
- A host name that has been set for Dynamic DNS - Router port forwarding setting - To use USB devices via the Internet, the DS-700AC firmware version must be 1.1.0 or higher, and the SX Virtual Link version must be 5.1.0 or higher. -
Page 161: Using Usb Devices Over The Internet
- UPnP Control is set to ENABLE by default. UPnP function setting Access the Web page of DS-700AC. - For how to display the Web page of DS-700AC, refer to 8-1-1. Displaying the Web page of DS-700AC. Note The login page is displayed. - Page 162 Select ENABLE for UPnp Control and click Submit. - DS-700AC uses the External Port number to set the external port for a port forwarding function. If this port number has already been used for another device, or when there are multiple DS-700AC units, it Note needs to be changed.
- Page 163 8. Other Features Enter the password for DS-700AC and click Login. The Web page of DS-700AC is displayed. From the left menu on the Web page, click Status - UPnP.
- Page 164 DS-700AC User's Manual UPnP Status page is displayed. Check the value at External Port under IGD Register Information. - If the status of IGD Register Information is "Registration Failure", it is impossible to connect to DS-700AC via NAT. Note - The reason of "Registration Failure" might be the followings.
-
Page 165: Sx Virtual Link Setting
8. Other Features SX Virtual Link Setting Start SX Virtual Link. - For how to start SX Virtual Link, refer to 7. Using USB Devices Connected to DS-700AC. Note In SX Virtual Link's main window, click the Options button (... - Page 166 9 of UPnP function setting for Port, and click OK. - For Address, the external IP address of DS-700AC can be set. However, please note that the IP address changes automatically when DS-700AC is in use.
-
Page 167: Deleting Port Forwarding Setting
- If the deletion fails, the registered IGD information will not be deleted. Access the Web page of DS-700AC. - For how to display the Web page of DS-700AC, refer to 8-1-1. Displaying the Web page of DS-700AC. Note The login page is displayed. - Page 168 DS-700AC User's Manual UPnP Status page is displayed. Click Delete.
-
Page 169: Using Openvpn Client Function
OpenVPN in advance. - Multicast and broadcast are not allowed for Azure VNET. To search for DS-700AC via Azure VPN Gateway, it is necessary to set the DS-700AC’s IP address of VPN to the device server search address of SX Virtual Link. -
Page 170: Openvpn Client Function Setting
DS-700AC User's Manual OpenVPN Client function setting Access the Web page of DS-700AC. - For how to display the Web page of DS-700AC, refer to 8-1-1. Displaying the Web page of DS-700AC. Note The login page is displayed. Enter the password for DS-700AC and click Login. - Page 171 Select ENABLE for OpenVPN Client. Click Browse, select the OpenVPN configuration file and click Submit. The Restart page is displayed. Click Restart to restart DS-700AC. The changes will take effect after restart. When the login page is displayed, the reboot is completed.
-
Page 172: Sx Virtual Link Setting
DS-700AC User's Manual SX Virtual Link Setting Start SX Virtual Link. - For how to start SX Virtual Link, refer to 7. Using USB Devices Connected to DS-700AC. Note In SX Virtual Link's main window, click the Options button (... - Page 173 8. Other Features The Options window is displayed. Click the Search for device servers tab. Check the check box of Enable the search address, enter the DS-700AC's IP address of VPN for Address and click OK.
-
Page 174: Using Sx Virtual Link Lite
8-7. Using SX Virtual Link Lite 8-7-1. What is SX Virtual Link Lite? This page explains the USB device connection service "SX Virtual Link Lite" to use DS-700AC. SX Virtual Link Lite is a utility that runs as Windows service. -
Page 175: Installing Sx Virtual Link Lite
8. Other Features 8-7-2. Installing SX Virtual Link Lite This page explains how to install the USB device connection utility "SX Virtual Link Lite" on your PC. Extract the downloaded "Device Server Setup" file on your desktop. Double-click "Dssetup.exe" contained in the "Device Server Setup" folder to start the "Device Server Setup"... - Page 176 DS-700AC User's Manual Select your language and click Next. SX Virtual Link Lite installation wizard is displayed. Click Next. Read the SOFTWARE LICENSE AGREEMENT and click Yes.
- Page 177 8. Other Features Click Start to begin the installation. SX Virtual Link Lite has been installed. Click Finish.
-
Page 178: Sx Virtual Link Lite Setting
DS-700AC User's Manual 8-7-3. SX Virtual Link Lite Setting This page explains on "SX Virtual Link Lite Setting" that is used to configure the SX Virtual Link Lite settings. Using SX Virtual Link Lite SX Virtual Link Lite Setting is used to configure the SX Virtual Link Lite settings. Follow the instructions below to start it. - Page 179 8. Other Features Check the check box of the device to connect automatically. Click Apply. Click Yes in the message below. The setting will take effect on SX Virtual Link Lite. When it is finished, SX Virtual Link Lite Setting will be closed and the selected USB devices will automatically be connected.
-
Page 180: Sx Virtual Link Lite Setting's Window
DS-700AC User's Manual SX Virtual Link Lite Setting's Window SX Virtual Link Lite Setting's Window <Main window> Opens the security dialog. The button is enabled only when the device server Security supports the USB connection password or encrypted connection. Opens the option dialog window. - Page 181 8. Other Features <Options window> Adds an address to search. Enter the broadcast address to the address field and click Register (up to 16 addresses can be registered). Register The broadcast address needs to be registered in case you want to search for networks beyond the router.
-
Page 182: Uninstalling Application On Windows
DS-700AC User's Manual 8-8. Uninstalling Application on Windows This page explains how to uninstall SX Virtual Link on Windows. 8-8-1. Uninstalling SX Virtual Link SX Virtual Link can be uninstalled from Uninstall a program in the Control Panel. How to uninstall SX Virtual Link: - To uninstall SX Virtual Link, administrator privilege is required. - Page 183 8. Other Features A confirmation message is displayed. Click Yes to start the uninstallation. When a screen below is displayed, click Restart. SX Virtual Link has been uninstalled.
-
Page 184: Uninstalling Sx Virtual Link Lite
DS-700AC User's Manual 8-8-2. Uninstalling SX Virtual Link Lite SX Virtual Link Lite can be uninstalled from Uninstall a program in the Control Panel. How to uninstall SX Virtual Link Lite: - To uninstall SX Virtual Link Lite, administrator privilege is required. - Page 185 8. Other Features A confirmation message is displayed. Click Yes to start the uninstallation. When a screen below is displayed, click Restart. SX Virtual Link has been uninstalled.
- Page 186 DS-700AC User's Manual Blank page...
-
Page 187: Troubleshooting
9. Troubleshooting Troubleshooting... -
Page 188: Useful Information
SX Virtual Link. - Is there anything I should do before connecting a USB device to DS-700AC? If the driver of the USB device that you wish to use with DS-700AC is not yet installed to your PC, install it first. - Page 189 There are two ways to initialize DS-700AC as follows: Use the push switch on the unit By using the push switch on the DS-700AC unit, you can reset DS-700AC to its factory default settings. For the detailed process, refer to Resetting using the push switch on DS-700AC at 8-5-2.
- Page 190 Windows, otherwise printing will become unavailable. To avoid this, it is recommended that you set a static IP address to DS-700AC or set your DHCP server to always assign a static address to DS-700AC.
-
Page 191: Q&A
The startup of DS-700AC may not have been completed. It takes up to 30sec for DS-700AC to get ready after it is powered on. Please wait until DS- Solution 700AC becomes ready and then click the Search in the Device Server Setup. - Page 192 How should I determine the way to assign an IP address to DS-700AC? There are two ways to assign an IP address to DS-700AC; one is to Get IP address automatically from DHCP server and the other is to Assign IP address manually. Choose the way to assign an IP address according to your environment.
- Page 193 When there is no DHCP server in the network environment, or when you do not prefer getting an IP address from DHCP server Please use DHCP Server feature of DS-700AC or Assign IP address manually. Keep in mind of the following points regarding the IP address to assign to DS-700AC.
-
Page 194: Problems While Using Ds-700Ac
The startup of DS-700AC may not have been completed. It takes up to 30sec for DS-700AC to get ready after it is powered on. Please wait until DS- Solution 700AC becomes ready and then click the Refresh button in SX Virtual Link again. - Page 195 Check that the IP Address of the PC is a proper address for communicating with the IP Address of DS-700AC. If the PC and DS-700AC are in the same network segment but use a different network number in their addresses, you need to change either the address of the PC or DS-700AC.
- Page 196 Reply from 192.168.0.10: Destination host unreachable If there is a reply while DS-700AC is turned off, it means there is another network device using the same IP address as DS-700AC. In such a case, change the IP address of either DS-700AC or the other network device.
- Page 197 ECO Mode if SX Virtual Link is running. Solution To allow DS-700AC to switch to ECO Mode, shut down all PCs with SX Virtual Link installed or close SX Virtual Link on each PC. For details, refer to 8-5-1. About ECO Mode.
- Page 198 The operation mode or settings of DS-700AC may need to be checked. If the Network Mode is set to AUTO, DS-700AC will run in wired LAN mode when a network cable is connected. Unplug the network cable and restart DS-700AC to use DS- 700AC on a wireless LAN.
- Page 199 9. Troubleshooting Connection is interrupted or disconnected. If your wireless LAN is interrupted or disconnected, DS-700AC may be placed in a location subject to weaker radio wave signals. Reconsider the location and surrounding conditions. Solution Please try to use DS-700AC in a room with better sight and radio signal strength.
- Page 200 DS-700AC User's Manual Blank page...
Need help?
Do you have a question about the DS-700AC and is the answer not in the manual?
Questions and answers