Silex technology SD-300 User Manual
Serial device server
Hide thumbs
Also See for SD-300:
- Setup manual (2 pages) ,
- User manual (158 pages) ,
- Setup manual (2 pages)
Table of Contents
Advertisement
Quick Links
Advertisement
Table of Contents

Related Manuals for Silex technology SD-300


Summary of Contents for Silex technology SD-300
- Page 1 Serial Device Server SD-300 User's Manual...
- Page 2 Copyright© 2019 silex technology, Inc. All rights reserved. WA105970XX...
-
Page 3: Table Of Contents
1-2. Safety Instructions ................3 1-3. Product Information and Customer Services ......6 Product Information ................6 Customer Support Center ..............6 2. About SD-300 ............7 2-1. Package Contents ................8 2-2. Features ....................9 2-3. Parts and Functions .................10 Parts and Functions ................10... - Page 4 3. Software Overview ..........19 3-1. What is Serial Device Server Setup? ..........20 Select Configuration Method ............20 TCP/IP Settings ..................21 3-2. What is SX Virtual Link for Serial Device Server? ....22 About SX Virtual Link for Serial Device Server ......22 Functional Overview ................23 SX Virtual Link for Serial Device Server Optional Settings ..24 3-3.
- Page 5 Before You Begin ..................58 Link to Serial Device ................61 6. Other Functions ..........63 6-1. Configure Using the SD-300 Web Page ........64 Access the SD-300 Web Page ............64 Log in to the SD-300 Web Page ............69 Log out the SD-300 Web Page ............70 Configure Advanced Network Settings .........71...
- Page 6 / Server 2012 / Server 2012 R2 / Server 2016 ......108 Printing Using the LPR Port on Windows 8.1 / 10 / Server 2012 / Server 2012 R2 / Server 2016 ...........113 7. Troubleshooting ..........119 7-1. Problems During the Setup ............120 7-2. Problems While Using SD-300 ...........124...
-
Page 7: Introduction
1. Introduction Introduction Thank you for purchasing the Serial Device Server SD-300. This manual provides information on how to configure and use SD-300. Please read the 1-2.Safety Instructions carefully before using SD-300. -
Page 8: Introduction
300. * Be sure to carefully review before using SD-300. : This symbol indicates important information that needs to be observed when operating SD-300. Make sure to read this information for safe and proper use. : This symbol indicates information that is useful when using SD-300. If you experience difficulties operating SD-300, please refer to this information first. -
Page 9: Safety Instructions
This page provides the safety instructions for safe use of SD-300. To ensure safe and proper use, please read the following information carefully before using SD-300. The safety instructions include important information on safe handling of SD-300 and on general safety issues. - Page 10 SD-300 User's Manual Warning * In the following cases, turn off the connected devices and unplug the AC plug of this product from a power outlet. Failure to follow these instructions may cause fire or an electrical shock. - When this product emits a strange smell, smoke or sound or becomes too hot to touch.
- Page 11 1. Introduction Caution * Use the AC adaptor supplied with this product. Other AC adaptors may cause malfunction. * Do not place any objects on the cable or bend, twist, or pull it excessively. * Do not use or store this product under the following conditions. * It may cause malfunction.
-
Page 12: Product Information And Customer Services
SD-300 User's Manual 1-3. Product Information and Customer Services Product Information The services below are available from the Silex Technology website. For details, please visit the Silex Technology website. * Latest firmware download * Latest software download * Latest manual download * Support information (FAQ) URL:https://www.silextechnology.com/... -
Page 13: About Sd-300
2. About SD-300 About SD-300... -
Page 14: Package Contents
SD-300 User's Manual 2-1. Package Contents Following items are bundled: * SD-300 * AC adaptor * Rubber foot (4pcs) * Setup Guide * Warranty Booklet * GPL License Notice (Distribution of source code subject to open source software) -
Page 15: Features
2. About SD-300 2-2. Features SD-300 is a serial device server which allows you to connect to serial devices via wired LAN. SD-300 has the following features: * Share various serial devices By using SD-300 and the serial device connection utility, "SX Virtual Link for Serial Device Server", you can share various serial devices among Windows PCs (for details on the... -
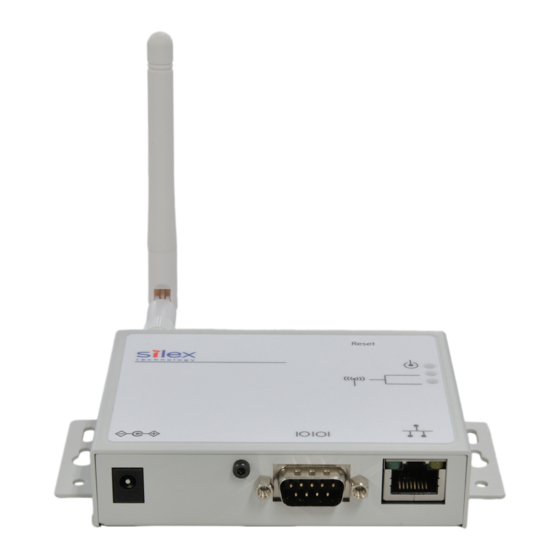
Page 16: Parts And Functions
SD-300 User's Manual 2-3. Parts and Functions Parts and Functions The parts name and functions are as follows: <<Front>> (1) (2) (3) SD-300 Orange LED For details, refer to 2-4. LED Lighting Pattern. Yellow LED Green LED <<Top>> (4) SD-300 This push switch is used to reset to the factory defaults. - Page 17 Connect a network cable. Yellow LED Indicates the network connection status. For details, refer to 2-4. LED Lighting Pattern. Green LED <<Back>> SD-300 (10) E/A : XXXXXXXXXXXX S/N : YYYYYYYYY Made in Japan SD-300 (10) Ethernet Address Ethernet Address of SD-300...
-
Page 18: Serial Port Pin Assignment And Serial Cable
SD-300 User's Manual Serial Port PIN Assignment and Serial Cable The serial port PIN assignment is as follows: PIN No. Details Input / Output DCD(Data Carrier Direct) Input RxD(Receive Data) Input TxD(Transmit Data) Output DTR(Data Terminal Ready) Output GND(Ground) Input... -
Page 19: Led Lighting Pattern
2. About SD-300 2-4. LED Lighting Pattern SD-300 has 3 LEDs (Orange, Yellow, Green) to show the operating status. <<FRONT>> Orange LED Yellow LED Green LED SD-300 Orange LED Product Status SD-300 is powered on SD-300 is not powered on Blink Updating the firmware... -
Page 20: Hardware Specifications
SD-300 User's Manual 2-5. Hardware Specifications 32bit RISC CPU RAM : 64MByte Memory FlashROM : 8MByte Wired network interface 10BASE-T / 100BASE-TX 1 port (auto-sensing) Serial Interface RS-232C : 1 port Power supply Operating voltage : 5V Push Switch 1 button... - Page 21 2. About SD-300 FCC / IC Notice Note: This equipment has been tested and found to comply with the limits for a Class B digital device, pursuant to part 15 of the FCC Rules. These limits are designed to provide reasonable protection against harmful interference in a residential installation.
-
Page 22: Software Specifications
SD-300 User's Manual 2-6. Software Specifications Software Specifications Supported protocols TCP/IP DHCP, BOOTP, TCP, UDP, ARP, ICMP, IPv4, SNMP, TELNE T, HT TP, #30 01, #910 0, #920 0, JCP(silex proprietar y protocol), SXSPE(silex proprietar y protocol) Supported OS * Windows 7 (32-Bit Edition / 64-Bit Edition) * Windows 8.1... -
Page 23: Rfc2217 Command List
2. About SD-300 RFC2217 Command List SD-300 supports RFC2217. When SD-300 is used in Serial Port Emulation Mode, you can utilize the following RFC2217 commands over the network. Command Details Note SIGNATURE Exchanges the device information. Not supported SET-BAUDRATE Changes the baud rate. - Page 24 SD-300 User's Manual Blank page...
-
Page 25: Software Overview
3. Software Overview Software Overview... -
Page 26: What Is Serial Device Server Setup
3-1. What is Serial Device Server Setup? The Serial Device Server Setup is the configuration utility exclusively designed for serial device servers. TCP/IP settings, etc. can be configured by following the instructions on the screen after SD-300 is powered on and displayed on this utility. -
Page 27: Tcp/Ip Settings
3. Software Overview TCP/IP Settings Configure the IP address appropriate for your environment. Get IP Address Automatically Select this to automatically assign an IP Address using the DHCP server. Assign IP Address Select this to manually configure IP Address, subnet mask and default gateway. -
Page 28: What Is Sx Virtual Link For Serial Device Server
SD-300 User's Manual 3-2. What is SX Virtual Link for Serial Device Server? About SX Virtual Link for Serial Device Server SX Virtual Link for Serial Device Server allows you to connect your computer to a serial device that is connected to a device server. -
Page 29: Functional Overview
3. Software Overview Functional Overview * Easy to Use You only have to select the serial device in SX Virtual Link for Serial Device Server and click the Connect button. The serial device can be used from your computer as if it was directly connected to your computer. When finished using the serial device, click the Disconnect button in SX Virtual Link for Serial Device Server. -
Page 30: Sx Virtual Link For Serial Device Server Optional Settings
SD-300 User's Manual SX Virtual Link for Serial Device Server Optional Settings This page explains the SX Virtual Link for Serial Device Server optional settings. SX Virtual Link general settings such as startup and communication settings can be configured. Click the Option button ( ) on SX Virtual Link for Serial Device Server's main window. - Page 31 3. Software Overview Show a balloon notification when an Notifies you of a device error by displaying a balloon error occurs message in the task tray. (Default: On) Show a confirmation message when Displays a confirmation message before disconnecting a disconnecting devices USB device via SX Virtual Link for Serial Device Server.
- Page 32 SD-300 User's Manual * For example, to register "192.168.1.xxx" (Subnet Mask:255.255.255.0), enter "192.168.1.255" into the address field. In the sample screen below, "192.168.1.255" and "192.168.2.255" are registered to include "192.168.1.xxx" and "192.168.2.xxx" (Subnet Mask:255.255.255.0) addresses for the device server search.
- Page 33 3. Software Overview Display The SX Virtual Link display settings can be configured. Name Displays the name of USB devices connected to the device server. The USB device name can be changed. For details, refer to USB Device Operational Settings. (Default: On) * This check box cannot be cleared.
- Page 34 SD-300 User's Manual Ethernet Address Displays the Ethernet Address of the device server. The Ethernet Address is the 12-digit number found on the side or backside of the device server. (Default: Off) Auto Connect Displays the current status of the USB device's auto-connect settings.
-
Page 35: Download The Utilities
3. Software Overview 3-3. Download the Utilities The utilities to configure and use SD-300 can be downloaded from our website. Access the URL below on the PC to use to configure SD-300. URL: https://www.silextechnology.com/ Go to the Support page and select the product model. - Page 36 SD-300 User's Manual Blank page...
-
Page 37: How To Configure
4. How to Configure How to Configure... -
Page 38: Necessary Items For Setup
For details on the supported serial cable, refer to 2-3. Parts and Functions - Serial Port PIN Assignment and Serial Cable. * When you connect SD-300 to 100BASE-TX network, please use the Ethernet Hub and network cable which support 100BASE-TX (category 5 or above). -
Page 39: Power On
4. How to Configure 4-2. Power on Connect a network cable to SD-300 and the other end to an Ethernet Hub (or broadband router, Access Point, PC). Then, connect the AC adaptor to SD-300 and the plug to the outlet. -
Page 40: Configure Network Settings
SD-300 User's Manual 4-3. Configure Network Settings Extract the compressed file of Serial Device Server Setup that you have downloaded. Double-click Sdsetup.exe in the extracted folder to start the Serial Device Server Setup utility. The startup menu is displayed. Click Device Server Setup. - Page 41 4. How to Configure * If the User Account Control screen is displayed, click Continue or Yes. * If the message below is displayed, click Yes. The Serial Device Server Setup screen is displayed. Click Next. Read the SOFTWARE LICENSE AGREEMENT and click Yes.
- Page 42 SD-300 User's Manual Select SD-300 and click Next. * If SD-300 is using the factory default settings and an IP address other than 0.0.0.0 is displayed in the list, it means the IP address was obtained from a DHCP server.
- Page 43 4. How to Configure << Assign an IP address manually >> Select Assign IP Address and enter an IP address. Click Next. * The IP address used in the screen above is a sample address. Please enter an IP address appropriate for your environment.
- Page 44 SD-300 User's Manual Check the settings and click Execute. * The information displayed in this screen will vary depending on the items you have configured. * If an error occurs after clicking Execute, please refer to Communication error occurs when configuring with Serial Device Server Setup.
- Page 45 Remove the power plug from the outlet. Network Ethernet Hub SD-300 Network Cable AC adaptor Connect the serial device that you wish to share over the network to SD-300 using a serial cable and insert the power plug of SD-300 into the outlet. Network Ethernet Hub SD-300 Network Cable To Serial Device...
- Page 46 SD-300 User's Manual Blank page...
-
Page 47: How To Use
5. How to Use How to Use... -
Page 48: Link To Serial Device Using The Serial Device Connection
SD-300 User's Manual 5-1. Link to Serial Device Using the Serial Device Connection Utility (Serial Port Emulation Mode) What is Serial Port Emulation Mode? Serial Port Emulation Mode is a function to communicate with a serial device on the standard Windows COM port using SX Virtual Link for Serial Device Server. Once this feature is used, users can communicate with the serial device over a network using a serial port communication utility such as a terminal software program. -
Page 49: Install Application
5. How to Use Install Application This page explains how to install the serial device connection utility, "SX Virtual Link for Serial Device Server". * If SX Virtual Link for Serial Device Server is not installed yet, install it according to the instructions below. - Page 50 SD-300 User's Manual SX Virtual Link for Serial Device Server Install wizard is displayed. Click Next. Read the SOFTWARE LICENSE AGREEMENT and click Yes. Select a folder to install SX Virtual Link for Serial Device Server into and click Next.
- Page 51 5. How to Use Enter a Group Name to be displayed in the Start Menu. Click Next. Click Start to begin the installation. A confirmation message for software installation is displayed. Click Install.
- Page 52 SD-300 User's Manual Again, click Install. * If the message below is displayed, click Yes. SX Virtual Link for Serial Device Server has been installed. Click Finish. * If using a firewall function of commercial security software, please add SX Virtual Link for Serial Device Server to the exception list in your security software.
- Page 53 5. How to Use Application installation is complete. SX Virtual Link for Serial Device Server will run.
-
Page 54: Start Sx Virtual Link For Serial Device Server
SD-300 User's Manual Start SX Virtual Link for Serial Device Server How to start SX Virtual Link for Serial Device Server is as follows: Click the icon in the task tray. * If SX Virtual Link for Serial Device Server is not running, click Start - All Programs - SX Virtual Link for Serial Device Server - SX Virtual Link for Serial Device Server. -
Page 55: Link To A Serial Device
5. How to Use Link to a serial device How to link to serial device is as follows: Select the serial device in SX Virtual Link for Serial Device Server's main window and connect to it. How to Link: Double-click Double-click the serial device in SX Virtual Link for Serial Device Server's main window. - Page 56 SD-300 User's Manual * To specify the COM port manually, please complete the following steps before you link to the serial device. Note 1. Select the serial device that you wish to link and click the Properties button 2. In the Optional settings tab, check Specify the COM port check box and select the COM port that you wish to use from Virtual Port Name.
-
Page 57: Start A Serial Communication Software
SX Virtual Link for Serial Device Server's main window. Also, configure the serial port settings such as baud rate, stop bit, etc. Once the communication settings are complete, you can communicate with the serial device connected to SD-300. -
Page 58: Unlink From A Serial Device
SD-300 User's Manual Unlink from a serial device How to unlink from serial device is as follows: Select the serial device in SX Virtual Link for Serial Device Server's main window and disconnect from it. How to Unlink: Double-click Double-click the serial device in SX Virtual Link for Serial Device Server's main window. -
Page 59: Ecable Mode
Change the settings to use SD-300 in Ecable Mode. Access the Web page of the SD-300 that you wish to use as the transmitter end. * For details on how to access the Web page, refer to Access the SD-300 Web Page. Note... - Page 60 SD-300 User's Manual Select OFF for SX Virtual Link compatibility. When completed, click the Submit button. In the left pane of the Web page, click Serial Conf. In the page displayed, configure the following settings at General Configuration as appropriate for your serial device.
- Page 61 5. How to Use Select Enabled for Ecable Mode. For Destination IP Address, enter the IP address of the receiver end (another SD-300). And for Destination Port, enter the port number that you wish to use. When completed, click the Submit button.
- Page 62 SD-300 User's Manual Select OFF for SX Virtual Link compatibility. When completed, click the Submit button. In the left pane of the Web page, click Serial Conf. and configure the settings at General Configuration. When completed, click the Submit button.
-
Page 63: Link To Serial Device
For TCP Port, enter the same value for both receiver end and transmitter end. When completed, click the Submit button. The configuration has been completed. Link to Serial Device Power on both serial devices and then both SD-300's. After they are powered on, bidirectional communication will be active between the serial devices. -
Page 64: Raw Tcp Connection Mode
Change the settings to use SD-300 in Raw TCP Connection Mode. Access the Web page of SD-300. * For details on how to access the Web page, refer to Access the SD-300 Web Page. Note In the left pane of the Web page, click General. - Page 65 5. How to Use Select OFF for SX Virtual Link compatibility. When completed, click the Submit button. In the left pane of the Web page, click Serial Conf.
- Page 66 SD-300 User's Manual In the page displayed, configure the following settings at General Configuration as appropriate for your serial device. * Baud Rate * Bits per character * Stop Bits * Parity * Flow Control When completed, click the Submit button.
-
Page 67: Link To Serial Device
The configuration has been completed. Link to Serial Device Power on the serial devices and then SD-300. Start an application that runs on the TCP Socket API from your PC and bidirectional communication with the serial device will be active when a link is established. - Page 68 SD-300 User's Manual Blank page...
-
Page 69: Other Functions
6. Other Functions Other Functions... -
Page 70: Configure Using The Sd-300 Web Page
SD-300 User's Manual 6-1. Configure Using the SD-300 Web Page Since SD-300 has the HTTP protocol, advanced settings can be configured or changed via a Web browser. Useful functions such as a remote restart or factory default configuration for SD-300 are available. - Page 71 The Web browser will run and the login password configuration page will be displayed. Enter the password to configure for SD-300 and click Submit. * The login password configuration page is displayed only when SD-300 is configured for the first time.
- Page 72 SD-300 User's Manual The System Status page will be displayed.
- Page 73 6. Other Functions <<Use a Web browser to display the Web page>> Enter the IP address that is configured on SD-300 in the address bar of the Web browser. Press the ENTER key. Example) Enter 172.25.72.239 and press the ENTER key.
- Page 74 SD-300 User's Manual The System Status page will be displayed.
-
Page 75: Log In To The Sd-300 Web Page
6. Other Functions Log in to the SD-300 Web Page Follow the instructions below to log in to the Web page. In the left pane of the Web page, click Login. In the login page, enter the password and click Login. -
Page 76: Log Out The Sd-300 Web Page
SD-300 User's Manual Log out the SD-300 Web Page Follow the instructions below to log out the Web page. In the left pane of the Web page, click Logout. Click Yes to the confirmation message. -
Page 77: Configure Advanced Network Settings
To take effect of the changes, restart SD-300 by clicking Restart from the left pane of the Web page. * If you are to continue configuration on other pages, you do not have to restart SD-300. Restart it when all configuration is done. - Page 78 To take effect of the changes, restart SD-300 by clicking Restart from the left pane of the Web page. * If you are to continue configuration on other pages, you do not have to restart SD-300. Restart it when all configuration is done.
- Page 79 To take effect of the changes, restart SD-300 by clicking Restart from the left pane of the Web page. * If you are to continue configuration on other pages, you do not have to restart SD-300. Restart it when all configuration is done.
-
Page 80: Configure Serial Port Settings
To take effect of the changes, restart SD-300 by clicking Restart from the left pane of the Web page. * If you are to continue configuration on other pages, you do not have to restart SD-300. Restart it when all configuration is done. - Page 81 To take effect of the changes, restart SD-300 by clicking Restart from the left pane of the Web page. * If you are to continue configuration on other pages, you do not have to restart SD-300. Restart it when all configuration is done.
-
Page 82: Configuration Item List
SD-300 User's Manual Configuration Item List The SD-300 has the following configuration items: <<Network Configuration (General)>> General Configuration Name System Name Details Enter a unique name for the server. This name can be up to 32 ASCII printable characters. Default... - Page 83 The value must be 4 numbers separated by dots and expressed in the Details format [xxx.xxx.xxx.xxx]. Also, the gateway needs to be running in the same subnetwork as SD-300. If "0.0.0.0" is set, this setting is disabled. 0.0.0.0 Default DNS Server (Primary) Name Set a primary DNS server address.
- Page 84 SD-300 User's Manual IP Protocol Configuration Name Each selection controls a TCP/IP based protocol. Details Set "ON" for a protocol to allow a remote host to access the server using that protocol. Set "OFF" to disallow use of the protocol.
- Page 85 Select the physical network type. Details In most cases, AUTO is used. If the LINK lamp on your HUB does not light up when SD-300 is turned on, configure this setting to match that of the HUB. Default AUTO <<Serial Port Configuration (Serial Configuration)>>...
- Page 86 Ecable Mode Configuration Name Ecable Mode When Ecable mode is enabled, SD-300 will try to make a network connection to the remote device defined by following parameters. When the connection Details is established, data received on serial port will be sent to the remote device and data received on the remote device will be sent to serial port.
- Page 87 Default Name Queued (TCP) When ON is selected and raw TCP port is specified, SD-300 adds the job to queue after it is sent to that port. Details When OFF is selected, the received job is discarded when SD-300 is handling other jobs.
- Page 88 To add the IP address range for a remote host, enter the start address (lower address) and end address (higher address) and click the Add button. Details All hosts are allowed to access SD-300 as long as they have the IP address within the registered range. Default 0.0.0.0...
-
Page 89: Security Settings
6-2. Security Settings Change the Password Access the Web page of SD-300. * For details on how to access the Web page, refer to Access the SD-300 Web Page. Note In the left pane of the Web page, click Password. -
Page 90: Allow Communication Only From A Particular Pc
To take effect of the changes, restart SD-300 by clicking Restart from the left pane of the Web page. * If you are to continue configuration on other pages, you do not have to restart SD-300. Restart it when all configuration is done. - Page 91 To take effect of the changes, restart SD-300 by clicking Restart from the left pane of the Web page. * If you are to continue configuration on other pages, you do not have to restart SD-300. Restart it when all configuration is done.
-
Page 92: Maintenance
<<Remote reboot from the Web page>> Access the Web page of SD-300. * For details on how to access the Web page, refer to Access the SD-300 Web Page. Note In the left pane of the Web page, click Restart. - Page 93 6. Other Functions The Restart page is displayed. Click Yes. The reboot will begin. When the system status page is displayed, the reboot is completed. Finish the Web browser.
-
Page 94: Reset To Factory Default
* Before you start, please make sure that no PCs are currently linked. * Do not turn off SD-300 while resetting to factory default. * Do not press the push switch on the top when turning on SD-300 again after it was reset to the factory default settings. - Page 95 <<Reset from the Web page>> Access the Web page of SD-300. * For details on how to access the Web page, refer to Access the SD-300 Web Page. Note In the left pane of the Web page, click Factory Default.
- Page 96 SD-300 User's Manual The reboot will begin. When the progress bar reaches the right end of the screen, the reboot is completed. Finish the Web browser then.
-
Page 97: Update Firmware
* It is recommended to take notes of the current settings. You cannot restore it once the firmware update is complete. Access the Web page of SD-300. * For details on how to access the Web page, refer to Access the SD-300 Web Page. Note In the left pane of the Web page, click Firmware Update. - Page 98 SD-300 User's Manual The Firmware Update page is displayed. Click Browse to select the firmware file to be loaded to SD-300. Check that the file name is displayed in the New firmware field and click Update. A confirmation message is displayed. Click OK.
- Page 99 6. Other Functions When the system status page is displayed, the firmware update is completed. See the bottom left of the page and check that the version information is changed. Finish the Web browser.
-
Page 100: Uninstall Application
SD-300 User's Manual 6-4. Uninstall Application The SX Virtual Link for Serial Device Server can be deleted from Uninstall a program in the Control Panel. * To uninstall SX Virtual Link for Serial Device Server, administrator privilege is required. Click Control Panel - Uninstall a program. - Page 101 6. Other Functions When a screen below is displayed, click Finish. SX Virtual Link for Serial Device Server has been uninstalled.
-
Page 102: About The Print Server Feature
SD-300 supports the common network printing protocols, "Raw" and "LPR". When a printer is connected to SD-300, standard Windows printing can be used. Please note that you do not have to use SX Virtual Link for Serial Device Server for printing via the print server feature. -
Page 103: Before Using Standard Windows Printing
* Printing Using the LPR Port on Windows 7 / Server 2008 R2 * Printing Using the LPR Port on Windows 8.1 / 10 / Server 2012 / Server 2012 R2 / Server 2016 * For details on how to access the Web page, refer to Access the SD-300 Web Page. Note... -
Page 104: Er 2008 R2
SD-300 User's Manual Printing Using the Standard TCP/IP Port on Windows 7 / Server 2008 R2 This page explains how to configure the settings to print on Windows 7 / Server 2008 R2 using the standard TCP/IP port. Click Start - Control Panel - View devices and printers - Add a printer. - Page 105 Select the method to add a printer. Select Add a printer using a TCP/IP address or hostname and click Next. Select TCP/IP Device for Device type and enter the IP address assigned to SD-300 for Hostname or IP address. Clear Query the printer and automatically select the driver to use check box and click Next.
- Page 106 SD-300 User's Manual Select Custom and click Settings. Configure the port settings. Select Raw. Enter the RAW port number displayed on the Web page for TCP Port Number. Click OK.
- Page 107 6. Other Functions Click Next. Select a printer driver. Select the printer driver you want to use and click Next.
- Page 108 SD-300 User's Manual Enter a printer name and click Next. Click Print a test page and see the result of printing. If the print result is OK, click Finish. The print setting has been completed.
-
Page 109: Printing Using The Lpr Port On Windows 7 / Server 2008 R2
6. Other Functions Printing Using the LPR Port on Windows 7 / Server 2008 R2 This page explains how to configure the settings to print on Windows 7 / Server 2008 R2 using the standard LPR port. Click Start - Control Panel - View devices and printers - Add a printer. The wizard for adding a printer appears. - Page 110 Select the method to add a printer. Select Add a printer using a TCP/IP address or hostname and click Next. Select TCP/IP Device for Device type and enter the IP address assigned to SD-300 for Hostname or IP address. Clear Query the printer and automatically select the driver to use check box and click Next.
- Page 111 6. Other Functions Select Custom and click Settings. Configure the port settings. Select LPR. Type the queue name displayed on the Web page for Service name and select the LPR Byte Counting Enabled check box. Click OK.
- Page 112 SD-300 User's Manual Click Next. Select a printer driver. Select the printer driver you want to use and click Next.
- Page 113 6. Other Functions Enter a printer name and click Next. Click Print a test page and see the result of printing. If the print result is OK, click Finish. The print setting has been completed.
-
Page 114: Server 2012 / Server 2012 R2 / Server 2016
SD-300 User's Manual Printing Using the Standard TCP/IP Port on Windows 8.1 / 10 / Server 2012 / Server 2012 R2 / Server 2016 This page explains how to configure the settings to print on Windows 8.1 / 10 / Server 2012 / using the standard TCP/IP port. - Page 115 Select the method to add a printer. Select Add a printer using a TCP/IP address or hostname and click Next. Select TCP/IP Device for Device type and enter the IP address assigned to SD-300 for Hostname or IP address. Clear Query the printer and automatically select the driver to use check box and click Next.
- Page 116 SD-300 User's Manual Select Custom and click Settings. Configure the port settings. Select Raw. Enter the RAW port number displayed on the Web page for TCP Port Number. Click OK.
- Page 117 6. Other Functions Click Next. Select a printer driver. Select the printer driver you want to use and click Next.
- Page 118 SD-300 User's Manual Enter a printer name and click Next. Click Print a test page and see the result of printing. If the print result is OK, click Finish. The print setting has been completed.
-
Page 119: Printing Using The Lpr Port On Windows 8.1 / 10 / Server 2012 / Server 2012 R2 / Server 2016
6. Other Functions Printing Using the LPR Port on Windows 8.1 / 10 / Server 2012 / Server 2012 R2 / Server 2016 This page explains how to configure the settings to print on Windows 8.1 / 10 / Server 2012 / using the standard LPR port. - Page 120 Select the method to add a printer. Select Add a printer using a TCP/IP address or hostname and click Next. Select TCP/IP Device for Device type and enter the IP address assigned to SD-300 for Hostname or IP address. Clear Query the printer and automatically select the driver to use check box and click Next.
- Page 121 6. Other Functions Select Custom and click Settings. Configure the port settings. Select LPR. Type the queue name displayed on the Web page for Service name and select the LPR Byte Counting Enabled check box. Click OK.
- Page 122 SD-300 User's Manual Click Next. Select a printer driver. Select the printer driver you want to use and click Next.
- Page 123 6. Other Functions Enter a printer name and click Next. Click Print a test page and see the result of printing. If the print result is OK, click Finish. The print setting has been completed.
- Page 124 SD-300 User's Manual Blank page...
-
Page 125: Troubleshooting
7. Troubleshooting Troubleshooting... -
Page 126: Problems During The Setup
The startup of SD-300 may not have been completed. Solution It takes up to 30sec for SD-300 to get ready after it is powered on. Please wait until SD- 300 becomes ready and then click the Search in the Serial Device Server Setup. - Page 127 How should I determine the way to assign an IP address to SD-300? There are two ways to assign an IP address to SD-300; one is to Get IP address automatically from DHCP server and the other is to Assign IP address manually. Choose the way to assign an IP address according to your environment.
- Page 128 * Assign an IP address unique in the network. * Assign an IP address that has the same address class as the PC that will use SD-300. e.g. When an IP address of the PC is "192.168.0.xx", assign an address such as "192.168.0.100"...
- Page 129 7. Troubleshooting Is it possible to install "SX Virtual Link" (USB device management utility) and "SX Virtual Link for Serial Device Server" (serial device management utility) on the same PC? t is possible to install "SX Virtual Link" and "SX Virtual Link for Serial Device Server" on the same PC.
-
Page 130: Problems While Using Sd-300
SD-300 or the Ethernet Hub SD-300 is connected to may have a problem regarding connection, power transmission or operation. Solution Please check the LED status of SD-300 and the Ethernet Hub SD-300 is connected to. If the LED indicates improper status, replace the AC plug and other cables, and reboot the connected devices. - Page 131 If there is a reply while SD-300 is turned off, it means there is another network device using the same IP address as SD-300. In such a case, change the IP address of either SD- 300 or the other network device.
- Page 132 SD-300 and the serial communication software. A serial cable used to connect SD-300 and a serial device may not be plugged in correctly. Solution Please check that the serial cable is properly plugged into SD-300 and the serial device.
Need help?
Do you have a question about the SD-300 and is the answer not in the manual?
Questions and answers