
Related Manuals for Maxell One


Summary of Contents for Maxell One
- Page 1 quick response tws earbuds USER’S MANUAL MANUAL DE USUARIO SCAN FOR MORE INFORMATION MANUAL DE USO MODEL: EB-BTONE FELHASZNÁLÓI KÉZIKÖNYV...
- Page 2 Unboxing Charging Case TYPE C charging cable Silicone Ear-tips...
-
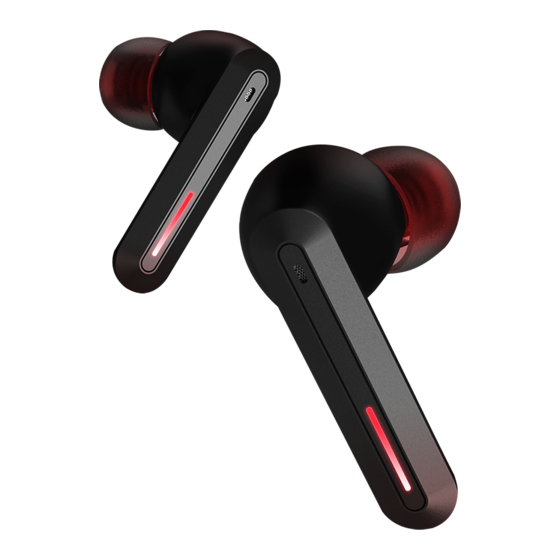
Page 3: Device Overview
Device Overview 1. Tap area 2. Indicator (red) 3. Status LED (red) 4. Charging interface 5. Charging port... - Page 4 Charging Please fully charge the ONE after unboxing. Use Type-C cable to charge the charging case. Charging Indicator Status Charging Case Indicator light ON (By Type C charging) Charging by Type C: Charging Case indicator flashes red 1 time/ 2 seconds...
- Page 5 A: Ensure both buds are inside the charging case and take out both buds. The buds indicator will flash for a while, which means earbuds were Power On. B: Press ONE form the smartphones Bluetooth menu. There's a voice prompt “Your Device is Connected” after succeed connection with smartphone..
- Page 7 QUICKLY TAP L or R earbuds 5 times to enter into paring mode, both earbuds indicators will flash until pairing, which means the ONE had been reset successfully. Put them back into charge case, and the Hifuture ONE ready to Use on AUTO ON & AUTO Pairing.
- Page 8 1.Disconnected 2.Gaming Mode ON 3.Gaming Mode OFF 4.Connected 5.Pairing 6.Low Battery 7.Power ON 8.Power OFF 9.Min. Volume 10.Max. Volume 11.Reset Successful 12.Incoming Call...
- Page 9 * Not all device support this functionality Short Press the Double Press Double Press Long press L or R L or R earbuds L Earbuds R Earbuds earbuds for 2 seconds Press 3 times on the Short Press Press L Earbuds for Press R Earbuds for L or R earbud L or R Earbuds...
- Page 10 Desembalaje Estuche de carga Cable de carga TIPO C Puntas de silicona para los oídos...
-
Page 11: Descripción General Del Dispositivo
Descripción general del dispositivo 1. Toque el área 2. Indicador (rojo) 3. LED de estado (rojo) 4. Interfaz de carga 5. Puerto de carga... - Page 12 Cargar Cargue completamente el ONE después de desembalarlo. Utilice un cable tipo C para cargar el estuche de carga. Estado del indicador de carga Luz indicadora del estuche de carga ENCENDIDA (por carga tipo C) Carga por tipo C: el indicador del estuche de carga parpadea en rojo...
- Page 13 El indicador de botones parpadeará durante un tiempo, lo que significa que los auriculares estaban encendidos. B: Toque ONE desde el menú de Bluetooth de los teléfonos inteligentes. Hay un mensaje de voz que dice "Su dispositivo está conectado"...
- Page 15 ONE se ha restablecido correctamente. Vuelva a colocarlos en el estuche de carga y el Hifuture ONE estará listo para Úselo en AUTO ON y AUTO Pairing.
- Page 16 1.Desconectado 2.Modo de juego activado 3.Modo de juego desactivado 4.Conectado 5.Emparejamiento 6.Batería baja 7.Encendido 8.Apagado 9.Min. Volumen 10.Max. Volumen 11.Restablecimiento exitoso 12.Llamada entrante...
- Page 17 * No todos los dispositivos admiten esta funcionalidad Toque largo Toque brevemente Doble toque Doble toque auriculares L o R los auriculares el auricular L el auricular R durante 2 segundos L o R Toque 3 veces Toque el Toque el Toque corto el el auricular L o R para auricular R...
- Page 18 Unboxing Estojo de Carregamento Cabo de carregamento Pontas auriculares TIPO C de silicone...
-
Page 19: Visão Geral Do Dispositivo
Visão geral do dispositivo 1. Área de toque 2. Indicador (vermelho) 3. LED de status (vermelho) 4. Interface de carregamento 5. Porta de carregamento... - Page 20 Carregando Carregue totalmente o ONE após desembalar. Use o cabo Tipo C para carregar o estojo de carregamento. Status do indicador de carga Luz indicadora da caixa de carga LIGADA (por tipo de carregamento C) Carregando por tipo C: o indicador da caixa de carregamento pisca em...
- Page 21 A: Ensure both buds are inside the charing case and take out both buds. The buds indicator will flash for a while, which means earbuds were Power On. B: Toque em UM no menu Bluetooth do smartphone. Há um aviso de voz “Seu dispositivo está conectado” após o sucesso conexão com smartphone.
- Page 23 ONE foi reiniciado com sucesso. Coloque-os de volta no estojo de carga e o Hifuture ONE estará pronto para Use em AUTO ON e AUTO Pairing.
- Page 24 1. Desconectado 2. Modo de jogo LIGADO 3. Modo de jogo DESLIGADO 4. Conectado 5. Emparelhamento 6. Bateria Fraca 7. LIGAR 8. DESLIGUE 9.Min. Volume 10.Máx. Volume 11. Reinicialização com sucesso 12. Chamada de entrada...
- Page 25 * Nem todos os dispositivos suportam esta funcionalidade Fones de ouvido Fones de ouvido Fones de ouvido Fones de ouvido Long Tap L ou R Long Tap L ou R Double Tap L Double Tap R por 2 segundos Toque 3 vezes Fones de ouvido Toque nos fones Toque nos fones...
- Page 26 Csomagolás Töltőtok C típusú töltőkábel Szilikon füldugó...
- Page 27 Eszköz – áttekintés 1. Érintő terület 2. Kijelző (piros) 3. Állapot LED (piros) 4. Töltő csatlakozás 5. Töltőport...
- Page 28 Töltés Kérjük, a kicsomagolás után töltse fel teljesen a készüléket. A töltőtok töltéséhez használja a C típusú kábelt. Töltésjelző állapota Töltőtok jelzőfényei (C kábel csatlakoztatva): Töltés C típusú kábellel: A töltőtok jelzőfénye pirosban villog 2 másodpercenként Teljesen feltöltve: Töltőtok kijelzője fehéren világít Töltőtok jelzőfényei (C kábel nélkül) Piros jelzőfény világít a fülhallgatók töltése közben (5 másodperc elteltével automatikusan kigyullad) Töltőház akkumulátor töltöttsége alacsony: Piros kijelző...
- Page 29 A: Győződjön meg arról, hogy mindkét fülhallgató a töltő tokban van, és vegye ki mindkettőt. A fülhallgatók villogni fognak egy ideig, ami azt jelenti, hogy bekapcsoltak. B: Válassza ki a ONE eszközt az okostelefon Bluetooth menüjében. A sikeres csatlakozást, a "Your device is connected" hangjelzés erősíti meg.
- Page 31 Győződjön meg arról, hogy a ONE le van választva a telefonról vagy más Bluetooth készülékről. Mindkét fülhallgatót 5 másodpercig helyezze a töltő tokba, amíg a lámpa kialszik, majd vegye ki őket, gyorsan érintse meg az „L” vagy „ R” fülhallgatót 5-szer, hogy belépjen a csatlakoztatási módba, mindkét fülhallgató...
- Page 32 1. Leválasztva 2. Játék mód BE 3.Gaming mód KI 4. Csatlakoztatva 5. Párosítás 6. Alacsony akkumulátor 7. Bekapcsolás 8. Kikapcsolás 9. Min. Hangerő 10. Max. Hangerő 11. Reset Sikeres 12. Bejövő hívás...
- Page 33 * Nem minden eszköz támogatja ezt a funkciót Dupla koppintás Dupla koppintás Hosszú érintés Röviden érintse “L” Fülhallgató az “L” vagy “R” meg a “L” vagy “R ” “R” Fülhallgató Fülhallgató fülhallgatót 2 másodpercig Koppintson Koppintson a “R” Koppintson az “L” Rövid koppintás háromszor az L fülhallgatót...
- Page 34 Maxell Corporation of America, Maxell Europe Limited 3 Garret Mountain Plaza, 3rd Ground Floor, Block E Floor, Suite #300, Woodland Sefton Park, Bells Hill Park, NJ 07424. Stoke Poges www.maxell-usa.com. Buckinghamshire SL2 4HD Email: hq@maxell.eu Maxell Latin America, PH Oceanía Plaza...
Need help?
Do you have a question about the One and is the answer not in the manual?
Questions and answers