Sirius Satellite Radio XMp3i User Manual
Sirius satellite radio satellite radio user guide
Hide thumbs
Also See for XMp3i:
- User manual (130 pages) ,
- Quick manual (2 pages) ,
- User manual (68 pages)
Table of Contents
Advertisement
Quick Links
Advertisement
Table of Contents

Related Manuals for Sirius Satellite Radio XMp3i


Summary of Contents for Sirius Satellite Radio XMp3i
- Page 1 User Guide...
-
Page 3: Table Of Contents
Activation . . . . . . . . . . . . . . . . . . . 29 Using Your XMp3i . . . . . . . . . . . . . 31 The Four XMp3i Menu Options . - Page 4 .com/xm . . . . . . . . . . . . . . . . . . . .109 Updating the XMp3i Firmware . . . . . . . . . 111 Disconnecting the XMp3i from a PC .
-
Page 6: Features
• Record songs while you listen, or schedule recordings of your favorite shows . • Set XMp3i to record up to five of your favorite XM channels automatically so you’ll always have something to listen to . • TuneSelect and GameSelect find your favorite artists or sports events on any XM channel . -
Page 7: Safety And Care Information
Safety and Care Information IMPORTANT! Always read and understand all the instructions to avoid injury to yourself and/or damage to your device . SIRIUS XM Radio Inc . disclaims all responsibility for damage from data loss due to breakdown, repair, or other causes . • Do not expose to extreme temperatures, outside the recommended temperature range of 32°... - Page 8 • When using this product, stay aware of your surroundings when enjoying your XMp3i . If you’re a pedestrian, keep your eyes and ears open . If you’re driving, keep your eyes on the road and your hands on the wheel . Not doing so could result in personal injury, death, and/or damage to your device, accessories, and/ or to your vehicle or other property .
- Page 9 Protect Your Ears and Yourself • Always follow traffic safety directions . Do not use earbuds or headphones while operating a bicycle, automobile, or motorcycle . Not only is it dangerous, it may be illegal . • Make sure the earbud or headphone cable does not get in the way of your arms or other surrounding objects while you’re walking or exercising .
-
Page 10: Important Battery Information
Introduction Important Battery Information Your XMp3i’s battery should be charged before you use it . The amount of charge is indicated by the battery level meter in your XMp3i’s display . When you’re charging the battery you will see a red battery icon . - Page 11 • Do not use your battery if it is dropped or damaged . • Charge your XMp3i battery only with Sirius XM approved charger . • Risk of Explosion if battery is replaced with an non XM approved battery .
-
Page 12: What's In The Box
Introduction What’s in the Box? XMp3i Radio Remote Control Earbuds Stereo Audio Cable Home Dock Indoor/Outdoor Antenna USB Cable Battery Home Power Adapter... -
Page 13: Xmp3I Buttons And Connectors
XMp3i Buttons and Connectors Power/Lock Switch Slide down to turn XMp3i on or off, slide up to lock buttons . Menu Go to Live XM, My Music Library, Auto Recordings, or Settings . Back Return to previous screen . Press and hold to return to the previous channel . -
Page 14: Home Dock
Introduction Home Dock Color-Coded Connections The color-coded Home Dock makes it simple to connect . Just match the colors on the cable ends to the colors on the dock to see what goes where . A N T ANT (Silver) Connection for the Indoor/Outdoor Antenna . -
Page 15: Remote Control Functions
Remote Control Functions Power Button Turn Radio on/off . Replay Buttons Pause and replay live XM programming and navigate your recordings . Select Button Press to confirm highlighted selections; press and hold to access FM channel presets . Menu Go to the main menu . Number Keys Enter a channel number to tune directly to the... -
Page 16: Installing And Charging The Battery
Installing and Charging the Battery The battery is shipped partially charged . Charge the battery for at least 3 hours before using your XMp3i for the first time, or if you have not used it for several months . Insert the battery into the XMp3i as shown . -
Page 17: Microsd™ Memory Card
NOTE! You cannot store any recorded XM content on your microSD card . Installing and Removing the microSD Memory Card Turn your XMp3i off before inserting or removing the microSD memory card . To insert the memory card, press it down until it clicks into place . To remove it, press down and release and it will eject . -
Page 20: Step 1: Connect The Home Dock
Home Dock Installation There are two steps to installing your Home Dock . First, connecting the Home Dock to the AC Power Adapter, the Indoor Outdoor Antenna, and to your stereo or powered speakers, and second, placing and aiming the Indoor/Outdoor Antenna . Step 1: Connect the Home Dock When installing the Home Dock in your home, choose a location in close proximity to your home stereo system or powered speakers, and also where the cable from... - Page 21 Connect the Home Power Adapter Connect the Home Power Adapter to the red POWER connector at the left side of the Home Dock, and plug it into a wall outlet . Connect the Home Dock to a Home Stereo System or Powered Speakers The Home Dock can be connected to your home stereo system, or to a pair of powered speakers .
- Page 22 Home Dock Installation AUX In or LINE In connection of your home stereo system, using the provided Stereo Audio Cable . Take the provided Stereo Audio Cable and connect the single 1/8” (3 .5 mm) connector to the green AUDIO connector at the rear of the Home Dock .
- Page 23 AC outlet . Turn the speakers On . Dock Your XMp3i Place the XMp3i into the Home Dock as shown, and turn it On by sliding the Power/Lock switch down . IMPORTANT! Allow the XMp3i to charge the battery for a...
-
Page 24: Antenna
. Access the Antenna Aiming screen of your XMp3i to see a visual indication of signal strength . Press menu, turn the Control Wheel to highlight Settings . - Page 25 Not sure which way is south? Think about where the sun rises (in the east) and sets (in the west) . Then stand so that east is to your left and you’ll be facing south . Is there a window in the direction you’re facing? Move the antenna closer to the window .
- Page 26 Home Dock Installation on a window ledge, porch, table, or patio . The location you choose should provide the antenna with a clear view of the southern sky . SOFFIT If none of the previous solutions work for you, then the BEST reception can be achieved by mounting the antenna outdoors, with a clear view of the southern sky .
- Page 27 Antenna Template” on page 126 . Once you have found a suitable location for the antenna, route the antenna cable to the Home Dock . Be sure you avoid any obstructions that could crimp, kink, or twist the cable . Use protective grommets wherever rough openings are encountered .
- Page 28 Home Dock Installation signal strength, make small adjustments to the angle of tilt of the clamshell until the highest possible signal strength is achieved . If you have not wall-mounted the antenna, turn the antenna slightly to the right or left and observe if the signal strength increases .
- Page 30 Make a note of your XM Radio ID . You can find it on channel 0, on a label on the bottom of the gift box, and on the label on the back of your XMp3i . NOTE! The XM Radio ID does not use the letters I, O, S, or F .
-
Page 32: The Four Xmp3I Menu Options
Using Your XMp3i The Four XMp3i Menu Options The XMp3i has four menu options which can be selected after pressing the menu button . These menu options are summarized here, and are explained in detail in the four following chapters of this User Guide . -
Page 33: Xmp3I
. At Home/Office Place your XMp3i in the Home Dock to listen to live XM through your home stereo or powered speakers . Use the Remote Control to tune channels, play tracks from your music library or record new content from across the room . - Page 34 . Trees, buildings and even your own body can block this signal causing audio interruption . If you lose the satellite signal, XMp3i will prompt you to listen to content from My Music Library or Auto Recordings .
-
Page 35: Navigation Buttons
Navigation Buttons Power/Lock Switch Sliding the Power/Lock switch down turns the XMp3i On or Off . Sliding the Power/Lock switch up locks the buttons on the XMp3i to prevent the accidental pressing of a button . Slide back to the center position to unlock the buttons . - Page 36 Pressing and holding back returns to the previous channel to which you were listening . Menu Button menu The menu button lets you access the four XMp3i modes, Live XM, My Music Library, Auto Recordings, and Settings . Keypad Button keypad The keypad button displays an on-screen keypad allowing you to directly tune any XM channel by entering the channel number .
-
Page 37: Display Icons
Display Icons The following is a list of the icons that are displayed by the XMp3i . Icon Live XM mode My Music Library mode Auto Recordings mode Settings mode Battery Charging Battery Charged (green) Battery Low (red) Lock - buttons locked . To unlock, slide the Power/Lock switch down to the middle position Mute –... - Page 38 Using Your XMp3i Icon Explanation (Green) microSD card is in the device Song included on a playlist MP3 or WMA file loaded onto the microSD card that has been added to a playlist TuneSelect set to alert on artist’s name...
-
Page 39: Using The Control Wheel
Using the Control Wheel The Control Wheel on the XMp3i is multifunctional . Use your finger to spin the wheel clockwise or counter-clockwise to browse and highlight XM channels and menu lists . Select highlighted items by pressing the Select button in the center of the Control Wheel . -
Page 42: Introduction
Live XM is where you listen to Satellite Radio, browse channels and tune to your favorite XM programs . To listen to Live XM with your XMp3i from any screen: Press menu . The Live XM icon is highlighted . -
Page 43: The Live Xm Main Display
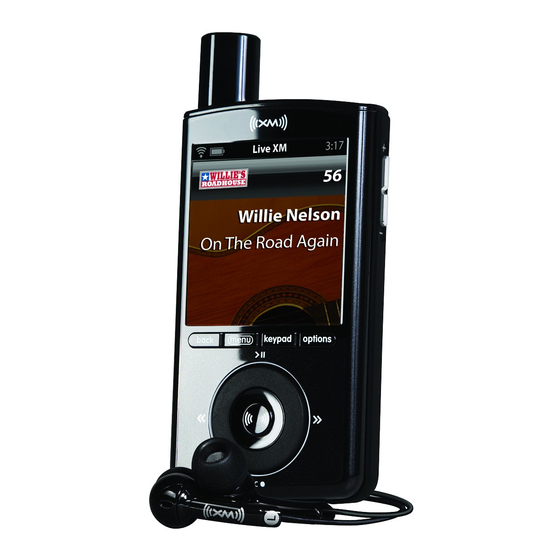
The Live XM Main Display When listening to a channel, information about the channel and XMp3i are displayed . Indicates whether you are listening to Live XM or Replay content Battery Level Satellite Signal Strength Channel Name Song Title or Program Topic... -
Page 44: Tuning A Channel
Live XM Tuning a Channel Tune a channel to listen to Live XM programming . You can tune by browsing channels and selecting, or by directly entering the channel number . Browsing Channels To select a channel to listen to: Turn the Control Wheel to display the list of channels . -
Page 45: Category Lists
Category Lists Channels are grouped into categories such as Pop, Rock, Comedy, Talk/ News, etc ., to make it easier to find channels of similar genre . To display a list of categories Press menu . The Live XM icon is highlighted . Press Select . Turn the Control Wheel to highlight All Categories . -
Page 46: Replay Live Xm
Live XM Replay Live XM You don’t need to miss any XM programming with the XMp3i . If you’re temporarily interrupted while listening to a channel, just pause the channel to enter Replay . When you’re ready to listen again, set the channel to play . A paused channel will save up to the last 30 minutes of the programming for replay . -
Page 47: Favorite Channels
Favorite Channels Saving favorites is an easy way to quickly browse and tune only those XM channels you listen to frequently . You can save up to 99 channels as favorites . To save a favorite channel While listening to any channel press options . Turn the Control Wheel to highlight Add to Favorites and press Select . -
Page 48: Tuneselect And Gameselect
Live XM TuneSelect and GameSelect TuneSelect and GameSelect alerts you whenever your favorite artists, songs or sports teams are playing on any XM channel . When a match is found for an entry in your TuneSelect or GameSelect list, you’ll be prompted with audio and a displayed alert . -
Page 49: Info Extras
Info Extras Game scores for up to 60 teams or up to 30 stock quotes can be displayed at the bottom of the display screen . The game scores or stock quotes will scroll in a ticker fashion if there are too many to display at once . To turn Info Extras On or Off Press menu . - Page 50 Live XM Turn the Control Wheel to highlight Stocks and press Select . If this is the first time you are adding a stock, the Add Stocks screen will be displayed, otherwise press Select to select Add Stocks . Turn the Control Wheel until the first letter of the stock symbol is displayed and press Select .
- Page 51 Game Scores To add sports teams for game score updates Press menu . Turn the Control Wheel to highlight Settings and press Select . Turn the Control Wheel to highlight Info Extras and press Select . Turn the Control Wheel to highlight Sports and press Select . From the list of sports categories displayed, turn the Control Wheel to highlight the category of your team and press Select From the list of team names displayed, turn the Control Wheel to...
-
Page 52: Recording
For recordings to happen and finish, the XMp3i must be receiving the XM signal and be in Live XM mode . Additionally, for Scheduled Recordings and Auto Recordings, the XMp3i must be docked in a Home Dock or Vehicle Dock which is connected to a power source . - Page 53 To record a song Press and hold Record rec until rec is shown in red at the top of the display screen . To stop recording a song while it’s recording: Press Record rec . Stop Rec Song will be highlighted . Press Select . To record a channel The channel to which you are listening can be recorded in a block of 1, 2, 3, 4, 5, or 6 hours .
- Page 54 To schedule a recording A scheduled recording lets you capture programs that you either can’t listen to when they are broadcast, or may want to listen to again . XMp3i makes it easy to set up a schedule recording .
- Page 55 time specified Set the Start Time hour by turning the Control Wheel . Press Select . Set the Start Time minutes by turning the Control Wheel . Press Select . Set the End Time hour by turning the Control Wheel . Press Select . Set the End Time minutes by turning the Control Wheel .
-
Page 56: Bookmarks
. Songs may be purchased from compatible online music services . To bookmark a song that is currently playing, press options Bookmark . Refer to “Using your XMp3i with a PC” on page 102 for more information about the XM2go Music Manager software . -
Page 57: Blocking Explicit Channels
Blocking Explicit Channels A channel logo that contains “xL” means that you may hear frequent explicit content and language . If you do not want these channels to appear in the channel lists, you can block them . Blocked channels can still be selected by entering the channel number using the keypad button . -
Page 60: Introduction
• Recorded XM: Songs and scheduled recordings which you have recorded from Live XM . • MP3s and WMAs: Stored MP3 and WMA files you’ve downloaded to XMp3i memory or loaded onto a microSD card from your PC • My Books: Audio books that you have downloaded to your XMp3i from your PC . -
Page 61: Screens
The My Music Library Main Display Screens When listening to recorded or downloaded content, information about the song and XMp3i are displayed . When you are listening to a recorded song (Recorded XM): Battery Level Channel Name Song Title or Program Topic... - Page 62 My Music Library When you are listening to a downloaded content (MP3s & WMAs or My Books): Battery Level Song Title or Book Name Current listening position Time elasped since beginning of playback Indicates you are listening to My Music Library Clock Artist Name or Book Author...
-
Page 63: Listening To My Music Library
• All Songs: View all the XM recordings by song name or title . • Artists: View all the Recorded XM by artist name . • Auto Recordings: View Auto Recordings that the XMp3i has automatically saved for you . • Categories: View Recorded XM by category (genre) . - Page 64 My Music Library • Playlists: View Recorded XM by the playlist in which it appears . Turn the Control Wheel to highlight your choice and press Select . MP3s & WMAs To listen to your downloaded MP3 and WMA files: Press menu . Turn the Control Wheel to highlight My Music Library and press Select .
- Page 65 My Books To listen to your downloaded MP3 and WMA files: Press menu . Turn the Control Wheel to highlight My Music Library and press Select . Turn the Control Wheel to highlight My Books and press Select . You’ll be presented with several options for viewing and selecting the content: • View all My Books by book title .
-
Page 66: Playlists
My Music Library Playlists A playlist is a collection of songs (or other content) which you create . The playlist can then be selected to play all the songs contained in the playlist . You can make multiple playlists, and songs can be in more than one playlist . An existing playlist can also be added to another playlist . - Page 67 If you already have created a playlist, and are adding another playlist, select New Playlist . If you haven’t yet created a playlist, you’ll be prompted to create a playlist title . Turn the Control Wheel to select the first character of the playlist name and press Select .
- Page 68 My Music Library To delete content from a playlist Press menu . Turn the Control Wheel to highlight My Music Library and press Select . Turn the Control Wheel to highlight either Recorded XM or MP3s & WMAs and press Select . Turn the Control Wheel to highlight Playlists and press Select .
- Page 69 Delete will be highlighted . Press Select . Turn the Control Wheel to highlight Yes and press Select . To rename a playlist Press menu . Turn the Control Wheel to highlight My Music Library and press Select . Turn the Control Wheel to highlight either Recorded XM or MP3s &...
- Page 70 My Music Library To add a playlist to another playlist Adding one playlist to another playlist will cause all the content contained in the first playlist to be added to the second playlist . Press menu . Turn the Control Wheel to highlight My Music Library and press Select .
-
Page 72: Introduction
. The XMp3i records auto recordings from channels you have specifically selected, or have listened to for at least 30 minutes . XMp3i may record up to 6 hours from as many as 5 different channels, for a total of up to 30 hours of auto recordings . - Page 73 To select specific channels for auto recording: While listening to the channel you wish to select for auto recordings, press options . Turn the Control Wheel to highlight Set to Auto Record and press Select . You will receive a confirmation that the channel has been set to auto record .
- Page 74 Auto Recordings To listen to Auto Recordings with your XMp3i: Press menu . Turn the Control Wheel to highlight My Music Library and press Select . Turn the Control Wheel to highlight Auto Recordings and press Select . You’ll be shown one or more auto recording sessions . Select the auto recording you want to listen to by turning the Control Wheel to highlight the channel and pressing Select .
- Page 75 While listening to an auto recording you may press Play/Pause Rewind , and Fast-Forward recorded songs or segments . NOTE! You can not manually delete any auto recordings . However, auto recordings will be deleted automatically when space is needed for new recordings .
-
Page 78: Introduction
Settings Introduction Settings is where you manage the XMp3i configuration options such as display brightness, editing alerts, setting your time zone, etc . To manage your XMp3i’s configuration: Press menu . Turn the Control Wheel to highlight Settings and press Select . -
Page 79: Eq Settings
EQ Settings The equalization profile of the XMp3i (EQ) is adjustable for the type of music you are listening to, and for your listening pleasure . Possible selections are: Max Boost Rock Talk Vocal Bass Boost Classical Flat Jazz To adjust the EQ setting: Press menu . -
Page 80: Change Display
Settings Change Display In Change Display, you can change the brightness of the display screen, set the duration of the display backlight, and turn Info Extras on or off . To change the display brightness Press menu . Turn the Control Wheel to highlight Settings and press Select . Turn the Control Wheel to highlight Change Display and press Select . - Page 81 Each press of Select will sequence through the choices, Always On, or on for 1 minute, 30 seconds, or 15 seconds . The less time the backlight is on, the longer the battery will last before requiring recharging . To turn Info Extras on or off Press menu .
-
Page 82: Edit Alerts
Settings Edit Alerts In Edit Alerts, you can mange your TuneSelect, GameSelect, and Program alerts . You can also turn alerts On or Off . To configure TuneSelect and GameSelect Press menu . Turn the Control Wheel to highlight Settings and press Select . Turn the Control Wheel to highlight Edit Alerts and press Select . - Page 83 To learn how to add TuneSelect or GameSelect alerts, refer to “TuneSelect and GameSelect” on page 48 . To turn all alerts On or Off Press menu . Turn the Control Wheel to highlight Settings and press Select . Turn the Control Wheel to highlight Edit Alerts and press Select . Turn the Control Wheel to highlight All Alerts and press Select .
-
Page 84: Info Extras
Settings Info Extras In Info Extras, you can add stocks to be displayed, and remove a stock from your list of stocks . You also can add and remove sports teams . To manage stocks Press menu . Turn the Control Wheel to highlight Settings and press Select . Turn the Control Wheel to highlight Info Extras and press Select . - Page 85 Turn the Control Wheel to highlight Sports and press Select . You can then select or remove sports teams for Info Alerts . To learn how to add or remove sports teams, refer to “Info Extras” on page 49 .
-
Page 86: Channel Access
Settings Channel Access In Channel Access, there are three options to configure: • Direct Tune: When you highlight a channel name in a list, select whether to have the channel tuned as soon as you highlight the channel, or whether you need to press Select to tune the channel . - Page 87 keypad button . Press menu . Turn the Control Wheel to highlight Settings and press Select . Turn the Control Wheel to highlight Channel Access and press Select . Turn the Control Wheel to highlight Channel Skip/Add and press Select . A list of channels will be displayed .
-
Page 88: Auto Recordings
Auto Recordings Auto Recordings are content that your XMp3i can record automatically for you . When the feature is turned on, the XMp3i learns your listening habits and automatically records XM programming from the five channels you listen to most frequently, or records from specific channels that you designate . -
Page 89: Vehicle Settings
Vehicle Settings NOTE! The Vehicle Settings menu item only appears if the XMp3i is in a Vehicle Dock . The settings apply only when the XMp3i is in a Vehicle Dock . In Vehicle Settings, there are three options: • FM Channels: Set and select FM channel presets . When using the PowerConnect™... - Page 90 . Just press menu and exit the screen . The chosen FM channel will be confirmed on the display screen and the XMp3i will tune to that FM Set your vehicle’s FM radio to same FM channel .
- Page 91 IMPORTANT! You’ll first need to find a suitable FM channel that is unused or available in your area . To quickly select an FM channel from the preset list: Press and hold Select . You will be prompted to set your vehicle radio to the displayed FM channel .
- Page 92 Settings Turn the Control Wheel to highlight Vehicle Settings and press Select . Turn the Control Wheel to highlight Power Off and press Select . Each press of Select sequences through the choices, Off, 60 Minutes, 90 Minutes, 120 Minutes, and 180 Minutes .
-
Page 93: Line Out Level
NOTE! The Line Out Level setting option only appears when the XMp3i is docked, and an audio cable is connected . Line Out Level is used to adjust the volume level of the XMp3i’s vehicle or home dock to match the volume of other audio sources you may use, such as a CD player, other FM stations, a TV, or an MP3 player . -
Page 94: Antenna Aiming
Settings Antenna Aiming Your XMp3i can display the received strength of the satellite and terrestrial signals being received . This is useful if you are troubleshooting signal reception problems . Press menu . Turn the Control Wheel to highlight Settings and press Select . -
Page 95: Set Time
Set Time In Set Time there are three options: • Time Zone: Select the time zone you are in for an accurate clock . • Daylight Savings: Select whether Daylight Savings Time is observed in your location . • Hour Mode: Select whether the clock is displayed in 12-hour or 24- hour mode . - Page 96 Settings Turn the Control Wheel to highlight Daylight Savings and press Select . Each press of Select will toggle between Off and On . To select a 12 or 24 Hour Mode for the clock display Press menu . Turn the Control Wheel to highlight Settings and press Select . Turn the Control Wheel to highlight Set Time and press Select .
-
Page 97: Restore Defaults
Restore Defaults In Restore Defaults, there are two options: • Restore Settings: This erases all personal settings on your XMp3i and restores the factory defaults, but does not delete your recorded or downloaded content . Personal settings include TuneSelects, Favorite Channels, Scheduled Recordings, and Info Extras . - Page 98 Settings Turn the Control Wheel to highlight Restore Defaults and press Select . Turn the Control Wheel to highlight Restore and Erase and press Select . Turn the Control Wheel to highlight Yes and press Select .
-
Page 99: Memory Usage
Memory Usage Memory usage displays how much of the memory in your XMp3i is currently being used: • XM Singles: This is the songs you have recorded from XL Live . • Other Content: These are channel recordings from Live XM,... -
Page 102: Introduction
XM channels for the next week . • Rip CDs to MP3 or WMA files so you can download them to your XMp3i . • View your XMp3i bookmarks and purchase songs from compatible online music services including Napster®... - Page 103 PCs running Microsoft Windows Vista® must meet the following requirements: • CPU: 800 MHz or higher for Vista Home; 1 GHz or higher for other Vista editions • Hard drive: at least 100 MB free disk space • RAM: at least 512 MB for Vista Home; at least 1 GB for other Vista editions • High-speed Internet connection • Windows Media Player 11 (loaded at time of installation if not present)
-
Page 104: My Music
My Music The XM2go Music Manager helps you organize recorded XM content, your MP3 and WMA files, and audio book files on your XMp3i . • View your XM recordings, including the artist name, song title, the channel it was recorded from, and song length . -
Page 105: Record Xm
Record XM Schedule Recordings of XM content on your XMp3i, using the XM2go Music Manager . • Save time by recording up to five channels at the same time . • View all scheduled recordings, including the duration of the recording . -
Page 106: Bookmarks
• View songs you have bookmarked on your XMp3i and link to Napster .com to purchase them . • Add your music library to the XMp3i with a standard or high capacity microSD card . We recommend storing your MP3 files on a microSD card since you can only record XM content to the XMp3i . -
Page 107: Napster .Com
• Connect to Napster directly from the XM2go media manager . • Easy access to a library of millions of songs . • Add your music library to your XMp3i with a standard or high capacity microSD card . NOTE! We recommend storing your MP3 files on a microSD card since you can only record XM content to the XMp3i . -
Page 108: My Books
Using your XMp3i with a PC My Books View the authors, titles, and length of audio books saved on your XMp3i . • Link to http://www .audible .com/xm to see available audio books . -
Page 109: Audible .Com/Xm
• Link to http://www .audible .com/xm to see available audio books . • Choose from over 40,000 downloadable audio books, including the latest best sellers and timeless classics . • Download audio books to your XMp3i (or other compatible devices) and listen at the gym, on your commute, anywhere, anytime . - Page 110 Using your XMp3i with a PC Info View Information about your XMp3i such as model and Radio ID . • Personalize the name of your XMp3i . • View the amount of XM content storage used/available, and personal music storage used/available on your XMp3i .
-
Page 111: Updating The Xmp3I Firmware
Occasionally we make improvements to the XMp3i’s software to add features or improve performance . To be sure your XMp3i is taking advantage of the latest software it is recommend you attempt to update your XMp3i at least once a year . -
Page 112: Disconnecting The Xmp3I From A Pc
Disconnecting the XMp3i from a PC To disconnect your XMp3i from your PC, you must follow these steps: Click on “Eject” on the lower left-hand corner of the XM2go Music Manager screen . XM2go Music Manager will sync with your XMp3i, and then inform you that you can disconnect your XMp3i . - Page 114 XMp3i has been designed and built to be trouble-free but if you experience a problem, try this: • Check that all connections are firm and secure . • Make sure you have installed the XMp3i as described in this User Guide . If you see this on the screen: No signal...
- Page 115 XMp3i shuts off unexpectedly . Try this: Activate your XM subscription to be able to record XM programming on your XMp3i . Do nothing . Recording is restricted by the content owners . Do nothing . Recording is restricted by the content owners .
- Page 116 Check the battery level, it may be low . Charge the battery for 8 hours . Check that you have not skipped any channels . If you still do not receive all channels, your XMp3i may not be properly activated . Contact XM Listener Care .
- Page 117 You need to turn the Auto Recordings feature on . Refer to “Auto Recordings” on page 88 . Check power and USB connections between your XMp3i and your PC . Be sure to use the supplied USB cable . Remove your XMp3i from the Home Dock, then re-insert .
- Page 120 Product Specifications XMp3i Radio Power Requirements Temperature Range Audio Output Dimensions Weight: Storage Capacity Audio Connector Power Connector Battery Type Capacity Music File Formats Home Dock Dimensions Weight Audio Connector Antenna Connector Power Connector Remote Control Dimensions: Weight: Battery: 5 .2 V DC, 1 .6 A (max) 32°F to 95°F (0°C to 35°C)
-
Page 121: Patent Information
Patent and Environmental Information Patent Information It is prohibited to, and you agree that you will not, copy, decompile, disassemble, reverse engineer, hack, manipulate, or otherwise access and/ or make available any technology incorporated in this product . Furthermore, the AMBE voice compression software included in this product is protected ™... - Page 122 • Consult the dealer or an experienced radio/TV technician for help . WARNING! The FCC and FAA have not certified this Satellite Radio Receiver for use in any aircraft (neither portable nor permanent installation) . Therefore, SIRIUS XM Radio Inc .
- Page 123 NHL Enterprises, L .P . The Home Ice® channel is a registered trademark of XM Satellite Radio Inc . The Swinger Golfer logo is a registered trademark of PGA TOUR, Inc . Visit xmradio .com/xmlineup for updates . All programming/channel lineup/XM service subject to change or preemption .
-
Page 124: Owners Record
Owners Record Owner’s Record The Radio model number is located below and the XM Radio ID is located on the label on the back of the XMp3i . Record the XM Radio ID in the space provided below . Refer to these numbers whenever you call your dealer regarding this product . -
Page 126: Template
Indoor/Outdoor Antenna Template 1-3/8” 1-1/8”... - Page 128 .com SIRIUS XM Radio Inc . 1221 Avenue of the Americas New York, NY 10020 1 .800 . 9 67 .2346 © 2010 SIRIUS XM Radio Inc . XMP3i User Guide_XMP3IUG0210_021710...
Need help?
Do you have a question about the XMp3i and is the answer not in the manual?
Questions and answers