Table of Contents
Advertisement
Available languages
Available languages
OWNER'S MANUAL • MANUAL DEL USUARIO
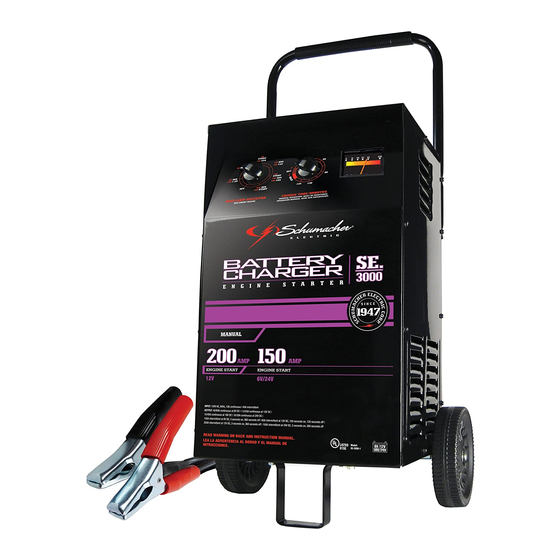
Models / Modelos: SE-2254, SE-2352, SE-3000, SE-4020,
Manual Battery Charger • Cargador de Batería Manual
•
READ THE ENTIRE MANUAL BEFORE USING THIS PRODUCT.
FAILURE TO DO SO CAN RESULT IN SERIOUS INJURY OR DEATH.
•
LEA EL MANUAL COMPLETO ANTES DE UTILIZAR ESTE PRODUCTO.
CUALQUIER FALLA PODRÍA RESULTAR EN SERIAS LESIONES O PODRÍA SER
MORTAL.
SE-4022, SE-5025, SE-6030, SE-8050
ADVERTENCIA
00-99-001026/0210
Advertisement
Table of Contents

Related Manuals for Schumacher Electric SE-4022


Summary of Contents for Schumacher Electric SE-4022
- Page 1 READ THE ENTIRE MANUAL BEFORE USING THIS PRODUCT. FAILURE TO DO SO CAN RESULT IN SERIOUS INJURY OR DEATH. • LEA EL MANUAL COMPLETO ANTES DE UTILIZAR ESTE PRODUCTO. CUALQUIER FALLA PODRÍA RESULTAR EN SERIAS LESIONES O PODRÍA SER MORTAL. SE-4022, SE-5025, SE-6030, SE-8050 ADVERTENCIA 00-99-001026/0210...
-
Page 3: Table Of Contents
SECTION IMPORTANT SAFETY INSTRUCTIONS PERSONAL PRECAUTIONS PREPARING TO CHARGE CHARGER LOCATION DC CONNECTION PRECAUTIONS FOLLOW THESE STEPS WHEN BATTERY IS INSTALLED IN VEHICLE. FOLLOW THESE STEPS WHEN BATTERY IS OUTSIDE VEHICLE. BATTERY CHARGING – AC CONNECTIONS ASSEMBLY INSTRUCTIONS CONTROL PANEL OPERATING INSTRUCTIONS CALCULATING CHARGE TIME MAINTENANCE INSTRUCTIONS... - Page 4 SECCIÓN INSTRUCCIONES IMPORTANTES DE SEGURIDAD PRECAUCIONES PERSONALES PREPARACIÓN PARA LA CARGA UBICACIÓN DEL CARGADOR PRECAUCIONES DE CONEXIÓN EN CC SIGA ESTOS PASOS CUANDO LA BATERÍA ESTÉ COLOCADA EN EL VEHÍCULO. SIGA ESTOS PASOS CUANDO LA BATERÍA SE ENCUENTRE FUERA DEL VEHÍCULO. CARGA DE BATERÍA, CONEXIONES DE CA INSTRUCCIONES DE MONTAJE PANEL DE CONTROL...
- Page 5 IMPORTANT: READ AND SAVE THIS SAFETY AND INSTRUCTION MANUAL. SAVE THESE INSTRUCTIONS – The SE Line of Wheel Chargers offers a wide range of features to accommodate your needs. This manual will show you how to use your charger safely and effectively. Please read, understand and follow these instructions and precautions carefully, as this manual contains important safety and operating instructions.
-
Page 6: Important Safety Instructions
Do not expose the charger to rain or snow. Use only recommended attachments. Use of an attachment not recommended or sold by Schumacher® Electric Corporation may result in a risk of fire, electric shock or injury to persons or damage to property. To reduce the risk of damage to the electric plug or cord, pull by the plug rather than the cord when disconnecting the charger. -
Page 7: Preparing To Charge
To reduce the risk of a battery explosion, follow these instructions and those published by the battery manufacturer and the manufacturer of any equipment you intend to use in the vicinity of the battery. Review the cautionary markings on these products and on the engine. NEVER smoke or allow a spark or flame in the vicinity of a battery or engine. -
Page 8: Charger Location
3.11 Determine the voltage of the battery by referring to the vehicle owner’s manual and make sure that the output voltage selector switch is set to the correct voltage. If the charger has an adjustable charge rate, charge the battery in the lowest rate first. -
Page 9: Follow These Steps When Battery Is Outside Vehicle
For a positive-grounded vehicle, connect the NEGATIVE (BLACK) clip from the battery charger to the NEGATIVE (NEG, N, -) ungrounded post of the battery. Connect the POSITIVE (RED) clip to the vehicle chassis or engine block away from the battery. Do not connect the clip to the carburetor, fuel lines or sheet- metal body parts. -
Page 10: Assembly Instructions
NOTE: Pursuant to Canadian Regulations, use of an adapter plug is not allowed in Canada. Use of an adapter plug in the United States is not recommended. Recommended minimum AWG size for extension cord: A.C. input rating, amperes* But less least than *If the input rating of a charger is given in watts rather than in amperes, the... - Page 11 Attach the Foot: upside down on a flat surface. Attach the foot and secure it with the four ¼-20 thread cutting screws provided. Assemble the Wheels and Axle surface. Then, using a hammer, tap one of the axle caps onto the top end of the axle. Be sure to tap the axle cap on straight. Slide both wheels onto the axle with the recessed hubs facing out as shown.
- Page 12 Mount the Axle to the Charger on the bottom of the charger. Place the axle assembly under each bracket. Attach the brackets using the two, 10-32 thread cutting screws provided. NOTE: Be careful not to drop the brackets inside of the charger case. Attach the Handle handle until it is centered at the top.
-
Page 13: Control Panel
CONTROL PANEL Note: Not all controls are available on all models. Charge Rate Selector Switch Use the Charge Rate selector switch to select the charge rate or engine starting setting you require. • 2A Slow Charge Rate those commonly used in garden tractors, snow mobiles and motorcycles. •... -
Page 14: Operating Instructions
Battery Tester Switch (Models SE-2254 & SE-4022 only) When testing a battery, use this switch to select between testing a 6 volt battery and testing a 12 volt battery. Voltage Selector Switch Use this switch to set the scale of the voltmeter to either 6 volt and 12 volt DC to match the battery or batteries being charged. - Page 15 STOP cranking the engine until the other problem has been diagnosed and corrected. Using the Battery Voltage Tester (Models SE-2254 and SE-4022 only) Set the Voltage Selector switch to the correct setting (6V or 12V) to match the battery to be tested.
-
Page 16: Calculating Charge Time
Yellow or Red but the needle continues to fall – Indicates the battery may be defective or rundown. Release the load switch and note the voltmeter reaction. Voltage recovery into the green or above within seconds indicates a defective battery. A slow recovery indicates a rundown condition. For best results, check the specific gravity of the battery. - Page 17 Example: Amp Hour Rating x % of charge needed x 1.25 = hours of charge Charger Setting 100 (Ah Rating) x .50 (charge needed) x 1.25 = 3.125 hours 20 (Charger Setting) 100 x .50 x 1.25 = 3.125 You would need to charge your 100-Ampere Hour Battery for a little more than 3 hours at the 20-Amp charge rate using the above example.
- Page 18 • •...
-
Page 19: Maintenance Instructions
MAINTENANCE INSTRUCTIONS 13.1 After use and before performing maintenance, unplug and disconnect the battery charger (see Sections 6, 7 and 8). 13.2 Use a dry cloth to wipe all battery corrosion and other dirt or oil from the terminals, cords, and the charger case. 13.3 Ensure that all of the charger components are in place and in good working condition, including the plastic boots on the battery clips. - Page 20 PROBLEM Ammeter reads less than selected charge rate when charging a discharged battery The charger is making an audible clicking sound. Charger makes a loud buzz or hum. POSSIBLE CAUSE Extension cord is too long or wire gauge is too small. Weak cell or sulfated plate in battery.
-
Page 21: Before Returning For Repairs
PROBLEM Short or no start cycle when cranking engine. Charger will not turn on when properly connected. The battery is connected and the charger is on, but is not charging. The measured current is much lower than what was selected. BEFORE RETURNING FOR REPAIRS 16.1 When a charging problem arises, make certain that the battery is capable... -
Page 22: Limited Warranty
Manufacturer does not provide any warranty for any accessories used with this product that are not manufactured by Schumacher Electric Corporation and approved for use with this product. This Limited Warranty is void if the product is misused, subjected to careless handling, repaired, or modified by anyone other than Manufacturer or if this unit is resold through an unauthorized retailer. - Page 23 IMPORTANTE: LEA Y GUARDE ESTE MANUAL DE INSTRUCCIONES Y SEGURIDAD. GUARDE ESTAS INSTRUCCIONES: La línea SE de Cargadores de ruedas ofrece una amplia gama de características para satisfacer sus necesidades. Este manual le mostrará cómo utilizar su cargador en forma segura y efectiva.
-
Page 24: Instrucciones Importantes De Seguridad
No exponga el cargador a la lluvia o a la nieve. Utilice solamente accesorios recomendados. El uso de un accesorio no recomendado o suministrado por Schumacher® Electric Corporation puede provocar riesgo de incendio, descarga eléctrica o lesiones a personas o daño a la propiedad. -
Page 25: Precauciones Personales
PRECAUCIONES PERSONALES Riesgo de gases explosivos. Resulta peligroso trabajar en forma cercana a una batería de plomo. Las baterías generan gases explosivos durante su normal funcionamiento. Por este motivo, resulta de suma importancia que siga las instrucciones cada vez que utiliza el cargador. Para reducir el riesgo de explosión de una batería, siga estas instrucciones y aquellas publicadas por el fabricante de la batería y por el fabricante de cualquier equipo que intente utilizar en la proximidad de la batería. -
Page 26: Ubicación Del Cargador
Si resulta necesario extraer la batería del vehículo para cargarla, siempre retire el terminal con descarga a tierra en primer lugar. Asegúrese de que todos los accesorios en el vehículo se encuentren apagados para evitar la formación de arcos eléctricos. Asegúrese de que el área que rodea a la batería se encuentre bien ventilada mientras se carga la batería. -
Page 27: Siga Estos Pasos Cuando La Batería Esté Colocada En El Vehículo
SIGA ESTOS PASOS CUANDO LA BATERÍA ESTÉ COLOCADA EN EL VEHÍCULO. Ubique los cables de C.A. y C.C. para reducir el riesgo de daños a la cubierta, a la puerta y a las piezas móviles o calientes del motor. NOTA: Si es necesario cerrar el cofre durante el proceso de carga, asegúrese que el cofre no toque parte metálica de la batería o pele los cables. -
Page 28: Carga De Batería, Conexiones De Ca
Conecte el gancho POSITIVO (ROJO) del cargador al borne POSITIVO (POS, P, +) de la batería. Ubíquese junto con el extremo libre del cable que previamente sujetó al borne NEGATIVO (NEG, N, -) de la batería a la mayor distancia posible de la batería. -
Page 29: Instrucciones De Montaje
Tamaño AWG mínimo recomendado para alargadore: Consumo nominal de C.A., Amperes* Pero menos menor a *Si el consumo nominal del cargador se expresa en vatios en lugar de amperes, el consumo en amperes correspondiente se determinará dividiendo el consumo en vatios por el consumo en tensión, por ejemplo: 1200 watts/120 volts = 10 amperes INSTRUCCIONES DE MONTAJE... - Page 30 Acople el pie : retire el cargador de los materiales de embalaje y ubíquelo en forma invertida sobre una superficie plana. Acople el pie y asegúrelo con los cuatro tornillos de rosca cortante de ¼-20 que se suministran. Ensamble las ruedas y el eje: piso o sobre la superficie de trabajo. Luego, con un martillo, inserte una de las tapas de eje en el extremo superior del eje. Asegúrese de insertar la tapa de eje en forma recta.
- Page 31 Ensamble el eje al cargador ranura que se encuentra en la parte inferior del cargador. Ubique la unidad del eje debajo de cada abrazadera. Acople las abrazaderas por medio de los dos tornillos de rosca cortante de 10-32 que se suministran. NOTA: Tenga cuidado de no tirar las abrazaderas contenidas en la caja del cargador.
-
Page 32: Panel De Control
PANEL DE CONTROL NOTA: No todos los interruptores y LED se encuentran disponibles en todos los modelos. Interruptor de selección de índice de carga Utilice el interruptor de selección de índice de carga para seleccionar el índice de carga o la configuración inicial del motor que necesite. • Índice de carga lenta 2A como aquellas habitualmente utilizadas en tractores para jardín, motos de nieves y motocicletas. -
Page 33: Instrucciones De Operación
Interruptor del Probador de Carga en la Bateria (Modelo SE-8050 solamente) Utilice este interruptor para probar la carga de la batería. Interruptor de Probador de Bateria (Modelo SE-2254 y SE-4022 solamente) Utilice este interruptor para probar baterías de 6 volts y baterías de 12 volts. - Page 34 Carga (Modelos SE-2254, SE-3000, SE-4020, SE-4022, SE-5025, SE-6030, SE-8050) Asegúrese de que todas las piezas del cargador estén bien instaladas y en buenas condiciones para su función, incluyendo los protectores de plástico de las pinzas de la batería. Conectar la batería teniendo en cuenta las precauciones que figuran en las secciones 6 y 7.
-
Page 35: Cálculo De Tiempo De Carga
Usando el Probador de Voltaje de la Bateria (Modelos SE-2254 y SE-4022 solamente) Fije el interruptor del selector de voltaje al ajuste correcto (6V o 12V) para emparejar la batería a probarse. Fije el medidor de tiempo a la posición de Off (Apagado) Conecte la batería al cargador según lo especificado en secciones 6 y 7. El... - Page 36 PESO ESPECÍFICO 1.265 1.225 1.155 1.120 Cuando conoce el porcentaje de carga y el índice de amperio por hora (Ah) de su batería, puede calcular el tiempo aproximado necesario para que la batería alcance una carga completa. Para convertir la capacidad de reserva en amperes por hora, divida la capacidad de reserva por 2 y sume 16: Ejemplo: Índice de amperio por hora = Capacidad de reserva + 16...
- Page 37 • •...
-
Page 38: Instrucciones De Mantenimiento
INSTRUCCIONES DE MANTENIMIENTO 13.1 Después de usar y antes de realizar mantenimiento, desenchufe y desconecte el cargador de la batería (ver Secciones 6, 7 y 8). 13.2 Utilice un paño seco para limpiar la corrosión de toda la batería y otra suciedad o aceite de los terminales, cables y carcasa del cargador. - Page 39 PROBLEMA La lectura en el amperímetro permanece elevada. El amperímetro lee una cantidad menor al índice de carga seleccionado cuando se carga una batería descargada. Se escucha un sonido seco en el cargador (“clic”). El cargador realiza un fuerte zumbido. POSIBLE CAUSA La batería se encuentra extremadamente...
- Page 40 PROBLEMA Ciclo reducido o sin inicio al arrancar el motor. El cargador no se enciende incluso al estar bien conectado. POSIBLE CAUSA Consumo mayor a el índice de arranque del motor. No espera 3 minutos (180 segundos) entre los arranques. Los ganchos no se encuentran bien conectados.
-
Page 41: Antes De Devolver A Reparaciones
ésta se pueda reparar o reemplazar. El Fabricante no presta garantía por lo accesorios utilizados con este producto que no sean los fabricados por Schumacher Electric Corporation y que no estén aprobados para su uso con este producto. La presente Garantía... - Page 42 ASUMIR O A ADQUIRIR NINGUNA OTRA OBLIGACIÓN RESPECTO DEL PRODUCTO QUE NO SEA LA PRESENTE GARANTÍA. Servicio de atención al cliente de Schumacher Electric Corporation 1-800-621-5485 Lunes-viernes 7:00 a. m. a 5.00 p. m. CST Schumacher y el logo Schumacher son marcas registradas de Schumacher Electric Corporation • •...