
Related Manuals for Casio PS-3000


Summary of Contents for Casio PS-3000
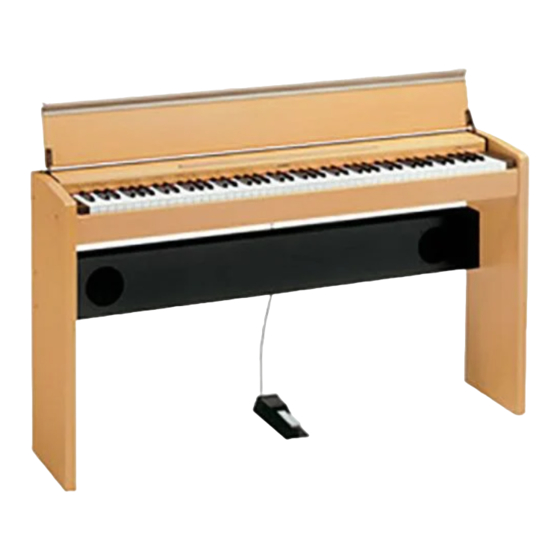
- Page 1 USER’S GUIDE GUÍA DEL USUARIO PS3000-ES-1 PS3000_es_cover.p65 03.10.8, 2:22 PM...
-
Page 2: Fcc Warning
Never let children use an AC adaptor that is seriously damaged. • The product is not intended for children under 3 years. • Use only CASIO AD-12 adaptor. • The AC adaptor is not a toy. • Be sure to disconnect the AC adaptor before cleaning the product. -
Page 3: Safety Precautions
Safety Precautions Congratulations on your selection of the CASIO Digital Piano. This digital piano is a sophisticated musical instrument that blends the very best of traditional piano feel and sound quality with the latest that modern electronics technology has to offer. - Page 4 Doing so creates the risk of electric shock, burn injury, or other personal injury. Leave all internal inspection, adjustment, and repair up to your original retailer or an authorized CASIO service provider. 03.10.22, 2:52 PM 417A-E-004A...
- Page 5 2. If you are using the AC adaptor for power, unplug it from the wall outlet. 3. Contact your original retailer or an authorized CASIO Service Provider. Do not put plastic bags over your head or in your mouth. Never allow the plastic bags that the piano and its accessories come in to be placed over the head or swallowed.
- Page 6 Safety Precautions Location Avoid locating the piano in the following types of areas. Subjecting the piano to the conditions described below creates the risk of fire and electric shock. • Areas expose to high humidity or large amounts of dust •...
-
Page 7: Main Features
❐ MIDI terminal • Connecting to another MIDI musical instrument lets you play two instruments from the keyboard of this digital piano. You can also connect to a commercially available MIDI sequencer to increase the number of parts you can play. -
Page 8: Table Of Contents
Contents Safety Precautions ... E-1 Main Features ... E-5 Contents ... E-6 General Guide ... E-8 Power Supply ... E-10 Using the AC Adaptor ... E-10 Connections ... E-11 Connecting Headphones ... E-11 Connecting to a PEDAL Jack ... E-11 Accessories and Options ... - Page 9 417A-E-009A PS3000_e_01_07.p65 03.10.8, 2:22 PM...
-
Page 10: General Guide
General Guide • See page E-27 for details on the stand. POWER button VOLUME knob CONTROL button RECORD button START/STOP button METRONOME button GRAND PIANO button PS3000_e_08_15.p65 Front POWER Indicator 417A-E-010A 03.10.8, 2:22 PM... - Page 11 CAUTION • The keyboard cover is designed so it closes slowly. This is to avoid injury caused by pinching your fingers with the cover. • When using the piano, make sure that you fully open the keyboard cover so it does not close accidentally as you play. Bottom DAMPER PEDAL jack, SOFT/SOSTENUTO PEDAL jack...
-
Page 12: Power Supply
• Never twist or stretch the cord. • Should the electric cord or plug become damaged, contact your original retailer or authorized CASIO Service Provider. • Never touch the AC adaptor while your hands are wet. Doing so creates the risk of electric shock. -
Page 13: Connections
Connections Bottom IMPORTANT! • Whenever connecting external equipment, first set the VOLUME knob of the digital piano and the volume controller of the external equipment to relatively low volume settings. You can later adjust volume to the level you want after connections are complete. •... -
Page 14: Basic Operations
Basic Operations Using Tones The following procedures describe everything you need to know about selecting and using tones. Selecting a Tone This digital piano has a selection of 8 built-in tones. • The names of the tones are marked above the keyboard keys to which they are assigned. - Page 15 Touch response affects the HARPSICHORD tone only slightly, because the CHORUS original musical instrument normally produces the same sound, no matter how much pressure is applied. Digitally Sampled Tones The tones of this piano are produced using digitally recorded samples of actual musical instruments.
-
Page 16: Using The Pedals
Basic Operations Using the Pedals The digital piano is equipped with two pedal jacks, one for a damper pedal and one for a soft/sostenuto pedal. Whether the pedal connected to the SOFT/SOSTENUTO jack operates as a soft pedal or sostenuto pedal depends on what you do when you turn on the digital piano power. -
Page 17: Adjusting The Metronome Volume
Change the tempo setting as described below. • A note does not sound when you press a keyboard key while holding down the CONTROL button. • While holding down the CONTROL button, press keyboard key A (–) to decrease tempo or B increase it. -
Page 18: Using The Memory
The life of the lithium battery is five years after the date of manufacture of the piano. Be sure to contact your CASIO dealer about having the lithium battery replaced every five years. -
Page 19: Playback
Playback Use the following procedure to play back from memory. To playback from memory If you want the metronome to sound during playback of your recording, hold down the CONTROL button and press keyboard key B turn on the metronome. Setting Range : Metronome ON (black key): Metronome OFF... -
Page 20: Using Demo Tunes
Using Demo Tunes This digital piano comes with eight built-in demo tunes, each of which features one of the eight built-in tones. To play the demo tunes in sequence While holding down the CONTROL button, press the START/STOP button. • All the demo tunes play in sequence, starting from the Tune 1. -
Page 21: Keyboard Settings
This means you can change the key of the piano to suit the voice of a vocalist or the key of another musical instrument, without having to learn to play a piece in another key. Use the keys shown below to change the transpose setting. -
Page 22: Adjusting The Tuning Of The Piano
Keyboard Settings Adjusting the Tuning of the Piano You can adjust the overall tuning of the piano for play along with another instrument. You can adjust tuning within a range of ±50 cents from A = 440.0Hz. Use the keyboard keys noted below to adjust the tuning of the piano. -
Page 23: Midi
MIDI What is MIDI? The letters MIDI stand for Musical Instrument Digital Interface, which is the name of a worldwide standard for digital signals and connectors that makes it possible to exchange musical data between musical instruments and computers (machines) produced by different manufacturers. -
Page 24: Setting The Keyboard Channel
MIDI Setting the Keyboard Channel This parameter sets the channel for MIDI messages to an external device. You can set any MIDI channel in the range of 1 to 16 as the keyboard channel. To set the Keyboard Channel While still holding down the CONTROL button, select the Keyboard channel by pressing one of the keyboard keys illustrated below. -
Page 25: Program Change Number Settings
Program Change Number Settings The tones of this digital piano have two different sets of program numbers: Type 1 sequential numbers and Type 2 numbers that correspond to the General MIDI System (see “General MIDI” on page E-24). The tables below show the program numbers that are assigned, depending on whether you select Type 1 or Type 2 using the procedure under “To change the program change number type”... -
Page 26: Turning Local Control On And Off
MIDI To change the program change number type While still holding down the CONTROL button, select the Program Change Mode by pressing one of the keyboard keys illustrated below. (black key): TYPE 1 • A note does not sound when you press a keyboard key while holding down the CONTROL button. -
Page 27: Midi Data Notes
MIDI Data Notes This section provides details about the MIDI data this digital piano sends and receives. You can also find further technical information in the “MIDI Data Format” and “MIDI Implementation Chart”* at the end of this User’s Guide. * The MIDI Implementation Chart is a standard format summary of how data is transferred between this digital piano and a connected MIDI device. -
Page 28: Troubleshooting
1. Move VOLUME knob more 2. Headphones connected to the 2. Disconnect the headphones from piano. Lithium battery is dead. Contact your CASIO Service Provider for replacement of the lithium battery. 1. The digital piano Keyboard 1. Change the Keyboard Channel... -
Page 29: Assembly Instructions
Assembly Instructions Caution • This stand should be assembled by two people working together. • When assembling the stand, you should have the piano standing up with its back facing downwards, as shown in Figure 3. • Do not remove the tape securing the keyboard cover in place until assembly is complete. - Page 30 Assembly Instructions Perform the following steps. Figure 4 1. Attach side panel A to the piano. Secure the side panel in place using two screws D (Figure 4). • Be sure to tighten the screws securely. 2. Attach side panel B to the other side of the piano. Secure the side panel in place using two screws D (Figure 4).
-
Page 31: Attaching The Ac Adaptor And Pedal To The Piano
Protecting the Piano Against Tipping Over Locating the piano against a wall is normally enough to protect it against tipping over. If you need to locate it away from a wall, be sure to perform the following steps in order to ensure that it is secure. -
Page 32: Specifications
Piano + Stand: Weight Piano + Stand: • Design and specifications are subject to change without notice. E-30 PS3000_e_26_31.p65 PS-3000 88 piano keys (with touch response) 64 notes, maximum Reverb (4 types), Chorus Repeat (all tunes, one tune) Real-time recording, playback... -
Page 33: Locating The Unit
Note that you will be charged separately for lithium battery replacement. • Note that CASIO COMPUTER CO., LTD. shall not be held liable for any damages or losses or any claims by third parties arising from corruption or loss of data caused by malfunction or repair of the unit, or from battery replacement. -
Page 34: Appendix
Appendix/Apéndice Initial Power On Settings The table below shows the initial settings of the digital piano whenever power is turned on. Item Tone GRAND PIANO Reverb HALL 1 (GRAND PIANO) Chorus Off (GRAND PIANO) Touch Select MIDDLE Transpose Ajustes iniciales al activarse la alimentación La tabla siguiente muestra los ajustes iniciales del piano digital siempre que se activa la alimentación. -
Page 35: Midi Data Format
MIDI Data Format Items marked “#” are receive only. Channel Messages Note Messages Note Off Recognition Format Byte 1 Byte 2 n ... Voice Channel Number = 0H to FH (Ch1 to Ch16) kk ... Note Number = 00H to 7FH vv ... - Page 36 Channel Volume # Format Byte 1 Byte 2 n ... Voice Channel Number = 0H to FH (Ch1 to Ch16) vv ... Volume = 00H to 7FH Pan # Format Byte 1 Byte 2 n ... Voice Channel Number = 0H to FH (Ch1 to Ch16) vv ...
- Page 37 MIDI Data Format Brightness # Format Byte 1 Byte 2 n ... Voice Channel Number = 0H to FH (Ch1 to Ch16) vv ... Filter Cutoff Frequency = 00H to 7FH Portamento Control # Format Byte 1 Byte 2 n ... Voice Channel Number = 0H to FH (Ch1 to Ch16) kk ...
-
Page 38: Midi Data Format
Filter Cut Off Frequency NRPN MSB = 01H NRPN LSB = 20H Data Entry MSB = mmH mm .. Cut Off Frequency = 00H to 40H to 7FH (-64 to 0 to +63) Recognition When the instrument receives this message, the preset Filter Cut off Frequency value for the tone is changed to the value that corresponds to the data entry MSB of the received message. -
Page 39: Channel Mode Message
MIDI Data Format Pitch Bend Sensitivity # RPN MSB = 00H RPN LSB = 00H Data Entry MSB = mmH mm .. Pitch Bend Sensitivity = 00H to 18H (0 to 24 semi- tones) Recognition The data entry LSB is always ignored. Master Fine Tuning RPN MSB = 00H RPN LSB = 01H... -
Page 40: System Messages
All Note Off Format Byte 1 Byte 2 n ... Voice Channel Number = 0H to FH (Ch1 to Ch16) Recognition Receipt of the All Note Off message mutes all tones be- ing played by data received over the MIDI channels (note off). -
Page 41: Formato De Datos Midi
Formato de datos MIDI Solamente se reciben los ítemes marcados con “#” . Mensajes de canales Mensajes de nota Desactivación de nota Reconocimiento Formato 1er. byte 2do. byte n ... Número de canal de voz = 0H a FH (canal 1 al 16). kk ... - Page 42 Volumen de canal # Formato 1er. byte 2do. byte n ... Número de canal de voz = 0H a FH (canal 1 al canal 16). vv ... Volumen = 00H a 7FH Efecto panorámico # Formato 1er. byte 2do. byte n ...
- Page 43 Formato de datos MIDI Brillo # Formato 1er. byte 2do. byte n ... Número de canal de voz = 0H a FH (canal 1 al canal 16). vv ... Frecuencia de corte de filtro = 00H a 7FH. Control de portamento # Formato 1er.
- Page 44 Reconocimiento Cuando el instrumento recibe este mensaje, el valor de extinción de vibrato preajustado para el sonido es cambiado al valor que corresponde al MSB de ingreso de datos del mensaje recibido. No hay cambio cuando el valor de MSB de ingreso de datos es 40H(0). Frecuencia de corte de filtro NRPN MSB = 01H NRPN LSB = 20H...
-
Page 45: Cambio De Programa
Formato de datos MIDI Envío Un RPN es enviado siempre que una operación cambia el parámetro asignado al RPN. Sensibilidad de inflexión de altura tonal # NRPN MSB = 00H NRPN LSB = 00H MSB de ingreso de datos = mmH mm .. -
Page 46: Mensajes De Sistema
Desactivación de nota completa Formato 1er. byte 2do. byte n ... Número de canal de voz = 0H a FH (canal 1 al ca- nal 16). Reconocimiento La recepción del mensaje de desactivación de nota completa silencia todos los sonidos que están siendo reproducidos por los datos recibidos sobre los canales MIDI (desactivación de nota). - Page 47 417A-E-080A PS3000_s_MIDI Data.p65 03.10.22, 2:54 PM...
- Page 48 417A-E-081A PS3000_s_MIDI Data.p65 03.10.22, 2:54 PM...
- Page 49 417A-E-082A PS3000_s_MIDI Data.p65 03.10.22, 2:54 PM...
- Page 50 417A-E-083A PS3000_s_MIDI Data.p65 03.10.22, 2:54 PM...
- Page 51 417A-E-084A PS3000_s_MIDI Data.p65 03.10.22, 2:54 PM...
- Page 52 417A-E-085A PS3000_s_MIDI Data.p65 03.10.22, 2:54 PM...
- Page 53 417A-E-086A PS3000_es_MIDI Chart.p65 03.10.8, 2:22 PM...
- Page 54 417A-E-087A PS3000_es_MIDI Chart.p65 03.10.8, 2:22 PM...
- Page 55 This recycle mark indicates that the packaging conforms to the environmental protection legislation in Germany. Esta marca de reciclaje indica que el empaquetado conforma a la legislación de protección ambiental en Alemania. CASIO COMPUTER CO.,LTD. 6-2, Hon-machi 1-chome MA0305-B Printed in China Shibuya-ku, Tokyo 151-8543, Japan PS3000-ES-1 PS3000_es_cover.p65...
Need help?
Do you have a question about the PS-3000 and is the answer not in the manual?
Questions and answers