Novexx Solutions U-RX Operating Instructions Manual
Hide thumbs
Also See for U-RX:
- Operating instructions manual (20 pages) ,
- Operators & service manual (3 pages) ,
- User manual (32 pages)
Table of Contents
Advertisement
Quick Links
06/09 Rev. 5.02-01
Setting up, Operation
Mounting the U-RX ....................................... 2
Lifting ......................................................... 2
Mounting ................................................... 2
Checking the contents ............................... 3
Product description ....................................... 4
Operating parts ......................................... 4
Connections .............................................. 5
Warning labels on the U-RX ...................... 6
Operating buttons ...................................... 7
Basic operation ............................................. 8
Plugging in and powering up ..................... 8
Setting up the print-stop function .............. 9
OPERATING INSTRUCTIONS
U-RX
Rewinding settings ...................................10
Settings for unwinding .............................11
different diameter .....................................12
Changing fuses ........................................13
Inserting the material ...................................14
U-RX as rewinder ....................................14
U-RX as unwinder ....................................15
Cleaning the unit .........................................16
Cleaning agents .......................................16
Cleaning ...................................................16
Advertisement
Table of Contents

Subscribe to Our Youtube Channel
Related Manuals for Novexx Solutions U-RX


Summary of Contents for Novexx Solutions U-RX
-
Page 1: Table Of Contents
Inserting the material ........14 Operating parts ......... 4 U-RX as rewinder ........14 Connections ..........5 U-RX as unwinder ........15 Warning labels on the U-RX ...... 6 Cleaning the unit .........16 Operating buttons ........7 Cleaning agents ........16 Basic operation ..........8 Cleaning ...........16... -
Page 2: Mounting The U-Rx
U-RX Mounting the U-RX Lifting WARNING! The U-RX may weight up to 38 kg. Lifting it improperly can cause back injury. Two persons are required to lift it. Try to lift the unit in a safe way, for example by –... -
Page 3: Checking The Contents
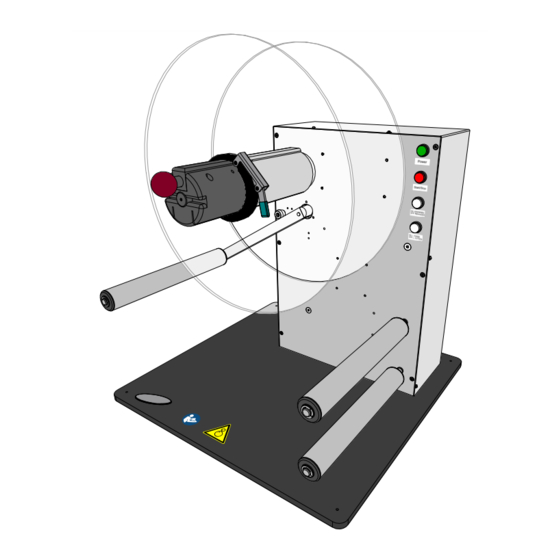
Operating position of the U-RX Checking the contents Before using the U-RX for the first time, take a few minutes to check that the following is in order: Check that the unit has not been damaged in transit. If the packaging has been dented or torn, check the contents particularly carefully for shipping damage. -
Page 4: Product Description
Displays the speed of the material rotating direction; being fed. Inside guide plate Ensures the material roll is rewound straight. Deflection rollers Ensure a wide winding angle onto the dancer arm, thereby regulating the rewinding speed. Front view of the U-RX... -
Page 5: Connections
Error signal interface to the printer. If connected with the appropriate cable, the printing stops, if an error occurs at the U-RX. This avoids paper jam. Power supply Connection to the power supply using the power cable provided. Rear view of the U-RX... -
Page 6: Warning Labels On The U-Rx
Warning labels on the U-RX WARNING Keep hands clear of rollers. A5346 Warning stickers on the base plate of the U-RX • The label shown [5] above is a warning about getting caught in the printer’s moving parts (part no. A5346). •... -
Page 7: Operating Buttons
Start/stop button/ light Unwinder/rewinder button/light Inside/outside winding button/light U-RX operating buttons Power indicator Lights up when the unit is ready for use, in other words when the power cord lamp is plugged in and the on/off switch is at “0”. Start/stop... -
Page 8: Basic Operation
For further information, refer to the service manual. 2. Ensure that power switch [2B] on the U-RX Check the mains voltage set for the U-RX on the power is set to “0” (off). socket of the unit (shown here as 230 V). -
Page 9: Setting Up The Print-Stop Function
USI signal interface (regardless, if 5 V or 24 V version). 1. Turn off the printer and the U-RX. 2. Connect the printer to the U-RX with the A7264 cable. 3. Turn both units back on. 4. Set the following parameters for the printer: •... -
Page 10: Rewinding Settings
06/09 Rev. 5.02-01 OPERATING INSTRUCTIONS Setting up, operation U-RX Rewinding settings Press the button to turn the indicator light on or off. Changes to the white buttons only become effective once the operational mode has been switched from “stopped” to “ready”. -
Page 11: Settings For Unwinding
06/09 Rev. 5.02-01 OPERATING INSTRUCTIONS Setting up, operation U-RX Settings for unwinding Press the button to turn the light on or off. • Unwinding direction “label on the outside”: the upper white button is lit, but the one below is not [5]. -
Page 12: Assembling A Rewinding Mandrel With A Different Diameter
06/09 Rev. 5.02-01 OPERATING INSTRUCTIONS Setting up, operation U-RX Assembling a rewinding mandrel with a different diameter Tools 2 mm Allen screwdriver Dismantling 1. Pull out the lock clamp [7C]. 2. Loosen the set screw [7B], unscrew [8A] completely. 3. Push out parallel pin [7A] laterally. -
Page 13: Changing Fuses
06/09 Rev. 5.02-01 OPERATING INSTRUCTIONS Setting up, operation U-RX Changing fuses Required fuse type: T2AH/250 V (Part number: A8676) WARNING! The unit operates using mains voltage! Touching electrically live parts mayexpose you to hazardous electrical currents and may lead to burns. -
Page 14: Inserting The Material
The unit should only be operated by trained users. • The U-RX can process material rolls up to about 28 kg. Using an improper lifting technique when changing the rolls can lead to back injury. Rolls that are dropped can lead to foot injury. -
Page 15: U-Rx As Unwinder
If the red light does not turn off, there has been an error. In this case, repeat step 3. U-RX as unwinder • U-RX is turned on and ready for operation (red start/stop button is lit) • Operational mode and winding direction are already set for the unit. -
Page 16: Cleaning The Unit
06/09 Rev. 5.02-01 OPERATING INSTRUCTIONS Setting up, operation U-RX Cleaning the unit WARNING! Maintenance and cleaning may result in hazardous situations. Accidents can occur by mechanical or electrical means if safety instructions are not observed! Turn off the unit and remove from the power supply prior to cleaning or...
Need help?
Do you have a question about the U-RX and is the answer not in the manual?
Questions and answers