Advertisement
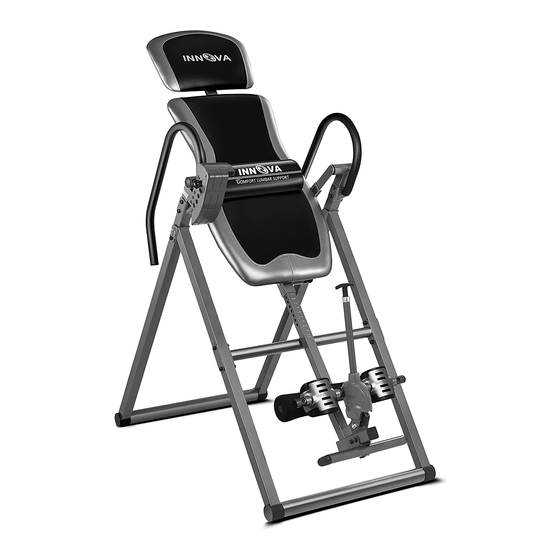
Heavy Duty Deluxe Inversion Table
Model ITX9688
WARNING:
BE SURE to read this manual in its ENTIRETY
prior to installing and using the inversion table.
DO NOT USE inversion table without the approval
of a licensed physician. Some medical conditions
may not be suitable for use with this product.
CAREFULLY READ all Warnings and Instructions
before using this inversion table. Misuse of this
equipment may result in serious injury.
BODY WEIGHT will put pressure on ankles while
inverting. New users are advised to start at lower
settings (15 or 30) and to wear athletic shoes.
DO NOT let children under the age of 13 use the
inversion table.
DO NOT allow children, bystanders, or pets
around while using this equipment.
DO NOT put hand or fingers inside the Protective
Cover for the Angle Selector Pin.
TO PREVENT unauthorized usage, it is strongly
recommended you purchase a lock to fasten the
Height Adjustment Tube to the Cross Bar.
Note:
This product is designed
to adjust from 4'10" to 6'6" with a
KEEP FINGERS, feet, clothing, and hair free of all
Maximum User Weight of
moving parts.
300 LBS
TIGHTEN ALL nuts, bolts, and screws BEFORE
using equipment.
LEAVE adequate space to invert.
Images may be slightly different
from actual product.
THIS EQUIPMENT is for indoor, household and
non-institutional use only.
Questions/Comments
Innova Products Inc. is committed to providing the best quality and customer satisfaction
for all products we distribute. If you are dissatisfied with your purchase or need assistance,
please do not hesitate to contact us.
Phone: (408) 541-1866
Monday through Friday
Email: support@innovaproductsinc.com
8:00 am – 4:00 pm Pacific Time
Owner's Manual
Version:200822JJ
Advertisement
Table of Contents

Subscribe to Our Youtube Channel
Related Manuals for Innova ITX9688


Summary of Contents for Innova ITX9688
- Page 1 THIS EQUIPMENT is for indoor, household and non-institutional use only. Questions/Comments Innova Products Inc. is committed to providing the best quality and customer satisfaction for all products we distribute. If you are dissatisfied with your purchase or need assistance, please do not hesitate to contact us.
-
Page 2: Product Warranty
PRODUCT WARRANTY One-Year Limited Liability Innova Products Inc. warrants that this product will be free from defects in materials and workmanship for a period of one year from date of purchase. This warranty applies only to the original purchaser when purchase of the product is from an authorized retailer and is for personal or household use. - Page 3 · Users can also read the condensed version of the Warnings and User’s Guidelines on the back of the Backrest. · Innova Products Inc. assumes no responsibility for personal injury or property damage sustained by or through the improper use of the Inversion Table.
- Page 4 STEP 2 PART# PART#20/19/21 22/19 STEP 3 PART#29/19/21 STEP 2 PART#26 STEP 4 PART# STEP 3 PART#20/19/21 PART#19/21/39/40/42 PART#14 M 8* 45 M8x55 M 8* 40 STEP 5 PART#41/55 ITX9700BK 0 inch 0 cm INNOVA PRODUCTS INC.2018 Hardware Pack & Manual...
-
Page 5: Step 1 - Base Frame Assembly
Rear Base Frame (8R&8L) and let it stand on the floor. Front Installation Guidance Video DOES NOT replace Owner’s Manual. Please be sure to read the Owner’s Manual in its entirety. http://innovaproductsinc.com/innova9688/ or search “Innova ITX9688 Installation Guide” on YouTube.com... - Page 6 Step 2 – Handlebars Assembly Bolt 22 must 1. Attach the Right Handlebar (6) to the be installed Rear Base Frame (8R) using 2 Bolts (20), 2 Flat Washers (19), and 2 Lock Nuts (21). Be sure to insert Bolts (20) from the inside of the frame.
- Page 7 Step 3 – Pre-Installed Backrest to Base Frame Connecting Brackets Must Point Downward Before Installation, Please NOTE: When Attaching the Pre-Installed Backrest Connecting Brackets (11R&11L) MUST be pointing downward and the Pre-Installed Backrest MUST be attached from below and up into the connecting brackets or the table will not invert properly.
- Page 8 Step 4 – Height Adjustment Tube and Ankle Holders 1. Install the Footrest (4) into the Height Adjustment Tube (3) using 2 Bolts (20), 2 Washers (19), and 2 Lock Nuts (21). For easier installation, pull up on the T Knob (37) and push the bar away from the Height Adjustment Tube (3).
- Page 9 Step 5 – Height Adjustment Tube & Protective Cover Assembly Pull the Height Adjustment Knob (38) and at the same time slide the Height Adjustment Tube (3) into the Backrest Support Tube (2) to your desired height number and release the Height Adjustment Knob (38).
- Page 10 PREPARING TO INVERT 1: INVERSION ANGLE AND HEIGHT SETTING SELECT INVERSION ANGLE Familiarize yourself with the Angle Selector Pin located on the Right Side of the Inversion Table. The positioning of the pin will determine the slope of the inversion. The 6 selections are: 15 - Slight Inversion 30 - Moderate Inversion...
- Page 11 PREPARING TO INVERT 2: SECURING YOUR ANKLES WARNING: Always wear ATHLETIC SHOES with top laces to help relieve the ankle pressure while using the inversion table and to help protect your feet while exercising. Always make sure that the U-SHAPE HOLDERS and FOAM ROLLERS are secured snugly against your ankles and that the T-KNOB is fully tightened and locked into place before you use the inversion table.
-
Page 12: How To Invert
HOW TO INVERT NOTE: Body weight will put pressure on ankles while inverting. New users are advised to start at lower settings (15 or 30) and to wear athletic shoes. Starting at a lower setting may also help you get use to the pressures applied to your feet/ankles while inverting. -
Page 13: Frequently Asked Questions (Faqs)
Frequently Asked Questions (FAQs) 1. How can I tell which is the Right Base Frame (8/9R) vs. Left Base Frame (8/9L)? There is a Warning sticker on the Right Front Base Frame (9R). There is also a protruding metal piece on the Right Connecting Bracket (11R). In this manual, Right indicates the right side while using the inversion table, not facing it. -
Page 14: Parts Listing
Parts Listing Part# Description Part# Description Bottom Tube Stopper Backrest Support Tube EVA Space Pad Height Adjustment Tube Round End Cap - Ankle Tube Footrest T-Knob Ankle Holding Tube Height Adjustment Knob Right Handlebar Bolt - M8x16mm Left Handlebar Nylon Snap Rear Base Frame - Left Cap Nut M20 Rear Base Frame - Right... -
Page 15: Exploded View
Exploded View 19 21... -
Page 16: Storage And Maintenance
2) PC Code for your item (front page of this manual) 3) Part number or installation step number in question http://innovaproductsinc.com/innova9688/ or search “Innova ITX9688 Installation Guide” on YouTube.com Installation Guidance Video DOES NOT replace Owner’s Manual. Please be sure to read the Owner’s Manual in its entirety.
Need help?
Do you have a question about the ITX9688 and is the answer not in the manual?
Questions and answers