
Related Manuals for Canon DelftDI LLS-1


Summary of Contents for Canon DelftDI LLS-1
- Page 1 User Manual: LLS-1 User manual LLS-1 Single Shot Long-Length Imaging Rev.: 14-01-2022 draft ODB-118-0070ENG 14-01-2022 Page 1 of 36...
- Page 2 User Manual: LLS-1 Blank Page ODB-118-0070ENG 14-01-2022 Page 2 of 36...
- Page 3 User Manual: LLS-1 List of revisions Equipment LLS-1 Document User manual Document number ODB-118-5070ENG revision Date Comment 05-12-2017 First version 12-02-2018 Add new wall locking system 07-09-2018 Correction of WEEE symbol 17-06-2019 Add Name Single Shot Long-Length, warning label, alignment instructions, specs and small text updates 14-01-2022 Update to MDR...
- Page 4 User Manual: LLS-1 Preface Identification Manuals are identified by a part number. The part number is printed at the bottom of the title page. Numbers printed on other pages are for internal revision control and may differ. CE Classification Product meets the relevant provisions of the European MDR (EU 2017/745 - Medical Device Regulation);...
- Page 5 User Manual: LLS-1 Symbols Symbol Meaning Remarks Location: Near or on the Symbol for separated collection of electrical Owners of marked equipment should and electronic equipment per Directive contact the organization that imported type identification plate. 2002/96 of the European Parliament and the equipment into their country, when the Council of the European Union they want to dispose of the equipment,...
- Page 6 User Manual: LLS-1 Conventions The LLS-1 has been designed to meet all safety requirements applicable to medical equipment. However, anyone using the LLS-1 must be fully aware of potential safety hazards. The information contained in this chapter is provided to help users to operate the LLS-1 safely.
- Page 7 User Manual: LLS-1 Do not modify any part of Oldelft Benelux supplied hardware, software or software configuration. Any modification, installation or running an application that has not explicitly been approved by Oldelft Benelux may WARNING: compromise patient safety and will result in termination of all warranty and service contracts.
-
Page 8: Table Of Contents
User Manual: LLS-1 About this manual ..................9 Identification label ..................10 Description of the device ................11 Intended purpose ..................14 Principles of operation of the device ............13 Precautions ....................20 Use of the device ..................22 ODB-118-0070ENG 14-01-2022 Page 8 of 36... -
Page 9: About This Manual
User Manual: LLS-1 Introduction About this manual This user manual is a guide for the operator of the LLS-1, a Long-Length X-ray system. In this manual it is assumed that the operator is a professional and trained X- ray user, who has gained sufficient knowledge to operate LLS-1 safely. In particular this document describes the daily operation. -
Page 10: Identification Label
User Manual: LLS-1 Identification label Label Location ODB-118-0070ENG 14-01-2022 Page 10 of 36... -
Page 11: Description Of The Device
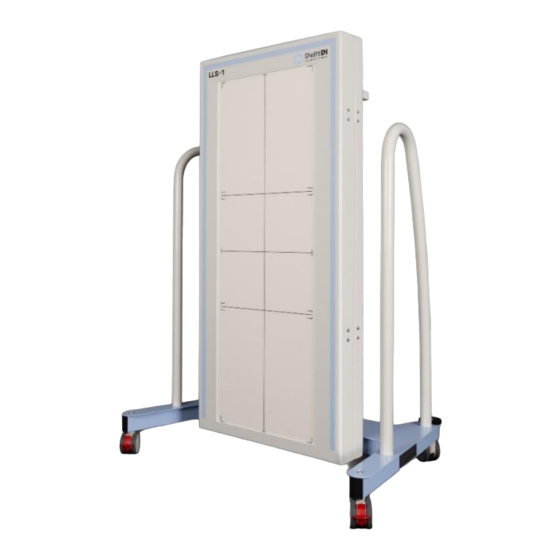
User Manual: LLS-1 General description Description of the device Product / Trade name: LLS-1 The LSS-1 is also referenced as: • One Shot Long-Length imaging Stand • Single Shot Long-Length Imaging Stand The LLS-1 is available in two variations. • Detectors CXDI 410C •... - Page 12 LSS-1 Stand with UP/Down Movement LSS-1 Docking incl. 3 detectors The Canon Detectors 3x (42x43cm) or 3x (35x43cm) don’t need any interfacing with the X-ray generator. The detector system is equipped with Ultralight Automatic Exposure Detection (AED) for automatically triggering and acquire the image during the X-ray procedure.
-
Page 13: Principles Of Operation Of The Device
The LLS-1 stand is intended to hold three Canon detectors in order to be able to make a Long-Length X-ray image in one shot, and to support the patient retaining a stable vertical position. -
Page 14: Intended Purpose
Intended purpose and patient population Intended Purpose: The LLS-1 stand is intended to hold three Canon detectors in order to be able to make a Long-Length X-ray image in a single shot, and to support the patient retaining a stable vertical position. - Page 15 User Manual: LLS-1 Instructions for Installation This product was designed and manufactured to ensure maximum safety of use. It should be installed and serviced in strict compliance with the instructions described in this Document. WARNING: If the Stitch Frame U package is open or damaged inspect the product on damage and inform the distributor.
- Page 16 User Manual: LLS-1 Setting up of the Wall bracket LLS-1 Stand • Position the LLS-1 on the supposed position and center the LLS-1 stand in relation to the X-ray tube. • FFD > 2.0m, depending of the used collimator. • Position the Wall brackets between the LLS-1 stand and the wall.
- Page 17 User Manual: LLS-1 • Remove the LLS-1 brackets and drill the Holes with an 8mm stone bit. • Clean all the dust and debris from the holes and floor. • Install Nylon Fixing Plugs into the holes and mount the wall brackets to the wall. •...
- Page 18 User Manual: LLS-1 Install Detectors in the Docking • The LLS-1 stand is prepared to work with two types Canon detectors. CXDI-410C Wireless detector. CXDI-710C Wireless detector. • The following steps needs to be done to mount the detectors in the right way.
- Page 19 User Manual: LLS-1 • Install the detectors in the right order starting with 1 (middle) 2 (lowest) 3 (highest) It’s advised to use the systems preferred detector location. Each detector is designated for a specific location within the frame. Labeling the detectors with “middle”, “upper”...
-
Page 20: Precautions
User Manual: LLS-1 Instructions for Use Precautions The user is expected to use the product (soft and hardware) in accordance with the instructions given in this manual, which must be read before the system is used. Any unauthorized deviation from the procedures laid down in this manual can affect the contractual obligations between purchaser and vendor. - Page 21 User Manual: LLS-1 Before using the LLS-1 stand ensure the stability of the frame and locking to the locking mechanism of the wall brackets. WARNING: Check if the LLS-1 stand can move up and down without bumping against any CAUTION: obstacles.
-
Page 22: Use Of The Device
User Manual: LLS-1 Use of the device Instructions for Docking, moving/Transport the LLS-1 stand Positioning the stand for use. • Position the LLS-1 stand in the Wall brackets. • Check the locking pin is positioned in the LLS-1 stand (in position) and fixates the LLS-1 stand to the wall (2x). - Page 23 User Manual: LLS-1 Instructions for Docking, moving/Transport the LLS-1 stand Prepare the stand for moving / transport • Move the Docking with the handset to the lowest position. • To unlock the LLS-1 stand, pull the locking pin up and rotate the pin, so it stays in the upper position (2x).
- Page 24 User Manual: LLS-1 Attach and remove the anti-scatter grid • Unlock and open the LSS-1 docking, using the two latches on the backside. • Rotate the latches a half turn CW. • Open the Docking. • Slide the grid frame into notch on the bottom of the frame.
- Page 25 User Manual: LLS-1 Attach and remove the anti-scatter grid • To change the height of the LLS-1 stand: • Press the appropriate button on the hand controller. Hand controller of the LLS-1 stand Check if the LLS-1 stand can move up and down without bumping against CAUTION: any obstacles.
- Page 26 User Manual: LLS-1 Alignment patient, LLS-1 and the X-ray beam • Align the X-ray center beam on the vertical centerline in the middle of the stand (left-right) • Position the patient in front of the LLS-1 stand. • Adjust the LLS-1 stand horizontal centerline in the middle of the target area.
- Page 27 User Manual: LLS-1 Capturing Single Shot Long-Length images • Select a target study order that includes a Single Shot Long-Length type protocol. • Start the examination - Click [Start Exam]. • Select the Single Shot LL type protocol. Confirm that the indicator changes to in the system status Indicators, and that a ready thumbnail appears in the target protocol.
- Page 28 User Manual: LLS-1 Arrange the patient in the correct posture. Adjust the patient’s posture so that the target body part fits appropriately in the irradiated field. See also: Alignment patient, LLS-1 and the X-ray beam. Perform exposure. Press and release the exposure switch of the X-ray generator. The indicator changes to , and then to...
- Page 29 User Manual: LLS-1 Stitched Image ODB-118-0070ENG 14-01-2022 Page 29 of 36...
- Page 30 When the stitched image cannot be generated correctly after the detector receives some mechanical shock, the calibration for stitching boundaries by service engineer is required. Contact your sales representative or local Canon dealer for details. Finish the examination. Click [End Exam]. The image data will be transferred to a preset destination such as storage servers (PACS).
- Page 31 User Manual: LLS-1 Correct wrong stitched image manually When detectors are in the wrong positions in a stand accidentally, the stitched image is not generated correctly. You can rearrange partial images manually and regenerate the correct stitched image. Rearrange partial images Click the thumbnail of the image in the wrong position, drag it onto to the correct position, and release the mouse button.
- Page 32 User Manual: LLS-1 A stitched image is regenerated. After partial images are rearranged, a stitched image is automatically generated. Preparing system for transportation For transportation of the LLS-1 stand follow the following steps: • Move the docking to their lowest position. •...
- Page 33 User Manual: LLS-1 Instructions for Maintenance The LLS-1 is maintenance free but, to help ensure the safe operation of your LLS-1, there are checks that should be performed before using the frame. Integrity checks a. Check overall condition of the LLS-1 stand. b.
- Page 34 Follow local regulations regarding disposal of devices that contain electronic parts. Specifications Specification LLS-1 Stand Type Docking with Integrated light weight columns for X-ray tube and Detector Suitable for Canon detectors: • CXDI 410C • CXDI 710C Synchronized column movement allowing easy patient positioning (up/down) Setup time <...
- Page 35 User Manual: LLS-1 Dimensions LLS-1 Stand height 1344 mm (min) ~ 1944mm (max) travel range 600mm length 1074 mm depth 691 mm weight 92 kg Top View Front View Side view – lower position Side View – higher position ODB-118-0070ENG 14-01-2022 Page 35 of 36...
- Page 36 User Manual: LLS-1 Used materials Used product description materials • High Pressure Laminate (HPL) 3mm sheet material Trespa® • Very good chemical resistance / very high impact resistance • Biocompatibility (skin contact) DIN EN 10993-5 - Non cytotoxic • S 235 JR Steel •...
Need help?
Do you have a question about the DelftDI LLS-1 and is the answer not in the manual?
Questions and answers