Table of Contents
Advertisement
Quick Links
UM-8300-Compatt 6
User Manual for the Type 8300 Compatt 6 (and
Variants)
Issue B, Rev 3
Date of Issue: 24th April 2019
Sonardyne International Limited
Blackbushe Business Park
Yateley, Hampshire
GU46 6GD, United Kingdom
920-0026
T. +44 (0) 1252 872288
F. +44 (0) 1252 876100
E. support@sonardyne.com
www.sonardyne.com
Advertisement
Table of Contents

Related Manuals for Sonardyne UM-8300-Compatt 6


Summary of Contents for Sonardyne UM-8300-Compatt 6
- Page 1 UM-8300-Compatt 6 User Manual for the Type 8300 Compatt 6 (and Variants) Issue B, Rev 3 Date of Issue: 24th April 2019 Sonardyne International Limited T. +44 (0) 1252 872288 Blackbushe Business Park F. +44 (0) 1252 876100 Yateley, Hampshire E. support@sonardyne.com GU46 6GD, United Kingdom www.sonardyne.com...
- Page 2 (“Sonardyne”) and is provided solely for the customer’s use of the Sonardyne equipment as described in this user manual and in accordance with Sonardyne’s then prevailing terms and conditions of sale. This user manual has been compiled to the best of Sonardyne’s knowledge and belief, but no representation, warranty (whether express or implied) or guarantee is made to any persons or legal entities as to the accuracy, reliability or completeness of the information contained in this user manual.
- Page 3 Contacting the Sonardyne Support Team 24-hour Emergency Telephone Helpline: +44 (0) 1252 877600 The Sonardyne 24-hour helpline is answered at the UK Headquarters during normal office hours (08:00 to 17:00). Outside these hours, your call is automatically transferred to an agency, which logs the details of your emergency and alerts the appropriate Sonardyne personnel.
-
Page 4: Table Of Contents
UM-8300-Compatt 6 User Manual for the Type 8300 Compatt 6 (and Variants) Issue B3 Contents Contacting the Sonardyne Support Team Amendment History Section 1 – Introduction 1.1 Scope of this Manual 1.2 Purpose of this Manual 1.3 Related Publications 1.4 Conventions Section 2 –... - Page 5 UM-8300-Compatt 6 User Manual for the Type 8300 Compatt 6 (and Variants) Issue B3 4.2.3 Anchor Weights 4.2.4 Strops 4.2.5 Mounting Guidelines for Endcaps with an Inclinometer Section 5 – Deployment 5.1 Introduction 5.2 Lifting 5.3 Deployment from Ship 5.3.1 Recommended Method 5.3.2 Additional Deployment methods...
- Page 6 UM-8300-Compatt 6 User Manual for the Type 8300 Compatt 6 (and Variants) Issue B3 8.11 Removal and Fitment of the Sensor Endcap 8.11.1 Sensor Endcap Removal 8.11.2 Sensor Endcap Fitment 8.12 Corrosion Removal Section 9 – Functional Test 9.1 Introduction 9.2 Test Equipment...
- Page 7 UM-8300-Compatt 6 User Manual for the Type 8300 Compatt 6 (and Variants) Issue B3 13.13.1 3,000 m Omni-Directional 13.13.2 3,000 m MF Omni-Directional Aluminium Housings 13.13.3 3,000 m MF Directional Aluminium Housings 13.13.4 3,000 m LMF Omni-Directional Aluminium Housings 13.13.5 3,000 m LMF Directional Aluminium Housings 13.13.6 3,000 m MF Omni-Directional Super Duplex Housings...
- Page 8 UM-8300-Compatt 6 User Manual for the Type 8300 Compatt 6 (and Variants) Issue B3 Figure 3–4 Mini Compatt 6 Figure 3–5 Maxi Compatt 6 Figure 3–6 Dynamic Positioning Transponder 6 Transponder Figure 3–7 Pressure Inverted Echo Sounder Transponder Figure 3–8 Autonomous Monitoring Transponder Figure 3–9 Sensor Logging Transponder...
- Page 9 UM-8300-Compatt 6 User Manual for the Type 8300 Compatt 6 (and Variants) Issue B3 Figure 9–3 Release Mechanism Fully Open Figure 9–4 Release Mechanism Fully Closed Figure 9–5 Release Mechanism Rotating Lock Figure 9–6 Release Test Figure 9–7 Manually Closing the Release Mechanism Figure 9–8 Transponder Test Report pdf...
- Page 10 UM-8300-Compatt 6 User Manual for the Type 8300 Compatt 6 (and Variants) Issue B3 Table 9–1 Test Equipment...
-
Page 11: Amendment History
UM-8300-Compatt 6 User Manual for the Type 8300 Compatt 6 (and Variants) Issue B3 Amendment History The amendment history records all amendments and additions made to this manual. Issue Revision Date Comments Section Page 30/09/2010 First Issue 30/11/2010 Minor Changes 07/12/2010 Removed Section 4.2 –... -
Page 12: Section 1 - Introduction
Section 2 "Safety" of this manual and in any related manuals are read and fully understood. 1.3 Related Publications To ensure the equipment is operated safely, a Sonardyne Safety Manual is supplied with this user manual. It is important that the Sonardyne Safety Manual is read and fully understood before proceeding with any activity on the equipment. -
Page 13: Section 2 - Safety
Section 2 – Safety 2.1 Introduction Before any activity is carried out on the equipment, it is recommended that the included Sonardyne Safety Manual and all warnings and cautions in this manual are read and fully understood. It is recommended that the operator complies with the Health and Safety Regulations applicable to the vessel and the region before operating this equipment. -
Page 14: Cautions
UM-8300-Compatt 6 User Manual for the Type 8300 Compatt 6 (and Variants) Issue B3 Risk of toxic gases and corrosive liquids. Do not stand in direct line with the end of the transponder when operating the pressure relief vent valve. Sudden release of high pressure gases could cause injury to personnel. -
Page 15: Handling Procedures For Cmos Devices And Circuit Boards
UM-8300-Compatt 6 User Manual for the Type 8300 Compatt 6 (and Variants) Issue B3 Equipment Damage. Only use the authorised battery packs in the transponder. Failure to use the correct batteries could cause damage to the equipment. Protective coating failure. Do not use any abrasive brushes or sharp tools to remove marine growth when cleaning the instrument as this will damage the protective coating and increase the risk of corrosion. -
Page 16: Section 3 - Technical Description
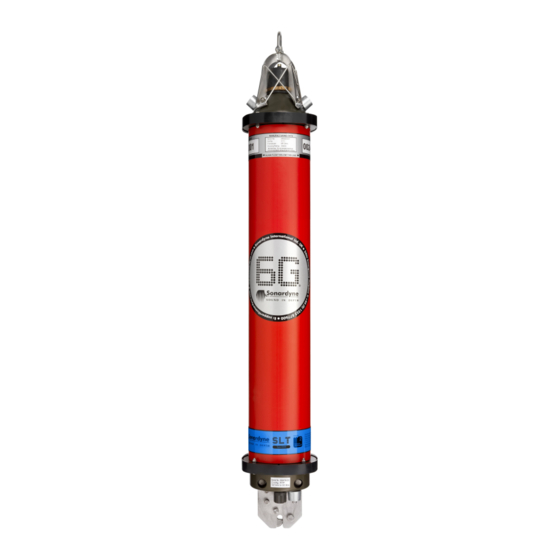
® The 8300 (and variants) series Wideband 2 transponders can be fully integrated with other ® Sonardyne products from the 6G range. This manual covers the following Wideband®2 Transponders: Type 8300 – Compatt 6 Transponder, including: Standard length... -
Page 17: Midi Compatt
UM-8300-Compatt 6 User Manual for the Type 8300 Compatt 6 (and Variants) Issue B3 Figure 3–1 Compatt 6 Transponder – Omni-Directional Figure 3–2 Compatt 6 Transponder – Directional 3.2.2 Midi Compatt 6 The Midi is approximately 784 mm overall length (depending on transducer type and sensor options). -
Page 18: Maxi Compatt
UM-8300-Compatt 6 User Manual for the Type 8300 Compatt 6 (and Variants) Issue B3 Figure 3–4 Mini Compatt 6 3.2.4 Maxi Compatt 6 The Maxi is approximately 1604 mm overall length (depending on transducer type and sensor options) and is designed for long life and/or high intensity applications. The hard-anodised pressure housing is approximately 135 mm diameter. -
Page 19: Pressure Inverted Echo Sounder (Type 8302)
UM-8300-Compatt 6 User Manual for the Type 8300 Compatt 6 (and Variants) Issue B3 Figure 3–6 Dynamic Positioning Transponder 6 Transponder 3.3.2 Pressure Inverted Echo Sounder (Type 8302) The Pressure Inverted Echo Sounder (PIES) is a long-life sensor logging node that measures the average sound velocity through a column of water from the seabed to the sea surface. -
Page 20: Modem 6 Transponder (Type 8307)
UM-8300-Compatt 6 User Manual for the Type 8300 Compatt 6 (and Variants) Issue B3 Figure 3–8 Autonomous Monitoring Transponder 3.3.4 Modem 6 Transponder (Type 8307) The Modem 6 Transponder has the same capabilities and mechanical specification as the Compatt 6 but operates as a modem only. -
Page 21: Housing Labelling
Housing Rating:3000 m Unit ID:0047D Address:2010 3.4.2 Bottom Label Variant: COMPATT 6 Type No: Type 8300 Serial No Identifies the transponder and should be quoted in all communications with Sonardyne International Ltd or their agents. Section 3 – Technical Description... -
Page 22: Table 3-1 Type Number Identification
UM-8300-Compatt 6 User Manual for the Type 8300 Compatt 6 (and Variants) Issue B3 Type and Config The Type Number is a four digit number beginning with an ‘8’ e.g. 8300 – Compatt 6 and 8305 – AMT. The following four digits indicate the depth rating, material housing size and transducer type as indicated in the table below: e.g. -
Page 23: Endcaps
UM-8300-Compatt 6 User Manual for the Type 8300 Compatt 6 (and Variants) Issue B3 Table 3–2 Address Range Address Signal Type Purpose Range 0101–1514 Wideband®1 Limited backward compatibility with 5G Wideband Transponders and GDT USBL 1701–3114 Wideband®2 Standard Navigation 6G standard 5001–6314... -
Page 24: Sensor Endcap
UM-8300-Compatt 6 User Manual for the Type 8300 Compatt 6 (and Variants) Issue B3 3.5.2 Sensor Endcap The sensor endcap is an inter-changeable Data Acquisition Sub-Assembly (DAS), and has its own label, serial number and configuration number. Figure 3–11 Example of a Sensor Endcap... -
Page 25: Connector
UM-8300-Compatt 6 User Manual for the Type 8300 Compatt 6 (and Variants) Issue B3 Note Digiquartz ® sensors can be damaged if over pressurised by a range of 20% The high accuracy inclinometers fitted have a range of ±90°. All transponder sensor endcaps have a low accuracy inclinometer fitted as standard. -
Page 26: Battery Disconnect Fob
UM-8300-Compatt 6 User Manual for the Type 8300 Compatt 6 (and Variants) Issue B3 The battery voltage and remaining capacity (%) can be checked using 6G Terminal Lite software or an iWAND hand held test unit; see Section 8.8 "Battery Maintenance". - Page 27 UM-8300-Compatt 6 User Manual for the Type 8300 Compatt 6 (and Variants) Issue B3 record of time elapsed whilst battery is installed and connected, plus estimates of the number of interrogations should be kept. Section 3 – Technical Description...
-
Page 28: Section 4 - Installation
A minimum of four times the net transponder/float buoyancy is recommended. As the anchor weight will be left on site after recovery of the transponder, Sonardyne International Ltd recommend “bio-degradable” anchor weights which take the form of gravel inside a double or triple skin of hessian sacks. -
Page 29: Strops
UM-8300-Compatt 6 User Manual for the Type 8300 Compatt 6 (and Variants) Issue B3 4.2.4 Strops The suspension rope or strop between the anchor weight and the shackle in the release mechanism should be long enough to allow ‘line of sight’ between the transponders in the array, and any topographical features in between. -
Page 30: Figure 4-1 Example Of Inclinometer Mounting Kit
UM-8300-Compatt 6 User Manual for the Type 8300 Compatt 6 (and Variants) Issue B3 The stand-off arms must be detachable to allow the Riser through the drill floor. A bucket could equally be used to hold the transponder on the end of the arm(s). -
Page 31: Figure 4-2 Example Of Stab Mounting Kit
UM-8300-Compatt 6 User Manual for the Type 8300 Compatt 6 (and Variants) Issue B3 Figure 4–2 Example of Stab Mounting Kit Section 4 – Installation... -
Page 32: Figure 4-3 Recommended Specification For Inclinometer Endcap Mounting Plate
UM-8300-Compatt 6 User Manual for the Type 8300 Compatt 6 (and Variants) Issue B3 Figure 4–3 Recommended Specification for Inclinometer Endcap Mounting Plate 4 x Plate Mounting Holes (M10 Ident Align with Endcap Notch Min. Bolt Size). 4 x Compatt 6 M8 Threaded... -
Page 33: Section 5 - Deployment
UM-8300-Compatt 6 User Manual for the Type 8300 Compatt 6 (and Variants) Issue B3 Section 5 – Deployment 5.1 Introduction Before deploying the equipment, ensure Section 2 "Safety" is read and fully understood. Deployment of a transponder can take many forms. The following sections detail common deployment methods. -
Page 34: Figure 5-2 Lowered By Vessel Crane Or A-Frame - Single Transponder Installation
UM-8300-Compatt 6 User Manual for the Type 8300 Compatt 6 (and Variants) Issue B3 Lowered by Vessel Crane or A-Frame – Single Transponder Installation The ROV grabs a one metre loop of rope attached to the top guard or the float. -
Page 35: Figure 5-4 Acoustic Release Used As A Crane Hook
UM-8300-Compatt 6 User Manual for the Type 8300 Compatt 6 (and Variants) Issue B3 Acoustic Release used as Crane Hook An acoustic release is used as a crane hook. Typically the release will need to be 15–20 metres under water for a survey boat and 35–50 metres for a semi-sub. -
Page 36: Figure 5-5 Slip Hook With Integral Swivel
UM-8300-Compatt 6 User Manual for the Type 8300 Compatt 6 (and Variants) Issue B3 Slip Hook with Integral Swivel Slip hook with integral swivel and D shackle to transponder to be released. Figure 5–5 Slip Hook with Integral Swivel Release Control Line ROV grabs One metre Loop of Rope The ROV grabs a one metre loop of rope attached to the top guard or float. -
Page 37: Section 6 - Operation
UM-8300-Compatt 6 User Manual for the Type 8300 Compatt 6 (and Variants) Issue B3 Section 6 – Operation 6.1 Introduction Before operating the equipment, ensure Section 2 – Safety is read and fully understood. 6.2 Operational Modes The transponder is activated by removing the battery disconnect fob (if fitted). -
Page 38: Modem
The inclinometers orientation is marked on the bottom endcap by a groove running up the edge of the endcap, indicating the bow or forward face and a BOW/Forward label is fitted adjacent to the groove. The Sonardyne polarity follows a standard Cartesian format: Bow Up = Pitch +ve Port Up = Roll +ve Section 6 –... -
Page 39: Section 7 - Retrieval And Storage
UM-8300-Compatt 6 User Manual for the Type 8300 Compatt 6 (and Variants) Issue B3 Section 7 – Retrieval and Storage 7.1 Introduction Before retrieving the equipment, ensure Section 2 "Safety" is read and fully understood. 7.2 Retrieval Planning It is advised that a retrieval procedure is formulated and understood by all involved before attempting to retrieve any equipment. -
Page 40: Storage
UM-8300-Compatt 6 User Manual for the Type 8300 Compatt 6 (and Variants) Issue B3 Lubricate the connectors; see Section 8.5 "Lubrication". Check and replace the battery if required; see Section 8.8.1 "Checking the Battery Condition". 7.5 Storage On completion of all procedures in the previous section the instrument can be placed in storage as described below. -
Page 41: Section 8 - Maintenance
UM-8300-Compatt 6 User Manual for the Type 8300 Compatt 6 (and Variants) Issue B3 Section 8 – Maintenance 8.1 Introduction Before any maintenance activity is carried out on the equipment, ensure Section 2 "Safety" is read and fully understood. 8.2 Retrieval from the Water See Section 7 "Retrieval and Storage". -
Page 42: Lubrication
UM-8300-Compatt 6 User Manual for the Type 8300 Compatt 6 (and Variants) Issue B3 11. Inspect the clamp ring bolts for signs of corrosion. 12. Check the plastic clamp ring insulators are in place. 8.5 Lubrication The following lubricants are recommended for maintenaing the Compatt 6. -
Page 43: Scheduled Maintenance And Recalibration
UM-8300-Compatt 6 User Manual for the Type 8300 Compatt 6 (and Variants) Issue B3 3. Using a clean finger (not a brush), smear a light film of Vaseline all over the surface of the O-ring only (do not smear Vaseline into the endcap grooves). -
Page 44: Pressure Sensor Oil Top-Up
A zero offset can be trimmed by re-computing the coefficients supplied with the sensor (contact Sonardyne Support for details). Consequently, the only calibration undertaken at Sonardyne involves a single point calibration at atmospheric pressure, to a limit of 0.01%, using a calibrated barometer to measure the atmospheric pressure to an accuracy greater than 0.01% FSD. -
Page 45: Pressure Relief Vent Valve
UM-8300-Compatt 6 User Manual for the Type 8300 Compatt 6 (and Variants) Issue B3 Further testing is then carried out at nominal 20% steps of the sensor’s pressure range, to ensure the sensor functions correctly over the full range. In order to confirm the calibration to the full accuracy of the sensor, a pressure source with an accuracy of an order of magnitude better that the accuracy of the sensor would be required;... -
Page 46: Battery Maintenance
UM-8300-Compatt 6 User Manual for the Type 8300 Compatt 6 (and Variants) Issue B3 Notes If the pressure relief vent valve is difficult to pull out, a pair of long nosed pliers can be used to assist. The pressure relief vent valve has an internal retaining screw preventing it from being fully pulled out of the endcap. - Page 47 UM-8300-Compatt 6 User Manual for the Type 8300 Compatt 6 (and Variants) Issue B3 Battery Removal 1. With the transducer endcap removed and cables disconnected, pull out the top bulkhead 2. Rotate the housing so the battery is located upper most in the housing.
- Page 48 UM-8300-Compatt 6 User Manual for the Type 8300 Compatt 6 (and Variants) Issue B3 3. Using the drawstring attached to the battery pack, slowly pull and support the battery pack out of the transponder. Battery Fitment Before fitting a new battery pack ensure there are no obstructions inside the pressure housing.
-
Page 49: Figure 8-1 Fitting The Bulkhead Plate
UM-8300-Compatt 6 User Manual for the Type 8300 Compatt 6 (and Variants) Issue B3 5. Position the bulkhead plate over the two locating pins and firmly push into position. 6. Connect the black battery connector lead to the connector and ensure the locking mechanism engages. -
Page 50: Removal And Fitment Of A Directional Transducer Endcap
UM-8300-Compatt 6 User Manual for the Type 8300 Compatt 6 (and Variants) Issue B3 11. For fitment instructions of the directional transducer endcap, see Section 8.9.2 "Fitment of the Directional Transducer Endcap"; for fitment instructions of the omni-directional transducer endcap, see Section 8.10.2 "Fitment of the Omni-Directional Transducer Endcap". -
Page 51: Figure 8-4 Removing The Guard And Bump Stop
UM-8300-Compatt 6 User Manual for the Type 8300 Compatt 6 (and Variants) Issue B3 Figure 8–4 Removing the Guard and Bump Stop Guard Clamp Rings Bump Stop Nuts, Washers and Nylon Spacers 5. With the guard and bump stop removed, remove the clamp rings. -
Page 52: Fitment Of The Directional Transducer Endcap
UM-8300-Compatt 6 User Manual for the Type 8300 Compatt 6 (and Variants) Issue B3 8. Using a lint free cloth, clean around the O-ring seals; see Figure 8–6. Figure 8–6 Cleaning the O-ring Seals (Omni-Directional shown for Reference) Note Remove the transducer endcap slowly to prevent the cables becoming detached. -
Page 53: Figure 8-7 Refitting The Guard And Bump Stop
UM-8300-Compatt 6 User Manual for the Type 8300 Compatt 6 (and Variants) Issue B3 3. Lubricate the O-rings; see Section 8.5.2 "Endcap O-Rings". 4. Position the transducer endcap next to the transponder housing. 5. Connect the white transducer endcap cable to the white connection block. -
Page 54: Removal And Fitment Of Omni-Directional Transducer Endcap
UM-8300-Compatt 6 User Manual for the Type 8300 Compatt 6 (and Variants) Issue B3 13. Secure the Bump Stop and Guard in place with the six nylon spacers, washers and nuts; see Figure 8–8. Figure 8–8 Securing the Bump Stop and Guard... -
Page 55: Figure 8-9 Removing The Clamp Rings
UM-8300-Compatt 6 User Manual for the Type 8300 Compatt 6 (and Variants) Issue B3 3. Undo and remove the nuts, washers and bolts securing the clamp rings securing the transducer to the housing see Figure 8–9. Figure 8–9 Removing the Clamp Rings 4. -
Page 56: Figure 8-11 Removing Transducer Housing Using The Opening Tools
UM-8300-Compatt 6 User Manual for the Type 8300 Compatt 6 (and Variants) Issue B3 7. Using the Opening Tools , lever the transducer endcap from the housing until the O-ring seals are exposed; see Figure 8–11. Figure 8–11 Removing Transducer Housing using the Opening Tools 8. -
Page 57: Fitment Of The Omni-Directional Transducer Endcap
UM-8300-Compatt 6 User Manual for the Type 8300 Compatt 6 (and Variants) Issue B3 10. Disconnect the battery , battery disconnect fob (if fitted) and transducer cable connectors by pressing in the connector locking pin and pulling out. 8.10.2 Fitment of the Omni-Directional Transducer Endcap 1. -
Page 58: Removal And Fitment Of The Sensor Endcap
8.11 Removal and Fitment of the Sensor Endcap 8.11.1 Sensor Endcap Removal Note Removal of the sensor endcap must only be carried out by Sonardyne trained personnel. 1. Ensure the transponder has been cleaned with clean fresh water and any marine growth removed; see Section 8.3 "Cleaning". -
Page 59: Figure 8-15 Figure 0-13 Remove The Sensor Endcap
UM-8300-Compatt 6 User Manual for the Type 8300 Compatt 6 (and Variants) Issue B3 5. Undo and remove the nuts, washers and bolts securing the clamp rings and bump stop from the sensor endcap. 6. Push the rubber bump stop free from the clamp rings and housing (use the tapered end of the Opening Tools to assist if necessary). -
Page 60: Figure 8-16 Removing The Sensor Endcap
UM-8300-Compatt 6 User Manual for the Type 8300 Compatt 6 (and Variants) Issue B3 12. Inspect the condition of the O-ring seals; replace if necessary. Figure 8–16 Removing the Sensor Endcap 13. While pulling off the sensor endcap, support the chassis without touching the printed circuit boards. -
Page 61: Figure 8-18 Disconnecting Pl1 Connection From The Interface Pcb Assembly
UM-8300-Compatt 6 User Manual for the Type 8300 Compatt 6 (and Variants) Issue B3 15. Inspect the spring gaskets for signs of damage. Replace if necessary; see Figure 8–18. 16. Disconnect the PL1 connection from the Interface PCB Assembly. Figure 8–18 Disconnecting PL1 Connection from the Interface PCB Assembly 17. -
Page 62: Figure 8-20 Disconnecting The Ribbon Cable From The Interface Pcb Assembly
UM-8300-Compatt 6 User Manual for the Type 8300 Compatt 6 (and Variants) Issue B3 18. Disconnect the Ribbon Cable from the connection point on the Interface PCB Assembly. Note An Allen key can be used to assist in lifting the ribbon cable connection from its location point. -
Page 63: Sensor Endcap Fitment
8.11.2 Sensor Endcap Fitment Note Fitting of the sensor endcap must only be carried out by Sonardyne trained personnel. 1. Before fitting a new sensor endcap, inspect the main chassis and sensor endcap mating faces for any signs of damage. -
Page 64: Figure 8-22 Abutting Chassis And Sensor Endcap
UM-8300-Compatt 6 User Manual for the Type 8300 Compatt 6 (and Variants) Issue B3 2. Position the sensor endcap so it abuts the main chassis; see Figure 8–22. 3. Feed the wiring and ribbon cable through the cut out in the main chassis. -
Page 65: Figure 8-24 Interface Pcb Connections
UM-8300-Compatt 6 User Manual for the Type 8300 Compatt 6 (and Variants) Issue B3 3. Connect the black block connection to the PL1 connection point on the Interface PCB Assembly. Figure 8–24 Interface PCB Connections Interface PCB Assembly Ribbon Cable connection point... - Page 66 UM-8300-Compatt 6 User Manual for the Type 8300 Compatt 6 (and Variants) Issue B3 5. Lubricate the 2 x O-rings on the Sensor Endcap ; see 6. Push the sensor endcap fully into the housing. Note If any resistance is felt, pull out the sensor endcap and Chassis fully and inspect the housing for any obstructions.
- Page 67 UM-8300-Compatt 6 User Manual for the Type 8300 Compatt 6 (and Variants) Issue B3 11. Viewing the housing from the other end, rotate the transponder housing so the circuitry is at the bottom of the housing. 12. Check inside the housing for any signs of obstruction.
-
Page 68: Figure 8-26 Fitting The Bulkhead Plate Over The Pins
UM-8300-Compatt 6 User Manual for the Type 8300 Compatt 6 (and Variants) Issue B3 14. Position the bulkhead plate so the machined rim is outer most. Feed the battery connection lead through the bulkhead plate ; see Figure 8–26. 15. Position the bulkhead plate over the two locating pins and firmly push into position. -
Page 69: Corrosion Removal
UM-8300-Compatt 6 User Manual for the Type 8300 Compatt 6 (and Variants) Issue B3 19. Position the transducer endcap next to the transducer housing. 20. For fitment instructions of the directional transducer endcap, see Section 8.9.2 "Fitment of the Directional Transducer Endcap"; for fitment instructions of the omni-directional transducer endcap, see Section 8.10.2 "Fitment of the Omni-Directional Transducer Endcap". -
Page 70: Section 9 - Functional Test
Terminal Lite (referred to as 6G Terminal Lite in this manual). 9.2.2 iWAND Hand Test Device The Type 8315 iWAND is a hand-held acoustic transponder test and configuration device for use with Sonardyne’s 6G product range. Section 9 – Functional Test... -
Page 71: Operational Testing
UM-8300-Compatt 6 User Manual for the Type 8300 Compatt 6 (and Variants) Issue B3 9.3 Operational Testing The following test procedures are described using 6G Terminal Lite. Many of the procedures can also be performed using the iWAND acoustic transponder; see UM-8315 “User Manual for the Type 8315 iWAND”. -
Page 72: Connecting The Dual Serial Cable
UM-8300-Compatt 6 User Manual for the Type 8300 Compatt 6 (and Variants) Issue B3 9.3.1 Connecting the Dual Serial Cable 1. Locate the round Dual Serial Cable connection point on the transponder. Figure 9–2 Dual Serial Cable 2. Using the special tool... - Page 73 UM-8300-Compatt 6 User Manual for the Type 8300 Compatt 6 (and Variants) Issue B3 3. Check the connection points are free from dirt and obstruction. 4. Position the Dual Serial Cable in the correct orientation and insert into the connection point...
-
Page 74: Checking The Wideband Acoustics
UM-8300-Compatt 6 User Manual for the Type 8300 Compatt 6 (and Variants) Issue B3 5. Make sure the Dual Serial Cable is inserted fully, and secure in place by screwing in the red plastic cover clockwise. 6. The other end of the Dual Serial Cable has the CPU and DAS connectors for use when requested by the instructions. - Page 75 UM-8300-Compatt 6 User Manual for the Type 8300 Compatt 6 (and Variants) Issue B3 2. The 6G Terminal Lite dialog box will open on the 6G Setup tab. 3. Click Connect . 4. On the Select port type drop-down list, select the computer connection port.
- Page 76 UM-8300-Compatt 6 User Manual for the Type 8300 Compatt 6 (and Variants) Issue B3 6. The 6G Setup tab displays information on the connected transponder including address, serial number, depth rating and battery status. 7. A COM log window will also open. The green writing indicates the commands sent from the software to the transponder, the blue writing is the transponders response.
- Page 77 UM-8300-Compatt 6 User Manual for the Type 8300 Compatt 6 (and Variants) Issue B3 9. An Address Selector window will open listing all available addresses for Wideband 2. Select the address for the attached device and then click OK. Note Tabs are also available to show addresses for Wideband 1 and Wideband 2+ systems.
-
Page 78: Checking The Sensor Measurements
13. If the Range Test is unsuccessful, Fail will appear next to the Range Test button. 14. If Fail appears next to the range test, move the transponder to a new location and repeat the range test. If the Range Test continues to fail contact Sonardyne Support. 15. The acoustic checks are now complete. - Page 79 UM-8300-Compatt 6 User Manual for the Type 8300 Compatt 6 (and Variants) Issue B3 1. On the 6G Setup tab, click Test Sensors Check to perform a test of all sensors installed in the transponder. 2. Acquiring appears next to the Test Sensors Check button to indicate the test is in operation.
-
Page 80: Checking The Release Mechanism
UM-8300-Compatt 6 User Manual for the Type 8300 Compatt 6 (and Variants) Issue B3 3. PASS appears next to the Test Sensors Check button to indicate the test is successful. If the test is unsuccessful the word FAIL appears. Note The Inclination values refer to the roll followed by pitch in degrees. -
Page 81: Figure 9-3 Release Mechanism Fully Open
UM-8300-Compatt 6 User Manual for the Type 8300 Compatt 6 (and Variants) Issue B3 Figure 9–3 Release Mechanism Fully Open Figure 9–4 Release Mechanism Fully Closed 3. When closed the release mechanism is held in position by a rotating lock Figure 9–5 Release Mechanism Rotating Lock... -
Page 82: Figure 9-6 Release Test
UM-8300-Compatt 6 User Manual for the Type 8300 Compatt 6 (and Variants) Issue B3 4. A functional test of the release mechanism can be carried out using 6G Terminal Lite software on the 6G Setup tab; see Figure 9–6. 5. On the 6G Setup tab, the greyed out button to the right of the Release ARM button indicates the next position of the release mechanism, for example, if the release mechanism is currently open the button shows CLOSE. - Page 83 10. If the release is in the Open position, it will be necessary to manually position the release into the closed position. 11. Screw a long screw (either an M4 or M5 screw – not supplied by Sonardyne) into the release mechanism ; see Figure 9–7.
-
Page 84: Figure 9-7 Manually Closing The Release Mechanism
UM-8300-Compatt 6 User Manual for the Type 8300 Compatt 6 (and Variants) Issue B3 Figure 9–7 Manually Closing the Release Mechanism Release Mechanism Mechanism Retaining Screw Hole Screw ‘D’ Shackle Pin 13. Click ARM to prepare the release mechanism to be operated. -
Page 85: Creating A Test Report
UM-8300-Compatt 6 User Manual for the Type 8300 Compatt 6 (and Variants) Issue B3 16. After CLOSE has been clicked, it will become greyed out and Active will appear to indicate the mechanism is moving. 17. When the release mechanism movemnet has completed, the OPEN/CLOSE button indicates the next position of the release mechanism. - Page 86 UM-8300-Compatt 6 User Manual for the Type 8300 Compatt 6 (and Variants) Issue B3 To generate a test report: 1. Click Generate Test Report on the 6G Setup tab. 2. A file location window will open to save the created Test Report pdf in the selected folder.
-
Page 87: Figure 9-8 Transponder Test Report Pdf
UM-8300-Compatt 6 User Manual for the Type 8300 Compatt 6 (and Variants) Issue B3 3. A pdf test report will now be created and saved in the designated location. The report will list all information provided on the 6G Setup tab. A tick and pass will appear alongside all the tests to indicate the transponder has passed all the tests. -
Page 88: Section 10 - Firmware Update
(and Variants) Issue B3 Section 10 – Firmware Update 10.1 Introduction The latest firmware version is displayed on the Sonardyne website product support page. Contact Sonardyne Support to obtain the updated firmware files. 10.2 Firmware Update Procedure To update the firmware: 1. - Page 89 UM-8300-Compatt 6 User Manual for the Type 8300 Compatt 6 (and Variants) Issue B3 6. On the main window click File >Open. 7. Browse to and select new firmware and then click Open. Note After the new firmware has been selected it will appear in the Bootloader home page title bar.
- Page 90 UM-8300-Compatt 6 User Manual for the Type 8300 Compatt 6 (and Variants) Issue B3 8. On the Bootloader main window, click TOC. 9. If a connection is not made successfully, an error message will appear on the Bootloader window. 10. Check all cables are connected correctly to the PC.
-
Page 91: Das Firmware Update
UM-8300-Compatt 6 User Manual for the Type 8300 Compatt 6 (and Variants) Issue B3 15. Clicking Enable Delete will activate the Erase button to appear at the end of each installed firmware (clicking Erase will remove that firmware). 16. After an old firmware version has been erased, the Start Bootload button will appear. - Page 92 UM-8300-Compatt 6 User Manual for the Type 8300 Compatt 6 (and Variants) Issue B3 Note Make a note of which comms port each connector is connected to. 4. Double click the 6G Terminal Lite icon to open the software. 5. Connect to the instrument as described in Section 9.3.2 "Checking the Wideband Acoustics"...
- Page 93 UM-8300-Compatt 6 User Manual for the Type 8300 Compatt 6 (and Variants) Issue B3 9. On the DAS Comms window, select the correct COMMS port for the DAS connection from the drop-down list and then click Select. 10. When the DASCAL program opens click Disconnect.
- Page 94 UM-8300-Compatt 6 User Manual for the Type 8300 Compatt 6 (and Variants) Issue B3 13. The firmware update will commence (this process will take approximately 4-5 minutes). 14. When the new firmware update has completed, a Reprogramming Succeeded notification will be displayed on the DAS home page window.
-
Page 95: Section 11 - Fault Diagnosis
UM-8300-Compatt 6 User Manual for the Type 8300 Compatt 6 (and Variants) Issue B3 Section 11 – Fault Diagnosis 11.1 Introduction The following section assists in diagnosis when the transponder fails to operate correctly. Each section identifies a fault, the possible cause and the recommended action to rectify the fault. - Page 96 UM-8300-Compatt 6 User Manual for the Type 8300 Compatt 6 (and Variants) Issue B3 Fault Possible Cause Action Transponder replies to Transponder disabled. Check by reading the transponder CS reply. commands, but not EC1 indicates the transponder is enabled for CIS interrogations.
-
Page 97: Section 12 - Spares
When ordering spare parts, please provide: The parts number The drawing number (if known) The description Enquiries about, or orders for spare parts should be directed to your local Sonardyne office. 12.2 Recommended Spares The following is a list of common spare parts. 12.2.1 Batteries... -
Page 98: Cables
UM-8300-Compatt 6 User Manual for the Type 8300 Compatt 6 (and Variants) Issue B3 Part Number Drawing Number Description Quantity 925-0005 Silica Gel Bag – self indicating 12.2.4 Cables Part Number Drawing Number Description Quantity 820-6795 8000-075 SubConn 8 W mating connector kit including locking sleeve... -
Page 99: Section 13 - Technical Specifications
UM-8300-Compatt 6 User Manual for the Type 8300 Compatt 6 (and Variants) Issue B3 Section 13 – Technical Specifications Note Dimensions and weights are shown below for 3,000 m rated omni-directional with release endcap (release endcap is not avaiable for Mini-Compatt 6). Weights and dimensions will vary according to transducer type and sensor endcap options;... -
Page 100: Mechanical - Maxi Compatt 6 Type 3141 With Release Endcap
UM-8300-Compatt 6 User Manual for the Type 8300 Compatt 6 (and Variants) Issue B3 13.4 Mechanical – Maxi Compatt 6 Type 3141 with Release Endcap Parameter Specification Diameter (main body) 133.5 ±2 mm (5.3 ±0.1 ins) Overall Length 1604 mm (63.2 ins) Weight in air (lithium battery) 34.8 kg (76.7 lb) -
Page 101: Battery Life Estimator
UM-8300-Compatt 6 User Manual for the Type 8300 Compatt 6 (and Variants) Issue B3 Figure 13–2 Estimated Battery Life (Standard Lithium) 13.6 6G Battery Life Estimator To determine there is sufficient battery life for operational scenarios, the 6G Battery Life Estimator is available as a new Android Battery life Estimation App. -
Page 102: Communication Port
UM-8300-Compatt 6 User Manual for the Type 8300 Compatt 6 (and Variants) Issue B3 13.7 Communication Port Type RS232 Baud Rate (default) Default 9600 baud (8 data bit, no parity, 1 bit stop) Configurable to 2400, 4800, 9600, 19200, 38400, 57600 and 115200 baud 13.8 Acoustic... -
Page 103: Responder Input Trigger (Sync Input)
UM-8300-Compatt 6 User Manual for the Type 8300 Compatt 6 (and Variants) Issue B3 Depth Measurement (High Precision Strain Gauge) Resolution 0.01 kPa 0.01 kPa 0.01 kPa 0.01 kPa 0.01 kPa Accuracy ±0.5 m ±0.3 m ±0.1 m ±0.05 m ±0.03 m... -
Page 104: Nett Upthrust
13.13 Outline Drawings 13.13.1 3,000 m Omni-Directional Common Compatt 6 and variants outline drawings are shown below. For dimensions or information on configurations not shown below, contact Sonardyne Support. 13.13.2 3,000 m MF Omni-Directional Aluminium Housings Note In the following product types, “x” denotes Compatt 6 variants, for example, standard Compatt 6: 8300, DPT: 8301, AMT: 8305 etc;... -
Page 105: Figure 13-5 Type 830X-3111 (Standard Length 3,000 M Mf Omni-Directional)
UM-8300-Compatt 6 User Manual for the Type 8300 Compatt 6 (and Variants) Issue B3 Figure 13–5 Type 830x-3111 (Standard Length 3,000 m MF Omni-Directional) Section 13 – Technical Specifications... -
Page 106: Figure 13-6 Type 830X-3121 (Maxi 3,000 M Mf Omni-Directional)
UM-8300-Compatt 6 User Manual for the Type 8300 Compatt 6 (and Variants) Issue B3 Figure 13–6 Type 830x-3121 (Maxi 3,000 m MF Omni-Directional) Section 13 – Technical Specifications... -
Page 107: Figure 13-7 Type 830X-3131 (Mini 3,000 M Mf Omni-Directional)
UM-8300-Compatt 6 User Manual for the Type 8300 Compatt 6 (and Variants) Issue B3 Figure 13–7 Type 830x-3131 (Mini 3,000 m MF Omni-Directional) Note The Type 830x-4131 (Mini 4,000m MF Omni-Directional) has the same dimensions as above. Section 13 – Technical Specifications... -
Page 108: Figure 13-8 Type 830X-3141 (Midi 3,000 M Mf Omni-Directional)
UM-8300-Compatt 6 User Manual for the Type 8300 Compatt 6 (and Variants) Issue B3 Figure 13–8 Type 830x-3141 (Midi 3,000 m MF Omni-Directional) Section 13 – Technical Specifications... -
Page 109: 3,000 M Mf Directional Aluminium Housings
UM-8300-Compatt 6 User Manual for the Type 8300 Compatt 6 (and Variants) Issue B3 13.13.3 3,000 m MF Directional Aluminium Housings Figure 13–9 Type 830x-3113 (Standard Length 3,000 m MF Directional) Section 13 – Technical Specifications... -
Page 110: Figure 13-10 Figure 0-10 Type 830X-3123 (Maxi 3,000 M Mf Directional)
UM-8300-Compatt 6 User Manual for the Type 8300 Compatt 6 (and Variants) Issue B3 Figure 13–10 Figure 0-10 Type 830x-3123 (Maxi 3,000 m MF Directional) Section 13 – Technical Specifications... -
Page 111: Figure 13-11 Type 830X-3133 (Mini 3,000 M Mf Directional)
UM-8300-Compatt 6 User Manual for the Type 8300 Compatt 6 (and Variants) Issue B3 Figure 13–11 Type 830x-3133 (Mini 3,000 m MF Directional) Note The Type 830x-4133 (Mini 4,000m MF Directional) has the same dimensions as above. Section 13 – Technical Specifications... -
Page 112: Figure 13-12 Type 830X-3143 (Midi 3,000 M Mf Directional)
UM-8300-Compatt 6 User Manual for the Type 8300 Compatt 6 (and Variants) Issue B3 Figure 13–12 Type 830x-3143 (Midi 3,000 m MF Directional) Section 13 – Technical Specifications... -
Page 113: 3,000 M Lmf Omni-Directional Aluminium Housings
UM-8300-Compatt 6 User Manual for the Type 8300 Compatt 6 (and Variants) Issue B3 13.13.4 3,000 m LMF Omni-Directional Aluminium Housings Figure 13–13 Type 830x-3115 (Standard Length 3,000 m LMF Omni-Directional) Section 13 – Technical Specifications... -
Page 114: Figure 13-14 Type 830X-3125 (Maxi 3,000 M Lmf Omni-Directional)
UM-8300-Compatt 6 User Manual for the Type 8300 Compatt 6 (and Variants) Issue B3 Figure 13–14 Type 830x-3125 (Maxi 3,000 m LMF Omni-Directional) Section 13 – Technical Specifications... -
Page 115: Figure 13-15 Type 830X-3135 (Mini 3,000 M Lmf Omni-Directional)
UM-8300-Compatt 6 User Manual for the Type 8300 Compatt 6 (and Variants) Issue B3 Figure 13–15 Type 830x-3135 (Mini 3,000 m LMF Omni-Directional) Note The Type 830x-4135 (Mini 4,000m LMF Omni-Directional) has the same dimensions as above. Section 13 – Technical Specifications... -
Page 116: Figure 13-16 Type 830X-3145 (Midi 3,000 M Lmf Omni-Directional)
UM-8300-Compatt 6 User Manual for the Type 8300 Compatt 6 (and Variants) Issue B3 Figure 13–16 Type 830x-3145 (Midi 3,000 m LMF Omni-Directional) Section 13 – Technical Specifications... -
Page 117: 3,000 M Lmf Directional Aluminium Housings
UM-8300-Compatt 6 User Manual for the Type 8300 Compatt 6 (and Variants) Issue B3 13.13.5 3,000 m LMF Directional Aluminium Housings Figure 13–17 Type 830x-3116 (Standard Length 3,000 m LMF Directional) Section 13 – Technical Specifications... -
Page 118: Figure 13-18 Type 830X-3126 (Maxi 3,000 M Lmf Directional)
UM-8300-Compatt 6 User Manual for the Type 8300 Compatt 6 (and Variants) Issue B3 Figure 13–18 Type 830x-3126 (Maxi 3,000 m LMF Directional) Section 13 – Technical Specifications... -
Page 119: Figure 13-19 Type 830X-3146 (Midi 3,000 M Lmf Directional)
UM-8300-Compatt 6 User Manual for the Type 8300 Compatt 6 (and Variants) Issue B3 Figure 13–19 Type 830x-3146 (Midi 3,000 m LMF Directional) Section 13 – Technical Specifications... -
Page 120: 3,000 M Mf Omni-Directional Super Duplex Housings
UM-8300-Compatt 6 User Manual for the Type 8300 Compatt 6 (and Variants) Issue B3 13.13.6 3,000 m MF Omni-Directional Super Duplex Housings Figure 13–20 Type 830x-3311 (Standard Length 3,000 m MF Omni-Directional) Section 13 – Technical Specifications... -
Page 121: Figure 13-21 Type 830X-3321 (Maxi 3,000 M Mf Omni-Directional)
UM-8300-Compatt 6 User Manual for the Type 8300 Compatt 6 (and Variants) Issue B3 Figure 13–21 Type 830x-3321 (Maxi 3,000 m MF Omni-Directional) Section 13 – Technical Specifications... -
Page 122: 3,000 M Lmf Omni-Directional Super Duplex Housings
UM-8300-Compatt 6 User Manual for the Type 8300 Compatt 6 (and Variants) Issue B3 13.13.7 3,000 m LMF Omni-Directional Super Duplex Housings Figure 13–22 Type 830x-3315 (Standard Length 3,000 m LMF Omni-Directional) Section 13 – Technical Specifications... -
Page 123: Figure 13-23 Type 830X-3325 (Maxi 3,000 M Lmf Omni-Directional)
UM-8300-Compatt 6 User Manual for the Type 8300 Compatt 6 (and Variants) Issue B3 Figure 13–23 Type 830x-3325 (Maxi 3,000 m LMF Omni-Directional) Section 13 – Technical Specifications... -
Page 124: 5,000 M Mf Omni-Directional Aluminium Housings
UM-8300-Compatt 6 User Manual for the Type 8300 Compatt 6 (and Variants) Issue B3 13.13.8 5,000 m MF Omni-Directional Aluminium Housings Figure 13–24 Type 830x-5211 (Standard Length 5,000 m MF Omni-Directional) Section 13 – Technical Specifications... -
Page 125: Figure 13-25 Type 830X-5221 (Maxi 5,000 M Mf Omni-Directional)
UM-8300-Compatt 6 User Manual for the Type 8300 Compatt 6 (and Variants) Issue B3 Figure 13–25 Type 830x-5221 (Maxi 5,000 m MF Omni-Directional) Section 13 – Technical Specifications... -
Page 126: Figure 13-26 Type 830X-5241 (Midi 5,000 M Mf Omni-Directional)
UM-8300-Compatt 6 User Manual for the Type 8300 Compatt 6 (and Variants) Issue B3 Figure 13–26 Type 830x-5241 (Midi 5,000 m MF Omni-Directional) Section 13 – Technical Specifications... -
Page 127: 5,000 M Mf Directional Aluminium Housings
UM-8300-Compatt 6 User Manual for the Type 8300 Compatt 6 (and Variants) Issue B3 13.13.9 5,000 m MF Directional Aluminium Housings Figure 13–27 Type 830x-5213 (Standard Length 5,000 m MF Directional) Section 13 – Technical Specifications... -
Page 128: Figure 13-28 Type 830X-5223 (Maxi 5,000 M Mf Directional)
UM-8300-Compatt 6 User Manual for the Type 8300 Compatt 6 (and Variants) Issue B3 Figure 13–28 Type 830x-5223 (Maxi 5,000 m MF Directional) Section 13 – Technical Specifications... -
Page 129: Figure 13-29 Type 830X-5243 (Midi 5,000 M Mf Directional)
UM-8300-Compatt 6 User Manual for the Type 8300 Compatt 6 (and Variants) Issue B3 Figure 13–29 Type 830x-5243 (Midi 5,000 m MF Directional) Section 13 – Technical Specifications... -
Page 130: Appendix A - Acoustic Positioning Methods
UM-8300-Compatt 6 User Manual for the Type 8300 Compatt 6 (and Variants) Issue B3 Appendix A – Acoustic Positioning Methods A.1 Long Baseline (LBL) A.1.1 Hardware A long baseline system has two parts or segments: The first segment comprises of a number of acoustic transponder beacons in an array moored in fixed positions on the seabed. -
Page 131: Beacon Numbers
UM-8300-Compatt 6 User Manual for the Type 8300 Compatt 6 (and Variants) Issue B3 A.1.3 Beacon Numbers In principle, navigation can be achieved using just two transponder beacons fixed to the seabed. However, with only two transponders, there would be ambiguity in the navigation solution because it would not be possible to determine from the measurements which side of the baseline was the correct transceiver position. -
Page 132: Baseline Distances
UM-8300-Compatt 6 User Manual for the Type 8300 Compatt 6 (and Variants) Issue B3 Figure A–2 Typical SBL System A.2.2 Baseline Distances The term ‘short’ is used as a comparison against long baseline techniques, where the baseline length usually exceeds 100 metres and can exceed 1000 metres. -
Page 133: Ultra-Short Baseline (Usbl)
UM-8300-Compatt 6 User Manual for the Type 8300 Compatt 6 (and Variants) Issue B3 A.3 Ultra-short Baseline (USBL) A.3.1 Hardware The principles of ultra-short baseline (USBL) position measurement are very similar to those of an SBL system already described. However, instead of the transducers being deployed at widely-spaced locations on the vessel, they are built into a single transceiver assembly. -
Page 134: Long / Ultra-Short Baseline (L/Usbl)
UM-8300-Compatt 6 User Manual for the Type 8300 Compatt 6 (and Variants) Issue B3 A.4 Long / Ultra-short Baseline (L/USBL) A.4.1 Hardware The long / ultra-short baseline (L/USBL) system is a special case of the USBL system. It uses USBL hardware in a configuration similar to the one described for the LBL system. -
Page 135: Dual Operation
UM-8300-Compatt 6 User Manual for the Type 8300 Compatt 6 (and Variants) Issue B3 Similarly, if Compatt beacons are used for the seabed array, the L/USBL system can command them to self-calibrate. Using Compatt beacons has the additional advantage of giving the system significantly more flexibility, in that they can be commanded to respond on any of a variety of frequencies and with any desired turn-around delay time. -
Page 136: Appendix A - Basic Principles Of Transponder Interrogation And Reply
UM-8300-Compatt 6 User Manual for the Type 8300 Compatt 6 (and Variants) Issue B3 Appendix A – Basic Principles of Transponder Interrogation and Reply The interrogation signal transmitted to a 6G® Wideband®2 Transponder is a phase-encoded acoustic signal. This signal is around 8 milliseconds in length. The acoustic transducer converts the acoustic signal into a low level alternating voltage. -
Page 137: Transceivers
Sonardyne software. A.3 Communicating via RS232 The transponder can be configured and tested via the RS232 link from a PC running the Sonardyne software. An acoustic and serial protocol document that describes the acoustic and serial commands supported by each transponder is available on request from Sonardyne Support. -
Page 138: Acoustic Navigation System Principles
UM-8300-Compatt 6 User Manual for the Type 8300 Compatt 6 (and Variants) Issue B3 A.4 Acoustic Navigation System Principles For a detailed description on acoustic navigation system principles, see Appendix A "Acoustic Positioning Methods". Appendix A – Basic Principles of Transponder Interrogation and Reply... -
Page 139: Definitions
® Sonardyne’s sixth generation technology hardware platform. Acoustic Signal Information carried by sound pressure waves through water. The Sonardyne acoustic signal has a finite length. Acoustic An instrument that emits an acoustic signal in response to an electrical signal carried to it by Responder cable. - Page 140 Issue B3 Term Definition Sonardyne 6G® transponders and transceivers use Sonardyne Wideband® 2 ultra-wide bandwidth ® Wideband signals giving a faster and robust transmission of data, more precise ranging and mitigation from multipath in shallow water and amongst steel structures in deep-water.
- Page 141 T. +44 (0)1252 872288 T. +55 22 2123 4950 T. +65 6542 1911 F. +44 (0) 1252 876100 F. +55 22 2123 4951 F. +65 6542 6937 sales@sonardyne.com brasil.sales@sonardyne.com asia.sales@sonardyne.com Houston, USA Aberdeen, UK 24/7 Emergency Helpline 8280 Willow Place Drive North Units 12–13,...
Need help?
Do you have a question about the UM-8300-Compatt 6 and is the answer not in the manual?
Questions and answers