
Subscribe to Our Youtube Channel
Related Manuals for Freewing E52


Summary of Contents for Freewing E52
- Page 1 Instruction Manual Freewing 6 Axis Gyro Stabilizer High Performance 6 Axis Airplane gyro & stabilizer Instruction Manual...
-
Page 2: Table Of Contents
Indicator LED lights and their corresponding functions Correct Direction for Gyro Installation Correct Direction for Gyro Installation Adjusting the Gain Programming card functions Programming card functions Programming card functions Material list Specification E52型6轴陀罗仪功能介绍 首次使用陀罗仪注意事项 安装方法 接收机和舵机连接方法 外置电容的使用 支持的控制舵面布局 飞行模式 指示灯和对应的功能 陀罗仪修正方向... -
Page 3: Introduction
(Ⅰ). Introduction to the Freewing E52 Gyro 1.The Freewing E52 gyro can automatically adjust the three channels of aileron, elevator, and rudder in real time to make the aircraft fly more smoothly, enhance stability during windy flight conditions, and overall enhance a pilot’ s flying experience. -
Page 4: Installation Methodology
(Ⅲ).Installation method Use screws or 3M double-sided tape to install the E52 inside the fuselage, while being sure to keep the three sides of the gyro shell parallel to the three rotation axes of the aircraft. It is critical to keep the gyroscope parallel to the installation plane and minimize the installation angle deviation. -
Page 5: Connecting The Receiver And Servos
In order to provide a stable voltage to the E52, it is necessary to the distributed large capacitor is plugged into the free channel of the gyro or receiver. Note that the red wire is the positive pole and the black wire is the negative pole. -
Page 6: Supported Control Surface Layout
Supported control surface layout ( ). Ⅵ The E52 supports conventional fixed wing, V-tail and delta wing (flying wing) mixing control. A variety of control surface layouts can be selected. For details, please connect according to the following diagram: Conventional Fixed Wing 1AIL+1ELE+1RUD... -
Page 7: Flight Modes
( ). Ⅶ The E52 provides a variety of flight modes for selection, which can be switched and selected through the three-stage switch and programming card connected to the [PPM/BUS/MOD] channel. Basic gain mode: During the Basic Gain Mode, the red LED is always on. This mode is suitable for all fixed-wing aircraft and is the most commonly used mode. -
Page 8: Indicator Led Lights And Their Corresponding Functions
If the action is not correct, shown in the arrow direction. If the action is not correct, it should be reset. it should be reset. Item No E52 Version No E52-V01... -
Page 9: Correct Direction For Gyro Installation
During this “test and verify” process, we recommend using the remote gain feature of the Freewing E52 Gyro, which enables the pilot to adjust the gain in real time from a potentiometer dial on their radio transmitter while the aircraft is still in flight. -
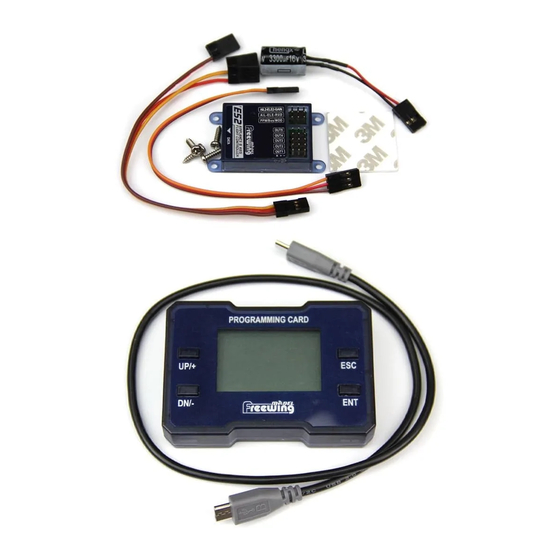
Page 10: Programming Card Functions
(Ⅺ ).Programming card function If you purchased the E52 programming card, you can design the E52 detail functions, and the settings made in the programming card will take effect after confirming and exiting. The specific functions are introduced as follows: 1.Key function... -
Page 11: Programming Card Functions
The gyro correction direction can be modified for ailerons, elevator and rudder, Gyro direction this is a common item. You can choose traditional parallel receiver, standard PPM receiver and S.BUS Receiver type receiver type. Remote control settings Channel allocation Item No E52 Version No E52-V01... -
Page 12: Programming Card Functions
Load data The saved data can be loaded onto E52 Language You can select the display language of the menu, this is a common item.
Need help?
Do you have a question about the E52 and is the answer not in the manual?
Questions and answers