
Subscribe to Our Youtube Channel
Related Manuals for Harbour HBRCG604


Summary of Contents for Harbour HBRCG604
- Page 1 60cm Gas Cooktop I N S T R U C T I O N M A N U A L IM VERSION: V1.5 | MODEL: HBRCG604 | PRODUCT CODE: 708159 | ISSUE DATE: 03/2022 SUPPORT: 1300 11 4357 | WWW.HARBOUR-APPLIANCES.COM.AU...
-
Page 2: Welcome
Welcome Congratulations on purchasing your new Gas Cooktop. All products brought to you by Harbour are manufactured to the highest standards of performance and safety and, as part of our philosophy of customer service and satisfaction, are backed by our comprehensive 3 Year In Home Warranty. -
Page 3: Table Of Contents
Contents Welcome Warranty Details General Safety Instructions Product Overview 10 Installation Instructions 18 Operation Instructions 20 Maintenance and Cleaning 22 Troubleshooting 24 Installation Certificate 25 Specifications 26 Repair and Refurbished Goods or Parts Notice 27 Warranty Returns... - Page 4 60cm Gas Cooktop REGISTER YOUR PURCHASE AT www.aldi.com.au/en/about-aldi/product-registration/ TO KEEP UP-TO-DATE WITH IMPORTANT PRODUCT INFORMATION Congratulations! You have made an excellent choice of this quality product. Our commitment to quality also includes our service. Should you, contrary to expectations, experience defects due to manufacturing faults, ALDI will provide you with a warranty against defects as follows: Warranty The product is guaranteed to be free from defects in workmanship and parts for a period of 36 months from the date of purchase.
-
Page 5: General Safety Instructions
General Safety Instructions IMPORTANT SAFETY INSTRUCTIONS READ CAREFULLY AND KEEP FOR FUTURE REFERENCE Read this manual thoroughly before first use, even if you are familiar with this type of product. The safety precautions enclosed in here reduce the risk of electric shock and injury when correctly adhered to. Make sure you understand all instructions and warnings. - Page 6 GENERAL SAFETY INSTRUCTIONS CONT. DANGER: GAS LEAKS If gas seems to leak,take the actions as follow: • Do not turn on the light. • Do not switch on/off any electrical appliance and do not touch any electric plug. Do not use a telephone. 1.
- Page 7 GENERAL SAFETY INSTRUCTIONS CONT. WARNING: OPERATING THE APPLIANCE • The appliance and its accessible parts become hot during use. • Care should be taken to avoid touching heating elements. • Only use the appliance for preparing food. • Do not modify this appliance. Burner panel is not designed to operate from an external timer or separate remote control system.
- Page 8 GENERAL SAFETY INSTRUCTIONS CONT. WARNING: CLEANING AND MAINTENANCE • Never use abrasive or caustic cleaning agents. • This appliance should only be repaired or serviced by an authorised service agent and only genuine spare parts should be used. • Before attempting to clean the appliance it should be disconnected from the mains and cooled. •...
-
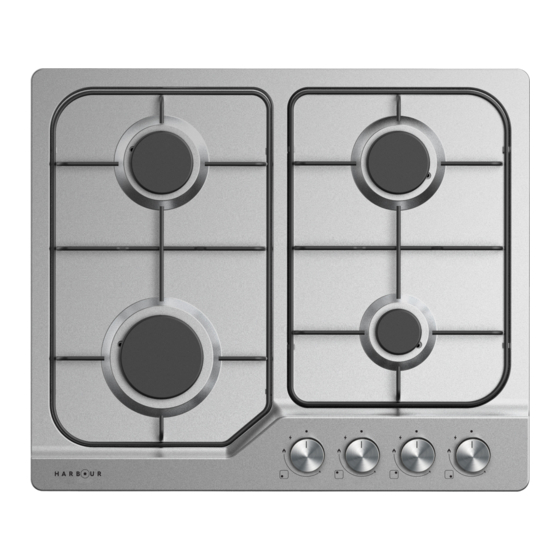
Page 9: Product Overview
Product Overview YOUR 60CM GAS COOKTOP 1. Semi-rapid Burner 4. Auxilary Burner Key: Description of the appliance 2. Rapid Burner 5. Knob Controls 3. Semi-rapid Burner ccessories Accessories: Sealing Strip (4) Sponge (4) Voltage regulator valve (1) Bracket (4) Bracket (4) Sealing Strip (4) Voltage Regulator Valve (1) Injector... -
Page 10: Installation Instructions
Installation Instructions INSTALLATION WARNINGS • Do not modify this appliance. • This appliance must be installed by an authorised technician or installer. • Prior to installation, ensure that the local distribution conditions (nature of the gas and gas pressure) and the adjustment of the appliance are compatible. - Page 11 700mm 700mm 400mm 400mm INSTALLATION INSTRUCTIONS CONT. INSTALLATION INSTRUCTIONS CONT. 400mm 400mm CLEARANCES REQUIRED POSITIONING POSITIONING WHEN FITTING THE HOB • Clearances required when fitting the cooktop with a cooker hood above. • Clearances required when fitting the cooktop with a cooker hood above. WITH A COOKER HOOD ABOVE FO 0813 FO 0813...
- Page 12 Take care that the Ignition devices and in this oper Do not leave a gap in the sealing agent or Follow the steps below to install your new Harbour Cooktop. overlap the thickness. flame supervision devices are not damaged 2.
- Page 13 nnection Gas Connection INSTALLATION INSTRUCTIONS CONT. GAS CONNECTION f power for safety and appliance protection. Close middle valve to WARNING! gas leakage. • This appliance must be installed and connected in accordance with installation regulations in force in the county in which the appliance is to be used. way from inflammable materials around appliance.
- Page 14 ■ Manufacturer’s Installation instructions ■ Local Gas Fitting Regulations ■ Municipal Building Codes ■ Refer to AS/NZS 5601.1 for Gas Installations ■ S.A.A. Wiring Code INSTALLATION INSTRUCTIONS CONT. ■ Local Electrical Regulations ■ Any other statutory regulations Preparing to install Refer to AS/NZS 5601.1 for piping size details.
- Page 15 st comply with AS/NZS nd installed in natural gas appliance with integral test point using s of the compound to the elbow may be installed INSTALLATION INSTRUCTIONS CONT. ot be subjected to abrasion, to be inspected along its the brass test point adaptor Unions compatible with proved gas thread tape or ed for gas leaks.The...
- Page 16 INSTALLATION INSTRUCTIONS CONT. ELECTRICAL CONNECTION • This appliance must be earthed. • This appliance is designed to be connected to a 220-240V, 50Hz-60Hz AC electricity supply. • The wires in the mains leads are coloured in accordance with the following code. Green/yellow = Earth Blue = Neutral Brown = Live...
- Page 17 Gas adjustment INSTALLATION INSTRUCTIONS CONT. Gas adjustment Gas adjustment GAS ADJUSTMENT • Take precautions on the operations and adjustments to be carried out when converting from one gas to another. • All work must be carried out by a qualified technician. Change the injector of the burners.
-
Page 18: Operation Instructions
Operation Instructions OPERATION OF YOUR GAS COOKTOP KNOB CONTROLS • The following symbols will appear on the control panel, next to each control knob. GAS OFF MAX. MIN. BURNER INDICATOR • The minimum setting is at the end of the anti-clockwise rotation of the control handle. •... - Page 19 OPERATION INSTRUCTIONS CONT. Safety and Energy saving advice Safety and Energy saving advice Safety and Energy saving advice SAFETY AND ENERGY SAVING ADVICE - The diameter of the bottom of the pan should correspond to that of the burner. • The diameter of the bottom of the pan should correspond to that of the burner - The diameter of the bottom of the pan should correspond to that of the burner.
-
Page 20: Maintenance And Cleaning
Maintenance and Cleaning CAUTION • Cleaning operations must only be carried out when the appliance is completely cool. • The appliance should be disconnected from your mains supply before commencing any cleaning process. • Clean the appliance regularly preferably after each use. •... - Page 21 cloth and wipe dry with a clean cloth. blocked. MAINTENANCE AND CLEANING CONT. RE-ASSEMBLE THE BURNERS AS FOLLOWS 1.Place the flame spreader ( 4 ) on to the burner cup ( 5 ) so that the ignition device and the flame supervision device extend through their respective holes in the flame spreader.The flame spreader must click into place correctly.
-
Page 22: Troubleshooting
Troubleshooting OPERATION IN CASE OF EMERGENCY In the event of an emergency you should: • Turn the cooktop off. • Switch off the appliance at the power outlet and remove the plug. • Call the Residentia Group support team on 1300 11 HELP (4357). Some minor faults can be fixed by referring to the instructions given in the Troubleshooting section below. - Page 23 TROUBLESHOOTING CONT. Issue Possible Cause Resolution Unstable flame • The burner lid is badly • Assemble the burner lid correctly assembled Gas smell • Gas leakage. • Stop using the product and close the middle valve. Open the window to ventilate.
-
Page 24: Installation Certificate
Installation Certificate CUSTOMER TO NOTE IMPORTANT: You Harbour Gas Cooktop must be installed by a licensed electrician. Improperly installed appliances can be dangerous and/or expensive to repair. Please never try to modify or repair the appliance by yourself. The details below are to be completed by the installer. Please retain your user manual with this filled-out page, along with the original purchase invoice and the Certificate of Safety (as provided by the installer) in the event that you need warranty support in future. -
Page 25: Specifications
Specifications Model: HBRCG604 Cooking Zones: 4 Zones Ignition Device: Continuous Ignition Type Rated Voltage: 220-240V~ Rated Frequency: 50Hz – 60Hz Rated Power 2.0W Product Dimensions (W × D × H): 600mm × 510mm × 95mm Gas Type: Set for Natural Gas (includes LPG conversion kit) -
Page 26: Repair And Refurbished Goods Or Parts Notice
60cm/90cm Canopy Rangehood 60cm Gas Cooktop Repair and Refurbished 7kg Clothes Dryer Repair and Refurbished Goods or Parts Notice Goods or Parts Notice Unfortunately, from time to time, faulty products are manufactured which need to be returned to the Supplier for repair. Please be aware that if your product is capable of retaining user-generated data (such as files Unfortunately, from time to time, faulty products are manufactured which need to stored on a computer hard drive, telephone numbers stored on a mobile telephone, songs... - Page 27 For an electronic copy of this manual, go to www.harbour-appliances.com.au and download a copy.
- Page 28 CERTIFICATE NO.: SGS-210521-E AN INITIATIVE BY RESIDENTIA GROUP TEL: 1300 11 4357 | EMAIL: SUPPORT@RESIDENTIAGROUP.COM.AU...
Need help?
Do you have a question about the HBRCG604 and is the answer not in the manual?
Questions and answers