
Related Manuals for Harbour HBRCC604


Summary of Contents for Harbour HBRCC604
- Page 1 60cm Ceramic Cooktop I N S T R U C T I O N M A N U A L IM VERSION: V1.3 | MODEL: HBRCC604 | PRODUCT CODE: 708161 | ISSUE DATE: 03/2022 SUPPORT: 1300 11 4357 | WWW.HARBOUR-APPLIANCES.COM.AU...
-
Page 2: Welcome
Welcome Congratulations on purchasing your new Ceramic Cooktop. All products brought to you by Harbour are manufactured to the highest standards of performance and safety and, as part of our philosophy of customer service and satisfaction, are backed by our comprehensive 3 Year In Home Warranty. -
Page 3: Table Of Contents
Contents Welcome Warranty Details General Safety Instructions Installation Instructions 14 Product Overview 16 Operation Instructions 23 Cooking Advice 24 Maintenance and Cleaning 25 Troubleshooting 28 Installation Certificate 29 Specifications 30 Repair and Refurbished Goods or Parts Notice 31 Warranty Returns... - Page 4 60cm Ceramic Cooktop REGISTER YOUR PURCHASE AT www.aldi.com.au/en/about-aldi/product-registration/ TO KEEP UP-TO-DATE WITH IMPORTANT PRODUCT INFORMATION Congratulations! You have made an excellent choice of this quality product. Our commitment to quality also includes our service. Should you, contrary to expectations, experience defects due to manufacturing faults, ALDI will provide you with a warranty against defects as follows: Warranty The product is guaranteed to be free from defects in workmanship and parts for a period of 36 months from the date of purchase.
-
Page 5: General Safety Instructions
General Safety Instructions IMPORTANT SAFETY INSTRUCTIONS READ CAREFULLY AND KEEP FOR FUTURE REFERENCE Read this manual thoroughly before first use, even if you are familiar with this type of product. The safety precautions enclosed in here reduce the risk of electric shock and injury when correctly adhered to. Make sure you understand all instructions and warnings. - Page 6 GENERAL SAFETY INSTRUCTIONS CONT. WARNING: POTENTIAL ELECTRIC SHOCK • Failure to follow the advice below may result in electrical shock or death. • Disconnect the appliance from the mains electricity supply before carrying out any work or maintenance on it. •...
- Page 7 GENERAL SAFETY INSTRUCTIONS CONT. WARNING: OPERATING THE APPLIANCE • The appliance and its accessible parts become hot during use. • Care should be taken to avoid touching heating elements. • Unattended cooking on a cooktop with fat or oil can be dangerous and may result in a fire. NEVER try to extinguish a fire with water, but switch off the appliance and then cover flame e.g.
-
Page 8: Installation Instructions
Installation Instructions GENERAL INSTALLATION WARNINGS: • The ceramic cooktop must be installed by a licenced electrician. • Please never try to modify or repair the cooktop by yourself. • The ceramic cooktop shall not be mounted to cooling equipment, dishwashers and rotary dryers. •... - Page 9 INSTALLATION INSTRUCTIONS CONT. Under all circumstances, make sure the Ceramic Cooktop is well ventilated and the air inlet and outlet is not blocked. Ensure the Ceramic Cooktop is in good working state (as shown below). NOTE: Ensure that there is a minimum 760mm between the cooktop and an overhanging surface or rangehood. Wall Min.
- Page 10 INSTALLATION INSTRUCTIONS CONT. AFTER INSTALLING THE COOKTOP • The power supply cable is not accessible through cupboard doors or drawers. • There is adequate flow of fresh air from outside the cabinetry to the base of the cooktop. • If the cooktop is installed above a drawer or cupboard space, a thermal protection barrier is installed below the base of the cooktop.
- Page 11 INSTALLATION INSTRUCTIONS CONT. CAUTIONS: • The Ceramic Cooktop must be installed by qualified personnel or technicians. We have professionals at your service. Never conduct the operation by yourself. Please contact our Service team on 1300 11 HELP (4357) to allocate you a qualified technician. •...
- Page 12 INSTALLATION INSTRUCTIONS CONT. CONNECTING THE COOKTOP TO THE MAINS POWER SUPPLY IMPORTANT: This cooktop must be connected to the mains power supply only by a suitably qualified person. Before connecting the cooktop to the mains power supply, check that: • The domestic wiring system is suitable for the power drawn by the cooktop. •...
- Page 13 INSTALLATION INSTRUCTIONS CONT. IMPORTANT: If the total number of heating unit of the appliance you choose is not less than 4, the appliance can be connected directly to the mains by single-phase electric connection, as shown below. • If the cable is damaged or to be replaced, the operation must be carried out the by after-sale agent with dedicated tools to avoid any accidents.
-
Page 14: Product Overview
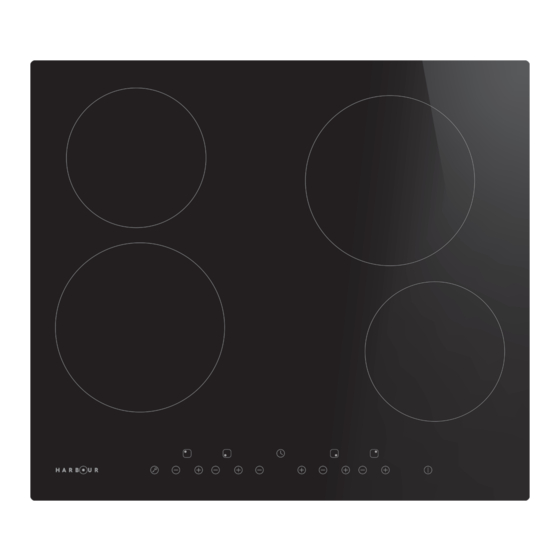
Product Overview THE CERAMIC COOKTOP Key: 1. Max. 1200W zone Not shown but also included: 2. Max. 1800W zone • 4 × Screws 3. Max. 1800W zone • 4 × Brackets • 1 × Instruction manual 4. Max. 1200W zone 5. - Page 15 PRODUCT OVERVIEW CONT. CONTROL PANEL 1. ON/Off control Key: 2. Power regulating controls 3. Timer regulating controls 4. Child lock BEFORE USING YOUR NEW CERAMIC COOKTOP Read this guide, taking special note of the ‘General Safety Instructions’ section. Remove any protective film that may still be on your Ceramic Cooktop.
-
Page 16: Operation Instructions
Operation Instructions OPERATION OF YOUR CERAMIC COOKTOP TOUCH CONTROLS • The controls respond to touch, so you don’t need to apply any pressure. • Use the ball of your finger, not just the tip. • You will hear a beep each time a touch is registered. •... - Page 17 OPERATION INSTRUCTIONS CONT. USING YOUR CERAMIC COOKTOP 1. Touch the ON/OFF power control. After 2. Place a suitable pan on the cooking zone the power is on, the buzzer will beep once that you wish to use. and all the displays show either “–” or Make sure the bottom of the pan and “––”...
- Page 18 OPERATION INSTRUCTIONS CONT. WHEN YOU FINISH COOKING 1. Turn the cooking zone off 2. Turn the whole cooktop by scrolling down to “0” or off by touching the ON/OFF simultaneously touching power control. ‘–’ and ‘+’ buttons together. 3. Beware of hot surfaces ‘H’...
- Page 19 OPERATION INSTRUCTIONS CONT. TIMER CONTROL You can use the timer in two different ways: • Cooking zone auto-off You can use the timer to turn one or more cooking zones off after the set time is up. The timer off maximum is 99 minutes. •...
- Page 20 OPERATION INSTRUCTIONS CONT. SETTING THE TIMER TO TURN ONE OR MORE COOKING ZONES OFF Setting one cooking zone: 1. With the desired zone turned on, set 2. To cancel the timer, touch the ‘–’ or ‘+’ the time by touching the ‘–’ or ‘+’ timer buttons together and the “- -”...
- Page 21 OPERATION INSTRUCTIONS CONT. Repeat steps 1–4 on page 20 if you want to set the timer for more than one cooking zone: If more than one cooking zone is using the timer function, the indicator will display the shortest time. Example: If Zone #1 has a setting time of 5 minutes and Zone #2 has a setting time of 15 minutes, then the timer will display “5”.
- Page 22 OPERATION INSTRUCTIONS CONT. OVER-HEAT PROTECTION When excessive temperature is detected, the zones will switch off automatically as a safety measure. AUTOMATIC SHUTDOWN As a safety feature, this cooktop has an “automatic shutdown” feature. This occurs whenever you forget to switch off a cooking zone. The default shutdown times are shown in the table below: Power level Default working timer (hour)
-
Page 23: Cooking Advice
Cooking Advice IMPORTANT: Take care when frying as oil and fat heat up very quickly. At extremely high temperatures, oils and fat will ignite spontaneously and this presents a serious risk of fire. COOKING TIPS • When food comes to the boil, reduce the temperature setting. •... -
Page 24: Maintenance And Cleaning
Maintenance and Cleaning IMPORTANT: Take care when frying as oil and fat heat up very quickly. At extremely high temperatures, oils and fat will ignite spontaneously and IMPORTANT: • When the power to the cooktop is switched off, there will be no ‘hot surface’ indication but the cooking zone may still be hot! Take extreme care. -
Page 25: Troubleshooting
Troubleshooting OPERATION IN CASE OF EMERGENCY In the event of an emergency you should: • Turn the cooktop off by pressing the “On/Off” button. • Switch off the appliance at the power outlet. • Call the Residentia Group support team on 1300 11 HELP (4357). Some minor faults can be fixed by referring to the instructions given in the Troubleshooting section below. - Page 26 TROUBLESHOOTING CONT. Issue Possible Cause Resolution Fan noise coming from A cooling fan built into your This is normal and needs no action. the Ceramic Cooktop. Ceramic Cooktop has come on Do not switch the power to the to prevent the electronics from Ceramic Cooktop off at the wall while the overheating.
- Page 27 TROUBLESHOOTING CONT. SPECIFIC FAILURES AND POSSIBLE SOLUTIONS Failure Possible Cause Resolution The LED does • No power supplied. • Check the connection. not come on • The accessorial power board and the • Replace the accessorial power when unit is display board connected failure.
-
Page 28: Installation Certificate
Installation Certificate CUSTOMER TO NOTE IMPORTANT: Your ceramic cooktop must be installed by a licenced electrician. Improperly installed ceramic cooktops can be dangerous and/or expensive to repair. Please never try to modify or repair the cooktop by yourself. The details below are to be completed by the installer. Please retain your user manual with this filled-out page, along with the original purchase invoice and the Certificate of Safety (as provided by the installer) in the event that you need warranty support in future. -
Page 29: Specifications
Specifications Model: HBRCC604 Cooking Zones: 4 Zones Total Power: 5500-6600W Rated Voltage: 220-240V~ Rated Frequency: 50Hz or 60Hz Product Dimensions (W × D × H): 590mm × 520mm × 55mm Built-in Dimensions (A × B): 560mm × 490mm Other Features:... -
Page 30: Repair And Refurbished Goods Or Parts Notice
60cm Ceramic Cooktop 60cm/90cm Canopy Rangehood Repair and Refurbished 7kg Clothes Dryer Repair and Refurbished Goods or Parts Notice Goods or Parts Notice Unfortunately, from time to time, faulty products are manufactured which need to be returned to the Supplier for repair. Please be aware that if your product is capable of retaining user-generated data (such as files Unfortunately, from time to time, faulty products are manufactured which need to stored on a computer hard drive, telephone numbers stored on a mobile telephone, songs... - Page 31 For an electronic copy of this manual, go to www.harbour-appliances.com.au and download a copy.
- Page 32 CERTIFICATE NO.: SGS-180727-EA AN INITIATIVE BY RESIDENTIA GROUP TEL: 1300 11 4357 | EMAIL: SUPPORT@RESIDENTIAGROUP.COM.AU...
Need help?
Do you have a question about the HBRCC604 and is the answer not in the manual?
Questions and answers