Table of Contents
Advertisement
Quick Links
Advertisement
Table of Contents

Related Manuals for DOREGRILL D-ONE


Summary of Contents for DOREGRILL D-ONE
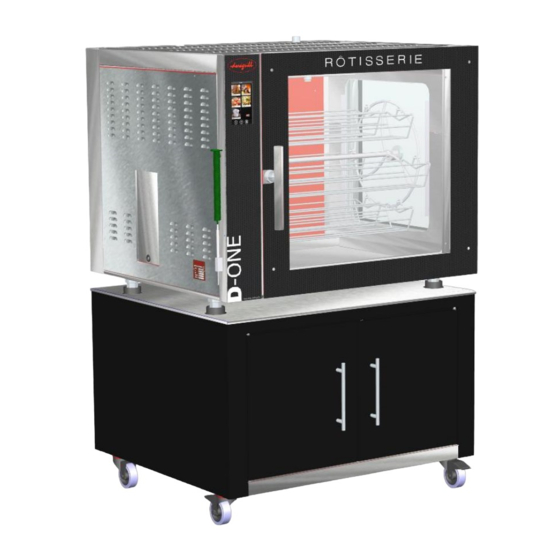
- Page 1 USER MANUAL PROFESSIONAL ROTISSERIE MULTIFUNCTIONAL D-ONE...
- Page 2 Thank you for choosing our equipment, the reliability, handling and presentation of which we have been refining for over 60 years. Always at the forefront of progress in its specialty, DOREGRILL offers you rotisseries in which we use our expertise to best meet your expectations, combining both style, comfort and safety of use.
- Page 3 USER INFORMATION...
-
Page 4: Table Of Contents
TABLE OF CONTENTS GENERAL ……………………………………………………………………………………………………………………………. 1. MARKING …………………………………………………………………………………………………………………6 1.1 IMPORTANCE OF THE MANUAL …………………………………………………………………………………………… ..6 1.2 GUARANTEE ……………………………………………………………………………………………………………… ..7 1.3 RESERVED RIGHTS ……………………………………………………………………………………………… ..7 2 TECHNICAL DESCRIPTION……………………………………………………………………………………………… 2.1 GENERAL DESCRIPTION . …………………………………………………………………………………….… ..8 2.2 TOUCH SCREEN ……………………………………………………………………………………………………..8. 2.3 MAIN MENU………………………………………………………………………………………………………...8 2.4 CATEGORIES MENU ………………………………………………………………………………………………... - Page 5 8.2.2 OPENING OF THE TECHNICAL BOX AND THE EXTERIOR REAR BOTTOM ..........21 9 ILLUSTRATED COMPOSITION TABLE ......................9.1 PLATE 1 _ ELECTRICAL DIAGRAM D-ONE HEATER .................23 9.2 PLATE 2 _ ELECTRICAL DIAGRAM D-ONE CLEANING ................23 9.3 PLATE 3 _ BUTTON EXPLODED ..........
-
Page 6: Marking
An integral part of our rotisseries, this manual, valid for the D-One model, must remain at the disposal of its operators. The manufacturer is not responsible for any damage caused to people, animals and property by misuse of the equipment, or non- compliance with the rules described in this manual. -
Page 7: Guarantee
1.4 Rights Reserved All rights reserved concerning this technical manual << Instructions for use of swing rotisseries D-One series self-cleaning machines>> remain the property of the manufacturer. No part of the manual can be reproduced and distributed without written permission from it. -
Page 8: Main Menu
2.3 Main Menu Active lighting Lighting Active motor rotation Motor rotation Washing mode (see Wash mode cleaning menu) 2.4 Menu Categories Each category has several choices. Each choice corresponds to a time and temperature value (see cooking characteristics tables on page 18) Sub-menus (Category access) -
Page 9: Manual Menu
2.5 Menu Categories - Set the desired temperature (set point) using the keypad - Set the desired time using the keys - Activate cooking using the button Key validated and cooking activated Key validated and motor activated - Activate the motor using the key - When cooking is activated the set point remains orange. -
Page 10: Transport And Handling
Warning to check if there is enough product before starting the cleaning process (see diagram for procedure and replacement of the product container) page DOREGRILL declines all responsibility if another cleaning product was used other than DECAONE product recommended for used within this rotisserie, and your product guarantee would not be valid. -
Page 11: Installation And Start-Up
INSTALLATION AND START-UP General guidelines The installation of the rotisserie in question (positioning and connection) must be carried out by authorised personnel with the technical and professional skills required to perform this installation in compliance with the standards in force in the country of which use of this type of equipment applies. -
Page 12: Water Connection
Preparation 400 + Neutral + Earth Operating voltage Water connection It is imperative to provide a cold water supply (diameter 15/21) near the rotisserie. The rotisserie will be connected to the network using a conventional flexible hose fitted with a standard female "sprinkler" type connection. IMPORTANT: It is imperative to install a softener upstream in order to avoid scale deposits and preserve the water solenoid valve and the shielded elements. -
Page 13: Cooking Chickens
- Validate the appropriate choice - Start cooking MAINTENANCE The D-One rotisserie was designed to make the chore of cleaning easy. - Regular daily cleaning is recommended. - Scotch brite stainless steel makes it difficult to catch grease. - The entire heating and ventilation process located in the bottom part of the rotisserie results in homogenization of the heat in the tank - - The presence of independent double glazing ensures both a panoramic view of the cooking area and direct accessibility. -
Page 14: Cleaning The Front Double Glazing
Cleaning the front double glazing - The separate opening of the two front windows allows cleaning of all glass surfaces. Cleaning the double glazing on the side - If necessary, cleaning of the side windows is possible by unscrewing the 4 screws that hold the exterior window (the maneuver must be done with delicacy) Automatic cleaning cycle - Two choices : A short cycle for a cleaning of about an hour... -
Page 15: Thermal Shock
6 TEMPERED GLASS WINDOWS - Main causes of glass breakage 6.1 Thermal shock - There cannot be a difference greater than 80 ° C between two precise points on the ice. When this is the case the breaking point is reached and the ice can then explode instantly. Ex: cleaning a hot ice cream with a cold sponge 6.2 Blows to the ice - When a blow is accidentally struck on a tempered glass window, more precisely on the edge or the edge of this one, a very small... - Page 16 INFORMATION FOR THE OPERATOR...
-
Page 17: Characteristics
CHARACTERISTICS TECHNIQUES D-ONE DIMENSIONS Overall width 1200 mm Overall depth 1070 mm Height 980 mm - From the rotisserie block 1770mm - Mounted on trolley or cabinet Total empty weight TECHNICAL COMPONENTS Swings Number Useful length 725 mm Drive motors... - Page 18 COOKING PROGRAMMING CHARACTERISTICS PRODUCT (top display) T ° C Oven Cooking Time T ° C Cooking Roast chickens 220 ° C 600g to 1 Kg 80 ° C 30 mins 220 ° C 80 ° C 1 Kg to 1.5 Kg 40 mins 220 °...
- Page 19 MAINTENANCE...
-
Page 20: Maintenance / After-Sales Service
MAINTENANCE / AFTER-SALES SERVICE Any interventions on your device must be carried out by a qualified professional. Location of damage The purpose of this part is to list the main failures that any user is likely to meet, give the possible causes and provide the means to rectify these without outside intervention. -
Page 21: Opening Of The Technical Box And The Exterior Rear Bottom
8.2.1 Opening the technical box and the outer bottom The technical chest is located on the left hand side of the rotisserie, behind the control panel. The rear part can also be dismantled, allowing access and repair of the various components of the electricity and water circuits. This operation should only be carried out by qualified personnel. -
Page 22: Illustrated Composition Table
ILLUSTRATED COMPOSITION TABLE... -
Page 23: Plate 1 _ Electrical Diagram D-One Heater
9 ILLUSTRATED COMPOSITION TABLE Plate 1 - D-One heater electrical diagram Plate 2 - Electrical diagram D-One Cleaning... -
Page 24: Plate 3 _ Button Exploded
9.3 Plate 3 - Exploded view of button CI... -
Page 25: Plate 4 _ Engine Chart
9.4 Plate 4 - Engine PCB exploded view... -
Page 26: Plate 5 - Rear Blast
9.5 Plate 5 - Back view... -
Page 27: Plate 6 - Glass Side View
Plate 6 - Exploded view of the mirrors side Plate 7 - Front view of the front window exploded view... -
Page 28: Plate 8 _ Rear Exploded View Front Window
Plate 8 - Rear view of the front window exploded view Plate 9 - Exploded view of the side ice... -
Page 29: Plate 10 - Interior Blast
9.10 Plate 10 - Interior exploded view... -
Page 30: Plate 11 - Handle Break
9.11 Plate 11 - Exploded view of the handle... -
Page 31: Plate 12 - Steam System Breakage
9.12 Plate 12 - Exploded view of the steam system... -
Page 32: Plate 13 - Cleaning System Breakdown
9.13 Plate 13 - Exploded view of the cleaning system... -
Page 33: Recommendations
10 RECOMMENDATIONS 10.1 Unpacking Check whether the packaging is correct and does not show signs of blows. Remove the delivery slip from the plastic bag. Remove the straps from the packaging. Open the box and remove it upwards. Remove the protective packaging and retaining studs and the straps but leave the plastic film... - Page 34 Placing the D-ONE rotisserie on its cart or cabinet Evacuation elbow Forklift forks Feet Handle After removing the carton and straps but leave the protective film. Adjust the forks of the lift truck to 750 mm outside (see diagram). Place the forks parallel to the ground.
-
Page 35: Change Of Product Container
10.2 Changing the cleaning container NB: Be careful to adjust the feet to be at the same height as the service (see accessories) a) Open hatch on the left side of the rotisserie. b) Position a table or servant at height. c) Place the new Deca-One container on the table and remove the plug. -
Page 36: Evacuation Tube Positioning
10.3 EVACUATION SYSTEM 10.3.1 supplies Exhaust system nomenclature Designation Flat D-One Water heater Mechanically welded stainless steel T fitting Ø40 stainless steel elbow PVC T connector Ø40 PVC tube Lg 455mm PVC tube Ø40 Lg 305 mm PVC tube Ø40 Lg 155 mm PVC tube Ø40 Lg 45 mm PVC tube... -
Page 37: Disassembly Tube Evacuation
10.4 Operation - Drip recovery of overpressure and emptying of the water heater - Connection to general evacuation... -
Page 38: Water Accessories Water Treatment
WATER TREATMENT ACCESSORIES Cartridge Support Head Cartridge Softener Softener Assembly of the whole Softener Cartridge Softener Cartridge 11.1 Positioning of the 20 Amps socket, water tap with softener and evacuation tube. -
Page 40: Dessert Accessories
DESSERT ACCESSORIES (option) Receptacle Flat grid support GN 1/1 container Wire rack Support with grids Support with gastro containers... -
Page 41: Desert
Mobile Table... -
Page 42: Receptacle Positioning In Rotissoire
POSITIONING ACCESSORIES SERVED IN THE ROTISSERIE 13.1 Receptacle positioning After removing the swings, position the grid support receptacle in the bottom of the dish in the center thereof. Receptacle... -
Page 43: Rotisserie Dessert Presentation
13.2 Rotisserie serving presentation Tray Feet NB: When mounting the rotisserie on the cabinet or on the trolley support, it is imperative to adjust the 4 feet of the rotisserie, (screw or unscrew) to the height of the serving tray (be careful to put the bib slightly above the seal so as not to deteriorate it prematurely). - Page 44 Push the grid support on the receptacle in the notches provided for this purpose Then remove the service and close the door The rotisserie is ready for use.
Need help?
Do you have a question about the D-ONE and is the answer not in the manual?
Questions and answers