Table of Contents
Advertisement
Quick Links
Advertisement
Table of Contents

Subscribe to Our Youtube Channel
Related Manuals for Bartscher 1505393


Summary of Contents for Bartscher 1505393
- Page 1 1505393...
- Page 2 Bartscher GmbH Phone: +49 5258 971-0 Franz-Kleine-Str. 28 Fax: +49 5258 971-120 Service hotline: +49 5258 971-197 D-33154 Salzkotten Germany www.bartscher.com 2806DM0074 Version: 1.0 Date of preparation: 2021-12-16...
-
Page 3: Table Of Contents
List of Components of the Appliance ............. 12 Installation Instructions ................14 Installation ....................14 Gas Connection ..................15 Operating Instruction ................... 18 Cleaning ...................... 21 Safety Instructions for Cleaning ............. 21 Cleaning ....................21 Possible Malfunctions .................. 23 Disposal ....................... 26 1505393 1 / 28... -
Page 4: Safety
You must strictly follow the instructions, to prevent accidents, personal injuries and property damages. DANGER! The signal word DANGER warns against hazards that lead to severe injuries or death if the hazards are not avoided. 2 / 28 1505393... -
Page 5: Safety Instructions
– immediately close the gas control knob(s) and the main gas valve; – provide for sufficient venting of rooms: open wide all doors and windows; – do not light up any open flame, quench flames; – do not smoke; 1505393 3 / 28... - Page 6 Never place flammable materials near the appliance (e.g., newspapers, shopping bags, plastic bags, petrol, etc.). • When the appliance is operated, provide for good ventilation: open windows or switch a fan on, so that air might circulate. 4 / 28 1505393...
- Page 7 • Close the gas shut-off valve should the fire emerge. Never put the flame out with water; to suppress fire, use a lid or a fire-blanket. Following extinction of fire, ensure sufficient fresh air inflow. 1505393 5 / 28...
- Page 8 The appliance may only be used when it is clean. • Use only original spare parts. Never attempt to repair the appliance on your own. • Do not introduce any changes in the appliance nor modify it. 6 / 28 1505393...
-
Page 9: Intended Use
The appliance may only be used to perform tasks described in this instruction manual. The following is an unintended use: – preparation of food products other than rice, – pouring and heating up flammable, harmful, and quickly evaporating liquids or materials, etc. 1505393 7 / 28... -
Page 10: General Information
Declaration of Conformity The appliance meets the currently applicable standards and guidelines of the European Union. We confirm the above in the EC Declaration of Conformity. We may provide relevant Declaration of Conformity upon request. 8 / 28 1505393... -
Page 11: Transport, Packaging And Storage
– in a location protected against mechanical shocks. In the case of extended storage (over three months), make sure you check the condition of the packaging and the parts regularly. If needed, replace the packaging with a new one. 1505393 9 / 28... -
Page 12: Technical Data
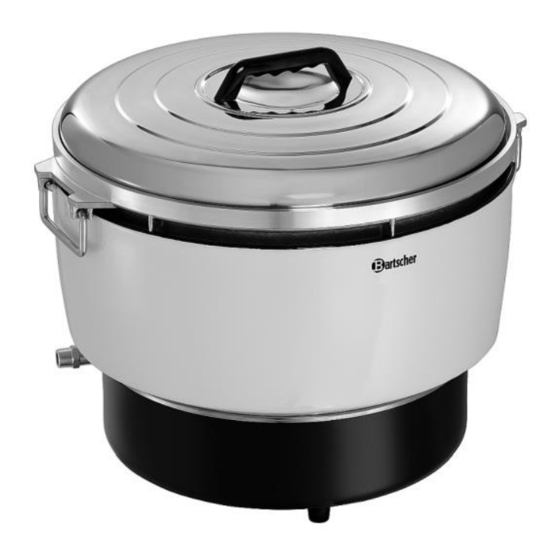
Characteristics of the inner pot: side handles, folding • The set includes: – measuring beaker – rice spoon • Important indication: – For use in well-ventilated rooms or outdoors only – Gas connection set not included in the delivery 10 / 28 1505393... - Page 13 Technical Data Name: Gas rice cooker 10L 1505393 Art. No.: Material: aluminium, enameled, stainless steel aluminium, heat-resistant, can be Inner pot version: removed Volume, in l: Quantity of rice, in portions: Control pressure, in mbar: Connected load: Dimensions (W x D x H), in mm:...
-
Page 14: Functions Of The Appliance
11. Feet (4 pcs) 12. Base 13. Gas connected stub 14. Pilot flame sight glass 15. Ignition 16. Temperature maintaining mode switch 17. Cooking mode switch 18. Gas cut-off valve 19. Measuring beaker 20. Rice spoon 12 / 28 1505393... - Page 15 Technical Data Fig. 1 1505393 13 / 28...
-
Page 16: Installation Instructions
Place the appliance in a way making the connections easily accessible, so that they may be quickly disconnected if such a need arises. • The appliance should be placed on surfaces that are: – even, with sufficient bearing capacity, resistant to water, dry and resistant to high temperatures; 14 / 28 1505393... -
Page 17: Gas Connection
– connect suitable gas hose (a), featuring suitable diameter, to the gas connection stub (13) of the appliance; – bind the gas hose (a) and the gas connection stub (13), using a wire (c). Fig. 2 1505393 15 / 28... - Page 18 The ignition flame should light up. The red temperature maintaining mode switch (WARMING) controls the ignition flame and in ON state it is covered with flame (FIRST IGNITE). Pressing the ignition (FIRST IGNITE) also activates and uncovers the temperature maintaining mode 16 / 28 1505393...
- Page 19 'Possible Malfunctions'. – When removing the inner pot, make sure that the red temperature maintaining mode switch (WARMING) is pushed up until it engages and is covered by ignition (FIRST IGNITE). Then, it is in OFF position. 1505393 17 / 28...
-
Page 20: Operating Instruction
Do not block the ignition with water or rice, as this leads to unsuccessful ignition. • The burner should always be kept dry. • To avoid incomplete gas burning, do not cover the top side of the appliance. • Never leave the operating appliance unattended. 18 / 28 1505393... - Page 21 4. Insert the inner pot in the wind screen. ATTENTION! Wet bottom of the inner pot leads to pour ignition or clogging of the burner, and thus to inefficient burning. Before inserting in the appliance, clean and dry the bottom of the inner pot. 1505393 19 / 28...
- Page 22 When cooking, do not pull the temperature maintaining mode switch (WARMING) up: otherwise the appliance will switch off. • If the main burner has not been lit or has gone off, push the cooking mode switch (THEN COOK) up to OFF position, until it engages. 20 / 28 1505393...
-
Page 23: Cleaning
• For cleaning, do not use any scouring agents that contain solvents nor corrosive cleaning agents. They may damage the surface. Cleaning 1. Clean the appliance and its equipment after each use. 1505393 21 / 28... - Page 24 8. Clean the base with a soft, damp cloth and dry it thoroughly. 9. To provide for effective burning, clean the burner regularly. Use soft, damp cloth. 10. Use a needle to clean openings of the burner. 22 / 28 1505393...
-
Page 25: Possible Malfunctions
Water spilled over the Dry the flame sensor flame sensor Incorrectly inserted water Insert correctly elements of pan, inner pot and/or wind the appliance screen Damaged or soiled Contact the service thermoelement company 1505393 23 / 28... - Page 26 The gas cut-off valve is not Open the gas cut-off valve fully open Soiled burner or there are Clean the burner, and insects inside the burner replace, if needed Remove insects from the burner 24 / 28 1505393...
- Page 27 After cleaning, the inner Dry the inner pot pot becomes dark-grey pot has not been dried thoroughly after cleaning Surface of the inner pot Aluminium discolouration is has been discoloured by not harmful to health fumes to dark-grey colour 1505393 25 / 28...
-
Page 28: Disposal
Before disposing of the appliance make sure that the appliance cannot be restarted to prevent any abuse and related risks, and then deliver it to the local collection point. 26 / 28 1505393...
Need help?
Do you have a question about the 1505393 and is the answer not in the manual?
Questions and answers