Table of Contents
Advertisement
Quick Links
Advertisement
Table of Contents

Related Manuals for XDynamics EVOLVE 2


Summary of Contents for XDynamics EVOLVE 2
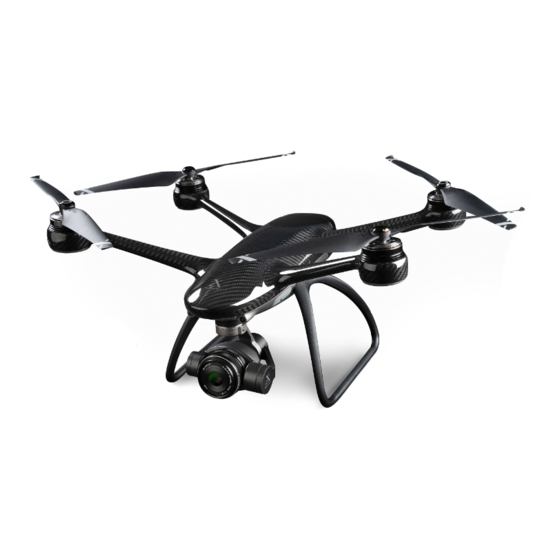
- Page 1 R-Side Bottom 60* View U S E R M A N UA L v 1 . 0 2020.06...
- Page 3 WHAT IS IN THE DOCUMENT Welcome to the Evolve 2 user manual. This user guide is designed to give you a detailed overview of each element of our product. It provides information on how to set up your Evolve 2 and optimise its use for safe flight.
- Page 4 EVOLVE 2 User Manual Quick Start Guide PRODUCT SUPPORT Store Website Please visit the fly safe page and download information related to the EVOLVE 2 here - https://store.xdynamics.com/fly-safe/ Support Website Find more information, tips, and troubleshooting and browse our comprehensive articles at - https://store.xdynamics.com/support/...
- Page 5 XDynamics believes in guarding our customers privacy and will continue to strive for more secure aircraft products in the future.
- Page 6 *XDynamics LLC is exempt from the user‘s liabilities for damage(s) to person/s or property, or injuries incurred directly or indirectly from the use of this product in the following conditions: •...
- Page 7 INTELLIGENT FLIGHT BATTERY SAFETY GUIDELINES All instructions and other collateral documents are subject to change at the sole discretion of XDynamics LLC. For up-to- date product information, visit http://www.xdynamics.com and click on the product page for this product. Read the ENTIRE user manual to become familiar with the features of this product before operating. Failure to operate the product correctly can result in damage to the product or personal property and cause serious injuries.
-
Page 8: Table Of Contents
CONTENTS Contents PRODUCT PROFILE _ _ _ _ _ _ _ _ _ _ _ _ _ _ _ _ _ _ _ _ _ _ _ _ _ _ _ _ _ _ _ _ _ _ _ _ _ _ _ _ _ _ _ _ _ _ _ _ _ _ _ _ _ _ _ _8 PRODUCT DESCRIPTION _ _ _ _ _ _ _ _ _ _ _ _ _ _ _ _ _ _ _ _ _ _ _ _ _ _ _ _ _ _ _ _ _ _ _ _ _ _ _ _ _ _ _ _ _ _ _ _ _ _ _ _9 KEY FEATURES... - Page 9 ATTACHING AND DETACHING THE PROPELLERS _ _ _ _ _ _ _ _ _ _ _ _ _ _ _ _ _ _ _ _ _ _ _ _ _ _ _ _ _ _ _ _ _ _ _ _ _ _ _ 56 PREPARING AIRCRAFT FOR FLIGHT _ _ _ _ _ _ _ _ _ _ _ _ _ _ _ _ _ _ _ _ _ _ _ _ _ _ _ _ _ _ _ _ _ _ _ _ _ _ _ _ _ _ _ _ _ _ 57 CAMERA AND GIMBAL SECTION...
-
Page 10: Product Profile
PRODUCT PROFILE... -
Page 11: Product Description
PRODUCT DESCRIPTION Within this section, the EVOLVE 2 aircraft and Ground Station are explained and the individual components are listed. The EVOLVE 2 aircraft and Ground Station form a powerful system offering a XXXX low latency FPV video downlink with 4K local video recording, combined with an out the box, ready to use fully integrated dual touch-screen Ground Station. -
Page 12: Key Features
M4/3 options. CFast / Pro-Res (coming soon) Build into the EVOLVE 2 is a CFast card slot. This will enable users to record up to 500 Mbits/s. A future firmware release will give users access to ProRes. - Page 13 EVOLVE 2 User Manual V1.0 by XDynamics Limited...
-
Page 14: Aircraft Annotated Diagram
AIRCRAFT ANNOTATED DIAGRAM Detailed Schematic of the EVOLVE 2 aircraft LED Light Camera Micro SD Port / TypeC / Pairing Button Camera LED Status Camera Lens Button Motor Forwarad Vision System Lens Propellers – 2 CW and 2 CCW 10. Camera CFast Port 11. -
Page 15: Ground Station Annotated Diagram
GROUND STATION ANNOTATED DIAGRAM Detailed Schematic of the EVOLVE 2 Ground Station Front Camera Microphone 8 inch Touch Screen On/Off Button Control Sticks 5.5 inch Touch Screen Landing / Take-off Button Light Sensor Signal LED 10. Speaker 11. RTH Button 12. -
Page 16: Aircraft
AIRCRAFT... -
Page 17: Inserting The Aircraft Battery
Then ensure the orientation of the battery is correct, the OLED display should be pointing upwards. Battery detail facing upwards Insert by pushing the battery gently into the aircraft until the two latches of the battery engage into the aircraft. EVOLVE 2 User Manual V1.0 by XDynamics Limited... -
Page 18: Removing The Aircraft Battery
REMOVING THE AIRCRAFT BATTERY Remove the battery by squeezing the battery mechanical latches and pulling the battery out of the aircraft. Ensure the aircraft battery is turned OFF before inserting or removing it from the aircraft or battery charger. When removing the battery from the aircraft allow the battery to cool to room temperature before charging the battery with the supplied charger. -
Page 19: Aircraft Flight Control
AIRCRAFT FLIGHT CONTROL Flight control of the EVOLVE 2 is accomplished by manipulating the control sticks on the Ground Station. Proper orientation must always be considered when flying the aircraft. A basic rule of thumb when remote piloting a aircraft is to realize that when the aircraft’s nose, or front end, is facing the pilot the control inputs for roll and yaw are backwards. -
Page 20: Beginner Mode
BEGINNER MODE User may enable Beginner Mode at the Settings Page. After enabling the Beginner Mode, the aircraft can only be flown within a spherical radius of 30m from the take-off point. -
Page 21: Flight Modes
FLIGHT MODES The EVOLVE 2 aircraft has 3 flight modes that the operator can choose from. The modes are selected by a 3-position switch located on the top left of the Ground Station. Below is a description of each: 1. Altitude Mode... -
Page 22: Turn On The Aircraft
TURN ON THE AIRCRAFT The battery has a dual press feature to avoid the user accidentally turning on the battery with a single button press. Press and release the battery switch then press again and hold The aircraft is powered off when the all four lights have turned battery switch (short press, long press) until the 4 lights appear in succession, then release. -
Page 23: Turn Off The Aircraft
Press and release the battery switch then press again and The aircraft is powered off when the all four lights have turned hold battery switch (short press, long press) until the 4 lights off. disappear in succession, then release. EVOLVE 2 User Manual V1.0 by XDynamics Limited... -
Page 24: Turning On/Off Aircraft Battery
Note: Never short out any of the pins of the battery or try to connect to any other equipment other than the EVOLVE 2 aircraft and the supplied charger. Turning the Battery Off When not Plugged into the aircraft The aircraft is powered on when the all four lights have turned on. -
Page 25: Aircraft Led Indicators
(Front : Solid Red LED ,Rear : Red / Green / Yellow alternating fast blinking LED) Error State (Front : Solid Red, Rear : Red Fast Blinking LED) - Refer to Troubleshooting Section Unsuccessful Arm (Front : Solid Red, Rear : LED Fast Blinking 3 times) EVOLVE 2 User Manual V1.0 by XDynamics Limited... - Page 26 AIRCRAFT LED INDICATORS The aircraft LED indicators are located under each motor and at the rear of the aircraft. The LED indicates the current state of the aircraft. See diagrams below for indications. Ready for Flight (GPS Mode) (Front : Solid Red, Rear : Solid Blue) – Ready for Smart Pilot App Launch Altitude Mode (Can be flown in GPS Mode) (Front : Solid Red, Rear : Solid Yellow) - Sets home position Sport Mode...
- Page 27 (Front : Red Front, Rear : Blue Solid) – Make Sure Landing Zone is Clear Malfunction During Flight (Consult Smart Pilot / Troubleshooting for More Details) If the ‘Malfunctioning During Flight’ LED warning is showing land aircraft immediately. EVOLVE 2 User Manual V1.0 by XDynamics Limited...
-
Page 28: Camera Indicators
CAMERA INDICATORS The camera system has an LED indicator located below the base of the mount. This indicator states the status of the camera. This is a visual reference for the operator to confirm the state of the camera such as taking video or taking still photography. -
Page 29: Aircraft Battery
The aircraft’s battery level icon is found at the top right of the top screen on the Ground Station. When the aircraft battery reaches 10% charge, a Force Landing will be activated. EVOLVE 2 User Manual V1.0 by XDynamics Limited... -
Page 30: Charging The Aircraft Battery
CHARGING THE AIRCRAFT BATTERY Battery Charger Overview Below is a diagram identifying the different components of the battery charger Components of the battery charger: AC Power Cord/Cable Adaptor Charger Spliter Block Aircraft Battery Connector Ground Station Battery Connector Follow the steps below to charge the aircraft battery: Connect charger to a power source. - Page 31 10% - Land Immediately The battery failsafe mode is triggered and RTH happens Warning: Never drain the battery to 5% or less, this may damage battery or make the battery unreliable on next charge. EVOLVE 2 User Manual V1.0 by XDynamics Limited...
-
Page 32: Ground Station
GROUND STATION... -
Page 33: Turning On The Ground Station
Ground Station LED indicator See diagram for Ground Station screen below Press ‘ START HERE ’ on the EVOLVE 2 home screen to complete the connection as instructed by the upper screen notice. EVOLVE 2 User Manual V1.0 by XDynamics Limited... -
Page 34: Ground Station Led Indicators
GROUND STATION LED INDICATORS The Ground Station LED indicator is located below the bottom screen. The LED indicates the current state of the Ground Station battery. When on charge, the Ground Station LED will be blinking Red, until the battery is fully charged and the LED stops blinking (constant off). -
Page 35: Flight Mode (Mode 2)
Throttle – Increase (Aircraft rises up) Move left thumbstick up Keep right thumbstick centerd (Left) (Right) Throttle – Decrease (Aircraft lowers down) Move left thumbstick down Keep right thumbstick centerd (Left) (Right) EVOLVE 2 User Manual V1.0 by XDynamics Limited... - Page 36 FLIGHT MODE (MODE 2) Yaw Counter Clockwise (Aircraft rotates CCW) Move left thumbstick left Keep right thumbstick centerd (Left) (Right) Yaw Clockwise (Aircraft rotates CW) Move left thumbstick right Keep right thumbstick centerd (Left) (Right)
- Page 37 Forward Movement – (Aircraft tilts forward) Keep left thumbstick centerd Move right thumbstick up (Left) (Right) Backwards Movement – (Aircraft tilts backwards) Keep left thumbstick centerd Move right thumbstick down (Left) (Right) EVOLVE 2 User Manual V1.0 by XDynamics Limited...
- Page 38 FLIGHT MODE (MODE 2) Roll Left – (Aircraft moves left) Keep left thumbstick centerd Move right thumbstick left (Left) (Right) Roll Right – (Aircraft moves right) Keep left thumbstick centerd Move right thumbstick right (Left) (Right)
-
Page 39: Prepare The Ground Station
Steps for removing the Ground Station Battery: First ensure the battery is turned OFF. Slide the latch to the right to disengage the lock. Remove by firmly gripping and pulling the battery from the Ground Station. EVOLVE 2 User Manual V1.0 by XDynamics Limited... -
Page 40: Ground Station
Follow the steps below to charge the Ground Station battery: Connect charger to a power source. Connect the Ground Station Battery. Connector to the Ground Station Battery Charging Port. Please note the Ground Station battery can also be charged simultaneously with the EVOLVE 2 aircraft battery. -
Page 41: Application
APPLICATION... -
Page 42: Screen Introduction
SCREEN INTRODUCTION See below indicators for reference. 1. Speed 13. Remain Flight time 2. Height 14. AE Lock 3. Distance 15. Switch Photo / Video 4. Aircraft Status 16. Current Mode 5. Record Time 17. Camera Setting 6. Wifi Signal 18. - Page 43 3. Display Mode 4. Drone Setting 5. Map Option 6. Compass 7. Map 8. Drone Location 9. Home Point 10. Remote Controller Location 11. Cancel Button 12. Smart Mode 13. RTH 14. Alert Center EVOLVE 2 User Manual V1.0 by XDynamics Limited...
-
Page 44: Warnings And Alerts
WARNINGS AND ALERTS Smart Pilot System provides notifications on warnings and alerts, and will provide suggested actions on solving the issues. The top screen shows the warnings at the top left corner. The bottom screen also shows the alerts on the left side. You may also refer to the Alert button at the top right corner for current warnings. -
Page 45: Settings Menu
The settings menu allows the operator to configure the aircraft to suit their preferences. Settings include Aircraft, Ground Station, Battery, Gimbal, Map and General. Aircraft Settings Ground Station Settings Battery Settings Gimbal Settings Map Settings General Settings EVOLVE 2 User Manual V1.0 by XDynamics Limited... -
Page 46: Linking The Ground Station
LINKING THE GROUND STATION The EVOLVE 2 aircraft system is pre linked from the factory. If there‘s a situation which requires the Ground Station and the aircraft to be re-linked follow the steps below: To pair the Ground Station to a new aircraft follow these steps: (Settings >... -
Page 47: Map Preloading (Offline Map)
Tap “+” to create a new offline map area Search for plane or address Drag and pinch the map to the designated area Tap Download to start downloading Smart Pilot System will indicate the download progress EVOLVE 2 User Manual V1.0 by XDynamics Limited... -
Page 48: Run Waypoint Plan
RUN WAYPOINT PLAN Setting Waypoints To execute the waypoints path, select Smart Mode by choosing the right position on the flight mode switch and then choose waypoint mode and follow the steps outlined below. Once the plan has been selected and completed, the aircraft will hover or return to home (RTH) from last waypoint. -
Page 49: Camera And Gimbal Section
The standard settings are similar to those found in most digital camera systems, including ISO, shutter speed, EV , quality, format etc. Auto exposure Lock Photo and video switch button Advance camera setting Record or Shutter Quick camera setting EVOLVE 2 User Manual V1.0 by XDynamics Limited... -
Page 50: Album And Image Editing
ALBUM AND IMAGE EDITING You may view your photos and videos on the Smart Pilot Systems page. The editing tool is also available for quick edits. Navigate to the Smart Pilot System Album page. The bottom screen shows the images and videos on the Ground Station. Tap the media on the screen. -
Page 51: Wi-Fi Network
To listen to voice alerts form the Smart Piot APP, the Ground Station must be connected to connect to Bluetooth capable devices. Navigate to the Bluetooth page on the Smart Pilot APP and connect to the desired Bluetooth device. Be sure to make Bluetooth devices detectable to the Ground Station. EVOLVE 2 User Manual V1.0 by XDynamics Limited... -
Page 52: Firmware Updates
FIRMWARE UPDATES The Ground Station App will guide the user through the Firmware Update process. Firmware Update requests are displayed on the Ground Station screen. Whenever an update is available, the Smart Co-Pilot system will request the operator perform the update when the Ground Station is connected to a Wi-Fi source. This process can be simply accessed from the alerts page by selecting update. -
Page 53: Flight
FLIGHT... -
Page 54: Preflight Checklist
1. Weather Limitations Although the EVOLVE 2 is a high performance aircraft, weather can be a crucial factor to flight performance and safe operations. Caution must be observed when it comes to weather planning. Effective weather planning breaks down to these criteria: •... - Page 55 • Check sensor status (Compass; Accelerometer) • Check RTH Alt height • Check GPS Signal • Check Gimbal & Camera status • Format media cards (As Necessary) • Check Controller Mode • CHECK COMPLETE EVOLVE 2 User Manual V1.0 by XDynamics Limited...
-
Page 56: Flight System Limitations
FLIGHT SYSTEM LIMITATIONS Below are the flight limitations of the EVOLVE 2: Speed • Assenting – 16.4ft/s (5m/s) • Descending – 6.6ft/s (2m/s) • Horizontal – 47mph (75km/h) (For higher top speeds contact customer support for signing of warranty wavier prior to activation) Distance •... -
Page 57: Ensure Correct Propeller Alignment
Release and the propeller should spring up slightly and lock in place. CW Props CCW Props EVOLVE 2 User Manual V1.0 by XDynamics Limited... -
Page 58: Attaching And Detaching The Propellers
ATTACHING AND DETACHING THE PROPELLERS The EVOLVE 2 aircraft employs a sturdily constructed attach and detach propeller system. With a quick half turn installation the aircraft can be ready to fly within minutes of pulling it out of the pack. To detach the propellers follow the steps below in reverse. -
Page 59: Preparing Aircraft For Flight
PREPARING AIRCRAFT FOR FLIGHT For the first flight of the EVOLVE 2 be sure to have a level surface available that is clear of obstacles and loose debris. Ensure that there are no overhead structures or trees that might interfere with the EVOLVE 2 connecting to GPS satellites. -
Page 60: Camera And Gimbal Section
CAMERA AND GIMBAL SECTION Removing lens To remove the Lens, press the button located underneath the gimbal backward, then unscrew the lens CCW as shown in the diagram below. -
Page 61: Aircraft Calibration
Once complete, the APP will indicate a failed or successful calibration. If failed, switch off the aircraft and Ground Station power and restart at Step 1. Accelerometer calibration is only required when requested by the Smart Pilot System. EVOLVE 2 User Manual V1.0 by XDynamics Limited... - Page 62 AIRCRAFT CALIBRATION Accelerometer calibration procedures...
-
Page 63: Aircraft Calibration
Compass calibration procedures: The electronic compass on the EVOLVE 2 aircraft is used to determine the direction which aircraft is pointing to in reference to true north. The compass is a sensitive sensor that is affected by electromagnetic interference from sources such as radio towers and high voltage power lines. - Page 64 AIRCRAFT CALIBRATION Compass calibration procedures...
-
Page 65: Arming The Aircraft
ARMING PRE-CHECK The EVOLVE 2 makes several internal calibrations and adjustments before each flight. If for any reason, any of the vital sensors or internal equipment has a safety issue, the aircraft will not ARM upon the ARM command given by the operator’s stick and the LEDs under each motor will turn RED. -
Page 66: Disarming The Aircraft
DISARMING THE AIRCRAFT After a landing the aircraft, hold the throttle stick down and to the left to disarm the motors. The LED indicators will change color followed by a long beep and propellers will stop spinning. Make sure all the LED indicators are solidly lit by the same color (either Green or Blue) with no blinking before moving the sticks back to central position. -
Page 67: Auto Take Off
AUTO TAKE OFF For ease of operation and to assist beginner operators, the EVOLVE 2 aircraft can take off and land automatically. Follow the steps below: Short Press and Long Press the Auto Take Off button for 3 seconds. The aircraft will arm itself and take off. -
Page 68: Auto Landing
AUTO LANDING For ease of operation and to assist beginner operators, the EVOLVE 2 aircraft can take off and land automatically. Follow the steps below: Short Press and Long Press the Auto Take Off button for 3 seconds. The Ground Station will voice over to indicate the aircraft ready to descent. ( during the descent the operator can reposition the aircraft to clear obstacles or land in preferred spot ) When landed, the aircraft will disarm automatically. -
Page 69: Return To Home
The number of GPS satellites acquired and the health of the GPS signal can also be checked on the top screen of the Ground Station. 6 is the minimum number of satellites needed. The signal health will be confirmed by a (Excellent / Good / Fair / Poor) message on the APP. EVOLVE 2 User Manual V1.0 by XDynamics Limited... -
Page 70: Using The Return To Home Button On The Ground Station
USING THE RETURN TO HOME BUTTON ON THE GROUND STATION Follow the steps below: Make sure GPS Signal is showing at least ‘Good’ (if not, visually track the aircraft as it flies back to home position). Press and hold the Return to Home button for 3 seconds. The aircraft will ascend to a pre-set altitude, or if at a greater altitude than the programed altitude it will remain at that altitude, and then return to the Home Point in shortest path (straight line). -
Page 71: Return To Home Button Cancellation
Press the cancel button to stop the Return to Home process. The aircraft will continue in the mode at which the 3 position switch mode is selected. Press the Cancel Button to stop the Return to Home process EVOLVE 2 User Manual V1.0 by XDynamics Limited... -
Page 72: Determining The Return To Home Altitude
DETERMINING THE RETURN TO HOME ALTITUDE Depending on the flight conditions and obstacles in the return to home flight path, the operator can choose a safe return altitude for the Return to Home function. This altitude should be set up before flight under the APP configuration tab. A low altitude setting is not recommended for obstacle clearance (such as trees or buildings). -
Page 73: Appendix
APPENDIX... -
Page 74: Product Specification
PRODUCT SPECIFICATION CAMERA SYSTEM ITEM SPECIFICATION Controllable Range Pitch -90° to 0° Gimbal Accuracy Static stability: ±0.005°, motion stability: ±0.01° Stabilization 3-axis (pitch, roll, yaw) Power Output Voltage Output Current Net Weight 480g Dimensions 143mm*110mm*104mm Operating Temperature 0 to 40°C Input Voltage CMOS Sensor 4/3›... - Page 75 Interval Timer Shot, HDR Exposure mode Auto, Manual,TV, AV Metering Mode Center-weighted, Evaluative, Partial, Spot Auto, Daylight, Fluorescent, Cloudy, Incandescent, White balance Manual(2300k-7500k) Focus Mode AF-S, AF-C, MF Color Profile Standard, X-log EVOLVE 2 User Manual V1.0 by XDynamics Limited...
- Page 76 GROUND STATION ITEM SPECIFICATION RK3399K Quad Core 2.0GHz Processor Cortex-A72 *2 Cortex-A53 *4 Mali-T864 GPU Operating System Android 8.1 Memory 4GB LPDDR4 Internal Storage 64GB eMMC 5.1 Supported SD Card Types Micro SD (SD/SDHC/SDXC) / Max. 64GB 8” 1080p Multi-Touch Screen Upper Display (View Finder) Anti-reflective Coating Luminance:...
- Page 77 Capacity 6700 mAh Li-Po 3S Voltage 10.8v Battery Type Lithium-ion Polymer Energy 72.36 Wh Net Weight <400 g Dimensions 147 mm*63.5 mm*38 mm Operating Temperature -20 to 60°C Max Charging Voltage 12.6V EVOLVE 2 User Manual V1.0 by XDynamics Limited...
- Page 78 AIRCRAFT ITEM SPECIFICATION Supported SD Card Types Micro +C3: C62USB, SD card, Type-C, Cfast Connectivity USB TypeC Dimension 455(L)*362.5(W)*258.8(H)mm Weight (including battery) <2kg Max. Rotation speed Motors 6600rpm Max Ascent Speed 5m/s Max. Descent Speed 2.5m/s Max Wind speed 7.9m/s Max.
- Page 79 EVOLVE 2 User Manual V1.0 by XDynamics Limited...
- Page 80 • Never use non-XDynamics batteries. Go to www.xdynamics.com to purchase new batteries. XDynamics takes no responsibility for any damage caused by non-XDynamics batteries. • Never use or charge swollen, leaky, or damaged batteries. If your batteries are abnormal, contact XDynamics or an XDynamics authorized dealer for further assistance.
- Page 81 Battery life may be reduced if not used for a long time. • Fully charge and discharge the battery at least once every 3 months to maintain battery health. Travel Notice • Store Intelligent Flight Batteries in a ventilated location. EVOLVE 2 User Manual V1.0 by XDynamics Limited...
- Page 82 DO NOT attach the batteries to wall outlets or car charger sockets directly, and always use a XDynamics approved adapter. • XDynamics takes no responsibility if the battery is charged using a non-XDynamics charger. • Never leave the battery unattended during charging. DO NOT charge the battery near flammable materials or on flammable surface such as carpet or wood.
- Page 84 U S E R M A N UA L v 1 . 0 2020.06...
Need help?
Do you have a question about the EVOLVE 2 and is the answer not in the manual?
Questions and answers