Table of Contents
Advertisement
Quick Links
Advertisement
Table of Contents

Related Manuals for XDynamics EVOLVE 2


Summary of Contents for XDynamics EVOLVE 2
- Page 1 R-Side Bottom 60* View U S E R M A NU A L v 1 . 3 2021.11...
- Page 2 WHAT IS IN THE DOCUMENT Welcome to the EVOLVE 2 user manual. This user guide is designed to give you a detailed overview of each element of our product. It provides information on how to set up your EVOLVE 2 and optimize its use for safe flight.
- Page 3 EVOLVE 2 User Manual Quick Start Guide PRODUCT SUPPORT Store Website Please visit the fly safe page and download information related to the EVOLVE 2 here - https://store.xdynamics.com/fly-safe/ https://store.xdynamics.com/download/ Support Website Find more information, tips, and troubleshooting and browse our comprehensive articles at -...
- Page 4 XDynamics understand the need for secure aircraft systems and will never download secured or private metadata information without the consent of our customers. XDynamics believes in guarding our customers privacy and will continue to strive for more secure aircraft products in the future.
- Page 5 *XDynamics LLC is exempt from the user‘s liabilities for damage(s) to person/s or property, or injuries incurred directly or indirectly from the use of this product in the following conditions: •...
- Page 6 INTELLIGENT FLIGHT BATTERY SAFETY GUIDELINES All instructions and other collateral documents are subject to change at the sole discretion of XDynamics LLC. For up-to- date product information, visit http://www.xdynamics.com and click on the product page for this product. Read the ENTIRE user manual to become familiar with the features of this product before operating. Failure to operate the product correctly can result in damage to the product or personal property and cause serious injuries.
-
Page 7: Table Of Contents
CONTENTS PRODUCT PROFILE PRODUCT INTRODUCTION _ _ _ _ _ _ _ _ _ _ _ _ _ _ _ _ _ _ _ _ _ _ _ _ _ _ _ _ _ _ _ _ _ _ _ _ _ _ _ _ _ _ _ _ _ _ _ _ _ _ _1 KEY FEATURES _ _ _ _ _ _ _ _ _ _ _ _ _ _ _ _ _ _ _ _ _ _ _ _ _ _ _ _ _ _ _ _ _ _ _ _ _ _ _ _ _ _ _ _ _ _ _ _ _ _ _ _ _ _ _ 2-3 AIRCRAFT ANNOTATED DIAGRAM... - Page 8 SMART PILOT SYSTEM SCREEN INTRODUCTION _ _ _ _ _ _ _ _ _ _ _ _ _ _ _ _ _ _ _ _ _ _ _ _ _ _ _ _ _ _ _ _ _ _ _ _ _ _ _ _ _ _ _ _ _ _ _ _ _ 43-44 NOTIFICATIONS _ _ _ _ _ _ _ _ _ _ _ _ _ _ _ _ _ _ _ _ _ _ _ _ _ _ _ _ _ _ _ _ _ _ _ _ _ _ _ _ _ _ _ _ _ _ _ _ _ _ _ _ _ _ _ _ 45 FIRMWARE UPDATES...
-
Page 9: Product Profile
PRODUCT PROFILE Product Introduction Key Features Aircraft Annoted Diagram Ground Station Annoted Diagram... -
Page 10: Product Introduction
EVOLVE 2 sports an Astra M4/3 camera with a Sony sensor and brushless gimbal system that brings unparalleled creative freedom to create compelling visual experiences that connect deeply with the audience. Designed for the multi-level professional, recording video at a maximum 4K at 120fps with a larger pixel pitch of 4,63µm –... -
Page 11: Key Features
XDynamics allows you to capture the most amazing images even in the most challenging environments. EVOLVE 2 sports an Astra M4/3 camera with a premium sensor and brushless gimbal system that brings unparalleled creative freedom to create compelling visual experiences that connect deeply with the audience. Designed for the multi-level professional, recording video at a maximum 4K at 120fps with a larger pixel pitch of 4,63µm –... - Page 12 The concept of the EVOLVE platform began with the idea that strength and durability are paramount to creating the best aerial cinematic experience for the pilot and the audience. The EVOLVE 2 is built with a single carbon fiber fuselage with high tensile strength, yet maintaining its light weight and extreme weather resistance.
-
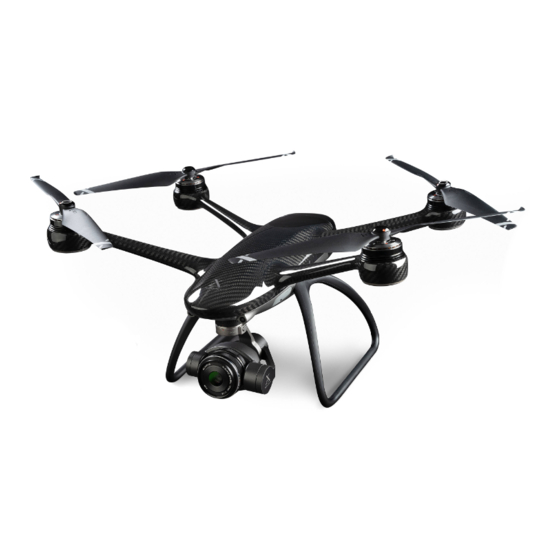
Page 13: Aircraft Annotated Diagram
AIRCRAFT ANNOTATED DIAGRAM AIRCRAFT LED Light Camera Micro SD Port / TypeC / Pairing Button Camera LED Status Camera Lens Release Button Motor Forward Vision System (inactive) Lens Propellers – 2 CW and 2 CCW 10. Camera CFast Port 11. Gimbal Release Button 12. -
Page 14: Ground Station Annotated Diagram
18. Battery Indicator Button 19. Customizable Button B2 20. Shutter Button 21. Roller (R2) 22. External Antenna Mount 23. Flight Mode Switch 24. Customizable Button B1 25. Record Button 26. Roller (R1) EVOLVE 2 User Manual V1.2 by XDynamics Limited... -
Page 15: Aircraft
AIRCRAFT Aircraft Introduction Inserting and Removing the Aircraft Battery Turning On/Off the Aircraft Battery Charging the Aircraft Battery Aircraft Battery LED Indications Aircraft LED Indicators Ensure Correct Propeller Alignment Attaching And Detaching The Propellers Beginner Mode Flight Modes Home Point Compass Calibration Accelerometer Calibration Gain and Expo... -
Page 16: Aircraft Introduction
Graceful by Nature. Strong by Design The EVOLVE 2 is a graceful and well-balanced aircraft designed with both the strongest and lightest materials that not only withstand the tests of time and weather but also provide a unique, comfortable, intelligent, and safe flight experience. -
Page 17: Inserting And Removing The Aircraft Battery
INSERTING AND REMOVING THE AIRCRAFT BATTERY INSERTING THE AIRCRAFT BATTERY Be sure that the aircraft battery is fully charged before flying. STEPS FOR AIRCRAFT BATTERY INSTALLATION Ensure the battery is turned OFF . Then ensure the orientation of the battery is correct (The OLED display with battery details should be facing upwards). Insert by pushing the battery gently into the aircraft until the two latches of the battery securely engage into the aircraft. - Page 18 STEPS FOR REMOVING THE AIRCRAFT BATTERY Ensure the battery is turned OFF. Squeeze the side latches to disengage the lock. Remove by firmly gripping and pulling the battery from the aircraft. EVOLVE 2 User Manual V1.2 by XDynamics Limited...
-
Page 19: Turning On/Off The Aircraft Battery
LED lights located underneath the 4 motors should light up when powered on. Never short out any of the pins of the battery or try to connect to any other equipment other than the EVOLVE 2 aircraft and the supplied charger. - Page 20 Make sure to remove the battery from the aircraft battery compartment when not in use to avoid accidentally turning it on. If the battery is still turned on when removed from the aircraft, ensure the battery connect terminals are left unobstructed to prevent short circuiting. EVOLVE 2 User Manual V1.2 by XDynamics Limited...
-
Page 21: Charging The Aircraft Battery
CHARGING THE AIRCRAFT BATTERY BATTERY CHARGER OVERVIEW Below is a diagram identifying the different components of the battery charger COMPONENTS OF THE BATTERY CHARGER AC Power Cord/Cable Adaptor Charger Splitter Block Aircraft Battery Connector Ground Station Battery Connector CHARGING THE AIRCRAFT BATTERY Connect charger to a power source. -
Page 22: Aircraft Battery Led Indications
Below describes the estimated flight times for battery percentages. Status when charging Status when switch on = ON = OFF = BLINKING EVOLVE 2 User Manual V1.2 by XDynamics Limited... -
Page 23: Aircraft Led Indicators
AIRCRAFT LED INDICATORS The aircraft LED indicators are located under each motor and at the rear of the aircraft. The LED indicates the current state of the aircraft. See diagrams below for indications. INITIALIZING / WAITING FOR RC SIGNAL (Front: Red, Rear : Green Yellow alternating fast blinking LED) - Page 24 ERROR/MALFUNCTION (Front: Red, Rear : Red - fast blinking 3 times) (Front: Red, Rear : Red - fast blinking continuously) When encountered in midflight, please land the aircraft immediately. Contact XDynamics Supports. EVOLVE 2 User Manual V1.2 by XDynamics Limited...
-
Page 25: Ensure Correct Propeller Alignment
ENSURE CORRECT PROPELLER ALIGNMENT The propellers need to be mounted with the correct CW (clockwise) and CCW (counter-clockwise) configurations. Two propellers are marked with white rings and two propellers have no markings. Mount the propellers with the white rings to the motors with a white ring on top. -
Page 26: Attaching And Detaching The Propellers
ATTACHING AND DETACHING THE PROPELLERS The EVOLVE 2 aircraft employs a sturdily constructed attach and detach propeller system. With a quick half turn installation, the aircraft can be ready to fly within minutes of pulling it out of the pack. To detach the propellers, follow the steps below in reverse. -
Page 27: Beginner Mode
FLIGHT MODES The EVOLVE 2 aircraft has 3 flight modes that the operator can choose from. The modes are selected by a 3-position switch located on the top left of the Ground Station. Turn on the Multiple Flight Modes setting under the following path: DRONE SETTINGS >... -
Page 28: Home Point
SPORT MODE (GPS Enabled) In this mode, the EVOLVE 2 to reaches its maximum speed and maneuverability. Increased yaw, roll and thrust give the user the ability to get the drone on target in the shortest possible time. This mode is recommended for experienced users who want to follow high-speed subjects and capture action packed videos. -
Page 29: Compass Calibration
COMPASS CALIBRATION The electronic compass on the EVOLVE 2 aircraft is used to determine the direction which aircraft is pointing to in reference to true north. The compass is a sensitive sensor that is affected by electromagnetic interference from sources such as radio towers and high voltage power lines. -
Page 30: Gain And Expo
Speed: Controls the top speed of the aircraft. • Gain: Determines the reaction to outside forces (the larger the value, the stronger the reaction). • Brake: Amount of time/distance it takes to stop the movement after input stops. EVOLVE 2 User Manual V1.2 by XDynamics Limited... -
Page 31: Aircraft Flight Control
AIRCRAFT FLIGHT CONTROL The flight control of the EVOLVE 2 is accomplished by manipulating the control sticks on the Ground Station. Proper orientation must always be considered when flying the aircraft. A basic rule of thumb when remote piloting an aircraft is to realize that when the aircraft’s nose, or front end, is facing the pilot the control inputs for roll and yaw are backwards. -
Page 32: Camera And Gimbal
CAMERA AND GIMBAL Attaching And Detaching Gimbal Attaching And Detaching Camera Lens Recommended Lens Camera Led Indicators Memory Card Format (SD Card/CFast) Shooting In ProRes Camera Settings Creative Assistant Gimbal Tilt Angle Gimbal Pitch (Speed/Smoothness) Auto Gimbal Calibration And Centralize Gimbal... -
Page 33: Attaching And Detaching Gimbal
ATTACHING AND DETACHING GIMBAL ATTACHING THE GIMBAL Locate the red mark on the gimbal and align it to the unlock icon Release the gimbal release button when the red mark aligns with on the attachment mount. Then screw the gimbal CCW. the lock icon on the attachment mount. -
Page 34: Attaching And Detaching Camera Lens
DETACHING THE CAMERA LENS To release the camera lens, press the release button located Unscrew the lens CCW and detach the lens from the camera underneath the gimbal. mount. EVOLVE 2 User Manual V1.2 by XDynamics Limited... -
Page 35: Recommended Lens
RECOMMENDED LENS The Astra m4/3 system supports a vast array of lenses from multiple manufacturers that are small, lightweight that let lighten the load while still performing beautifully. The smaller size, focal length (35mm equivalent), aperture and AF speed provide amazing choices for even the most discerning filmmaker. Olympus and Panasonic are two mainstream manufacturers of MFT format lenses. -
Page 36: Camera Led Indicator
Toggles Rapidly Till Shots Completed Burst Green Toggles Gently Video Recording Toggles Rapidly System Starting Up Toggles Gently SD Card Failure High Temperature/SD Card Missing Green Toggles Alternately Firmware Update in Progress EVOLVE 2 User Manual V1.2 by XDynamics Limited... -
Page 37: Memory Card Format (Sd Card/Cfast)
MEMORY CARD FORMAT (SD CARD/CFAST) The EVOLVE 2 supports the following card formats for both SD and CFast Cards: ExFAT / FAT 32. If the ground station indicates a ‘Card Format Error’, please reformat the card via Windows/Mac computer and check if the problem persists. -
Page 38: Creative Assistant
To enable this feature, please use the following path: CAMERA SETTINGS (TOP SCREEN) > GENERAL > GRID DISPLAY. Golden Ratio Pyramid EVOLVE 2 User Manual V1.2 by XDynamics Limited... -
Page 39: Gimbal Tilt Angle
GIMBAL TILT ANGLE To capture even more challenging shots, the EVOLVE 2 allows you to add an extra +/- 20 degrees to your gimbal tilt angle. To enable this feature, please use the following path: DRONE SETTINGS > GIMBAL > GIMBAL TILT ANGLE... - Page 40 EVOLVE 2 User Manual V1.2 by XDynamics Limited...
-
Page 41: Ground Station
GROUND STATION Inserting and Removing the Ground Station Battery Turning On/Off the Ground Station Battery Charging the Ground Station Battery Ground Station LED Indicator Pairing the Ground Station and Aircraft Antennas (Internal/External) Image Transmission Control Stick Modes... -
Page 42: Inserting And Removing The Ground Station Battery
STEPS FOR REMOVING THE GROUND STATION BATTERY First ensure the battery is powered off. Slide the latch to the right to disengage the lock. Remove by firmly gripping and pulling the battery from the Ground Station. EVOLVE 2 User Manual V1.2 by XDynamics Limited... -
Page 43: Turning On/Off The Ground Station Battery
TURNING ON/OFF THE GROUND STATION When powering on the Ground Station, be sure to provide at least 3 to 6 ft (1 to 2m) of space between the Ground Station and the aircraft. (If the Ground Station and aircraft are too close together the system may not properly connect.) Short press and long press the power switch until the Ground Station screens turn on (this double press procedure prevents accidental power ups). -
Page 44: Charging The Ground Station Battery
Connect the charger to a power source. Connect the Ground Station Battery. Connect the Ground Station Battery Charging Port. Please note that the Ground Station battery can also be charged simultaneously with the EVOLVE 2 aircraft battery. EVOLVE 2 User Manual V1.2 by XDynamics Limited... -
Page 45: Ground Station Led Indicator
GROUND STATION LED INDICATOR The Ground Station LED indicator is located below the bottom screen. The LED indicates the current state of the Ground Station battery. When on charge, the Ground Station LED will blink Red, until the battery fully charged. Once charged, the LED will stop blinking. -
Page 46: Pairing The Ground Station And Aircraft
PAIRING THE GROUND STATION AND AIRCRAFT The EVOLVE 2 aircraft and its Ground Station should be paired out of the box per factory settings. In the event you need to repair the aircraft and the Ground Station, please follow the steps below:... -
Page 47: Control Stick Modes
CONTROL STICK MODES FLIGHT MODE (MODE 2) Throttle – Increase (Aircraft rises up) Move left thumbstick up Keep right thumbstick centered (Left) (Right) Throttle – Decrease (Aircraft lowers down) Move left thumbstick down Keep right thumbstick centered (Left) (Right) - Page 48 FLIGHT MODE (MODE 2) Yaw Counterclockwise (Aircraft rotates CCW) Move left thumbstick left Keep right thumbstick centered (Left) (Right) Yaw Clockwise (Aircraft rotates CW) Move left thumbstick right Keep right thumbstick centered (Left) (Right) EVOLVE 2 User Manual V1.2 by XDynamics Limited...
- Page 49 FLIGHT MODE (MODE 2) Roll Left – (Aircraft moves left) Keep left thumbstick centerd Move right thumbstick left (Left) (Right) Roll Right – (Aircraft moves right) Keep left thumbstick centerd Move right thumbstick right (Left) (Right)
-
Page 50: Button Customization
The Ground Station has 6 customizable buttons allowing our users to personalize control of the camera and gimbal. You can customize the buttons under the following path: DRONE SETTINGS > GROUND STATION > BUTTON CUSTOMIZATION EVOLVE 2 User Manual V1.2 by XDynamics Limited... -
Page 51: Smart Pilot System
SMART PILOT SYSTEM Screen Introduction Notifications Firmware Updates Wi-Fi/Hotspot Connection Album and Image Editing Flight Records... -
Page 52: Screen Introduction
Number of GPS 20. Camera Parameters 8. Ground Station Signal 21. Capacity 9. Image Transmission Signal 22. Resolution 10. Aircraft Battery 23. Gimbal Angle 11. Ground Station Battery 24. Notification 12. Time EVOLVE 2 User Manual V1.2 by XDynamics Limited... - Page 53 BOTTOM SCREEN 1. Home Button 13. Ground Station Position 2. Pilot Name 14. Smart Mode 3. Display Mode 15. Take Off/Landing 4. Drone Settings 16. Notification Centre 5. Map Options 6. Radar 7. Map 8. Aircraft Position 9. Return to Home Path 10.
-
Page 54: Notifications
The bottom screen also displays the alerts on the left side. You may also refer to the top right corner for current warnings. Tapping the Alert icon on the screen will bring you to the Notification Center. You may check all the existing warnings and tap the suggested action to solve the issue. EVOLVE 2 User Manual V1.2 by XDynamics Limited... -
Page 55: Firmware Updates
FIRMWARE UPDATES The Smart Pilot APP guides the user through the Firmware Update process. Firmware Update requests are displayed on the Ground Station screen. Whenever an update is available, the Smart Co-Pilot system will request the operator perform the update when the Ground Station is connected to an internet connection. This process can be simply accessed from the alert page by selecting “update”. -
Page 56: Flight Records
Flight Path (Completed) Control Stick Input Map Position: Aircraft, Ground Station Map Type: RPM Chart Default, Satellite Flight Coordinates Playback Speed: Share (Coming Soon) 1x, 2x, 5x Pause/Play Prev. Next Record Record EVOLVE 2 User Manual V1.2 by XDynamics Limited... -
Page 57: Inflight
INFLIGHT Weather Forecast Preflight Checklist Flight System Limitation Preparing Aircraft for Flight Maximum Distance and Altitude Arming and Disarming the Aircraft Auto Take Off and Landing Return to Home Landing and Return to Home Cancellation Determining the Return to Home Altitude Map (Flight Map/Offline Map) Radar... -
Page 58: Weather Forecast
WEATHER FORECAST To make sure you’re always aware of weather conditions, the EVOLVE 2 gives you the local forecasts within the user interface. Sunrise and sunset times are also displayed so you never miss the most magical moment of the day. Information can be seen on the top screen after powering on OR in the advanced chart: DRONE >... -
Page 59: Preflight Checklist
WEATHER LIMITATIONS Although the EVOLVE 2 is a high-performance aircraft, weather can be a crucial factor to flight performance and safe operations. Caution must be taken when it comes to weather planning. Effective weather planning breaks includes the following criteria: •... - Page 60 3. GROUND STATION PREFLIGHT CHECKLIST • Control Stick Mode (MODE 1/MODE 2/MODE 3) • Antenna (Internal/External; If Using External, Ensure Correctly Orientated) • Battery (Installed; Status Check Fully Charged) • Map (Loaded) EVOLVE 2 User Manual V1.2 by XDynamics Limited...
-
Page 61: Flight System Limitations
PREPARING AIRCRAFT FOR FLIGHT For the first flight of the EVOLVE 2, be sure to have a level surface available that is clear of obstacles and loose debris. Ensure that there are no overhead structures or trees that might interfere with the EVOLVE 2 connecting to GPS satellites. -
Page 62: Arming And Disarming The Aircraft
ARMING PRE-CHECK The EVOLVE 2 makes several internal calibrations and adjustments before each flight. If for any reason, any of the vital sensors or internal equipment has a safety issue, the aircraft will not ARM upon the ARM command given by the operator’s stick and the LEDs under each motor will turn RED. -
Page 63: Auto Take Off And Landing
AUTO TAKE OFF AND LANDING For ease of operation and to assist beginner operators, the EVOLVE 2 aircraft can take off and land automatically. AUTO TAKE OFF PROCEDURE Short Press and Long Press the Auto Take Off button for 3 seconds. -
Page 64: Return To Home
Ground Station. The minimum number of satellites needed is 6. Signal health will be confirmed by a (Excellent / Good / Fair / Poor) message on the APP. EVOLVE 2 User Manual V1.2 by XDynamics Limited... -
Page 65: Landing And Return To Home Cancellation
RETURN TO HOME BUTTON PROCEDURE Make sure GPS Signal is showing at least ‘Good’ (if not, visually track the aircraft as it flies back to home position). Press and hold the Return to Home button for 3 seconds. The aircraft will ascend to a pre-set altitude, or if at a greater altitude than the programmed altitude it will remain at that altitude, and then return to the Home Point in shortest path (straight line). -
Page 66: Determining The Return To Home Altitude
START HERE > CHECKLIST > FLYPAGE. Double check that the Ground Station has automatically downloaded the map around your area before you take off. Turning on internet connection after takeoff is not advised, as this causes interferences. EVOLVE 2 User Manual V1.2 by XDynamics Limited... -
Page 67: Radar
OFFLINE MAP (PRELOADED MAP) To ensure that the map can be displayed without network connection, Smart Pilot APP offers the offline map download feature. Follow the steps below to download the map: Connect Ground Station to an internet connection with download capabilities Navigate to the Offline Map under the following path: DRONE SETTINGS >... - Page 68 PRODUCT SPECIFICATIONS...
-
Page 69: Product Specification
PRODUCT SPECIFICATION CAMERA SYSTEM ITEM SPECIFICATION Controllable Range Pitch -90° +/-20° Gimbal Accuracy Static Stability: ±0.01°, Motion Stability: ±0.2° Stabilization 3-axis (pitch, roll, yaw) Power Output Voltage Output Current Net Weight 4.2 oz (120 g) Dimensions Operating Temperature 0 to 40°C Input Voltage CMOS Sensor 4/3 WDR CMOS Sensor... - Page 70 Interval Timer Shot, HDR Exposure Mode Auto, Manual, TV, AV Metering Mode Center-weighted, Evaluative, Partial, Spot Auto, Daylight, Fluorescent, Cloudy, Incandescent, White Balance Manual(2300k-7500k) Focus Mode AF-S, AF-C, MF Color Profile Standard, X-log EVOLVE 2 User Manual V1.2 by XDynamics Limited...
- Page 71 GROUND STATION ITEM SPECIFICATION RK3399K Quad Core 2.0GHz Processor Cortex-A72 *2 Cortex-A53 *4 Mali-T864 GPU Operating System Android 8.1 Memory 4GB LPDDR4 Internal Storage 64GB eMMC 5.1 Supported SD Card Types Micro SD (SD/SDHC/SDXC) / Max. 64GB 8” 1080p Multi-Touch Screen Upper Display (View Finder) Anti-reflective Coating Luminance:...
- Page 72 Voltage 10.8v Battery Type Lithium-ion Polymer Energy 72.36 Wh Net Weight 14.1 oz (400 g) Dimensions 147 mm*63.5 mm*38 mm Operating Temperature -4°F - 140°F (-20°C - 60°C) Max Charging Voltage 12.6V EVOLVE 2 User Manual V1.2 by XDynamics Limited...
- Page 73 AIRCRAFT ITEM SPECIFICATION Supported SD Card Types Micro +C3: C62USB, SD card, Type-C, CFast Connectivity USB TypeC Diagonal Size (Excluding Propellers) 21.4 in (543 mm) Weight (Including Battery) 4.4lbs (2.00kg) Max. Rotation Speed Motors 6600rpm Max Ascent Speed 16.4ft/s (5m/s) Max.
- Page 74 U S E R M A N UA L v1 . 3 2021.11...
Need help?
Do you have a question about the EVOLVE 2 and is the answer not in the manual?
Questions and answers