
Related Manuals for Fervi E022/12


Summary of Contents for Fervi E022/12
- Page 1 USE AND MAINTENANCE MANUAL Flexible endoscope for mechanical use with probe Art. E022/12 ORIGINAL INSTRUCTIONS...
- Page 2 Manual on the date of issue, listed on this page; however, the machine may be subject to potentially major technical changes in the future, without the Manual being updated. Therefore, see FERVI for information about modifications that could be implemented. REV. 2 March 2014...
-
Page 3: Table Of Contents
MEASURING INSTRUMENTS CONTENTS INTRODUCTION ..................4 GENERAL INFORMATION................5 Battery ..........................5 PARTS LIST....................6 TECHNICAL CHARACTERISTICS..............7 HOW TO USE ..................... 8 Installing the battery ....................8 Connecting the display to the camera and sensor unit ..........8 Installation of accessories ....................8 Operating procedures ....................9 MAINTENANCE .................. -
Page 4: Introduction
MEASURING INSTRUMENTS 1 INTRODUCTION This product has been designed to be used with mechanical devices or to inspect difficult to reach areas but MUST NOT be used for purposes not permitted by law (medical, human, animal, etc.) The videoscope through new optical and electronic technologies allows the inspection of areas which are normally difficult to reach, making it easier to diagnose problems with mechanical parts. -
Page 5: General Information
MEASURING INSTRUMENTS 2 GENERAL INFORMATION Please observe the following indications to avoid electrical shock and injury to persons: Read and understand all the instructions before the start of each operation; Do not remove any labels from the instrument; ... -
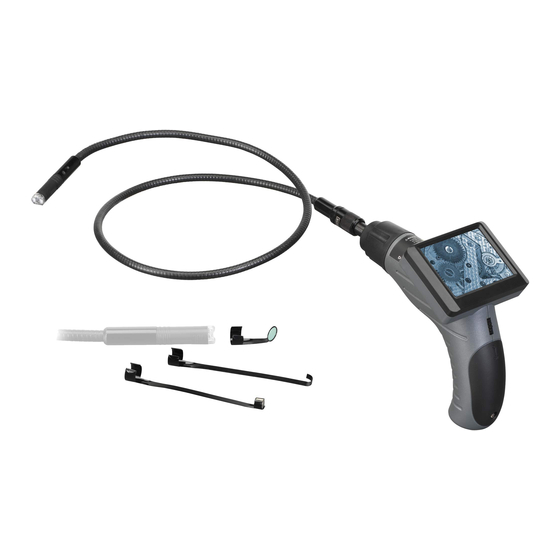
Page 6: Parts List
MEASURING INSTRUMENTS 3 PARTS LIST Portable screen Terminal hook Probe and camera head Terminal with mirror Magnetic terminal 3.5" LCD Screen Probe connection Battery Compartment Probe Instrument on/off and light adjustment Camera head wheel Page 6 of 10... -
Page 7: Technical Characteristics
MEASURING INSTRUMENTS 4 TECHNICAL CHARACTERISTICS Viewing direction Straight Angled view 60° Optical system Observation depth 50 mm Distance 2.5 cm ~ 30 cm Camera diameter 12 mm Image 3.5”LCD Probe type Flexible Specifications Probe length 90mm Probe and camera protection IP67 Power supply 1 x 9V alkaline battery... -
Page 8: How To Use
MEASURING INSTRUMENTS 5 HOW TO USE 5.1 Installing the battery Open the battery compartment using a screwdriver to loosen the screw (Fig. 4) Insert a 9V alkaline battery (6LR61) into the battery compartment, closing the compartment and tightening the screw (Fig 5). 5.2 Connecting the display to the camera and sensor unit The display must be properly connected to the camera and the probe. -
Page 9: Operating Procedures
MEASURING INSTRUMENTS 5.4 Operating procedures Position the display for a complete view (Fig. 9) . Turn the wheel towards the screen to turn on the instrument. The wheel will now serve to adjust the intensity of the LED Lights (Fig. 10), which are a source of illumination for the camera. -
Page 10: Maintenance
MEASURING INSTRUMENTS 6 MAINTENANCE The instrument must only be operated by qualified personnel who have read these instructions carefully. Damaged parts must be replaced by qualified personnel with other appropriate and original parts to avoid the possibility of electric shock. ...
Need help?
Do you have a question about the E022/12 and is the answer not in the manual?
Questions and answers