Table of Contents
Advertisement
Quick Links
Advertisement
Table of Contents

Related Manuals for Fervi A005


Summary of Contents for Fervi A005
- Page 1 USE AND MAINTENANCE MANUAL Digital anemometer Art. A005 ORIGINAL INSTRUCTIONS...
- Page 2 Manual on the date of its issuance (shown in this page). On the other hand, the instrument may also be subject to important technical changes in the future, without the manual being updated. Therefore, see FERVI for information about modifications that could be implemented. REV. 2 March 2014...
-
Page 3: Table Of Contents
MEASURING INSTRUMENTS CONTENTS INTRODUCTION ..................4 SPECIFICATIONS ..................5 General Characteristics ....................5 Technical Specifications ....................6 Measurement specifications ..................6 2.3.1 Wind speed ....................... 6 2.3.2 Temperature ......................6 DESCRIPTION ................... 7 Description of the instrument panel ................7 MEASURING PROCEDURE ................8 Measuring air speed ......................8 Measuring temperature....................8 REPLACING THE BATTERY................. -
Page 4: Introduction
MEASURING INSTRUMENTS 1 INTRODUCTION The digital anemometer is an measuring instrument which is light, compact and easy to carry but at the same time precise and sophisticated, ideal for use by both amateurs and professionals. Convenient and easy to use, thanks to its robustness and reliability it will guarantee years of use, if the operating instructions are properly followed. -
Page 5: Specifications
MEASURING INSTRUMENTS 2 SPECIFICATIONS 2.1 General Characteristics LCD screen 40x20mm. Character height equal to 10mm, up to 4 characters can be displayed. Storage of the maximum recorded value; Conventional rotors eliminate the possibility of error; High-speed bearings, for extreme precision at all speeds of rotation. -
Page 6: Technical Specifications
MEASURING INSTRUMENTS 2.2 Technical Specifications Character height 10mm Display 4 characters can be displayed Speed: m/s - km/h - ft/min. – knots Unit of measurement Temperature: °C - °F Operating temperature 0°C ÷ 50°C Operating humidity ≤ 80% Structure of the wind speed sensor Conventional rotor with high speed bearings Temperature sensor Resistance sensor... -
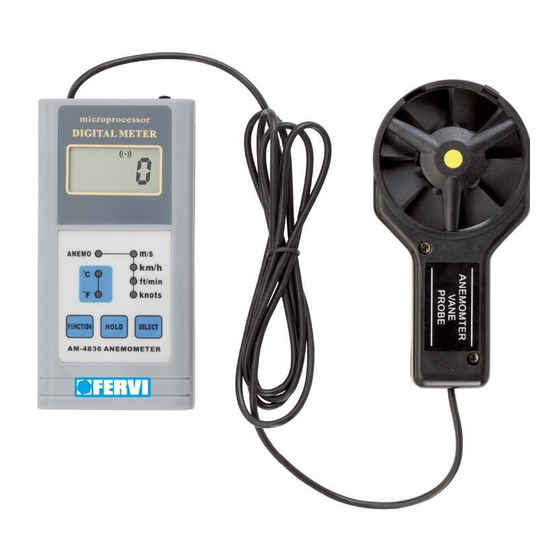
Page 7: Description
MEASURING INSTRUMENTS 3 DESCRIPTION Description of the instrument panel Figure 1 - Overview of the device On / off switch LCD screen Power output (0~2VDC) Led selection indicator SELECT, press this button to select the desired unit of measurement. HOLD, press this button to keep the peak value measured on the screen, press the button again to display the actual value measured Optional sensor input Led function in use indicator... -
Page 8: Measuring Procedure
MEASURING INSTRUMENTS 4 MEASURING PROCEDURE 4.1 Measuring air speed 1. Put the on/off switch of the instrument (3-1) to the "ON" position. 2. Select the desired unit of measurement, using the "SELECT" button. 3. Take hold of the meter and position the rotor against the air flow to be measured. 4. -
Page 9: Replacing The Battery
MEASURING INSTRUMENTS 5 REPLACING THE BATTERY Opening the instrument Make sure that the instrument is disconnected and switched off before replacing the battery. 1. Place the anemometer on a level surface with the screen facing down. Figure 2 – rear of the instrument 2. - Page 10 MEASURING INSTRUMENTS 4. Place battery inside battery compartment, and then replace the cover. Figure 5 - Inserting the battery Battery replacement The operation must always be performed with the instrument off. Be particularly careful to avoid pinching the wires of the connection socket of the battery while inserting the battery inside the battery compartment and when closing the battery compartment cover.
Need help?
Do you have a question about the A005 and is the answer not in the manual?
Questions and answers