VIA Technologies ARTiGO A820 Quick Start Manual
Hide thumbs
Also See for ARTiGO A820:
- User manual (49 pages) ,
- Quick start manual (25 pages) ,
- Development manual (10 pages)
Table of Contents
Advertisement
Quick Links
Advertisement
Table of Contents

Subscribe to Our Youtube Channel
Related Manuals for VIA Technologies ARTiGO A820


Summary of Contents for VIA Technologies ARTiGO A820
- Page 1 QUICK START GUIDE ARTiGO A820 Linux BSP v3.2.1 1.00-10262016-160700...
- Page 2 The information and product specifications within this document are subject to change at any time, without notice and without obligation to notify any person of such change. VIA Technologies, Inc. reserves the right the make changes to the products described in this manual at any time without prior notice.
- Page 3 ARTiGO A820 Linux BSP v3.2.1 Quick Start Guide Revision History Version Date Remarks 1.00 10/26/2016 Initial release...
-
Page 4: Table Of Contents
ARTiGO A820 Linux BSP v3.2.1 Quick Start Guide Table of Contents 1. Introduction ........................... 1 1.1. Package Contents............................... 1 1.1.1. BSP Folder Contents ..........................1 1.1.2. Document Folder Contents ........................1 1.1.3. EVK Folder Contents ..........................1 1.2. Version Information and Supported Features ..................... 2 2. -
Page 5: Introduction
1.1.2. Document Folder Contents ARTiGO_A820_Linux_BSP_v3.2.1_Quick_Start_Guide _v1.00_20161026.pdf: The Quick Start Guide provides an overview of getting started with the ARTiGO A820 system using Yocto with an OpenEmbedded filesystem. ARTiGO_A820_Linux_EVK_v3.2.1_Image_Installation_Guide_v1.00_20161026.pdf: The Image Installation Guide explains how to boot the Linux EVK system image on the ARTiGO A820 system in order to begin evaluating the platform. -
Page 6: Version Information And Supported Features
ARTiGO A820 Linux BSP v3.2.1 Quick Start Guide modules-imx6qvab820.tgz: contains the drivers for the VNT9271 USB Wi-Fi dongle, EMIO-1541 miniPCIe Wi-Fi module, EMIO-2531 miniPCIe Wi-Fi & BT module and EMIO- 2550 miniPCIe Mobile Broadband module. BT_Config folder: contains the three Bluetooth configuration files for A2DP support. -
Page 7: Image Development
Next, set the switch SW2 to the Micro SD position as shown below. Micro SD / SPI boot select switch diagram Insert the prepared Micro SD card into the ARTiGO A820, connect an HDMI display, and power on the device to initiate the boot process. -
Page 8: Booting From The Spi Rom And Emmc
ARTiGO A820 Linux BSP v3.2.1 Quick Start Guide 2.2. Booting from the SPI ROM and eMMC The ARTiGO A820 supports booting from the SPI ROM while loading the kernel and root filesystem from eMMC. The first step is to prepare a Micro SD card with the default image according to section 2.1. -
Page 9: Setting Up U-Boot Parameters
ARTiGO A820 Linux BSP v3.2.1 Quick Start Guide 2.3. Setting Up U-Boot Parameters The first step is to connect the host machine and the ARTiGO A820 through the onboard COM debug port. Use a serial port communication program such as PuTTY, GtkTerm, or Minicom, to configure serial port setting and connect to the debug console. -
Page 10: Restoring Default U-Boot Parameters
ARTiGO A820 Linux BSP v3.2.1 Quick Start Guide Next, power on the ARTiGO A820 to initiate the boot process. When prompted, press any key to stop the boot process, and enter the U-Boot console as illustrated by the screenshot below. -
Page 11: Using The Openembedded Console
ARTiGO A820 Linux BSP v3.2.1 Quick Start Guide 2.5. Using the OpenEmbedded Console The first step is to connect the host machine and the ARTiGO A820 through the onboard COM debug connector. Use a serial port communication program such as PuTTY, GtkTerm, or Minicom, to connect to the debug console. -
Page 12: Build Environment Setup
ARTiGO A820 Linux BSP v3.2.1 Quick Start Guide 3. Build Environment Setup This section guides you through setting up the build environment for development. All instructions are based on using Ubuntu 12.04 LTS and in newer Ubuntu versions. To make sure that the build process completes successfully, we recommend at least 120GB of disk space, and 15GB of combined memory and swap space on the host machine. -
Page 13: Image Build
ARTiGO A820 Linux BSP v3.2.1 Quick Start Guide 4. Image Build 4.1. Extracting the ARTiGO A820 BSP Use the following command to extract the contents of the BSP. $ tar xvf A820-yocto-bsp-v3.2.1.tar.bz2 4.2. Machine Configuration The via-setup-release.sh script creates the build directory with the Yocto configuration files for your target machine. -
Page 14: Hardware Functions
RS-232. 5.1.1. Setting Up RS-232 Mode The first step is to connect the host machine and the ARTiGO A820 through the COM 1 port. Use a serial port communication program such as PuTTY, GtkTerm, or Minicom, to connect to the COM 1 port. -
Page 15: Setting Up Rs-485 Mode
Enable the RS-485 on the ARTiGO A820 system with the following command: $ imx_rs485 1 Connect the host machine to the ARTiGO A820 COM 1 port with an RS-485 cable. To start the Minicom serial communication program on the ARTiGO A820, use the... -
Page 16: Configuring Network Settings
ARTiGO A820 Linux BSP v3.2.1 Quick Start Guide 5.2. Configuring Network Settings The ARTiGO A820 supports two LAN ports and the default setting is Gateway mode. In Gateway mode, LAN 1 is a WAN port while LAN 2 is a LAN port. If the system is already connected to the Wi-Fi module, it won’t support WLAN. -
Page 17: Configuring The Vnt9271 Usb Wi-Fi Dongle
ARTiGO A820 Linux BSP v3.2.1 Quick Start Guide 5.3. Configuring the VNT9271 USB Wi-Fi Dongle The VNT9271 USB Wi-Fi dongle supports Wi-Fi function. 5.3.1. Connecting to the Internet The first step is to insert the VNT9271 USB Wi-Fi dongle into the USB port. Next, remove the LAN cables, Wi-Fi miniPCIe or 3G miniPCIe module. -
Page 18: Configuring The Emio-1541 Minipcie Wi-Fi Module
5.4.1. Connecting to the Internet The first step is to insert the EMIO-1541 module into the miniPCIe slot. Next, remove the LAN cables and USB Wi-Fi dongle. Finally, power on the ARTiGO A820. Inserting the EMIO-1541 module When the boot process is completed, click on the “Connection Manager” icon to configure WLAN. -
Page 19: Configuring The Emio-2531 Minipcie Wi-Fi & Bt Module
5.5.1. Connecting to the Internet The first step is to insert the EMIO-2531 module into the miniPCIe slot. Next, remove the LAN cables and USB Wi-Fi dongle. Finally, power on the ARTiGO A820. Inserting the EMIO-2531 module When the boot process is completed, click on the “Connection Manager” icon to configure WLAN. -
Page 20: Enabling Bluetooth
ARTiGO A820 Linux BSP v3.2.1 Quick Start Guide 5.5.2. Enabling Bluetooth The following section explains setting up the Advanced Audio Distribution Profile (A2DP) and Serial Port Profile (SPP). 5.5.2.1. Setting Up Bluetooth A2DP Profile The first step is to copy the pulseaudio-system.conf, bluetooth.conf and system.pa files to /etc/dbus-1/system.d/ folder to replace the original pulseaudio-system.conf,... - Page 21 ARTiGO A820 Linux BSP v3.2.1 Quick Start Guide The default audio output setting for the ARTIGO A820 is HDMI device. To list all the available audio output devices, use the following command: $ pactl list short sinks 0 alsa_output.platform-sound-hdmi.23.analog-stereo module-alsa-card.c s16le 2ch 48000Hz SUSPENDED 2 bluez_sink.00_1D_82_BC_C1_C4...
- Page 22 Start a serial communication program on the host machine with the same communication settings using the appropriate Bluetooth SPP device. Afterwards the Bluetooth SPP device and the ARTiGO A820 will be able to communicate through the programs (for example sending a keypress on one machine should be shown on the...
-
Page 23: Configuring The Emio-2550 Minipcie Mobile Broadband Module
ARTiGO A820 Linux BSP v3.2.1 Quick Start Guide 5.6. Configuring the EMIO-2550 miniPCIe Mobile Broadband Module The EMIO-2550 miniPCIe Mobile Broadband module supports 3G and GPS functions. 5.6.1. Connecting to the Internet The first step is to insert an active SIM card into the EMIO-2550 module, and then insert the EMIO-2550 module into the miniPCIe slot. -
Page 24: Enabling Gps
ARTiGO A820 Linux BSP v3.2.1 Quick Start Guide 5.6.2. Enabling GPS To configure the GPS functions of the module requires the use of the Minicom serial communication program. Open the Minicom serial communication program with the following command: $ minicom -s... -
Page 25: Configuring Watchdog Timer
ARTiGO A820 Linux BSP v3.2.1 Quick Start Guide 5.7. Configuring Watchdog Timer The wdt_driver_test.out provides an application to configure the Watchdog timer. To enable the Watchdog with the default timeout (60 seconds), use the following command: $ /unit_tests/wdt_driver_test.out enable wdt To change the timeout <value>... -
Page 26: Setting Up Gpio
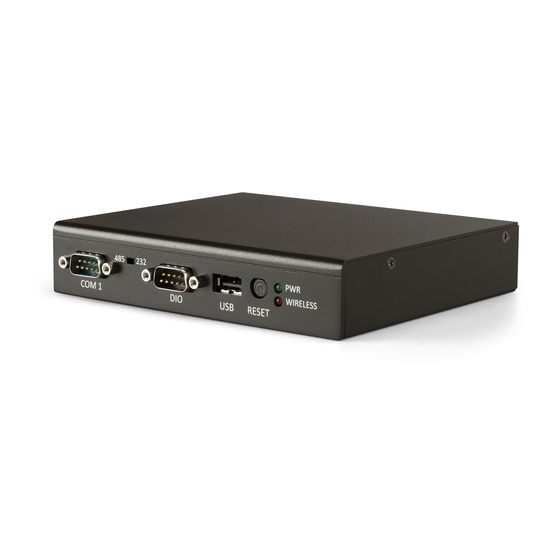
ARTiGO A820 Linux BSP v3.2.1 Quick Start Guide 5.8. Setting Up GPIO The DIO port on the ARTiGO A820 consists of 9 pins. The following section explains setting up these pins for input/output communication DIO port WIRELESS RESET COM 1 DIO port diagram 5.8.1. -
Page 27: Configuring Rtc
ARTiGO A820 Linux BSP v3.2.1 Quick Start Guide To output a “Low” value on the GPO pin, use the following command: $ echo 0 > /sys/class/gpio/gpio7/value To output a “High” value on the GPO pin, use the following command: $ echo 1 > /sys/class/gpio/gpio7/value 5.9.
Need help?
Do you have a question about the ARTiGO A820 and is the answer not in the manual?
Questions and answers