Table of Contents
Advertisement
Advertisement
Table of Contents

Related Manuals for Cellularline U-COM 3


Summary of Contents for Cellularline U-COM 3
- Page 1 User manual...
-
Page 2: Table Of Contents
SUMMARY 7. BLUETOOTH INTERCOM ® 7.1 Intercom pairing ................8 1. ABOUT 7.2 Two-way Intercom Conversation ............9 1.1 Product details ................. 3 7.3 Old Interphone Series ..............10 1.2 Package contents ................3 7.4 Anycom ..................10 8. FUNCTION PRIORITY AND FIRMWARE UPGRADES 2. -
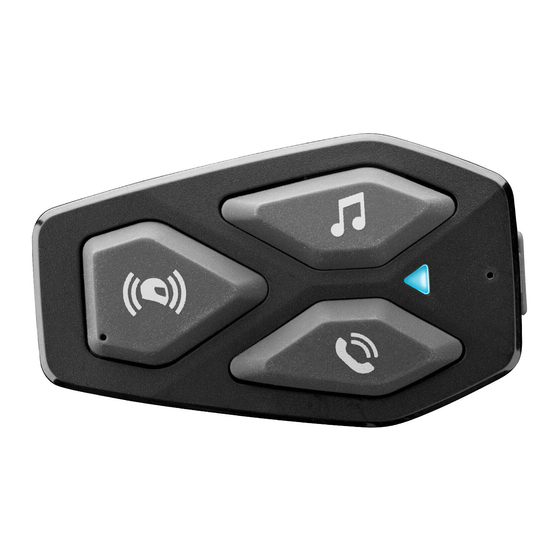
Page 3: About
1. ABOUT 1.2 Package contents Product details 1.1 Product details Battery Right speaker Music & Volume + Status led charging led 2 way connector Intercom DC Power Charging & Firmware Upgrade Port Phone & Volume – Left speaker 2 way connector Microphone 2 way connector Wired microphone... -
Page 4: How To Install
2. HOW TO INSTALL Installing the speakers and the microphone Installation 2.1 Install main unit Using the hook and loop fasteners for main unit Using the double sided adhesive tapes for main unit Using the clamp for main unit... -
Page 5: Getting Started
Power on Power off 2. With U-COM 3 on, press and hold central button for 10 seconds, to enter settings menu. Don’t release the button until the led light is blue. 1 sec 3. Press once MUSIC button to start phone pairing mode. -
Page 6: Second Mobile Phone Pairing
COLLEGAMENTI CONNECTIONS 2. With U-COM 3 on, press and hold central button for 10 seconds, to enter Casco pilota Rider’s helmet Second phone pairing (to be done with unit on) settings menu. Don’t release the button until the led light is blue. -
Page 7: Mobile Phone Usage
Beep Beep 5.2 Siri and Google Assistant 2 sec 3 sec U-COM 3 supports the Siri and Google Assistant access directly by pressing Music the PHONE button for two seconds. 2 sec 2 sec How to activate speed dial (with ADVANCED FEATURES on) -
Page 8: Music
2 sec devices (smartphones, 3 sec U-COM 3 can be paired with up to 3 other UCOM units (or Sena units), as ® MP3 players, Motorcycle TFTs etc ...) equipped with the A2DP profile. To shown in the following picture. -
Page 9: Two-Way Intercom Conversation
7.2 Two-way Intercom Conversation 2. Repeat the previous step again, pressing the center button (intercom) on the two units A and C for 5 seconds until you hear the voice prompt “Intercom pairing”. After pairing the control units, communication can be started, by pressing the INTERCOM button (center button), according to the diagram below. -
Page 10: Old Interphone Series
It is possible to pair previous Interphone series devices by pressing, with the unit on, the INTERCOM and TELEPHONE buttons for 5 seconds. Then start atching previous series. To be done with unit on on u-com 3 and with the unit off on the other 8.1 Function Priority... -
Page 11: Configuration Setting
(available for PC and MAC on www.interphone.com) or from the Interphone UNITE app. With U-COM 3 on, press and hold central button for 10 seconds, to enter Anycom pairing for other brands (except Sena) settings menu. Don’t release the button until the led light is blue. -
Page 12: Vox Intercom (Default: Disable)
9.2.5 VOX Intercom (Default: Disable) 9.2.8 HD Intercom (Default: Enable) If VOX Intercom is enabled, you can initiate an intercom conversation with HD Intercom enhances the two-way intercom audio from normal quality to the last connected intercom by voice. When you want to start intercom, say HD quality. -
Page 13: Troubleshooting
® 10.1 Fault reset Matching previous series. To be done with unit on on u-com 3 and with the unit off on the other device (consult the manual of the other device for more details) When the intercom is not working properly, you can reset the unit: 1.
Need help?
Do you have a question about the U-COM 3 and is the answer not in the manual?
Questions and answers
I can not pair with my Garmin Zumo Sat Nav. It just says can't connect despite finding it via blue tooth
To troubleshoot the pairing issue between the Cellularline U-COM 3 and a Garmin Zumo Sat Nav:
1. Activate GPS pairing mode: Turn on the U-COM 3 and press the specific button combination to activate GPS/Bluetooth pairing mode.
2. Start device search on Garmin Zumo: On the Garmin Zumo, start the search for new Bluetooth devices.
3. Select U-COM 3 from device list: When “U-COM 3 vx.x” appears in the list of available devices, select it.
4. Enter PIN if prompted: If the Garmin Zumo asks for a PIN, enter “0000”.
5. Confirm pairing: Wait for the U-COM 3 voice guide to confirm successful pairing.
6. Check for additional authorization: If the Garmin Zumo asks for further authorization, confirm it.
If pairing still fails, delete all previous pairings on both devices and try again.
This answer is automatically generated