
Related Manuals for Felix Instruments F-900


Summary of Contents for Felix Instruments F-900
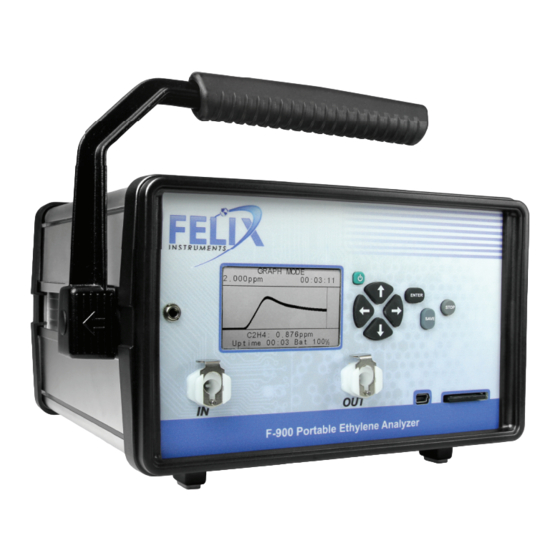
- Page 1 Maximize shelf life... Minimize shrinkage. F-900 Ethylene Gas Analyzer Operations Manual...
-
Page 3: Table Of Contents
DOCUMENT OVERVIEW INTRODUCTION…………………………………………………………………………………………………....…………...………………..1 Features…………………………………………………………………………………………………………………...……..………...…………2 Specifications…………………………………………………………………………………………………………………...……...……...……3 OPERATING INSTRUCTIONS……………………………………………………………………………………………………....……..5 Unpacking the F-900……………………………………………………………………………..………………………..……...……..…6 Charging the Internal Battery……..………………………………………………………………………………………...…………………..8 F-900 CO2 Sensor and Battery Power………………………………………………………..…………………………………...……………9 Measure Menu………………………………………………………………………………………………………………………………...………….9 Taking a Measurement….…………………………………………………………………………………………………………………….……10 Graph View……………………………………………………………………………………………………………………………………...….……11 Monitor Mode………………………………………………………………………………………………………………………...………………...13 Measurement Settings..……………………………………………………………………………………………………………..…...………14 Hot Keys…………………………………………………………………………………………………………………………………..…...………14 Field Mode……………………………………………………………………………………………………..………………………………...………16 Setup Menu…………………………………………………………………………………………………………………………...………...……….17 Setup Measure…………………………………………………………………………………………………………………………………………17 Setup GC Emulation Mode……………………………………………………………………………………………………...………...……….17 Setup Autosave…………………………………………………………………………………………………………….…………..…...…….20... - Page 4 Delete a File………………………………………………………………………………………………………...……...……………...…………….44 Create a File…………………………………………………………………………………………………………..…………...…………………….44 Open File………………………………………………………………………………………………………….………………………...…………….46 Data Transfer to a Computer…………………………………………………………………………………………..…………..………….47 Data Files on the Computer……………………………………………………………………...……………………………...……….……….48 FIRMWARE UPDATE………………………………………………………………………………...……………………………..…………….49 CLEANING AND MAINTENANCE OF THE F-900……………………………………..…………………..……………...……………….54 Refilling the Electrochemical Sensor…………………………………………………….………...……………………...………………….54 INTERFERING GASES……………………………………………………………………………………...…………………...……………..…….58 WARNINGS…………………………………………………………………………………………………………………………...………………….59 TECHNICAL SUPPORT………………………………………………………………………………………………………………...…………….60 Customer Service…………………………………………………………………………………………………...………………...…...………….60 Frequently Asked Questions……………………………………………………………………………………...…….…………..………….61 Guidelines for Bag Sampling……………………………………………………………………………...………...………………...………….66...
-
Page 5: Introduction
The F-900 analyzes the concentration of ethylene in a gas sample for the purpose of research or ethylene management. The F-900 employs an electro-chemical sensor as well as several other... -
Page 6: Features
GPS and time-date stamped data records External wire terminals for fixed location monitoring or control applications Figure 2: The removable SDcard on the F-900 makes data transfer quick and simple. 1554 NE 3 Ave, Camas, WA 98607, USA Phone (360) 833-8835 Fax (360) 833-1914 sales@felixinstruments.com... -
Page 7: F-900 Specifications
F-900 Instruction Manual rev. 1/16/2014 Specifications F-900 Specifications High Resolution Ethylene Sensor Electrochemical Air Sampling Rate 0.2 Liters/minute Sample Rate Open Loop - Monitoring @ 5 sec intervals Nominal Range 0-15 ppm, upper limit is 20 ppm Resolution 1 ppbv 5 % at 10 ppm;... - Page 8 F-900 Instruction Manual rev. 1/16/2014 Optional Sensors High Resolution Carbon Dioxide Sensor Low-Power Non-Dispersive Infrared Gas Analyzer Chopping Frequency Source Life 5000 Hours Nominal Range 1 - 2000ppm (Standard) 0 - 3000ppm (Optional) Resolution 0.1 ppm Repeatability ±0.1ppm (short term) Accuracy <...
-
Page 9: Operating Instructions
If the F-900 does not power on, eject the SDcard or disconnect the mini-USB cable from the front of the instrument. Then, power the F-900 on. Re-insert the SDcard or reconnect the charger. -
Page 10: Unpacking The F-900
F-900 Instruction Manual rev. 1/16/2014 (Note: to force a power off and reset of the F-900 at any point, a user may press and hold the POWER button for 10 seconds. This “emergency hard shut-down” feature exists to address hardware or software problems and should not be used except when needed, in general, simply pressing the Power button in the typical manner will power off the F-900). - Page 11 F-900 Instruction Manual rev. 1/16/2014 The F-900 Field Kit is designed to include parts to non-destructively sample fruit in the field. For this reason, the F-900FK arrives in a hard-sided carrying case and has a chamber and wand with flexible tubing to sample fruit or plants. The F-900FK also includes that parts and accessories that arrive with the F-900.
-
Page 12: Charging The Internal Battery
F-900 Instruction Manual rev. 1/16/2014 Charging the Internal Battery The F-900 arrives with a wall charger that can be used to recharge the F-900 battery, as well as for continually powering the unit during long-term monitoring. To charge the F-900: ... -
Page 13: F-900 Co2 Sensor And Battery Power
The CO sensor will draw power when turned on, even if the F-900 is not actively measuring. Turn off the CO sensor when charging the unit;... -
Page 14: Measure Menu
The F-900 will display the “Sensor Stability” screen after pressing the RIGHT arrow to get into the Measure Menu. The F-900 will begin to warm-up. The display will show the File that is open and the Flow of gas being pumped through the instrument. Below this will be whether the initialization is automatic or manual. -
Page 15: Graph View
Graph View Graph View will be entered automatically when the unit has stabilized in Sensor Stability mode. Or to enter Graph View, press the RIGHT arrow when the F-900 is in Sensor Stability Mode. This view graphically displays the measured C value over time. - Page 16 Every time a data point is added, the time scale is incremented. For time under 10 minutes, the graph is updating almost every second. The bottom of the display shows the uptime of the F-900 and current battery level. 1554 NE 3...
-
Page 17: Monitor Mode
Press the DOWN arrow to enter GRAPH Mode. To use the F-900 in Monitor Mode to continuously monitor fruit storage rooms or other locations, or to run the instrument for days or weeks at a time, connect the mini-USB cable to the charger cable and to the connection port on the front panel. -
Page 18: Measurement Settings
F-900 Instruction Manual rev. 1/16/2014 Settings The Settings screen is accessed by using the RIGHT arrow from Monitor Mode, and provides a short list of variables which may be manipulated while measurements are being made. From the Settings screen, the exterior Inbound and Outbound Chambers are turned On/Off, valves are closed causing gas to circulate internally (Closed Loop On/Off), or the value displayed by the unit is set to zero. - Page 19 SDcard, the user must press Enter at the warning screen. Pressing any other button will return to the main menu. Each time the F-900 tries to autosave, the unit will flash “write error” instead of “saved” at the top of the display.
-
Page 20: Field Mode
Field Mode To use the F-900 Field Kit in the field or laboratory, attach the hoses of the chamber wand to the IN and OUT ports on the front panel. Slide the end of the wand into the chamber and tighten the thumb-screw. -
Page 21: Setup Menu
GC Emulation Mode is only available with the F-900 field kit. Setup GC Emulation Mode To use the F-900 to analyze a small sample in a syringe, the GC Emulation Mode should be used. With the simple addition of our inline injection port, small volumes of analyte can be accurately measured. - Page 22 F-900 Instruction Manual rev. 1/16/2014 How GC Emulation Works The patent pending Flow Injection Analysis method integrates the signal from the ethylene sensor for 300 seconds. The resulting value, reported as area counts, is then compared against a user- definable calibration point and an estimated concentration is determined. The user-definable calibration point should be determined on a technician by technician basis as injection technique will alter the result.
- Page 23 F-900 Instruction Manual rev. 1/16/2014 3. Connect the inline injection port. 4. Fill the sample syringe with analyte. 5. When prompted, inject the sample and then press Enter. Setup injection tube then press Enter Uptime 00:13 Bat 98% 6. Wait 300 seconds (5 minutes) for results.
-
Page 24: Setup Autosave
The files created by the F-900 are saved in .csv (comma separated value) format, to be opened with Microsoft Excel or other spreadsheet program. -
Page 25: Setup Sensor
The Setup Sensor Menu has three options, Sensor Selection, Sensor Voltammetry and Closed Loop Cleaning. Sensor Selection allows the user to turn on/off different sensors of the F-900. Not all units are built with all sensors, so see the Production Check Sheet at the end of the manual to see which sensors are included in your unit. - Page 26 A screen similar to the Monitor Mode screen will appear, but the F-900 is cycling through the air inside the unit and is not be sampling the incoming air. Press stop to exit this mode and return to the Setup Sensor Menu. If Chamber A or B have been selected in the setup menu, or during measurements in Monitor Mode, then they will be included in the closed loop cleaning process.
-
Page 27: Setup C2H4 Calibration
Felix Instruments Technician only.** Calibration Parameters are set by a Felix Instruments Technician during factory calibration and are specific to each instrument. The internal offset is the ADC voltage output from the sensor when no ethylene is present, and gain is a measure of the ADC voltage output from the sensor in the presence of ethylene. - Page 28 F-900 Instruction Manual rev. 1/16/2014 during the measurement period, the offset autocorrection will be initiated the next time the user enters “Sensor Stability”, even if less than 24 hours have passed. Adjust enable: If “Yes” is selected, the unit will automatically adjust the offset every 24 hours or upon startup if more than 24 hours has passed between uses.
-
Page 29: Setup Co2 Calibration
F-900 Instruction Manual rev. 1/16/2014 Calibration To access the Calibrate CO feature of the F-900, press the RIGHT arrow key when Calibration is highlighted on the Setup Menu. Press enter to continue to the Calibration mode. The CO sensor (IRGA or ER) needs to be enabled in the SETUP<SENSOR menu to access the SETUP<CO... - Page 30 F-900 Instruction Manual rev. 1/16/2014 standardized gas with at least 100 ppm CO , but not over the range of the CO sensor (2000 ppm or 3000 ppm, check the production test check sheet at the end of the manual for CO sensor information).
- Page 31 Tips for Calibrating the F-900 CO Sensor with a buffer system: The operator should stand away from the F-900. Use extra tubing to get the intake source away from human breath. Use a buffer tank system to stabilize the intake source.
- Page 32 F-900 Instruction Manual rev. 1/16/2014 4. Insert a longer plastic tube into the cap of the buffer bottle that will connect to the “IN” of the instrument. Use hot glue or otherwise seal the tubing to the cap, with no leaks.
- Page 33 F-900 Instruction Manual rev. 1/16/2014 7. To use the buffer bottle, make sure that the tubing is clear from obstruction. Connect the In tubing to the unit. Place the buffer bottle in a location that has stable CO concentration (away from operator, cars, furnace, photosynthesizing plants).
-
Page 34: Setup O2 Calibration
F-900 Instruction Manual rev. 1/16/2014 Calibration The offset and gain from the previous calibration can be seen under Calibration Parameters. These values are achieved by setting a zero and a span for the unit. To re-calibrate, pressurized N gas and gas will be needed. -
Page 35: Setup Time And Date
Setup Time and Date To change the time and date on the F-900, press the RIGHT key when “Time” is highlighted on the Setup menu. This utility allows the user to set-up the instrument in different time zones or to adjust the time after daylight savings. -
Page 36: Setup Chamber
F-900 Instruction Manual rev. 1/16/2014 Setup Chamber To access the Setup Chamber feature of the F-900, press the RIGHT arrow key when Chamber is highlighted on the Setup Menu. Here, the user can turn on or off the in-line conditioning columns on the back of the instrument. - Page 37 Setup<Chamber menu and fill Chamber A with the appropriate consumable. Connect the fruit chamber hoses to both the IN and OUT ports on the front of the F-900. Keep the plastic containers on the F-900, even when empty, to protect the brass intakes.
- Page 38 The top line of the Monitor display will indicate CH_IN, meaning that Chamber B is enabled. Next, the current state (measure or cleaning) will be shown. If the F-900 is in state of Measure, the data will reflect the current measurement. If the F-900 is in a state of Cleaning, the data will show two ethylene values, one will be the last measured value in measure period and the second will be the current value in cleaning period.
- Page 39 1. Fill Conditioning Chamber In (B) only to the fill line and never completely fill the conditioning chamber with water. 2. Always keep the top panel of the F-900 facing up and do not tilt the instrument when there is water in the conditioning chamber. When operating in SPECIAL mode, do not operate the instrument with the display panel facing upwards.
-
Page 40: Setup Terminals
The terminal block is located between the chambers for consumables on the back panel of the F-900. The F-900 can turn on and off the gas or a fan based on the measured ethylene concentration of the room (or chamber). In this way, the F-900 could be used to control a fan set to evacuate a store room if ethylene concentrations increase past a set point. - Page 41 (pull straight out). The piece in the figure below will separate from the F-900. Slide the wire from what is going to be controlled through the opening for pin 4 or pin 5. Use a screw driver to tighten and clamp onto the wire, creating a connection. The removable section of the terminal block is designed to stay with the fan or gas control.
-
Page 42: Setup Board
F-900 Instruction Manual rev. 1/16/2014 Setup Board The Setup Board Menu should only be changed by a Felix Instruments Technician. This menu allows the user the select the type of hardware platform that the unit operates on, and should only be changed at installation, or if hardware is upgraded. -
Page 43: View Menu
View Files The View Files menu allows the user to review the filenames and file size of any files on the F-900. To view collected and saved data, either download files via USB or eject the SDcard and insert it in a computer. -
Page 44: View Voltage
Press the LEFT arrow or STOP to exit back to the View Menu. Voltage is set for each individual unit before leaving the Felix Instruments factory and is board specific. For default voltage values, please see the Production Test Check Sheet at the end of the Instruction Manual or contact support@felixinstruments.com... - Page 45 F-900 Instruction Manual rev. 1/16/2014 The Board refers to the hardware version of the unit. Features described in this manual are associated with all versions of hardware. When discrepancies occur, they are listed, along with the version that they are associated with.
-
Page 46: Other View Menu Options
512B GPS System Features The F-900 has a built-in GPS system which can relay the longitude, latitude and altitude of the instrument when performing measurements. The View GPS screen displays the mode of the GPS sensor (SEN= $GPGGA), as well as the values for latitude, longitude, altitude and indicates the number of satellites currently connected to. -
Page 47: File Menu
File Menu The File Menu is accessed by highlighting “File” on the Main Menu and pressing the RIGHT arrow key. Here, the user can manipulate files on the F-900, with options to clear, delete, create and open files. The F-900 uses an SDcard to store all measurements. This means the user is able to create, clear and delete any measurement file. -
Page 48: Delete A File
F-900 Instruction Manual rev. 1/16/2014 Delete a File Press the RIGHT arrow when “Delete” is highlighted on the display to get the unit into the delete file mode. This mode will erase a file (and filename) completely from the memory/SDcard. In this mode, the top line of the display reads “Delete”... - Page 49 <stop> The F-900 will save all parameters for each measurement on the SDcard. Once finished creating the file name, press the ENTER key, or press STOP to abort the process. The F-900 will exit to the File Menu. 1554 NE 3...
-
Page 50: Open File
F-900 Instruction Manual rev. 1/16/2014 Open File Press the RIGHT arrow when “Open” is highlighted on the display to get the unit into the open files mode. The top line of the screen will read “Open” on the left, and File on the right. Filenames are listed on the left and the file size is listed in the right column. -
Page 51: Data Transfer To A Computer
(computer). The user can only view/manipulate data on a computer via the USB connection, or with the removable SDcard. Data cannot be viewed after it is saved on the F-900. Once the instrument is connected to the computer via USB cable, it is strongly recommended that the user copy and re-save the files and images to the hard drive of the computer. -
Page 52: Data Files On The Computer
In this example, the CO sensor was not used in the example below, so the concentration values are zero. Figure 14: Example data spreadsheet for a F-900 measurement. REMEMBER: Always save the data files to the computer before making changes or starting analysis. -
Page 53: Firmware Update
Transfer all data files from the SDcard and DELETE all data files on SDcard before doing the firmware update! Leaving data files from older firmware versions may corrupt the SDcard. Several files should be accessed from the software CD or downloaded from the F-900 software webpage (http://www.cid-inc.com/CI-900-software.php). Always double-check the webpage for the latest compatible firmware version depending on the serial number of the F-900. - Page 54 Follow the prompts in the libsusb-win32 Inf-Wizard. i. Click Next after making sure the device is connected to the system. ii. Select the F-900 from the list. It may not be called the F-900. The vendor ID is 0x0483 and Product ID is 0x0572 iii.
- Page 55 F-900 Instruction Manual rev. 1/16/2014 iv. Re-name the Device Name to F-900 and click Next. v. Save the .inf file and remember where. vi. In the libusb-win32 Inf-Wizard, click the Install Now button. 1554 NE 3 Ave, Camas, WA 98607, USA Phone (360) 833-8835 Fax (360) 833-1914 sales@felixinstruments.com...
- Page 56 4. Open the DL203_900.exe “Transfer Code to CI-203 or F- 900” application. 5. Select File and Open. 6. Navigate to the F-900-ver-x.xx.bin. This is the code for the instrument. The .bin file should be located in the same folder as the DL203_900.exe.
- Page 57 F-900 Instruction Manual rev. 1/16/2014 10. Power on the F-900 and check the firmware version at the top of the display. The Transfer Code software application will indicate that no instrument is found, if the F-900: is not connected to the computer ...
-
Page 58: Cleaning And Maintenance Of The F-900
CLEANING AND MAINTENANCE OF THE F-900 The F-900 housing can be wiped down with a damp cloth if the unit becomes dirty or dusty. Please make sure to always keep the IN and OUT ports on the front panel clear from any obstructions. - Page 59 To Refill the Sensor By Opening Up the F-900: BE EXTERMELY CAREFUL NOT TO DRIP WATER ONTO ANY INTERNAL PARTS OF THE F-900! 1. Open the hard-sided case of the instrument; remove the top and back panels. The black plastic bezels that surround the front panel and back panel can be removed by unsnapping the middle of the side where there is a slight indentation.
- Page 60 F-900 Instruction Manual rev. 1/16/2014 5. Locate the black electrochemical sensor labeled “Interscan.” 6. Disconnect the tubing entering the white connection on the sensor by holding the base of the white connector in your hands firmly while sliding out the tubing.
- Page 61 Then, turn the F-900 on and resume measurements. Note: Weighing the entire F-900 unit on an analytical balance after the sensor has been refilled will allow you to monitor the water level of the sensor, by keeping track of the weight loss of the whole F-900 unit.
-
Page 62: Interfering Gases
This causes the ethylene value to be falsely high in the presence of interfering gas. Felix Instruments is currently experimenting to see the extent of the interference, as well as testing a method to absorb some of the competing gases and provide better ethylene measurements. -
Page 63: Warnings
Keep the analyzer in a clean and ventilated room at ambient temperature. Do not allow fluid to aspirate in the analyzer, which can destroy the sensors. Do not use the F-900 in a high RF (radio frequency) environment. High RF will disrupt the F-900. -
Page 64: Technical Support
F-900 Instruction Manual rev. 1/16/2014 TECHNICAL SUPPORT If you have a question about the F-900, first look in the F-900 Operation Manual. There is also online support available for the F-900 through our parent company at http://www.cid-inc.com/CI- 900-support.php. If you cannot find the answer, you can contact a Technical Support Representative located in your country. -
Page 65: Frequently Asked Questions
F-900 Instruction Manual rev. 1/16/2014 Frequently Asked Questions If there are any questions about the F-900, please check the Frequently Asked Questions below, as well as the CID Bio-Science and Felix Instruments support webpage and forum at http://www.cid- inc.com/F-900-support.php. 1. What type of fruit produces ethylene? a. - Page 66 5. How do I create and open a file to start using the F-900? a. To start using the F-900, you need to create a file to save data into. Go to File<Create. Change the file00 to the desired file-name and press save. Next, open the file to save measurements.
- Page 67 8. What are some possible applications for the F-900? a. The F-900 could be used to help optimize Controlled Atmosphere Storage Rooms and prevent losses. Ethylene is an important and sensitive marker for ripening of fruits. Other postharvest research applications are possible.
- Page 68 16. What type of membrane does the electrochemical sensor have? a. The electrochemical sensor uses a nafion or nafion-like membrane. 17. What is the detection rate of the F-900, taking into account the weight of the fruit (or sample) and the time measured? a.
- Page 69 F-900 Instruction Manual rev. 1/16/2014 Sensitivity to C : 0.1 µL/L or 100 nL/L Therefore, the F-900 optimally detects around 1500 nL/hr. If the specimen weighs 50 grams, then the detection rate is: 30 nL C /gfw/h. The unit is nanoliters of ethylene per gram fresh weight per hour.
-
Page 70: Guidelines For Bag Sampling
F-900 using the accessory parts. 1. Ensure that the bag material and fittings are appropriate for the compounds to be sampled. - Page 71 Connect the sample bag to the IN port of the F-900. Open the sample bag to allow gas to start flowing to the F-900. It takes about 3-5 minutes to measure a sample bag if the concentration of ethylene before measuring the sample bag is low.
-
Page 72: Felix Instruments Hardware Warranty
The purchaser is to pack, ship, or deliver the instrument to Felix Instruments, in Camas, Washington, USA, within 30 days after Felix Instruments has received written notice of the defect at the customer’s expense. No other arrangements may be made unless otherwise approved in writing by Felix Instruments. -
Page 73: Appendix I: Material Safety Data Sheet For 2N Sulfuric Acid
F-900 Instruction Manual rev. 1/16/2014 APPENDIX I: MATERIAL SAFETY DATA SHEET FOR 2N SULFURIC ACID SOLUTION SECTION 1: CHEMICAL PRODUCT AND COMPANY IDENTIFICATION Product Name: Sulfuric Acid, 2N Catalog Codes: CAS#: Mixture. RTECS: Not applicable. TSCA: TSCA 8(b) inventory: Sulfuric acid; Water CI#: Not applicable. - Page 74 F-900 Instruction Manual rev. 1/16/2014 Potential Chronic Health Effects: Extremely hazardous in case of skin contact (corrosive, irritant), of eye contact (irritant), of ingestion, of inhalation. Nonsensitizer for skin. Non-permeator by skin. CARCINOGENIC EFFECTS: Not available. MUTAGENIC EFFECTS: Not available.
- Page 75 F-900 Instruction Manual rev. 1/16/2014 SECTION 6: ACCIDENTAL RELEASE MEASURES Small Spill: Dilute with water and mop up, or absorb with an inert dry material and place in an appropriate waste disposal container. If necessary: Neutralize the residue with a dilute solution of sodium carbonate.
- Page 76 F-900 Instruction Manual rev. 1/16/2014 SECTION 9: PHYSICAL AND CHEMICAL PROPERTIES Physical state and appearance: Liquid. Odor: Odorless. Taste: Not available. Molecular Weight: Not applicable. Color: Clear Colorless. pH (1% soln/water): 2 [Acidic.] Boiling Point: The lowest known value is 100°C (212°F) (Water).
- Page 77 F-900 Instruction Manual rev. 1/16/2014 SECTION 12: ECOLOGICAL INFORMATION Ecotoxicity: Not available. BOD5 and COD: Not available. Products of Biodegradation: Possibly hazardous short term degradation products are not likely. However, long term degradation products may arise. Toxicity of the Products of Biodegradation: The products of degradation are more toxic.
-
Page 78: Appendix Ii: Procedure For Validation Of Ci-900 Using Fruit
The purpose of this method is to determine what response the sensor has without trapping of interfering gases. This can be thought of as the baseline response Procedure: 1. Turn on the F-900, verify chambers are set to off and flow is set to 200 ml/min. 2. Connect experimental setup as show in Figure 15. - Page 79 1. Fill Conditioning Chamber_Inbound (B) with distilled water and clean the water using a sodium permanganate tube connected to the inlet of the F-900, until the background signal is below 20ppb. 2. Load the sample specimen into the fruit chamber.
- Page 80 F-900 Instruction Manual rev. 1/16/2014 Figure 15: Set-up for fruit chamber using potassium permanganate (KMnO ) to scrub ethylene from the outside air. 1554 NE 3 Ave, Camas, WA 98607, USA Phone (360) 833-8835 Fax (360) 833-1914 sales@felixinstruments.com http://www.felixinstruments.com...
-
Page 81: F-900 Production Test Check Sheet
F-900 Instruction Manual rev. 1/16/2014 F-900 PRODUCTION TEST CHECK SHEET SERIAL NUMBER: Firmware Version: SENSOR: Weight (grams): C2H4 F-900 fully assembled Optional Sensors Included (Yes/No) C2H4 Low Resolution C02 High Resolution CO2 Low Resolution CALIBRATION PARAMETERS C2H4 High Resolution Internal offset... - Page 82 F-900 Instruction Manual rev. 1/16/2014 1554 NE 3 Ave, Camas, WA 98607, USA Phone (360) 833-8835 Fax (360) 833-1914 sales@felixinstruments.com http://www.felixinstruments.com...
-
Page 83: Warranty Registration Card
Ave, Camas, WA 98607, USA Phone: (360) 833-8835 Fax: (360) 833-1914 e-mail: sales@felixinstruments.com Web: www.felixinstruments.com PRODUCT REGISTRATION CARD Please complete and return this form to Felix Instruments within 30 days to validate your Warranty on Parts and Labor. Registration Information:...
Need help?
Do you have a question about the F-900 and is the answer not in the manual?
Questions and answers