Advertisement
Available languages
Available languages
Quick Links
5216 Portside Dr, Medina Oh 44256 USA • PH: 1 330.722.5033 • FAX: 1 330.722.5037
Read all instructions BEFORE assembly and USE of product.
FOR CUSTOMER SERVICE CALL
1-877-716-2757
(outside of U.S. 330-722-5033). DO NOT CALL
RETAILER OR RESELLER FOR SERVICE
AS THEY ARE NOT AUTHORIZED TO
RESOLVE ANY SERVICE ISSUES.
FOR FEDERAL SAFETY STANDARD
COMPLIANCE CERTIFICATES, PLEASE VISIT
OUR WEBSITE AT
www.foundations.com
ASSEMBLY ASSISTANCE
IMPORTANT: retain for future reference read
carefully.
Foundations
strives for the highest quality in our
®
products but occasionally a missing part or problem
can occur during assembly.
If any parts are missing or broken or you need
assistance with assembly, DO NOT return the
product to your dealer. Go to our website at
www.foundations.com or Call Foundations
assistance at 1-877-716-2757 (U.S. Only) or
1-330-722-5033 (Monday through Friday, 9:00
a.m.– 4:00 p.m. Eastern Time). Please have the
model number and manufacture date available
when you call or write us at: Foundations
5216 Portside Dr. Medina Oh. 44256
ASSEMBLY INSTRUCTIONS
• Adult assembly required.
• Read all instructions BEFORE assembly and USE
of product. KEEP INSTRUCTIONS FOR FUTURE
USE.
• Unpack carton, remove packing materials,
including poly bag. Identify and check all parts.
Foundations
www.foundations.com
Dressing Table
Models Covered: F06216
KEEP INSTRUCTIONS FOR FUTURE USE.
for
®
,
®
Worldwide, Inc.
®
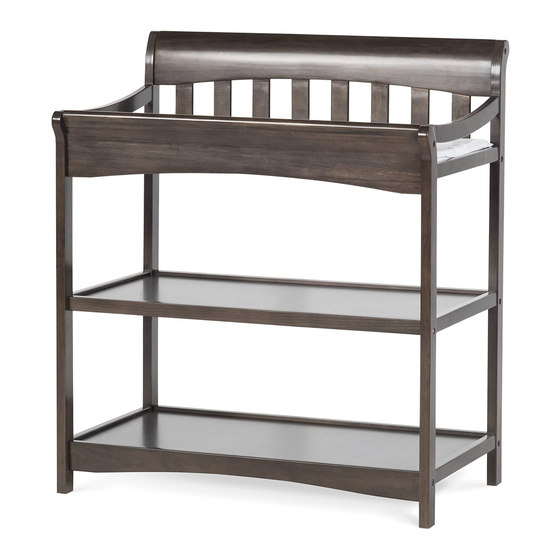
Assembled Dressing Table
Record the information for your product here:
Model number:
Manufacture date:
PO number:
1
AB20032_G1
Advertisement

Related Manuals for Foundations F06216


Summary of Contents for Foundations F06216
- Page 1 Record the information for your product here: a.m.– 4:00 p.m. Eastern Time). Please have the model number and manufacture date available Model number: when you call or write us at: Foundations ® 5216 Portside Dr. Medina Oh. 44256 Manufacture date:...
-
Page 2: Parts List
If any parts are missing or broken or you need assistance with assembly, DO NOT return the product to your dealer. Call Foundations ® assistance at 1 877.716.2757 (U.S. Only) or 1 330.722.5033 (Monday through Friday,... - Page 3 STEP 1 Parts K, L, M and N will be attached to End Assembly - Right J as shown. Before this assembly, Groove Counterbored Holes install one (1) Dowel Pin H into receiving holes in each of parts L and N as shown in diagram and then Allen into End Assembly - Right J.
- Page 4 STEP 3 Attach End Assembly - Left I following the same process as completed during Step 1. Also guide Assembly Shelves O and P into the receiving grooves in End from Step 2. Assembly - Left I and thread Allen Bolts B into metal threaded inserts.
- Page 5 STEP 4 Align the holes in each end of Belt G with the holes NOTE: Style of Dressing Table may vary. in the Top Shelf O. Attach by inserting Washer E on Allen Bolt C then through the hole in the Top Shelf O.
- Page 6 TO CLEAN THIS FINE FURNITURE. STORAGE AND USE OF CHANGING TABLE: After completing the assembly process you are advised to read and be aware of all Division of Foundations Worldwide, Inc. WARNINGS, CAUTIONS, CLEANING, STORAGE, USE AND 5216 Portside Dr.
-
Page 7: Guide D'assemblage
Si une pièce est manquante ou brisée, ou si vous avez besoin d’aide pour assembler le produit, NE retournez PAS le produit au détaillant. Visitez notre site Web au www.foundations.com ou demandez de l’aide à Foundations en composant le ®... -
Page 8: Liste Des Pièces
NE retournez PAS le produit au détaillant. Appelez Foundations® en composant le 1-877-716-2757 (É.-U. seulement) ou le 1-330-722-5033 (du lundi Trous au vendredi, de 9 h à 16 h, heure normale de Étiquette... - Page 9 ÉTAPE 1 Les pièces K, L, M et N doivent être fixées au côté droit J, comme il est illustré. Avant de commencer Rainure Trous chambrés l’assemblage, installer une (1) goupille de positionnement H dans les trous d’accueil dans la traverse avant supérieure L et la traverse avant Boulons inférieure N, comme il est illustré...
- Page 10 ÉTAPE 3 Fixez le côté gauche I en suivant la même Pièces assemblées procédure effectuée à l’étape 1. Insérez à l’étape 2. également les étagères O et P dans les rainures du côté gauche I et vissez les boulons hexagonaux B dans les douilles taraudées en métal.
- Page 11 ÉTAPE 4 Alignez les trous à chaque extrémité de la ceinture REMARQUE : Le modèle de la table de maintien G avec les trous de l’étagère supérieure à langer peut varier. O. Fixez en enfilant une rondelle E sur le boulon hexagonal C, puis insérez le boulon dans le trou de l’étagère supérieure O.
- Page 12 N’utilisez PAS la table à langer si des pièces sont manquantes ou endommagées; demandez l’aide de Foundations® en composant le 1-877-716-2757 (É-U que vous avez noté...
Need help?
Do you have a question about the F06216 and is the answer not in the manual?
Questions and answers