Advertisement
Quick Links
Advertisement

Related Manuals for E-LOK 9-Series


Summary of Contents for E-LOK 9-Series
- Page 1 905 & 915 User Manual...
-
Page 2: Summary Check List
9 - S e r i e s Summary Check List: For further details see pages 8-12 1. Crop out done as per template. 2. Arrow on spindle hub points to lever/hinges. 3. If changing handing, ensure plastic washers re-installed and fixing screw hand tightened. - Page 3 9 - S e r i e s Please Note: Keep the included mechanical keys in a convenient place such as an Elements Hardware 1236-BLK Key Safe Replace the batteries when they have low voltage Read this User Manual carefully before installing your 9- Series Smart Lock 1236-BLK Shown:...
-
Page 4: Contents Page
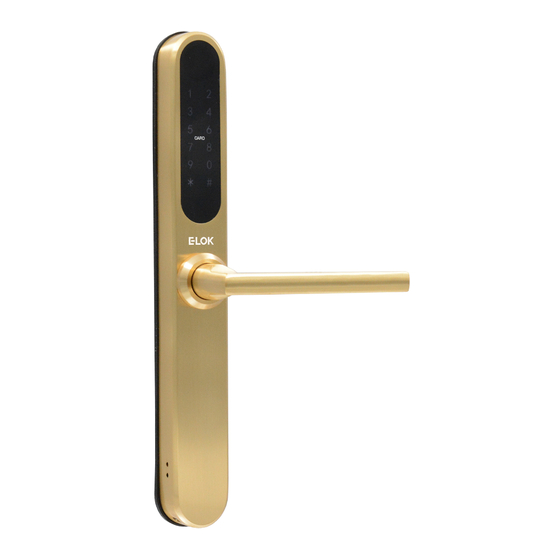
Pg 29. Unlock with Mechanical Key Pg 30. E-LOK Gateway Pg. 1 Pg 31. E-LOK Gateway Pg. 2 Pg 32. E-LOK Gateway Pg. 3 Pg 33. E-LOK Gateway Reset, Transfer Ownership & Specs Pg 34. Maintenance Guide Pg 35. Important Notes Pg 36. Contact... - Page 5 9 - S e r i e s 9-Series Body Dimensions: E-LOK 905 model shown on left with Standard Lever E-LOK 915 model shown in mid-left with Snib Lever Mounting points shown mid-right Body and lever projection shown on right...
- Page 6 9 - S e r i e s Mortice Lock Options: All Mortice templates are available online at E-LOK.com Back set: 35mm Sliding door lock 30mm 35mm 45mm 52mm 47mm Case Width: Back set: 40mm 60mm 45mm 57mm 62mm 74mm...
- Page 7 9 - S e r i e s 9-Series Packing List: (not included with 905-0 & 915-0) Front Panel Back Panel User Manual Mortice lock QTY 1 QTY 1 QTY 1 QTY 1 Faceplate & Mechanical Key RFID Card Split Pin...
-
Page 8: Specifications
9 - S e r i e s Specifications: Product Name: E-LOK 9-Series Smart Lock Operating Application: E-LOK App Manufactured Material: 304 Stainless Steel Finish Styles: Electroplate Black, Stainless Steel Unlock Methods: PIN Code RFID Card E-LOK App Mechanical Key Max Num. - Page 9 9 - S e r i e s Adjusting the Handing: Location of screw shown: To turn the handing on the front panel, loosen the inner screw. Remove the handle. After adjusting the direction of the handle, insert it into the handle seat, re- tighten the inner screw and ensure arrow is pointing in the direction of the handle (above image).
- Page 10 If you are experiencing these symptoms please ensure the arrow alignment is correct + split pin is installed. If your E-LOK was working fine for 4-12 weeks and now won't open from the outside, the Split Pin may have not been installed.
-
Page 11: Installation
Step 1. If you are retrofitting into an existing mortice hole, this step may not be required. If you are fitting the 9-Series into a new hole, take the included mortice template and cut the holes into your door. Your E-LOK 9- Series comes with screws to suit both wooden and aluminium doors. - Page 12 Screw the back panel to front. Depending on your door width, use the appropriate included fixings screws for the top and bottom fixing points. Install Batteries and screw the battery case back into place. E-LOK 9-Series Smart Lock should be ready to go!
- Page 13 You must be admin and in Bluetooth range of the Smart Lock in order to complete factory reset. You can factory reset your E-LOK by going into the lock settings and tapping "Delete". This will fully factory reset the E-LOK Smart Lock.
- Page 14 The system reset will be complete. From here you can link the E-LOK Smart Lock to your phone via the E-LOK App. Trouble shooting: If you manual reset whilst you were admin of the E-LOK, transferring Lockset to Trash will complete the reset of the E-LOK:...
-
Page 15: First Setup
9 - S e r i e s First Set-Up: Get the E-LOK App by visiting E-LOK.com for the app download link 1. Register an account 2. Login to your account. 3. Ensure E-LOK 9-Series with E-LOK using either is on and Bluetooth phone number or email. - Page 16 PIN Code Management: E-LOK App allows you to set 200 unique PIN Codes. You can set a range of different types of PIN Code. The best is to choose 'Custom' to create yours. Set it to permanent, name it and set your preferred sequence. (4-9 digits).
- Page 17 RFID Card + Proximity Touch to Unlock RFID Card Management: E-LOK App allows you to store 200 unique RFID Cards. To set up one of the three included with your E-LOK 9-Series Smart Lock, tap "Cards" on the lock management page, tap "Add Card", name your RFID Card, and then sync to your E-LOK Smart Lock.
- Page 18 An e-Key gives another person with an E-LOK App Account access to view and use your E-LOK 9-Series. Tap on the "eKey" icon on the lock management page. This allows you to send an electronic key to another person with an E-LOK App account.
- Page 19 9 - S e r i e s Admin Passcode + Unlock Records Admin Passcode: E-LOK comes with an admin passcode. To view this tap "Settings" on the lock management page, tap "Basics" and then tap "Admin Passcode". Unlock Records: E-LOK App records which passcodes were used to unlock the E-LOK and when.
- Page 20 Battery Percentage + Lockset Clock: Check Battery Percentage: E-LOK App allows you to check the battery percentage of your E-LOK in two easy ways. In the lock select page, the app will give you a percentage overview to the nearest 5%. You can also find a more accurate battery level in the settings of the Smart Lock.
- Page 21 Series Smart Lock. Tap into "Settings", "Passage Mode", then choose the days and hours you want your E-LOK Smart Lock to be in passage mode. A common application for this is having a Smart Lock on passage mode Mon-Fri 9am-5pm for an office building.
- Page 22 Extra Smart Lock Settings: Auto Lock: E-LOK App allows you to adjust the auto lock timer on the Smart Lock. This is the timer that is triggered once the Smart Lock has been unlocked using any unlock method unless passage mode is enabled. Auto lock timer is under the lock settings tab.
- Page 23 By default, after multiple failed unlock attempts, the E-LOK Smart Lock will sound a Tamper Alert. You can disable or enable this feature in the app settings as shown below: Tamper Alert locks out the E-LOK on a timer and sounds an alarm.
- Page 24 Import from another app feature allows you to sync PIN-Codes and RFID Cards between E-LOK Smart locks. If you have more than one E-LOK Smart Lock use this feature to have your PIN Code and RFID Card to work on each, without setting them up again.
- Page 25 Transfer Lockset Ownership: Transferring Lockset ownership can be useful in a few scenarios. What it allows you to do is give Master Admin ownership to another E-LOK App account holder. The process to Transfer Lockset Ownership is shown below: Tap into "Settings" then into "Transfer Lock(s)". Here you can select the Smart Locks you wish to transfer ownership.
- Page 26 Here's how it works: If you are the account holder that originally set-up your E-LOK 9-Series Smart Lock, then your account is automatically considered the Master Admin for that lock set. You cannot change who the Master Admin is, unless you reset the E- LOK Smart Lock or Transfer Lockset Ownership (shown page 25).
- Page 27 Admin: An Admin can set passcodes for their chosen 9-Series Smart Lock. They can only view their own passcodes and none of the passcodes set by another Admin or the Master Admin.
- Page 28 Cleaners, Clients and Tenants can be set up with User accounts if they choose to create an E-LOK App account. This would allow them to unlock the Smart Lock via Bluetooth or remotely over Wi-Fi (not advisable due to obvious security reasons).
- Page 29 Mortice Deadbolt Pull Down to Release Mortice Deadbolt Your E-LOK 9-Series Smart Lock has two handle functions: Lift up the handle to engage the mortice deadbolt. Pull down to unlock and release latch + deadbolt Important Notes: When the E-LOK 9-Series automatically locks, the handle disengages from the latch, but you can still lift the handle to engage the mortice bolt.
- Page 30 Unlocking E-LOK 9-Series with Key Your E-LOK comes with two mechanical keys and a slot in the front panel to use them. If you've forgotten your PIN Code or your E-LOK 9- Series batteries are flat, follow these steps to unlock it mechanically.
- Page 31 If the E-LOK Gateway is not near one or both, connection may be poor and the E-LOK Gateway may not function as expected. To add the E-LOK Gateway to the E-LOK App follows these steps: Open the left menu on the E-LOK App. Tap "Gateway". Tap "+" Sign. Select "G2"...
- Page 32 9 - S e r i e s E-LOK Gateway (only if you've purchased the E-LOK Gateway Add-On) Plug in E-LOK Gateway. The light should flash red and blue - this means its ready to connect. Tap "Next" then Tap "G2"...
- Page 33 Series. Open your lock management, tap into "Settings", locate the "Unlock Remotely" menu and ensure this is enabled. You will now be able to control your E-LOK 9-Series from the app remotely via Wi-Fi, whether you're at work or out-of-town. You can add, change or delete unlock codes.
- Page 34 E-LOK Gateway Specs + other info Reset E-LOK Gateway: If you require factory reset your E-LOK Gateway follow the below process. Removing the Gateway from your app will unlink the Smart Locks that are connected to it. The Smart Locks will work as usual via Bluetooth.
- Page 35 Loctite securing the handle to either or both the front and rear panel. It is also a good idea to do a full factory reset of the E-LOK 9-Series Smart Lock to ensure software stays light and un-bloated.
-
Page 36: Important Notes
Important Notes: Please Note: You must use the E-LOK App to set-up your E-LOK 9-Series Smart Lock. When you first power up your E-LOK, the Smart Lock will be unusable until you have completed the short set-up process and added at least one unlock code. - Page 37 9 - S e r i e s Contact: If you run into trouble with your E-LOK Smart Lock please visit: E- LOK.com for further information, help and tools. If you don't find your answer on E-LOK.com use the contact box and send us an email.
- Page 38 9 - S e r i e s Notes:...
- Page 39 9 - S e r i e s Notes:...
- Page 40 9 - S e r i e s User Manual E-LOK.com Version: 2112 E9UM...
Need help?
Do you have a question about the 9-Series and is the answer not in the manual?
Questions and answers