Table of Contents
Advertisement
Quick Links
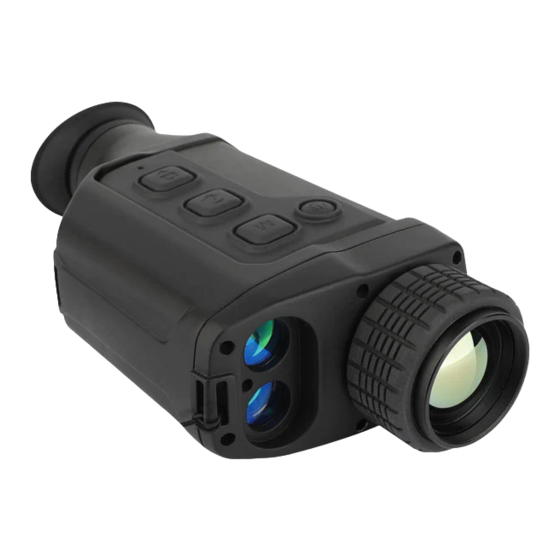
S236 series infrared thermal imaging
Key composition and interface
Eyepiece,
visibility
adjustment
Type-c interface,
charging,
data
transmission,
real-time image
Photo/video
recording, electronic
magnification/laser
ranging,
shortcut
Menu/main menu
Laser ranging,
laser
indication
telescope
Quick guide to use
Sleep
eyepiece/power
switch
Manual
focusing lens
Advertisement
Table of Contents

Related Manuals for Dali 236 Series


Summary of Contents for Dali 236 Series
- Page 1 S236 series infrared thermal imaging telescope Quick guide to use Key composition and interface Eyepiece, visibility adjustment Type-c interface, charging, data Sleep transmission, eyepiece/power real-time image switch Manual Photo/video focusing lens recording, electronic magnification/laser ranging, shortcut menu/main menu Laser ranging, laser indication...
- Page 2 Photo Ranging display recording Electronic compass bearing Remai Color Electr Anal State WIFI ning code electricity status storag state amplif video Power key ◼ Press on/off the thermal imager for a long time, and the green indicator light of the imager will always be on after it is turned on.
- Page 3 menu ◼ Press short to open the shortcut menu. ◼ Press and hold to open the main menu. combination key Photo button and laser ranging button ◼ Press and hold the "Photo" key and "Electronic Magnification" key at the same time to manually correct the image uniformity.
- Page 4 default: 1.0X. ◼ Eyepiece brightness setting: 1~5 eyepiece display brightness level, factory default: 3. primary menu ◼ Press and hold the "Menu" key for to enter or exit the main menu mode. ◼ In the main menu mode, press the "Laser Ranging" key or "Photographing"...
- Page 5 only single channel is activated for this product(802.11b_CH1). ◼ Enhancement: After it is turned on, enhanced images will be displayed to increase image details. ◼ Hot-spot tracking function: after it is turned on, it will take effect after exiting the menu, which can assist in tracking the highest temperature target on the screen.
- Page 6 be set systematically. language option: the native language can be displayed. compass calibration: electronic compass can be recalibrated. Compass calibration operation is as follows: After entering this function, press the "Laser Ranging" key "Photographing" key to switch to "YES", place the instrument horizontally, rotate it clockwise for three times, press the "Laser Ranging"...
- Page 7 green indicator lights up. ◼ Open the instrument interface cover, connect the computer with USB cable, and copy photos and video data files. Real time video output ◼ After the instrument is turned on, the key combination turns on the video output, and the status is ◼...
- Page 8 strong radiation sources (such as the sun, direct or reflection of laser beams, etc.), or it will cause permanent damage to the uncooled infrared telescope! ◼ Wipe the infrared lens gently with a wiping cloth and clean water. Do not use organic solvents or sharp hard objects to clean the infrared lens, so as not to cause the lens film to fall off.
Need help?
Do you have a question about the 236 Series and is the answer not in the manual?
Questions and answers