Advertisement
Available languages
Available languages
Quick Links
Advertisement

Related Manuals for LIW BabySafe Baffin.1


Summary of Contents for LIW BabySafe Baffin.1
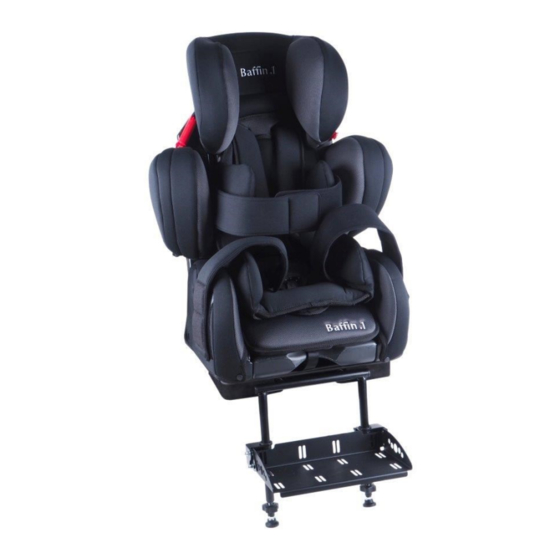
- Page 1 USER MANUAL Baffin.1 Edition 5 - 2021...
- Page 2 General notice for installation and use The Baffin.1 child car seat is suitable for ECE groups I-III, weight 9-36 kg and is designed to be installed using the vehicle three-point seatbelt with a separate five-point harness system for securing children in mass group I (weight 9-18kg).
- Page 3 – When the children whose weights are from 15 to 36 kg (Group II III) use this kind of seats, they need not use the harness. – The rigid items and plastic parts of a child restraint must be located. We are not liable, during everyday use of the vehicle to become trapped by a door of the vehicle.
- Page 4 WARNING: Only suitable for use in the listed vehicles fitted with 3 point safety belts, approved to ECE Regulation No.16 or other equivalent standards. Fig. 1 Fitting the seat for children (from 9 - 18kg · ECE-Group I) 1.1 Installation of the seat with a 3-point seat belt (Group I). Open the seat clip Fig.
- Page 5 1.2 Fit the safety seat to the vehicle seat with 3 point safety belt as show on the diagram. Warning: 1.Please use the lock-off the device. 2.The shoulder belt should pass under the head-rest, but not through the hook. Fig. 3 1.3 Fasten the seat belt buckle with an audible click.
- Page 6 1.4 Tighten the lap and diagonal seat belt. Fig. 5 1.5 Place the diagonal seat belt in the lock-off device and fasten it. Fig. 6 Using the Harness (2.1 – 2.6) Always use harness for children of mass from 9 kg to 18 kg Baffin.1 Edition 5...
- Page 7 Your child should be fastened to the seat using harness (5-point safety belt integrated in the seat). REMEMBER – the seat must be secured with the vehicle’s 3-point belt before (point 1 in user manual) To increase the length of the harness Fig. 7 press and hold down the central adjusting button (1) and pull the shoulder straps (2) at the bottom Fig.
- Page 8 2.3 Lay the shoulder straps to the side Fig. 9 2.4 Place your child in the seat and put the child’s arms through the shoulder straps. Fig. 10 Baffin.1 Edition 5...
- Page 9 2.5 Fasten the buckle by placing the two tongues over each other (1) and pushing them in with an audible click Fig. 11 2.6 Tighten the straps by pulling the central belt in the direction of the arrow. The straps should be pulled tight. Fig.
- Page 10 2.7-2.8 Adjusting the height of the harness 2.7 Pull the red locking button and adjust the head support in the next position Fig. 13 2.8 Use one hand to press down the central adjusting button, and the other hand pull the belt to adjust it to be suitable length. The straps of harness should be positioned as shown in Fig.
- Page 11 Use of the child seat for older children (from 15 - 36kg · ECE- Group II-III) For children with body weight more than 18 kg, the harness should be removed. For children between 15 kg and 18 of body weight ALWAYS use harness as described in point 2.
- Page 12 3.3 Remove the guiding tube by pushing it upwards. Then remove the shoulder belts. Fig. 17 3.4 Partly remove the seat cover and unloop the lap belt from the seat body. Fig. 18 Baffin.1 Edition 5...
- Page 13 3.5 Unloop the metal plate from the button strap and pull the buckle up and out Fig. 19 Restrain the seat and child with the 3-point seat belt.(Group II III - with backrest) 4.1 Pull out the car belt, pass the shoulder belt under the headrest at one side.
- Page 14 Fig. 20 Fig. 21 4.2 Place the diagonal belt under the headrest Warning: 1. Not use the lock-off the device. 2. The shoulder belt should pass under the headrest, but not through the hook. Fig. 22 Baffin.1 Edition 5...
- Page 15 4.3 Adjust the position of headrest according to the height of kids. As show in Fig. 13 It is important that the height of child’s shoulder is not higher than the position of belt. As show in Fig. 14. The path of car belt (both the shoulder belt and lap belt) finally must be fixed under the armrest or the other way will be not safe.
-
Page 16: Important Note
All REHA accessories (Fig. 24) are not safety devices. They do not protect against car accidents injuries. All additional accessories described below are only additional positioning equipment. For child’s safety, you have to always install and secure the seat and child with respect to general rules described in original user manual for Baffin.1. - Page 17 For use in ECE group II and group III (for children with a body weight from 15 kg to 36 kg): Restrain the seat Baffin.1 and child with the 3-point seat belt. Follow point 4 “Restrain the seat and child with the 3-point seat belt.(Group II III - with backrest) “...
- Page 18 5.1 Extra headrest upholstery. Pull the side covers of extra headrest as tight as possible over the side parts of the basic headrest. Next, pull the top edge of the extra headrest over the top part of the basic headrest. Use extra headrest upholstery when your child’s head needs extra side support for a head.
- Page 19 Fig. 27 Fig. 28 Fig. 29 If you need extra cushion for lateral suport then pull extra cushion on basic lateral support and fasten with velcro strap under the upholstery to fix it (Fig. 30 and Fig. 31). Correct positioning of lateral support shown on Fig.
- Page 20 Fig. 30 Fig. 31 Correct positioning of lateral support Fig. 31 A 5.3 Chest belt The chest belt is not a safety relevant item. The chest belt is only for additional positioning and support of a thorax (trunk). The chest belt is guided under the backrest upholstery (Fig. 32). Next, you need to cover it by original backrest upholstery.
- Page 21 Fig. 32 Fig. 33 Correct positioning of chest belt Fig. 33 A 5.4 Seat Cushion Seat cushion provides reduction of a seat width. Place the seat cushion on the basic seat upholstery. Remember to put the plastic buckle through the whole in the cushion (Fig. 34) You can also use extra cushion for side lateral support.
- Page 22 Fig. 34 Fig. 35 5.5 Legs belt Legs belt is used for positioning the lower limbs of a child. Place the legs belt on the seat upholstery (Fig. 36) and put the belt through the holes in a seat cushion (Fig. 37). If you don’t use seat cushion, place the legs belt under the basic seat upholstery.
- Page 23 Fig. 38 Fig. 39 Correct positioning of legs belt Fig 39 A 5.6 Rotating platform with footrest Rotating platform with footrest is equipped with ISOFIX rigid connectors (attachments) (Fig. 40 p. 4) that should be connected to two corresponding rigid anchorages (fixtures) in the vehicle. IMPORTANT: rotating platform with footrest can be used only in the vehicles that have ISOFIX anchorages (fixtures) at least on the rear passenger side.
- Page 24 5.6.1 Preparation for use – rotating platform – Fig. 40 Loose the screw (unscrew it) (1) next unbolt the pin (2) next pull forward and adjust the depth of the ISOFIX rigid attachments. Adjust it to the size of a car seat and to the position of the ISOFIX anchorages in the vehicle.
- Page 25 Fig. 41 IMPORTANT CHECK Place Baffin.1 seat on the rotating platform and CHECK if the Baffin seat has contact with the backrest of the vehicle‘s seat. IF NOT correct/adjust the depth of the ISOFIX rigid attachments (see point 5.6.1) Preparation for use – footrest – Fig. 42 and Fig. 43 To adjust the depth of the footrest (Fig.
- Page 26 set the desired height of the footrest and screw the knobs. The height of the footrest depends on the length of child’s lower limbs. To adjust the tilt angle of the footrest platform, the metal screws (6) should be unscrew (fork spanner size 10 is required ). Set the right angle and screw it (6).
- Page 27 WARNING: When you use rotating platform You have to always install and secure the seat with respect to general rules described in original user manual for Baffin.1. Your Baffin.1 seat should be installed in a car using 3-point seat belt. Follow the point 1 “Installation of the seat with a 3-point seat belt”...
- Page 28 Identification of symbols Manufacturer name and production date Serial number Permitted user weight Avoid contact with water Note! Follow product instructions Medical device Conformity mark according Regulation (EU) 2017/745 of the European Parliament and of the Council of 5 April 2017 on medical devices, Annex V Ban on disposal of the device to household waste-bin...
-
Page 29: Identification Plate
Car seat device Baffin.1 following the appendix VIII of European Union Parliament and Council Ordinance 2017/745 from the day of 5 of April 2017 regarding medical devices is non-invasive, active medical device of Class I, regarding the law 1. Declaration of Conformity of the device is available in Sales Department of the producer. - Page 30 Notes: Baffin.1 Edition 5...
- Page 31 Baffin.1 Edition 5...
- Page 32 Ogólne uwagi dotyczące instalacji i użytkowania Fotelik d iecięcy Baffin.1 jest pr e nac ony dla grup ECE I-III, o wadze 9-36 kg i jest aprojektowany do montażu a pomocą tr ypunktowych pas w be piec eństwa poja du odd ielnymi pięciopunktowymi pasami be piec eństwa do zabezpieczenia dzieci w grupie wagowej I ( waga 9-18kg).
- Page 33 - Prosimy o prawidłowe amocowanie fotelika godnie instrukcją, gdyż ws elkie nieprawidłowe c ynności będą niebe piec ne. - Dzieci o wad e od do 1 kg (Grupa I) mus ą być pr ypięte punktowymi pasami fotelika. - D ieci o wad e od 1 do 36 kg (Grupa II III) nie mus ą używać punktowych pas w fotelika.
- Page 34 s elkie pasy mocujące fotelik do poja du powinny być napięte, a ws elkie pasy pr ytr ymujące d iecko powinny być dopasowane do ciała d iecka i nie powinny być skręcone. ykonywanie jakichkolwiek pr er bek e wolenia i niepr estr eganie instrukcji montażu jest niebe piec ne i zabronione. - Nie używać...
- Page 35 Otw r klamrę fotelika. Rys. 2 1.2 Pr ymocuj fotelik do samochodu a pomocą 3-punktowego pasa be piec eństwa tak jak to pokazano na schemacie. Uwaga: Odblokuj klamrę. Pas barkowy powinien pr echod ić pod agł wkiem, ale nie pr e uchwyt w ks tałcie haka.
- Page 36 1.3 Zapnij klamrę pasa e słys alnym kliknięciem. Rys. 4 1.4 Skasuj luz na pasie biodrowym i barkowym. Rys. 5 Baffin.1 Edycja 5...
- Page 37 1.5 Umieść pas barkowy w klamr e i ablokuj ją. Rys. 6 Używanie pasów 5-punktowych fotelika. (2.1 -2.6) Zaws e używaj pas w -punktowych dla dzieci o wadze od 9 do 18 kg D iecko powinno być pr ypięte do fotelika a pomocą pas w (5-punktowy pas be piec eństwa integrowany fotelikiem).
- Page 38 Rys. 7 2.2 Ro pięcie pas w następuje popr e naciśnięcie c erwonego przycisku na klamrze. Rys. 8 Baffin.1 Edycja 5...
- Page 39 2.3 Ro suń pasy barkowe na boki. Rys. 9 2.4 Umieść d iecko w foteliku i pr eł ż jego ramiona pod pasy barkowe. Rys. 10 Baffin.1 Edycja 5...
- Page 40 2.5 Zapnij pasy składając dwie poł wki klamry ra em (1) następnie umies c ając je w amku wyra nym kliknięciem. Rys. 11 2.6 Zlikwiduj lu y pas w pociągając środkowy pas na dole sied iska. Pasy powinny być apięte ciasno. Rys.
- Page 41 2.7-2.8 Regulacja wysokości pasów. 2.7 Naciśnij c erwony pr ycisk blokady i ustaw agł wek w następnej pozycji. Rys. 13 2.8 Jedną ręką wciśnij środkowy pr ycisk regulacyjny, a drugą pociągnij pasek, aby wyregulować go na odpowiednią długość. Paski pas w 5-punktowych powinny być...
- Page 42 Korzystanie z fotelika dla starszych dzieci (od 15 do 36 kg • ECE-Grupa II-III) W pr ypadku d ieci o masie ciała powyżej 1 kg pasy 5-punktowe należy djąć. Dla d ieci o masie ciała od 1 kg do 1 kg ZA SZE używaj pas w 5-punktowych opisanych w punkcie 2.
- Page 43 3.3 Zdejmij ochraniac e pas w barkowych. Następnie demontuj pasy. Odkręć śrubę i demontuj wspornik . Rys. 17 3.4 Zdejmij c ęściowo tapicerkę i wyciągnij pasy biodrowe od spodu fotelika. Rys. 18 Baffin.1 Edycja 5...
- Page 44 3.5 Odc ep metalową płytkę abe piec ającą klamrę po spodniej stronie fotelika i wyciągnij klamrę. Rys. 19 Mocowanie fotelika i zapinanie dziecka 3-punktowym pasem (Grupa II III – z oparciem) yciągnij pas samochodowy, pr eciągnij pas barkowy pod agł wkiem po jednej stronie. Następnie pr eprowad biodrowy pr e otwory pod podłokietnikami po obu stronach.
- Page 45 Rys. 20 Rys. 21 Umieść pas barkowy pod agł wkiem. Uwaga: 1. Nie używać c erwonej klamry do blokowania pasa. 2. Pas powinien pr echod ić pod agł wkiem, pr e hak. Rys. 22 Baffin.1 Edycja 5...
- Page 46 4.3 Dostosuj wysokość agł wka do w rostu d iecka. ak jak to pokazano na Rys. 13. ażne, żeby ramiona nie były wyżej niż pasy, jak na Rys. 14. Pas biodrowy powinien pr echod ić pod obydwoma podłokietnikami (Rys. 23) inny pr ebieg pasa nie będ ie be piec ny. DOBRZE ŹLE Rys.
-
Page 47: Ważna Uwaga
Wszystkie akcesoria REHA (Rys. są ur ąd eniami abe piec ającymi. Nie chronią przed obrażeniami w wypadkach samochodowych. s ystkie dodatkowe akcesoria opisane poniżej stanowią jedynie dodatkowe wyposażenie po ycjonowania. w ględ w be piec eństwa d iecka należy aws e instalować... - Page 48 5-punktowy pas dla d ieci o masie ciała powyżej 1 kg może służyć jako dodatkowy element po ycjonujący. W takim przypadku zawsze abe piec d iecko a pomocą 3-punktowego pasa be piec eństwa pojazdu. Dodatkowa tapicerka agł wka Poduszka na oparcie Pas piersiowy Pas na nogi Poduszka siedziska...
- Page 49 5.1 Dodatkowa tapicerka agł wka. Pr eciągnij boc ne osłony dodatkowego agł wka tak mocno, jak to możliwe, nad boc ne c ęści podstawowego agł wka. Następnie pr eciągnij g rną krawęd dodatkowego agł wka nad g rną c ęść podstawowego agł...
- Page 50 Rys. 27 Rys. 28 Rys. 29 Jeśli potr ebujes dodatkowej podus ki do podparcia boc nego, pociągnij dodatkową podus kę na podstawową podporę boc ną i pr ymocuj paskiem na r epy pod tapicerką, aby ją amocować (Rys. 30 i Rys. 31). Prawidłowe ustawienie podpory bocznej pokazane na Rys.31 A.
- Page 51 Rys. 30 Rys. 31 Prawidłowe ustawienie podpory bocznej Rys. 31 A 5.3 Pas piersiowy Pas piersiowy nie jest elementem wią anym be piec eństwem. Pas piersiowy służy wyłąc nie dodatkowego po ycjonowania i podtr ymywania klatki piersiowej (tułowia). Pas piersiowy poprowad ony jest pod tapicerką oparcia (Rys. 32). Następnie należy go okryć...
- Page 52 Rys. 32 Rys. 33 Prawidłowe ustawienie pasa piersiowego Rys. 33 A 5.4 Poduszka siedziska Podus ka sied iska apewnia mniejs enie s erokości sied iska. Umieść podus kę sied iska na podstawowej tapicerce sied iska. Pamiętaj, aby plastikową klamrę pr ełożyć pr e całość w podus ce (Rys. 34) Możes r wnież...
- Page 53 Rys. 34 Rys. 35 5.5 Pas na nogi Pas na nogi służy do po ycjonowania końc yn dolnych d iecka. Umieścić pas udowy na tapicerce sied enia (Rys. 36) i pr ełożyć pas przez otwory w poduszce siedzenia (Rys. 37). Jeśli nie używas podus ki sied enia, umieść...
- Page 54 Rys. 38 Rys. 39 Prawidłowe ułożenie pas w na nogi Rys. 39 A 5.6 Obrotowa platforma podn żkiem Platforma obrotowa podn żkiem wyposażona jest w s tywne łąc niki ISOFIX (zaczepy) (Rys. 40 p. 4), kt re należy podłąc yć do dw ch odpowiadających s tywnych punkt w...
- Page 55 8.1.1 Pr ygotowanie do użycia - platforma obrotowa - Rys. 40 Polu uj śrubę (odkręć ją) (1), następnie odkręć swor eń (2), następnie pociągnij do pr odu i wyreguluj głębokość s tywnych mocowań ISOFIX. Dopasuj go do rozmiaru fotelika samochodowego i do położenia ac ep w ISOFIX w poje d ie.
- Page 56 Rys. 41 WAŻNA UWAGA Umieść sied isko Baffin.1 na platformie obrotowej i SPRA DŹ, c y sied isko Baffin styka się oparciem sied enia poja du. JEŚ I NIE, popraw / wyreguluj głębokość s tywnych mocowań ISOFIX (patr punkt .6.1) Przygotowanie do użytkowania - podnóżek - Rys.
- Page 57 Aby wyregulować wysokość podn żka (Rys. 43), należy wolnić śruby (pokrętła) ( ) ustawić żądaną wysokość podn żka i pr ykręcić pokrętła. ysokość podn żka ależy od długości końc yn dolnych d iecka. Aby wyregulować kąt nachylenia podn żka, należy odkręcić metalowe śruby (6) (wymagany jest kluc widelec o ro miar e 10).
- Page 58 UWAGA: Zabrania się stawania na podn żku. D iecko może tylko opr eć na nim stopy. UWAGA: W przypadku korzystania z platformy obrotowej należy aws e ainstalować i abe piec yć sied isko godnie og lnymi asadami opisanymi w oryginalnej instrukcji obsługi Baffina.1. Fotelik Baffin.1 należy amontować...
- Page 59 Oznaczenie symboli Nazwa producenta i data produkcji Numer seryjny Dopus c alny ciężar użytkownika Unikać kontaktu wodą Pr estr egać instrukcji obsługi yr b medyc ny Znak godności wg Ro por ąd enia Parlamentu Europejskiego i Rady (UE) 2017/745 z dnia 5 kwietnia 2017 w sprawie wyrob w medyc nych ał.V.
-
Page 60: Tabliczka Znamionowa
5 kwietnia 2017 w sprawie wyrob w medyc nych jest nieinwa yjnym, aktywnym wyrobem medyc nym klasy I według reguły 1. Deklaracja godności ur ąd enia jest do u yskania w D iale Handlowym producenta. Tabliczka znamionowa BAFFIN .1 BAF.1 0000 1: kg 1 kg 2: 1 kg 2 kg 3: 22 kg 36 kg... - Page 61 Notatki: Baffin.1 Edycja 5...
- Page 62 Edition 5 - 2021 LIW Care Technology Sp. z o.o. Golfowa 7, 94-406, Lodz, Poland www.liwcare.com...
Need help?
Do you have a question about the BabySafe Baffin.1 and is the answer not in the manual?
Questions and answers