Advertisement
Available languages
Available languages
Quick Links
Advertisement

Related Manuals for LIW Baffin.1

Summary of Contents for LIW Baffin.1
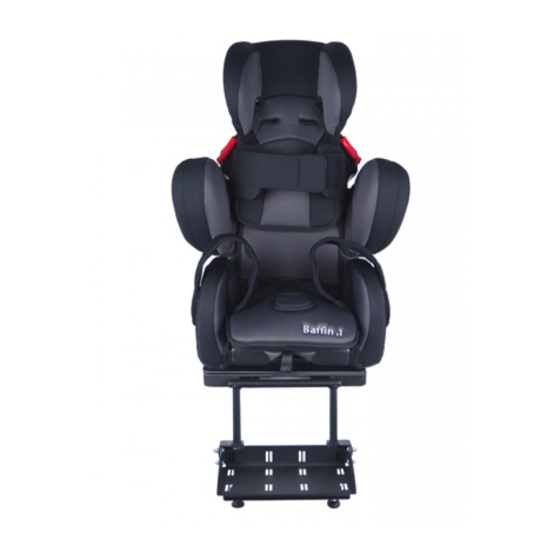
- Page 2 General notice for installation and use The Baffin.1 child car seat is suitable for ECE groups I-III, weight 9-36 kg and is designed to be installed using the vehicle three-point seatbelt with a separate five-point harness system for securing children in mass group I (weight 9-18kg).
- Page 3 – Not to use any load hearing contact points other that those described in the instructions and marked in the child restraint. – The instruction can be retained on the child restraint for its life period. Baffin.1 Edition 4...
- Page 4 Regulation No.16 or other equivalent standards. Fig. 1 Fitting the seat for children (from 9 - 18kg · ECE-Group I) Installation of the seat with a 3-point seat belt (Group I). Open the seat clip Fig. 2 Baffin.1 Edition 4...
- Page 5 Warning: 1.Please use the lock-off the device. 2.The shoulder belt should pass under the head-rest, but not through the hook. Fig. 3 Fasten the seat belt buckle with an audible click. Fig. 4 Baffin.1 Edition 4...
- Page 6 Tighten the lap and diagonal seat belt. Fig. 5 Place the diagonal seat belt in the lock-off device and fasten it. Fig. 6 Using the Harness (2.1 – 2.6) Always use harness for children of mass from 9 kg to 18 kg Baffin.1 Edition 4...
- Page 7 To increase the length of the harness Fig. 7 press and hold down the central adjusting button (1) and pull the shoulder straps (2) at the bottom Fig. 7 Unfasten the buckle by pressing the red button in the direction of the arrow Fig. 8 Baffin.1 Edition 4...
- Page 8 Lay the shoulder straps to the side Fig. 9 Place your child in the seat and put the child’s arms through the shoulder straps. Fig. 10 Baffin.1 Edition 4...
- Page 9 Fasten the buckle by placing the two tongues over each other (1) and pushing them in with an audible click Fig. 11 Tighten the straps by pulling the central belt in the direction of the arrow. The straps should be pulled tight. Fig. 12 Baffin.1 Edition 4...
- Page 10 Use one hand to press down the central adjusting button, and the other hand pull the belt to adjust it to be suitable length. The straps of harness should be positioned as shown in Fig. 14. Fig. 14 Baffin.1 Edition 4...
- Page 11 2. Using the Harness (2.1 – 2.6) Remove the end piece 15(1): Push the central adjuster (2) down, keep it down and remove the belt from the rear. Fig. 15 Pull the shoulder straps out through the front. Fig. 16 Baffin.1 Edition 4...
- Page 12 Remove the guiding tube by pushing it upwards. Then remove the shoulder belts. Fig. 17 Partly remove the seat cover and unloop the lap belt from the seat body. Fig. 18 Baffin.1 Edition 4...
- Page 13 III - with backrest) Pull out the car belt, pass the shoulder belt under the headrest at one side. And the lap belt pass through the hole of both armrests. Then pushing the buckle in with an audible click. Baffin.1 Edition 4...
- Page 14 Fig. 20 Fig. 21 Place the diagonal belt under the headrest Warning: 1. Not use the lock-off the device. 2. The shoulder belt should pass under the headrest, but not through the hook. Fig. 22 Baffin.1 Edition 4...
- Page 15 Additional REHA accessories for Baffin.1 - Fig. 24 – instruction for assembly and use Baffin.1 is approved for the use as a “restraint system for special needs (“S”)” according to Regulation No. 44 of the Economic Commission for Europe of the United Nations (UNECE).
-
Page 16: Important Note
For use in ECE group I (for children with a body weight from 9 kg to 18 kg): Your Baffin.1 seat should be installed in a car using 3-point seat belt. Follow the point 1 “Installation of the seat with a 3-point seat belt” in original user manual for Baffin.1. - Page 17 For use in ECE group II and group III (for children with a body weight from 15 kg to 36 kg): Restrain the seat Baffin.1 and child with the 3-point seat belt. Follow point 4 “Restrain the seat and child with the 3-point seat belt.(Group II III - with backrest) “...
- Page 18 – hole pointed as a 1 on the Figure) in the same place like shoulder belts from the harness. Attach both strips to the metal bar on the rear part of backrest seat in the same place like shoulder belts of the harness. (Fig. 29) Baffin.1 Edition 4...
- Page 19 If you need extra cushion for lateral suport then pull extra cushion on basic lateral support and fasten with velcro strap under the upholstery to fix it (Fig. 30 and Fig. 31). Correct positioning of lateral support shown on Fig. 31 A. Baffin.1 Edition 4...
- Page 20 The chest belt is guided under the backrest upholstery (Fig. 32). Next, you need to cover it by original backrest upholstery. You can fasten the chest belt with velcro strap. (Fig. 33). Correct positioning of chest belt is presented in Fig. 33 A. Baffin.1 Edition 4...
- Page 21 (Fig. 34) You can also use extra cushion for side lateral support. Then pull the extra cushion on the seat cushion – on the left side and right side of the seat cushion – Fig. 35. Baffin.1 Edition 4...
- Page 22 Next, fasten left and right end of the belt with the side velcro panels of a Baffin.1 seat (Fig. 38 and Fig. 39). Correct positioning of legs belts is shown on Fig. 39 A.
- Page 23 (attachments) (Fig. 40 p. 4) that should be connected to two corresponding rigid anchorages (fixtures) in the vehicle. IMPORTANT: rotating platform with footrest can be used only in the vehicles that have ISOFIX anchorages (fixtures) at least on the rear passenger side. Baffin.1 Edition 4...
- Page 24 Guide the ISOFIX connectors (Fig. 40 p. 4) (with red release buttons) into the vehicle‘s ISOFIX anchorages (fixtures). Check that the connectors have locked into place safely by pulling. CORRECT connection is signalled by GREEN colour on release button (Fig. 41) Baffin.1 Edition 4...
- Page 25 Fig. 41 IMPORTANT CHECK Place Baffin.1 seat on the rotating platform and CHECK if the Baffin seat has contact with the backrest of the vehicle‘s seat. IF NOT correct/adjust the depth of the ISOFIX rigid attachments (see point 5.6.1) Preparation for use – footrest – Fig. 42 and Fig. 43 To adjust the depth of the footrest (Fig.
- Page 26 Make sure that the threaded rods are not over-extended – the rotating platform and Baffin.1 seat should always lie flat on the vehicle‘s seat. Now lock the threaded rod by twisting the upper locking ring upwards. This prevents any accidental unscrewing of the threaded rods.
- Page 27 3-point seat belt. Follow the point 1 “Installation of the seat with a 3-point seat belt” in original user manual for Baffin.1. CORRECT position of a Baffin.1 seat on the rotating platform is on Fig. 44 Fig. 44 Baffin.1 Edition 4...
- Page 28 Notes: Baffin.1 Edition 4...
- Page 29 Baffin.1 Edition 4...
- Page 30 Ogólne uwagi dotyczące instalacji i użytkowania Fotelik dziecięcy Baffin.1 jest przeznaczony dla grup ECE I-III, o wadze 9-36 kg i jest zaprojektowany do montażu za pomocą trzypunktowych pasów bezpieczeństwa pojazdu oddzielnymi pięciopunktowymi pasami bezpieczeństwa do zabezpieczenia dzieci w grupie wagowej I ( waga 9-18kg).
- Page 31 - Gdy fotelik nie jest wyposażony w tekstylne pokrycie, należy chronić krzesełko przed światłem słonecznym, w przeciwnym razie może być zbyt gorące dla skóry dziecka. - Nie wolno używać fotelika dziecięcego bez tapicerki. Prosimy o używanie oryginalnej tapicerki, ponieważ stanowi ona integralną część wykonania fotelika. Baffin.1 Edycja 4...
- Page 32 3-punktowe pasy bezpieczeństwa, zatwierdzone zgodnie z regulaminem ECE nr 16 lub innymi równoważnymi normami. Rys. 1 Mocowanie fotelika dla dzieci (od 9 do 18 kg • ECE-grupa I) Montaż fotelika za pomocą 3-punktowego pasa bezpieczeństwa (grupa I). Baffin.1 Edycja 4...
- Page 33 Otwórz klamrę fotelika. Rys. 2 Przymocuj fotelik do samochodu za pomocą 3-punktowego pasa bezpieczeństwa tak jak to pokazano na schemacie. Uwaga: Odblokuj klamrę. Pas barkowy powinien przechodzić pod zagłówkiem, ale nie przez uchwyt w kształcie haka. Rys. 3 Baffin.1 Edycja 4...
- Page 34 Zapnij klamrę pasa ze słyszalnym kliknięciem. Rys. 4 Skasuj luz na pasie biodrowym i barkowym. Rys. 5 Baffin.1 Edycja 4...
- Page 35 PAMIĘTAJ - fotel należy wcześniej zabezpieczyć pasem 3-punktowym pojazdu (punkt 1 w instrukcji obsługi) W celu wydłużenia pasów naciśnij i przytrzymaj klamrę na środku siedziska (1) i pociągnij pasy barkowe (2) na dół. Nie ciągnij za osłonki pasa. Baffin.1 Edycja 4...
- Page 36 Rys. 7 Rozpięcie pasów następuje poprzez naciśnięcie czerwonego przycisku na klamrze. Rys. 8 Baffin.1 Edycja 4...
- Page 37 Rozsuń pasy barkowe na boki. Rys. 9 Umieść dziecko w foteliku i przełóż jego ramiona pod pasy barkowe. Rys. 10 Baffin.1 Edycja 4...
- Page 38 Zapnij pasy składając dwie połówki klamry razem (1) następnie umieszczając je w zamku z wyraźnym kliknięciem. Rys. 11 Zlikwiduj luzy pasów pociągając środkowy pas na dole siedziska. Pasy powinny być zapięte ciasno. Rys. 12 Baffin.1 Edycja 4...
- Page 39 Naciśnij czerwony przycisk blokady i ustaw zagłówek w następnej pozycji. Rys. 13 Jedną ręką wciśnij środkowy przycisk regulacyjny, a drugą pociągnij pasek, aby wyregulować go na odpowiednią długość. Paski pasów 5-punktowych powinny być ułożone tak, jak pokazano na Rys. 14. Rys. 14 Baffin.1 Edycja 4...
- Page 40 Dla dzieci o masie ciała od 15 kg do 18 kg ZAWSZE używaj pasów 5-punktowych opisanych w punkcie 2. Używanie pasów (2.1 - 2.6) Zdejmij końcówkę pasów (1): Naciśnij przycisk regulacji pasów (2), następnie wyciągnij pasy z tyłu. Rys. 15 Pociągnij pasy barkowe z przodu. Rys. 16 Baffin.1 Edycja 4...
- Page 41 Zdejmij ochraniacze z pasów barkowych. Następnie zdemontuj pasy. Odkręć śrubę i zdemontuj wspornik T. Rys. 17 Zdejmij częściowo tapicerkę i wyciągnij pasy biodrowe od spodu fotelika. Rys. 18 Baffin.1 Edycja 4...
- Page 42 Mocowanie fotelika i zapinanie dziecka 3-punktowym pasem (Grupa II III – z oparciem) Wyciągnij pas samochodowy, przeciągnij pas barkowy pod zagłówkiem po jednej stronie. Następnie przeprowadź pas biodrowy przez otwory pod podłokietnikami po obu stronach. Następnie wepnij klamrę pasa z wyraźnym kliknięciem. Baffin.1 Edycja 4...
- Page 43 Rys. 20 Rys. 21 Umieść pas barkowy pod zagłówkiem. Uwaga: 1. Nie używać czerwonej klamry do blokowania pasa. 2. Pas powinien przechodzić pod zagłówkiem, przez hak. Rys. 22 Baffin.1 Edycja 4...
- Page 44 Dodatkowe akcesoria REHA do Baffina.1 - Rys. 24 - instrukcja montażu i użytkowania Baffin.1 posiada homologację stosowania jako „urządzenie przytrzymujące dla specjalnych potrzeb („ S ”)” zgodnie z regulaminem nr 44 Europejskiej Komisji Gospodarczej Organizacji Narodów Zjednoczonych (UNECE). Baffin.1 Edycja 4...
-
Page 45: Ważna Uwaga
Postępuj zgodnie z punktem 2 „Używanie pasów 5-punktowych fotelika (2.1 - 2.6)” w oryginalnej instrukcji obsługi Baffin.1. PAMIĘTAJ - fotel należy wcześniej zabezpieczyć pasem 3-punktowym pojazdu. Do stosowania w grupie II i III ECE (dla dzieci o masie ciała od 15 kg do 36 kg): Fotel Baffin.1 i dziecko unieruchomić... - Page 46 5-punktowy pas dla dzieci o masie ciała powyżej 18 kg może służyć jako dodatkowy element pozycjonujący. W takim przypadku zawsze zabezpiecz dziecko za pomocą 3-punktowego pasa bezpieczeństwa pojazdu. Dodatkowa tapicerka zagłówka Poduszka na oparcie Pas piersiowy Pas na nogi Poduszka siedziska Obrotowa platforma z podnóżkiem Rys. 24 Baffin.1 Edycja 4...
- Page 47 (Rys. 28- otwór oznaczony jako 1 na rysunku) w tym samym miejscu co paski naramienne pasów 5-punktowych. Przymocuj oba paski do metalowego drążka w tylnej części oparcia w tym samym miejscu co pasy naramienne pasów 5-punktowych. (Rys. 29) Baffin.1 Edycja 4...
- Page 48 Jeśli potrzebujesz dodatkowej poduszki do podparcia bocznego, pociągnij dodatkową poduszkę na podstawową podporę boczną i przymocuj paskiem na rzepy pod tapicerką, aby ją zamocować (Rys. 30 i Rys. 31). Prawidłowe ustawienie podpory bocznej pokazane na Rys.31 A. Baffin.1 Edycja 4...
- Page 49 (tułowia). Pas piersiowy poprowadzony jest pod tapicerką oparcia (Rys. 32). Następnie należy go okryć oryginalną tapicerką oparcia. Pas piersiowy można zapiąć na rzep. (Rys. 33). Prawidłowe ułożenie pasa piersiowego przedstawiono na Rys.33 A. Baffin.1 Edycja 4...
- Page 50 Umieść poduszkę siedziska na podstawowej tapicerce siedziska. Pamiętaj, aby plastikową klamrę przełożyć przez całość w poduszce (Rys. 34) Możesz również użyć dodatkowej poduszki do bocznego podparcia. Następnie pociągnąć dodatkową poduszkę na siedzisku - po lewej i prawej stronie siedziska - Rys. 35. Baffin.1 Edycja 4...
- Page 51 (Rys. 37). Jeśli nie używasz poduszki siedzenia, umieść pas udowy pod podstawową tapicerką siedzenia. Następnie zapiąć lewy i prawy koniec pasa bocznymi rzepami siedziska Baffin.1 (Rys. 38 i Rys. 39). Prawidłowe ułożenie pasów na nogi pokazano na Rys.39 A.
- Page 52 ISOFIX (zaczepy) (Rys. 40 p. 4), które należy podłączyć do dwóch odpowiadających sztywnych punktów mocowania (uchwytów) w pojeździe. WAŻNE: platforma obrotowa z podnóżkiem może być używana tylko w pojazdach, które posiadają mocowania (mocowania) ISOFIX przynajmniej z tyłu po stronie pasażera. Baffin.1 Edycja 4...
- Page 53 Jeśli wypełniłeś punkt 5.6.1. następnie połóż obrotową platformę na siedzeniu pojazdu. Wprowadzić łączniki ISOFIX (Rys. 40 p. 4) (z czerwonymi przyciskami zwalniającymi) do punktów mocowania ISOFIX pojazdu (mocowanie). Sprawdź, czy złącza zostały bezpiecznie zablokowane, pociągając. PRAWIDŁOWE połączenie sygnalizowane jest ZIELONYM kolorem przycisku odblokowującego (Rys. 41) Baffin.1 Edycja 4...
- Page 54 Rys. 41 WAŻNA UWAGA Umieść siedzisko Baffin.1 na platformie obrotowej i SPRAWDŹ, czy siedzisko Baffin styka się z oparciem siedzenia pojazdu. JEŚLI NIE, popraw / wyreguluj głębokość sztywnych mocowań ISOFIX (patrz punkt 5.6.1) Przygotowanie do użytkowania - podnóżek - Rys. 42 i Rys. 43 Aby wyregulować...
- Page 55 WŁAŚCIWE położenie ma miejsce, gdy plastikowe końcówki prętów gwintowanych leżą na podłodze pojazdu. Upewnij się, że pręty gwintowane nie są nadmiernie rozciągnięte - obrotowa platforma i siedzenie Baffin.1 powinny zawsze leżeć płasko na siedzeniu pojazdu. Teraz zablokuj pręt gwintowany, przekręcając górny pierścień blokujący do góry. Zapobiega to przypadkowemu odkręceniu prętów gwintowanych.
- Page 56 3- punktowego pasa bezpieczeństwa. Postępuj zgodnie z punktem 1 „Montaż fotelika za pomocą 3-punktowego pasa bezpieczeństwa” w oryginalnej instrukcji obsługi Baffin.1. PRAWIDŁOWE położenie siedziska Baffin.1 na platformie obrotowej przedstawiono na Rys. 44 Rys. 44 Baffin.1 Edycja 4...
- Page 57 Notatki: Baffin.1 Edycja 4...
Need help?
Do you have a question about the Baffin.1 and is the answer not in the manual?
Questions and answers