Table of Contents
Advertisement
Quick Links
DIGITAL VOICE
RECORDER
DS-2200
ONLINE
INSTRUCTIONS
Thank you for purchasing an Olympus
Digital Voice Recorder.
Please read these instructions for information
about using the product correctly and safely.
Keep the instructions handy for future reference.
To ensure successful recordings, we recommend that
EN
you test the record function and volume before use.
Advertisement
Table of Contents

Related Manuals for Olympus DS-2200


Summary of Contents for Olympus DS-2200
- Page 1 DIGITAL VOICE RECORDER DS-2200 ONLINE INSTRUCTIONS Thank you for purchasing an Olympus Digital Voice Recorder. Please read these instructions for information about using the product correctly and safely. Keep the instructions handy for future reference. To ensure successful recordings, we recommend that...
-
Page 2: Table Of Contents
Table of Contents Table of Contents ... 2 Safe and Proper Usage ... 4 General Precautions ... 4 1 Getting Started Main Features ... 6 Card Basics ... 7 Identification of Parts ... 8 Inserting Batteries ... 10 Using the AC Adapter ... 11 Setting Time/Date (TIME&DATE) ... - Page 3 LCD Display Information ... 48 Hold ... 50 Formatting the Card (FORMAT) ... 51 Menu List ... 53 5 Managing Files on Your PC Using DSS Player Software ... 54 Operating Environment ... 55 Installing DSS Player Software ... 56 Uninstalling DSS Player Software ...
-
Page 4: Safe And Proper Usage
Safe and Proper Usage Before using your new recorder, read this manual carefully to ensure that you know how to operate it safely and correctly. Keep this manual in an easily accessible location for future reference. • The warning symbols indicate important safety related information. - Page 5 1 remove the batteries immediately while being careful not to burn yourself, and; 2 call your dealer or local Olympus representative for service. AC Adapter Warning • Do not attempt to disassemble, repair or modify the AC adapter in any way.
-
Page 6: Main Features
*1: DSS format in SP and LP mode recording, and WMA format in SHQ and HQ mode recording. *2: For WMA files, the recorder can recognize and play only those that are recorded with the Olympus Digital Voice Recorder. IBM and PC/AT are the trademarks or registered trademarks of International Business Machines Corporation. -
Page 7: Card Basics
To recover the original recording time, initialize/format the card in the recorder. • Olympus will not be held liable for any data corruption or loss due to misuse of media card. 1 Index area You can write down the card’s... -
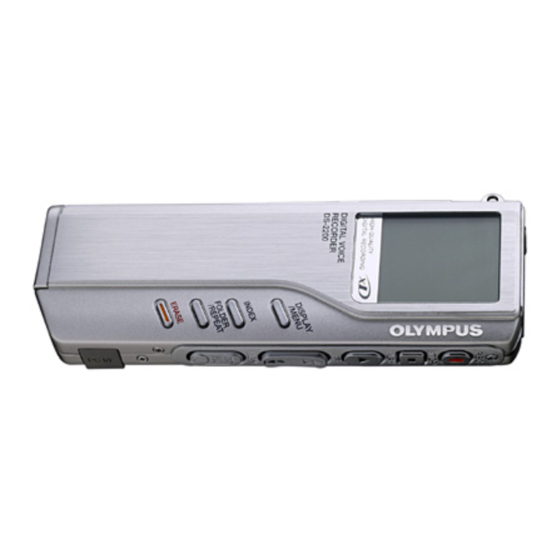
Page 8: Identification Of Parts
Identification of Parts 1 EAR/MIC/REMOTE jack 2 Built-in microphone 3 Record/Play indicator lamp 4 REC (Record) button 5 STOP button 6 PLAY button 7 FF (Fast Forward) button 8 REW (Rewind) button 9 VOL (+) button 0 VOL (–) button ! PC (USB) terminal @ ERASE button # FOLDER/REPEAT button... - Page 9 Display (LCD Panel) 1 Battery indicator 2 VCVA (Variable Control Voice Actuator) indicator 3 Alarm indicator 4 Microphone sensitivity display 5 Record mode indicator 6 Repeat play indicator 7 Erase lock indicator 8 Current file number 9 Total number of recorded files in the folder 0 Character Information display Remote Controller...
-
Page 10: Inserting Batteries
When the batteries are too weak, the recorder shuts down and “BATTERY LOW” appears on the display. AAA alkaline batteries are recommended. An optional Ni-MH Rechargeable Battery from Olympus can be used for the recorder ( → →... -
Page 11: Using The Ac Adapter
Using the AC Adapter Plug the optional AC adapter (Olympus Model A321 or A322) into household power outlet and connect the power plug to the recorder’s power connector (DC 3 V) as shown in the illustration. Always stop recording before connection. -
Page 12: Setting Time/Date (Time&Date)
Setting Time/Date (TIME&DATE) If you have set the time and date, information as to when an audio file is recorded is stored automatically with that file. The time and date should be set to ease file management tasks. The time and date setting is also needed to perform the alarm playback function ( P.38). The hour indicator will flash automatically when you load batteries before using the recorder for the first time, or after the recorder hasn't been used for a long time. - Page 13 Example: March 14, 2004 3M 14D 2004Y (Initial setting) ↓ 14D 3M 2004Y ↓ 2004Y 3M 14D Set the month. 1 Press the FF button or REW button to set the month. 2 Press the PLAY button to accept t h e month.
-
Page 14: Inserting And Ejecting A Card
• If an unformatted card is inserted, the recorder automatically displays the menu to format the card ( P.51). • Never use any card other than one that has been formatted on this unit or on a CAMEDIA series Olympus digital camera ( P.51). - Page 15 Ejecting a Card Slide the card cover lock to the direction indicated by the arrow. The card cover is unlocked and the message “CARD COVER OPEN” appears on the display. When this message appears, the power is switched off. Push the card all the way in to unlock it, and let it return slowly.
-
Page 16: Recording
Recording The recorder provides five folders, A, B, C, D and E, and each message recorded in a folder is saved as a Digital Speech Standard (DSS) file or a Windows Media Audio (WMA) file. These five folders can be selectively used to distinguish the kind of recording; for example, Folder A might be used to store private information, while Folder B might be dedicated to holding business information. -
Page 17: Recording Functions
Notes • A beep will sound when remaining recording time reaches 60 seconds, 30 seconds, and 10 seconds while recording. • “MEMORY FULL” or “FOLDER FULL” will be displayed when the memory or folder capacity is full. Delete any unnecessary files before recording any further ( P.34) or transfer voice files to your computer using DSS Player Software ( P.64). -
Page 18: Using The Variable Control Voice Actuator (Vcva)
Using the Variable Control Voice Actuator (VCVA) When the microphone senses that sounds have reached a preset threshold volume level, the built-in Variable Control Voice Actuator (VCVA) starts recording automatically, and stops when the volume drops below the threshold level. The VCVA feature help extend recording time and conserve memory by turning off recording during silent periods. - Page 19 Press the REC button to start recording. When the sound volume is lower than the preset threshold sound level, recording automatically stops after 1 sec approximately, and “STANDBY” flashes on the display. The record/play indicator lamp glows when recording starts and flashes when recording pauses.
-
Page 20: Recording With External Microphone
Recording with External Microphone To enhance sound quality during recording, use the stereo microphone (ME51S) or an optional external microphone. If a stereo microphone is used, recording in SHQ (Stereo High-Quality) mode is possible. Please note, when a microphone is connected to the jack on the recorder, the jack functional switch-over is made automatically. -
Page 21: Listening While Audio Is Recorded (Recording Monitor)
Listening While Audio Is Recorded (Recording Monitor) If you start recording after inserting the earphone into the jack on the recorder, you can hear the sound being recorded. The sound volume on the recording monitor can be adjusted by pressing the VOL (+) or VOL (–) button. -
Page 22: Recording Modes (Rec Mode)
Recording Modes (REC MODE) You can select from among three recording modes: HQ (High Quality) mode, SP (Standard Playback) mode and LP (Long Playback) mode. If a stereo microphone is used, the only possible recording mode is SHQ (Stereo High Quality). Press and hold the MENU button for 1 second or longer. -
Page 23: Microphone Sensitivity
Microphone Sensitivity Microphone sensitivity is adjustable to meet recording needs. CONF DICT Using the MICSENS switch, choose between the CONF and DICT positions. CONF: High-sensitivity mode that records sounds in all directions. DICT: Low-sensitivity mode suited for dictation. Notes • If you want to record clear or noise-free dictation, select DICT mode and place the microphone 3 to 4 inches from the source. -
Page 24: Recording From Another Audio Device
Recording From Another Audio Device The recorder can record the sound played back by another device with a connecting cord. Make sure that the recorder has stopped. Connect the recorder to the earphone jack on the other device with a connecting cord. For recording monaural sound, use the optional connecting cord, KA232*( P.81) and, for stereo sound, use a commercially... - Page 25 Press the FF or REW button to choose between “STEREO INPUT” and “MONAURAL INPUT”. Choose “STEREO INPUT” for the stereo recording. Choose “MONAURAL INPUT” for the monaural recording. Press the PLAY button to complete the setup screen. Press the STOP button to close the menu.
-
Page 26: Playing
Playing Press the FOLDER button to choose folder. Press the FF or REW button to choose the file that you want to play. If you keep pressing the FF or REW button in stop mode, the recorder continuously skips to the beginnings of files. Press the PLAY button to start playback. - Page 27 • If you set Noise Cancel to “LOW” or “HIGH”, you cannot use the Fast Playback and Slow Playback functions. • In case of WMA files, only the files recorded with this recorder or Olympus Digital Voice Recorders can be played back.
- Page 28 Playing Playback through earphone You can listen to audio playback through the earphone connected to the jack on the recorder or the EAR jack on the remote controller. When the earphone is used, the recorder speaker will be switched-off. Notes •...
-
Page 29: Continuous Playback (All Play)
Continuous Playback (ALL PLAY) When a file finishes playing back, the next file is played without stopping until it reaches the last file in the folder. Press and hold the MENU button for 1 second or longer. The menu opens ( P.53). Press the FF or REW button until “ALL PLAY”... -
Page 30: Auto Backspace Review (Back Space)
Auto Backspace review (BACK SPACE) If it is necessary to repeatedly listen to the last phrase, you can set the Auto Backspace function for either 1 or 2 seconds. Press and hold the MENU button for 1 second or longer. The menu opens ( P.53). -
Page 31: Noise Cancel Function
Noise Cancel Function If recorded audio is difficult to understand because of noise, adjust the Noise Cancel setting level. Noise will be reduced in the file when its played back for better sound quality. Press and hold the MENU button for 1 second or longer while the file is playing. -
Page 32: Repeat Playback
Repeat Playback This function enables repeated playback of part of the file being played. If the continuous playback function is used together, two or more files can be repeatedly replayed as long as they are in the same folder. Choose the file for Repeat Playback, and press the PLAY button. - Page 33 You can use Fast Playback and Slow Playback functions, insert and delete index marks, and use the Noise Cancel function. Notes • If no end position is designated, the end of the file becomes automatically the end position. If continuous playback is set to “ON”, the end of the last file in the folder is set to the end position and then repeated playback starts.
-
Page 34: Erasing
Erasing Erasing One File at a Time A selected file can be erased from a folder. Press the FOLDER button to choose a folder. Press the FF or REW button to choose the file you want to erase. a File to be erased Press the ERASE button. - Page 35 Erase All Files from a Folder All files in a folder can be erased simultaneously, except for locked files ( P.36). Notes • An erased file cannot be restored. • If the ERASE button is not pressed within the 8 seconds after “FILE ERASE?” or “ALL ERASE?” starts flashing, the recorder will revert to stop status.
-
Page 36: Locking Files (Lock)
Locking Files (LOCK) Locking a file keeps important data from being accidentally erased. Locked files are not erased when you choose to erase all files from a folder ( P.35). 2,4,6 Press the FOLDER button to choose a folder. Press the FF or REW button to choose the file you want to lock. -
Page 37: Index Marks
“INDEX FULL” to appear on the display. • Index marks cannot be set or cleared in a locked file ( P.36). • In case of WMA files, index marks can only be placed in files recorded with Olympus recorders. -
Page 38: Alarm Playback Function (Alarm)
Alarm Playback Function (ALARM) The alarm playback function can be set to play a selected file at a pre-set time. 2,4,6 Press the FOLDER button to choose a folder. Press the FF or REW button to choose the file to be played when the alarm sounds. - Page 39 9,11 8,10 9,11 8,10 Notes • The alarm playback function can be set for only one file at a time. • The alarm will sound at the scheduled time every day unless the alarm playback setting is cleared. • If you wish to change the file for alarm play, first turn the alarm settings “OFF”, then make any desired new alarm settings.
-
Page 40: Lcd Contrast Adjustment (Contrast)
LCD Contrast Adjustment (CONTRAST) If you find it difficult to read the display information due to lighting, temperature, or other conditions, you can adjust the contrast using this function to easily see the LCD display (display contrast). Display contrast can be adjusted in 12 levels. Press and hold the MENU button for 1 second or longer. -
Page 41: Backlight (Backlight)
Backlight (BACKLIGHT) The recorder display backlight is ON by default. The display will lit for about 10 seconds when a button on the recorder is pressed. The backlight feature can be turned off from the menu. Press and hold the MENU button for 1 second or longer. -
Page 42: Assigning Folder Names (Folder Name)
Assigning Folder Names (FOLDER NAME) The 5 folders on the recorder (Folder A to Folder E) can be easily renamed. The folder name is limited to 12 characters each. Frequently used names such as “dictation (DICT.)”, “meeting (MEETING)” and “schedule (SCHEDULE)” are pre-set in a template. 3,5,7 3,5,7 Press and hold the MENU button... - Page 43 Recorder buttons that are used to input characters Button Push PLAY Press once Press and hold Press once Press and hold Press once Press and hold FOLDER ---------- ERASE ---------- INDEX Press once Press and hold MENU Press once Press and hold Use the two following methods to quickly find characters.
- Page 44 Assigning Folder Names (FOLDER NAME) Available characters Type of Characters Folder name input Template File comment input Large caps Small caps Numerals Symbols When you have finished setting the folder name, press and hold the PLAY button for 1 second or longer. This completes the folder naming procedure.
-
Page 45: Assigning File Comments (Comment)
Note In case of WMA files, file comments can only be added to files recorded with Olympus recorders. Press the FF or REW button to choose the file you want to comment setup. -
Page 46: Moving Files Across Folders
Moving Files Across Folders A recorded file can be transferred from one folder to another. The file is added at the end of existing files in the destination folder. Notes • If the destination folder is full (a maximum of 199 files), “FOLDER FULL” appears on the display and files cannot be transferred to it. -
Page 47: System Sounds (Beep)
System Sounds (BEEP) The recorder beeps to alert you to button operations or warn you of errors. System sounds may be turned off. Press and hold the MENU button for 1 second or longer. The menu opens ( P.53). Press the FF or REW button until “BEEP”... - Page 49 While in record mode Displays 1 and 2 alternately. 1 Recording level meter Displays the sound input level graphically and the remaining time available for recording in count-down mode. 2 Remaining memory bars Displays the remaining time available for recording in bar mode and count- down mode.
-
Page 50: Hold
Hold Running state when HOLD is set 1: State of the recorder, 2: HOLD of the recorder, 3: HOLD of the remote controller, 4: Button operation on the recorder, 5: Button operation on remote controller connected STOPS connected Running *1: Pressing any button makes clock display blink for 2 seconds but the recorder does not start. *2: The recorder stops when playback completes or recording terminates due to no memory space. -
Page 51: Formatting The Card (Format)
Formatting the Card (FORMAT) Formatting prepares cards for recording. Cards that have been used on non-Olympus devices, or that can’t be accessed by this unit, require formatting. The card that comes with this unit and Olympus xD-Picture Cards are preformatted and can be used immediately following purchase. - Page 52 Formatting the Card (FORMAT) Press the PLAY button again. Formatting begins and an indicator flashes on the display. “FORMAT DONE” displays when formatting ends. Notes • Completion of Formatting may take about 1 minute. Never do the following during this period. Doing so may damage the data or card. -Removing the battery.
-
Page 53: Menu List
Menu List Press and hold the MENU button for 1 second or longer. Selection from HQ, SP and LP modes ( P.22). REC MODE Locking files setting ( P.36). Selection LOCK between ON (locked) and OFF (unlocked). Back space setting ( P.30). Selection from BACK SPACE OFF, 1 SEC SKIP and 2 SEC SKIP. -
Page 54: Using Dss Player Software
G Do NOT format the card using your PC. If you do, the recorder will not be able to recognize the card. Only format the cards using either the recorder or the Olympus CAMEDIA digital camera ( P.51). G Folder (directory) names displayed by... -
Page 55: Operating Environment
Operating Environment Windows IBM PC/AT compatible PC Operating System: Microsoft Windows 98/ 98SE/ Me/ 2000 Professional/ XP Professional,Home Edition CPU: Intel Pentium II class 333 MHz processor or more (Processor recommended) RAM: 64 MB or more (128 MB or more is recommended) Hard drive 10 MB or more space:... -
Page 56: Installing Dss Player Software
Make sure to exit all running applications, eject the floppy disk if you are using one, and logon as administrator if you are running Windows2000/XP (Professional only) or Mac OS X on the network. Windows Insert Olympus DSS Player CD into the CD-ROM drive. The installation program will start automatically. -
Page 57: Uninstalling Dss Player Software
Click the [Start] button on the Taskbar. Select [Add/Remove programs] from the [Control Panel]. A list of application installed is displayed. Select “Olympus DSS Player Pro”, then Click the [Change/Remove] button. Proceed with the installation according to the instructions on the screen. -
Page 58: Using Online Help
For information on the DSS Player usage and features, refer to the online help. To start online Help: Windows • Click the [Start] button, then select [All Programs], [Olympus DSS Player Pro], [Dictation Help]. • While DSS Player is running, select the [Help] menu, [Contents] . -
Page 59: Connecting To Your Pc
Connecting to Your PC Be sure to install the DSS Player software before connecting the recorder to the PC. However, if you do connect the recorder before or during the software installation, the “Add New Hardware Wizard” appears, cancel the wizard by pressing the [Cancel] button in the Wizard screen and then install or continue the installation of DSS Player software. - Page 60 Connecting to Your PC Connecting to your PC using the cradle Place the recorder on the cradle Insert end A of the USB cable to your PC's USB port or USB hub. Connect the end b of the USB cable to the cradle.
-
Page 61: Running Dss Player
Click the [Start] button, then select [All Programs]. All program menu will be displayed. Select [Olympus DSS Player Pro], then click [Dictation Module]. Note If you connect the recorder before installing DSS Player, the “Add New Hardware Wizard” dialog box will... - Page 62 Running DSS Player Macintosh Start your Macintosh. Connect the recorder to your PC. For cable connection instructions, see “Connecting to Your PC” ( P.59). Double-click the DSS Player for Mac folder. The DSS Player for Mac folder opens. Double-click DSS Player. DSS Player for Mac launches.
-
Page 63: Window Names
Window Names (Windows) 1 Play Control Bar Control buttons to play and stop voice files. 2 Dictation Folder Window Displays the directory structure of the DSS, WMA, WAVE (W indows only) and AIFF (Macintosh only)-format files stored on your PC's hard disk. 3 Device Manager Window Displays the directory structure of the folders in the recorder. -
Page 64: Download Voice Files From The Recorder
Download Voice Files from the Recorder There are 3 download options to transfer voice files from the recorder to the PC: • Download Selected Files Download one or several voice files to your PC. • Download Folders Download all the voice files in one folder. •... - Page 65 Download the voice file. From the [Download] menu, click [Download Selected Files]. Download complete. Do not disconnect the USB cable while the record/play indicator LED on the recorder is flashing. Disconnecting the USB cable when the recorder LED is flashing will result in data loss or corruption.
-
Page 66: Play A Voice File
Play a Voice File Select the folder. Select the folder that contains the voice file you would like to play. Select the voice file. Select the voice file to play from the Voice File List Box. Play the voice file. Click the (play) button of the Play Control Bar. -
Page 67: Upload Voice Files To The Recorder
• NEVER remove the card or disconnect the USB cable while the record/play indicator lamp is flashing. If you do, the data on the card will be destroyed. • In case of WMA files, only the files recorded with this recorder or Olympus Digital Voice Recorders can be uploaded. -
Page 68: Changing User Id (Author Id)
Changing User ID (Author ID) User ID can be uploaded to the recorder using the DSS Player. Up to 10 IDs can be uploaded to the recorder. From the main window, click the [Download] menu, then select [Create & Send Job Data]. The [Create & Send Job Data] window appears. -
Page 69: Changing A Folder Name
Changing a Folder Name Changing a folder name in the Voice Folder window You can change a folder name In the Voice File Window using the [Rename Folder] command from the [File] menu. A folder name can be up to 20 characters long and cannot use Ä / :*?"<>|. -
Page 70: Editing A Template
Editing a Template You can edit folder name and file comment templates in DSS Player in the [Edit & Upload Templates] window and transfer them to the recorder. Templates downloaded from the recorder can also be edited. Select [Edit & Upload Templates] from [Download] to open the [Edit and Upload Template] window. -
Page 71: Send Voice Files With E-Mail
The Message folder location can be found by selecting [Options] from the [Tools] menu. Replaying Received Files The file can be replayed with DSS Player-Lite even though the recipient does not have DSS Player. Free DSS Player-Lite can be downloaded from Olympus homepage. http://www.olympusamerica.com/cpg_section/cpg_downloads.asp http://cf.olympus-europa.com/consumer/voice/downloads/downloads.cfm... -
Page 72: How To Install And Activate Mail Function
How to Install and Activate Mail Function To activate the Send Mail function, the MAPI subsystem must be installed on your computer. Check if the MAPI subsystem is installed on your computer by following the steps below. Click Start, Settings and Control Panel. Check whether “Mail”... - Page 73 Install MAPI Subsystem Windows 98/2000/Me/XP Installing Microsoft Outlook 98 Start the Setup program for Outlook 98. When the following window appears, select [Other Mail Applications] and click the [Next]. When the following window appears, select [Corporate or Workgroup] and click the [Next]. Follow the instructions on each screen.
- Page 74 How to Install and Activate Mail Function Installing Microsoft Outlook XP After installing Outlook XP, double- click the Mail icon in the Control Panel, and then click the [Show Profiles…]. Click the [Add…]. Type the profile name and click [OK]. Select “Add a new e-mail account”...
- Page 75 If you select “Additional Server Types”, you will see the following dialog box. Click [Next] and follow the instructions on the screen, and then go to Step 8. If you select “POP3”, you will see the following dialog box. Enter the necessary information and click [More Settings…].
- Page 76 How to Install and Activate Mail Function Activate Send Mail Function Create a Profile The Profile is the group of information services to set up the Messaging application. The information services allow you to access the Mailbox and review the Address Book. The Send Mail function will not work if there is no Profile.
-
Page 77: Using The Recorder As A Reader/Writer
• NEVER remove the card or disconnect the USB cable while the record/play indicator lamp is flashing. If you do, the data on the card will be destroyed. • Only the WMA file that are recorded with the Olympus Digital Voice Recorder can be copied to a voice file of this recorder and played. -
Page 78: Alarm Message List
Alarm Message List Message Meaning BATTERY LOW Low battery power LOCK ON Erase-locked INDEX FULL Index full FOLDER FULL Folder full Maximum number OVER-FLOW Too many characters input CARD ERROR Incompatible card MEMORY FULL Zero remaining memory PLEASE Please download DOWNLOAD voice files to a PC FILES... - Page 79 Select another folder. Reformat the card ( P.51). Change the file name. This is a malfunction. Contact the place of purchase or Olympus Service Center for repair. Insert a card ( P.14). Close the card cover securely until it click ( P.14).
-
Page 80: Troubleshooting
Set the microphone sensitivity to CONF mode and try again ( P.23). Erase unnecessary index marks ( P.37). Unlock the file ( P.36). Use the Olympus A321 (for US, Canada) or A322 (for Europe except U.K) AC adapter (Optional). Switch to the right folder. -
Page 81: Accessories (Optional)
Accessories (optional) xD-Picture Cards of 16, 32, 64, 128, 256 and 512 MB:M-XD16/32/64/128/256/512 Olympus CAMEDIA digital camera series xD-Picture Cards can be used. PC Transcription kit: AS-3000 The AS-3000 transcription kit provides you with a PC-footswitch, a headset and DSS Player Pro Transcription Module for easy transcription of DSS recordings. -
Page 82: Specifications
(without protrusions) Weight 85 g (including alkaline batteries) * Specifications and design are subject to change without notice. * Battery life is measured by Olympus. It varies greatly according to the type of batteries used and the conditions of use. - Page 84 (Letters) Postfach 10 49 08. 20034 Hamburg. Germany. http://www.olympus.com DS-2200 DIGITAL VOICE RECORDER OLYMPUS AMERICA INC. 2 Corporate Center Drive, Melville, NY 11747-3157, U.S.A. 800-622-6372 Tested To Comply With FCC Standards L’indication “CE” signifie que ce produit est conforme aux exigences concernant la sécurité,...
Need help?
Do you have a question about the DS-2200 and is the answer not in the manual?
Questions and answers