Advertisement
Available languages
Available languages
Quick Links
JOBO International GmbH • Kölner Str. 58a • 51645 Gummersbach • Germany
Bedienungsanleitung / Operating Instruction
JOBO CPE-3
Technische Änderungen vorbehalten / Subject to technical modifications
JOBO International GmbH • Kölner Str. 58a • D-51645 Gummersbach • Tel. +49 (0)2261 / 545-0 • Fax +49 (0)2261 / 545-22 • Mail: i_info@jobo.com • Internet: www.jobo.com
Sitz der Gesellschaft: Gummersbach. Eingetragen unter HRB 69080 beim Amtsgericht Köln. Geschäftsführer: Johannes Bockemühl-Simon.
Advertisement

Subscribe to Our Youtube Channel
Related Manuals for JOBO CPE-3


Summary of Contents for JOBO CPE-3
- Page 1 Technische Änderungen vorbehalten / Subject to technical modifications JOBO International GmbH • Kölner Str. 58a • D-51645 Gummersbach • Tel. +49 (0)2261 / 545-0 • Fax +49 (0)2261 / 545-22 • Mail: i_info@jobo.com • Internet: www.jobo.com Sitz der Gesellschaft: Gummersbach. Eingetragen unter HRB 69080 beim Amtsgericht Köln. Geschäftsführer: Johannes Bockemühl-Simon.
- Page 2 Sicherheitshinweise Gerät nur an Steckdose mit Schutzkontakt anschließen. Gerät nur mit handelsüblichen Fotochemikalien betreiben. Beim Umgang mit Fotochemikalien die empfohlenen Sicherheitshinweise des Chemikalienheerstellers einhalten. Motorkopf nicht abspülen oder in Wasser tauchen. Gerät erst nach Füllen des Wasserbades einschalten. Technische Daten Abmessungen: 24x65,5x33 cm Gewicht: 3,5 kg Anschlußwerte siehe Typenschild...
- Page 3 Gerätausrichtung Die Geräte müssen unbedingt in Waage stehen. Legen Sie eine Wasserwaage auf die Vorderkante des Gerätes und unterlegen Sie es gegebenenfalls. Versuchen Sie nie die Trommel in Waage zu bringen! Gerät mit Wasser füllen Wasser langsam in die Wanne gießen. Füllmenge je nach Tanksystem 9-10 Liter. Beim CPE ist der Füllstand durch eine entsprechende Wassermenge einzustellen.
- Page 4 Safety instructions Only connect your processor to a standard 3 pin earthed socket. Only operate your processor using conventional photochemicals. When working with the photochemicals, ensure to observe the manufacturer’s safety instructions. The motor head cannot be rinsed or immersed in water. Do not switch the appliance on until the water bath has been filled.
- Page 5 Leveling your processor Your equipment must be level. Place a spirit level on the front edge of your processor and support underneath if necessary to make level. Never place your spirit level on top of the tank/drum as this will give an inaccurate reading! Filling the appliance with water Pour water slowly in the water bath, 9-10 liter in the case of the CPE depending on the tank system in use.
- Page 6 Technische Änderungen vorbehalten / Subject to technical modifications JOBO International GmbH • Kölner Str. 58a • D-51645 Gummersbach • Tel. +49 (0)2261 / 545-0 • Fax +49 (0)2261 / 545-22 • Mail: i_info@jobo.com • Internet: www.jobo.com Sitz der Gesellschaft: Gummersbach. Eingetragen unter HRB 69080 beim Amtsgericht Köln. Geschäftsführer: Johannes Bockemühl-Simon.
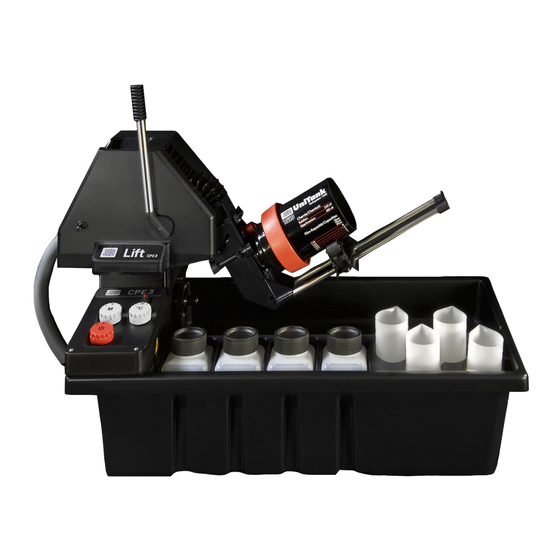
- Page 7 Montage Zahnrad Magnetkupplung vom vorhandenen Colorprozessor abschrauben und das mitgelieferte Zahnrad fest aufschrauben. Sollten Sie den CPE-3 mit einem Lift im Kit erworben haben entfällt dieser Punkt. Liftmontage Montageplatte vom Lift lösen. Montageplatte mit den beiliegenden Schrauben (3 Stück) auf...
- Page 8 Schraube seitlich neben dem Zahnrad lösen und zur Seite legen. Lift auf die Montageplatte bis zum Anschlag aufschieben und verschrauben Lift mit Schraube auf der rechten Seite des Motorkopfes verschrauben. Montage Lifthebel. Lifthebel aufstecken und im Uhrzeigersinn festdrehen.
- Page 9 Anwendung Tank/Drum ankuppeln Den Tank an den Lift ankuppeln. Bitte achten Sie hier auf die korrekte Position des Rollenbocks. Tank/Drum entleeren Lifthebel umschwenken, die Chemikalie fließt in die von Ihnen bereitgestellte Auffangflasche. maximale Tank- und Drumkombination mit dem CPE3 inkl. Lift System 1500 Tank 1510 mit max.
-
Page 10: Assembling The Lift
The JOBO Lift makes work faster, smoother and simpler. Tanks and drums are filled and emptied efficiently during rotation. Optimal wetting is achieved. Wet fingers during the process are a thing of the past! Systems 1500, 2500 and 2800 can be used with cog... - Page 11 Loosen the screw on the right-hand side of the motor control unit and put it aside. Slide lift onto mounting plate until the stop is reached and screw into position. Screw lift into position on the right-hand side of the motor control unit using the screw you unscrewed before.
- Page 12 Fitting the Lift lever Insert the Lift lever ans screw tight in clockwise direction. Usage Connecting a tank/drum Put the tank onto the lift arm. Adjust the roller block for tank/drum system and position according to the length of the tank. Emptying a tank/drum Pull down lift lever;...
Need help?
Do you have a question about the CPE-3 and is the answer not in the manual?
Questions and answers