Table of Contents
Advertisement
Advertisement
Table of Contents

Related Manuals for Nike Nike+ SportBand


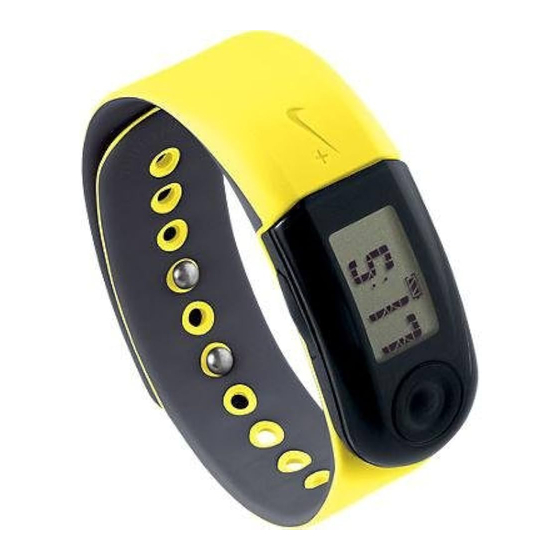
Summary of Contents for Nike Nike+ SportBand
- Page 1 Nike+ SportBand User’s Guide...
-
Page 2: Table Of Contents
Linking to More Than One Sensor Losing Connection to a Sensor About the Memory Charging the Battery Understanding Battery States Uploading Your Runs to nikeplus.com Making Updates Using the Sensor Specifications Service and Support Warranty Software Requirements The Nike+ SportBand User’s Guide... -
Page 3: Welcome
The Nike+ SportBand records your distance, pace, time and calories burned while you run, and saves a week’s worth of workouts for your review. When you’re done, connect the removable Nike+ SportBand Link to your computer to go to nikeplus.com, where you can track your runs, set goals, challenge others, and much more. -
Page 4: What You Need To Get Started
What You Need to Get Started To use your Nike+ SportBand, you must have: • The Nike+ Utility software. To download it, go to www.nikeplus.com/downloads • A Macintosh with built-in USB. Mac OSX v10.4.8 or later or • A PC with built-in USB or a USB card installed. Windows XP Home or Professional (SP2) or later, or Windows Vista. • Internet access. Broadband is recommended; fees may apply. Use subject to software license. The Nike+ SportBand User’s Guide... -
Page 5: Quick Start
3. Launch the Nike+ Utility Installer, and follow the instructions. Step 2: Connect the Link and customize the settings. (fig.2) 1. To charge the battery, simply connect the Nike+ SportBand Link to a USB port on your computer. For best results, let it charge for about 2 hours or until the battery icon shows that the battery is fully charged. 2. The Nike+ Utility software will open automatically when you plug in the SportBand Link. - Page 6 After recording your run or runs, plug the SportBand Link back into the USB port on your computer to recharge the battery and upload your runs to nikeplus.com. (fig.9) fig.9 The Nike+ SportBand User’s Guide fig.4 fig.5 fig.6 1 sec fig.7...
-
Page 7: Before Your Run
2. Download the Nike+ Utility Installer. 3. Launch the Nike+ Utility Installer, then follow the instructions. Connecting and Charging the Link After the Nike+ Utility is installed, take the Link out of the SportBand and connect it to a USB port on your computer. The Nike+ Utility will launch automatically. -
Page 8: The Nike+ Utility Main Window
Each time you connect the SportBand Link to a USB port on your computer, the Nike+ Utility software will automatically launch. The Nike+ Utility will upload your runs to nikeplus.com, free up the memory in your SportBand to record more runs, and allow you to customize your SportBand Link. -
Page 9: The Settings Window
To track your calories burned while you run, you’ll need to enter your current weight. In the User tab (fig.14), type in your weight, then use the pop-up menu to choose pounds or kilograms. Update your weight as needed, to keep the calories calculated accurate. The Nike+ SportBand User’s Guide Time Calibration MORE OPTIONS Done... - Page 10 To customize more settings, select another tab. When you are finished, click the Done button. This will save your changes, close the settings window, and take you back to the Nike+ Utility’s main window. The Nike+ SportBand User’s Guide...
- Page 11 The Time T ab Setting the Time When you connect the Nike+ SportBand Link to a USB port, the time and date on the SportBand Link will automatically be set to the current time and date on your computer. Here’s how you can adjust the time manually. Click on the Time tab (fig.15), then click on “Manually set the time and date.”...
- Page 12 The Calibration T ab Calibrating Your Nike+ SportBand The Nike+ SportBand is accurate for most runners without calibration. You can improve the accuracy by calibrating your individual running or walking style. You can calibrate for running and walking separately. Each one needs to be calibrated separately.
- Page 13 To customize more settings, select another tab. When you are finished, click the Done button. This will save your changes, close the settings window, and take you back to the Nike+ Utility main window. The Nike+ SportBand User’s Guide Cali bration walk , if needed.
-
Page 14: The Nike+ Utility Menu
The Nike+ Utility Menu The Nike+ Utility Menu is an alternate way to get to settings, battery status, and more. On a Mac, the Nike+ icon appears in the upper right hand side of the menu bar on your computer. On a PC, the Nike+ icon is in the System Tray at the bottom right hand corner. -
Page 15: Using Your Nike+ Sportband
Using Your Nike+ SportBand The Record and Toggle Buttons The Nike+ SportBand works as a recording device while you run. For the best viewing angle while you run, wear the Nike+ SportBand inside your wrist. Use the Record button (on the top) and the Toggle button (on the side) to control all of its functions. (fig.20) Use the Record button, located on top, to connect to the shoe sensor, start recording, to pause recording, resume recording and to stop recording your run. -
Page 16: During Your Run
Record button to start recording. If you press and hold the button, your run will automatically end, and your info won’t get recorded, or be available for upload to nikeplus.com. 5. Start running! The Nike+ SportBand User’s Guide fig.21 fig.22 fig.23 1 sec fig.24 “recording”... - Page 17 You can still cycle through run metrics using the Toggle button (on the side). To resume recording, press the Record button again. The numbers will stop blinking and the bar will animate along the bottom of the display. fig.25 The Nike+ SportBand User’s Guide fig.26 press to pause press to...
-
Page 18: Ending Your Run
Your SportBand will display the word END. (fig.28) Then, it will show you a review of the metrics you just recorded. (fig.29) T he review will display the metrics twice, then it will exit to TIME, showing you the current Time of day. (fig.30) fig.27 fig.29 x2, loops twice The Nike+ SportBand User’s Guide fig.28 fig.30... -
Page 19: After Your Run
Press the Toggle button (on the side) to cycle through the three review screens of your workouts until you get to the current time. Note: To make adjustments to the time, refer to the User tab settings in the Nike+ Utility. The Nike+ SportBand User’s Guide fig.31 toggle fig.32... -
Page 20: Linking To More Than One Sensor
(fig.36). If only one active sensor is present, a blinking LINK message will appear. The linking is complete once the OK message has appeared for 5 seconds. The SportBand can only link to one new shoe sensor at a time. If it detects too many unlinked sensors, the display will show WALK AWAY (fig.37). Walk away from where you are to allow the SportBand to establish the link to the sensor in the shoes you are wearing. When only that sensor is detected the LINK message will appear, followed by OK. Important: You can only link up to a total of eight different sensors. If you link to a 9th sensor, the link to the 1st sensor will be deleted. fig.35 10 sec fig.37 The Nike+ SportBand User’s Guide fig.36... -
Page 21: Losing Connection To A Sensor
If you stop for longer than 5 minutes, the recording automatically pauses, and the most recent display metric blinks. To resume recording, you must manually press the Record button (on the top) again, and start running. (fig.39) If 30 minutes pass and you haven’t pressed the Record button to resume recording your run, the SportBand will stop recording, and automatically end your workout. fig.38 The Nike+ SportBand User’s Guide fig.39 press to resume... -
Page 22: About The Memory
To free-up the memory, connect your SportBand Link to the USB port of a computer installed with the Nike+ Utility. All of your recorded runs will be uploaded to nikeplus. com, and the memory will be freed to record more runs. The Nike+ SportBand User’s Guide... -
Page 23: Charging The Battery
While charging in a USB port, the SportBand Link’s display will show the message CHRG. When the battery is full, the message will change to FULL. Check the battery charge any time using the Nike+ Utility. Simply look at the icon in the lower-left corner of the main window, or check the status using the main menu. Another way to check the battery is to look at the icon on the SportBand Link’s display. -
Page 24: Understanding Battery States
After that time has passed, the recording will automatically end, and the display will exit to the time of day. Note: A blank screen indicates that the battery has completely run out, and needs to be recharged. The Nike+ SportBand User’s Guide fig.40 fig.41... - Page 25 Note: If you reset the SportBand while you’re running, the recording will automatically stop. The metrics recorded up until the time of the freeze should be safe. Note: You cannot reset, or unfreeze, the SportBand Link if it’s connected to a USB port on your computer. fig.42 The Nike+ SportBand User’s Guide...
-
Page 26: Uploading Your Runs To Nikeplus.com
After recording one run, or many, you can send your workout info to nikeplus.com, where you can track your progress, set goals, challenge others and much more. 1. After recording a run or runs, remove the SportBand Link and connect it the to a USB port on a computer installed with the Nike+ Utility. 2. The Nike+ Utility will automatically launch and upload your run info to nikeplus.com 3. Your web browser will open automatically, and take you to nikeplus.com. Meanwhile, the message “All runs have been uploaded”... -
Page 27: Making Updates
Clicking the OK button will take you to nikeplus.com, where you can download the update. Updating the Nike+ SportBand Link When updates to the Nike+ SportBand Link are available, a message in the main win- dow will say, “A firmware update is available. Would you like to download and install it now?”... -
Page 28: Using The Sensor
To put the sensor to sleep: Use a pen or a paper clip to press and hold the Sleep/Wake button for three seconds. (fig.45) Important: Put the sensor to sleep before taking it on an aircraft, to comply with appli- cable government regulations. To wake the sensor: Use a pen or a paper clip to press the Sleep/Wake button. fig.45, Nike+ Sensor The Nike+ SportBand User’s Guide Sleep/Wake button... -
Page 29: Specifications
By exercising, you assume the risks inher- ent in physical exercise, including any injury that may result from such activity. Warning: the sensor is a potential choking hazards. Keep it away from children under three years of age. Important: Do not attempt to open the sensor, disassemble it, or remove the battery. No user-serviceable parts are inside. The Nike+ SportBand User’s Guide... -
Page 30: Service And Support
Learning More, Service and Support You can find out more information about using the Nike+ SportBand and the sensor on the web. To learn about Nike+ SportBand service and support, discussions, tutorials, and software downloads go to: www.nikeplus.com/downloads To learn about sensor service and support, discussions, tutorials, and software downloads go to: www.nikeplus.com/downloads... -
Page 31: Warranty
This warranty gives you specific legal rights, and you may also have other rights, which vary from state to state. The foregoing is without prejudice to other legal rights that may arise under applicable national legislation. The NIKE warranty extends only to products purchased from an authorized NIKE retailer. The Nike+ SportBand User’s Guide... -
Page 32: Software Requirements
About Compliance This device complies with part 15 of the FCC rules. Operation is subject to the following two conditions (1) this device may not cause harmful interference, and (2) this device must accept any interference received including interference that may cause undesired operation. FCC WARNING: any changes or modifications not expressly approved by Nike, Inc. could void the user’s authority to operate this equipment under FCC regulations Software Requirements Nike+ Utility software. To download, go to www.nikeplus.com/downloads A Macintosh with built-in USB. Mac OSX v10.4.8 or later or A PC with built-in USB or a USB card installed. Windows XP Home or Professional (SP2) or later, or Windows Vista. Internet access. Broadband is recommended; fees may apply. Use subject to software license. The Nike+ SportBand User’s Guide...