Econ sens3 Manual
3-phase multifunctional measuring instrument with logging function
Hide thumbs
Also See for sens3:
- Operating instructions (4 pages) ,
- Operating instructions manual (68 pages)

Subscribe to Our Youtube Channel
Related Manuals for Econ sens3


Summary of Contents for Econ sens3
- Page 1 Manual econ sens3 3-Phase Multifunctional Measuring Instrument with Logging Function Version 3.0...
-
Page 2: Table Of Contents
Contents General Information ....................1 About this handbook ....................1 Required basic knowledge ..................1 Warnings ........................2 Safety symbols on the instrument ................3 Explanation of symbols ....................3 Intended use of the product ..................4 Disposal instructions ....................4 Warranty conditions .................... - Page 3 Contents Open collector output ........................25 Digital output (pulse) ......................... 26 Digital input (pulse input) ........................27 Input for potential free contact ......................27 Analog output 4 to 20 mA ......................... 28 Analog input 4 to 20 mA ........................28 Analog input 0 to 10V/30 V .......................
- Page 4 10.2 Email contact ....................... 79 10.3 RMA ........................79 Technical Data ....................80 11.1 econ sens3 basic instrument ................80 11.2 econ sens3 measuring coils ................. 85 11.3 Storage capacity of the measurement data memory ..........85 11.4 Factory settings ....................85 Appendix ......................
-
Page 5: General Information
General Information General Information About this manual This manual describes the econ sens3 Multifunctional Measuring Instrument. It represents a part of the product and is intended for: Planners Operators Start-up engineers Service and maintenance personnel. This manual should be read before using the product and should be kept available for reference for the entire life of the product. -
Page 6: Warnings
If multiple hazard levels apply, the highest level warning will always be used. If a warning about personal injury is indicated in a warning sign with a warning triangle, a property damage warning can be included in the same warning sign. Manual econ sens3 Version 3.0... -
Page 7: Safety Symbols On The Instrument
The documentation should always be consulted if the general warning symbol is shown, as well as the warning symbol for the danger of electric shock. Figure 1: Safety symbols on the instrument Explanation of symbols Table 1 shows the safety symbols used on the instrument. Table 1: Explanation of symbols Manual econ sens3 Version 3.0... -
Page 8: Intended Use Of The Product
GmbH (Rogowski coils, referred to in this document as „econ coils”). Disposal instructions The econ sens3 energy consumption meter contains a small integrated lithium battery. Used batteries should never be disposed of in household trash but should be delivered instead to a collection point for used batteries. -
Page 9: Disclaimer
1.10 Registration Register your econ sens3 at www.econ-sens.com and receive the latest firmware updates automatically by email. -
Page 10: Description Of The Instrument
Modbus TCP Modbus RTU (RS-485) With the econ sens3 the active, reactive, and apparent power, the current, and the voltage for each phase, as well as other measurements, can be recorded via the Modbus interface (see the Modbus submenu in Chapter 8.10). -
Page 11: Special Features
Rogowski coils can be opened and placed around an insulated conductor. Before connecting the voltage path, ensure that the system was disconnected from the power supply. Applicable safety regulations for working with electrical systems must be obeyed. Manual econ sens3 Version 3.0... -
Page 12: Scope Of Delivery And Receiving Inspection
Standard Power Supply 24V DC for alternative supply of the 236341 instrument over protective extra-low voltage econ sens3 V-KIT, Safety Test Lead Set for connection to the voltage path 238975 via magnetic probes (for mobile and temporary measurements) Table 2: Scope of delivery and accessories... - Page 13 Completeness of the package contents Visible outer damage to the instrument. Please contact your econ sales partner if one or more of the above conditions are present. Warning! Damaged instruments must not be installed or taken into operation. The result can be serious bodily harm, including death, or property damage.
-
Page 14: Assembly
Installation position The econ sens3 energy consumption meter was designed for installation on a top-hat rail (TS35). To do this, slide the instrument onto the top-hat rail with the upper retaining collar, move the metal base bar downwards against the spring force with the flat head screwdriver, and bring the instrument into a horizontal position (see Fig. -
Page 15: Installation Space And Ventilation
Plan additional space for: Ventilation: The econ sens3 Multifunctional Measuring Instrument corresponds, with its 22.5 mm installation depth to 1.3 subunits. Maintain a distance of 6 mm from neighboring devices on both sides of the instrument. Consequently, the instrument occupies exactly 2 subunits at 17.5 mm each. -
Page 16: Disassembly
Then take the instrument down off the top-hat rail. Figure 3: Disassembly of the econ sens3 Attention! Make sure no tools or other objects that may cause a safety hazard are left behind at the... -
Page 17: Connection Of The Instrument
/ systems in accordance with the safety engineering standards for electrical circuits and instruments. • Training or instruction in accordance with the safety engineering standards for the care and use of appropriate safety equipment. • Training in first aid. Manual econ sens3 Version 3.0... -
Page 18: Overview Of Connections
Connection of the instrument Overview of connections All connections of the econ sens3, with the exception of the connection for current measurement (3) and the Ethernet interface (4), are designed as pluggable screw terminals. Warning! Incorrect connection can result in serious bodily harm, including death, or property damage. -
Page 19: Voltage Measurement Connection
TT, and IT systems. The voltage measurement is designed for overvoltage category 300V CATIII (rated surge voltage 4kV) The econ sens3 is suited for voltage measurements in the frequency range of 45 to 65Hz. Fig. 5 shows the connection of the voltage measurement input to the network. - Page 20 3.) Measuring voltages and measuring currents must originate from the same network. 4.) Synchronous phase connection Phases must be connected in the same sequence as the terminals, as the terminal assignments cannot be changed in the software parameterization. Manual econ sens3 Version 3.0...
-
Page 21: Supply Voltage Connection
Connection of a phase to current supply Operation of the econ sens3 requires a supply voltage of 100 to 240 VAC. Fig. 6 shows the connection of the supply input to the network. Connection examples for 1 and 3-phase networks are found in Chapter 5.10. -
Page 22: Alternative Voltage Supply With 12 To 24V Dc
Ensure correct polarity of the DC voltage during connection. Caution! Unprotected or reversed polarity supply voltage can lead to damage to the instrument or the system. Secure the instrument at all times with an IEC approved 2 A fuse or additional safety device. Manual econ sens3 Version 3.0... -
Page 23: Current Measurement Connection
Connection of the instrument Current measurement connection Current measurement with the econ sens3 is not performed over transformers but instead over the econ sens3 coils (Rogowski coils) included in the scope of delivery. Installation of the current sensors To install the current sensors (Rogowski coils), place these as shown in Fig. 8 around the conductor to be measured. - Page 24 (e.g. output). Figure 9: Phase displacement of the current sensors Unlike conventional transformers, the design of the econ coils guarantees that there is no danger from open secondary connections. Manual econ sens3...
-
Page 25: Ethernet Connection
This connection can be directly established with a PC or a node, such as hubs or switches. For this purpose, connect the sens3 to a patch cable (1:1) with your hub/switch or directly to your PC (via crossover cable). -
Page 26: Modbus Rtu Connection
Over the Modbus RTU RS485 protocol, the values can be retrieved according to the Modbus submenu in Chapter 8.10. Figure 11: Assignment of Modbus RTU interfaces (here with econ sens3 as gateway) In order to use Modbus RTU, a Modbus master is required. Up to 32 participants can be interconnected in a segment. -
Page 27: Cable Recommendation
For this purpose, a 120 Ω termination resistor should be placed between the A and B cables. To do this with the econ sens3, move the slide switch “Term” on the instrument front to “ON.” The bus length must not exceed 1200 meters. -
Page 28: Multiple I/O Connection
IO_GND GND connection for the I/O ports The econ sens3 Multifunctional Measuring Instrument includes four independent so-called multiple I/O ports that can be used to transfer the measurement data; for example, to a higher-level energy monitoring system. The multiple I/O ports are electrically isolated from the rest of the instrument and can be defined both as inputs and outputs and represent different connection scenarios. -
Page 29: Open Collector Output
Connection of the instrument Open collector output The multiple I/O ports of the econ sens3 can be configured as open collector outputs (S0). Fig. 12 shows the circuit diagram for this output configuration. Uvmax = 30V Open collector operation requires an external auxiliary voltage of up to 30 VDC. -
Page 30: Digital Output (Pulse)
Metal film resistors with a minimum power loss of 0.4 W are recommended as external resistors. Resistors with lower power dissipation can become hot during operation and cause burn injuries / skin irritation. Attention! The maximum cable length in the “open collector” and “digital output” configuration is 5 m. Manual econ sens3 Version 3.0... -
Page 31: Digital Input (Pulse Input)
2 VDC and higher and a minimum pulse length of t = 20 ms. The voltage at the pulse input must not exceed 24 VDC. Figure 16: Input for potential free contact Manual econ sens3 Version 3.0... -
Page 32: Analog Output 4 To 20 Ma
Figure 17: Analog output 4 to 20mA Analog input 4 to 20 mA I= 4..20 mA Figure 18: Analog input 4 to 20mA Analog input 0 to 10V/30 V Figure 19: Analog input 0 to 10V/30V Manual econ sens3 Version 3.0... -
Page 33: Shielding Of Connection Cables
Connection of the instrument Shielding of connection cables Grounding of the Modbus RTU, multiple I/O port, and Ethernet cables Shielding of connection cables described here applies to all data interfaces of the econ sens3. These are: Modbus RTU interface Multiple I/O ports Ethernet cable. -
Page 34: Cable Routing Instructions
The user of the system is responsible for compliance with legally prescribed limits (CE marking). Complete the required shielding as described in Fig. 22. Shield the Ethernet connection also as described in Fig. 22. Manual econ sens3 Version 3.0... -
Page 35: Connection Examples
Connection of the instrument 5.10 Connection examples 3-Phase/4-conductor system with any load Figure 23: 3-phase/4-conductor system with any load 3-Phasen/4-Leiter System beliebiger Belastung 3-Phase/3-conductor system with any load Figure 24: 3-phase/3-conductor system with any load Manual econ sens3 Version 3.0... -
Page 36: 1-Phase System
Figure 26: Functional grounding at the GND connection of the Modbus clamping point Attention: Do not ground the GND connection at the multiple I/O port. It is electrically isolated from the GND of the MODBUS!!! Manual econ sens3 Version 3.0... -
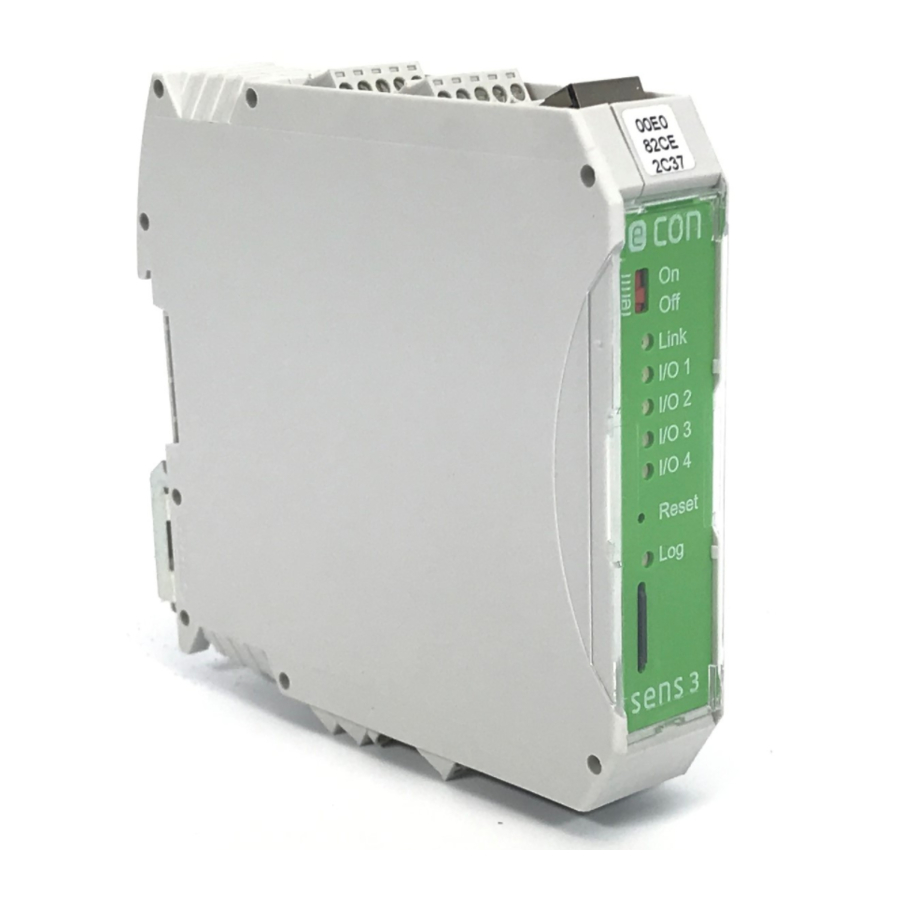
Page 37: Display And Control Elements
Display and control elements Display and control elements Figure 27 shows the arrangement of the display and control elements of the econ sens3. Figure 27: Display and control elements of the econ sens3 “TERM On/Off”: Activates/deactivates termination of the Modbus interface. More information on bus termination is found in Chapter 5.7. -
Page 38: Initial Operation
The Ethernet cable has been connected. Steps for initial operation 1.) Check of connections Before switching the instrument on, check that all cable connections to the econ sens3 were produced as described in Chapter 5. 2.) Application of supply voltage 3.) Application of the measurement voltage... -
Page 39: Operation And Parameterization
Subnet mask: 255.255.0.0 In order to open the web interface, ensure that the user PC is in the same network as the econ sens3. To do this, make the following settings (e.g. in Win7): 1. Under “Start / System control / Network and sharing center,” select the LAN connection of the network card connected to the network 2. -
Page 40: Home Menu
Opening the web interface in a network with DHCP server If the econ sens3 is located in a network in which a DHCP server for automatic address allocation is provided, it will automatically assume an address allocated to it from this server. The address that the econ sens3 received can be found on the DHCP server. -
Page 41: Measurement Menu
Operation and parameterization Measurement menu The econ sens3 displays the values it measured in the Measurement menu in table format. Fig. 31 shows this table. Figure 31: Measurement value table of the econ sens3 Displayed are phase L1, L2, L3 voltages and the associated currents, as well as the active and reactive power for each phase and the “power factor”... - Page 42 Figure 32: Waveform of currents and voltages for 1 second The econ sens3 is able to measure and display both the generated and the consumed active power. Consumed active power is shown in blue in the table, and the generated active power is shown in red with a negative sign.
-
Page 43: Phase Check" Installation Test Routine
Operation and parameterization “Phase check” installation test routine The econ sens3 has a small installation test routine called “Phase check”. Figure 34: Measurement value table without error message Generally, it is assumed that all measuring coils were installed correctly and the measured load has a power factor of >... - Page 44 ) In the measured network, only generated and little to no consumed power occurs b. ) The power factor of the connected load is in fact < 0.71 Manual econ sens3 Version 3.0...
-
Page 45: Analysis Menu
Displayed is respectively the sum of the power/energy from the three phases over a specified period. Use the buttons next to the X-axis title to browse through the measurement curves step by step (e.g. every day of the month). Manual econ sens3 Version 3.0... - Page 46 ->average total power. Optional: if the I/O option is activated in the sens3, the I/O button is also shown in the diagram. If this button is actuated, an additional diagram will appear below the diagram, in which the I/Os can be tracked.
-
Page 47: Input / Output Menu (Log Version)
The input / output menu is shown when inputs and outputs are configured in the LOG version of the econ sens3. This can be enabled using the options key (see Options submenu in Chapter 8.10). The applied values / impulses of the digital or analog inputs and outputs are displayed in the menu window. -
Page 48: Events Menu (Pro Version)
EN 50160. This function is optional (PRO version) and activated via the options key, see submenu Options in Chapter 8.10. Further explanations of the individual events can be found in the Events submenu in Chapter 8.10. Manual econ sens3 Version 3.0... -
Page 49: Export Menu
If you don’t choose all of the data, you can insert blank spaces for unselected columns. Check the menu item “Insert blank spaces for unselected columns” to confirm. Manual econ sens3 Version 3.0... - Page 50 If the export file should not show any blank lines below a specified threshold value, a power limit can be configured, below which the blank lines are omitted. Manual econ sens3 Version 3.0...
-
Page 51: Contact Menu
8.10 Config menu The Config menu is used for parameterization of the econ sens3. All of the settings required for operation of the instrument can be made in the associated submenus. Status information is displayed for the user on the start page of the menu. -
Page 52: General Information On Saving Settings
After login you will be forwarded to the submenus and taken automatically to the Date submenu. General information on saving settings The entire configuration process of the econ sens3 is divided into multiple menus and various input windows. There is an Accept button on each menu page that is used to save your input on the respective page;... - Page 53 Activate the selection Date and time = Set time manually. When you click on Accept the system time and date of the econ sens3 is compared to the values from the field Set time manually. Copy into this field for example the time setting of your PC displayed below.
-
Page 54: Network Submenu
Operation and parameterization Network submenu In the Network submenu you can make the basic network settings of the econ sens3. Figure 43: Start screen of the network menu Displayed are the network settings according to the DHCP server, if the IP address assignment was made via DHCP. -
Page 55: Electrical Submenu
Figure 44: Start screen of the Electrical menu The econ sens3 can be used in various networks; e.g., in 2-wire, 3-wire, and 4-wire networks with any load. The instrument can be used in networks with rated voltages of 120V or higher (e.g. in the USA) and in networks with 230/400 V. - Page 56 For our example, this means: Practice has shwon that a pulse rate of 100 imp/kWh (= 10 Wh/imp) is completely adequate. This calculation is the same as in setting the relationship with the input / output setting. Manual econ sens3 Version 3.0...
-
Page 57: Electrical Advanced Submenu
The settings on this page should only be changed if current or voltage transformers are used. At this time, it is possible (on request) to connect econ split current transformers (5A transformers). Additional functions and settings are currently still in development. -
Page 58: Input / Output Submenu (Log Version)
Input / Output submenu (LOG version) In the input / output submenu the additional interfaces of the sens3 can be activated or deactivated as inputs / outputs. Once you have selected an interface and activated it, various settings must still be made (see Fig. - Page 59 To use the output as sink requires an external source and an external user, as shown in the circuit diagram below. If the output of the sens3 is active, a NPN transistor pulls the output to low. The emitter of the transistor is connected to the IOGND.
- Page 60 IOGND. The current can be set to 1 mA, 2 mA, 5 mA, 10 mA, or 20 mA. If the output is activated, the user draws the current. VIPtrak5 sens3 IO1..4 User Load IOGND Digital input Figure 49: Digital input Manual econ sens3 Version 3.0...
- Page 61 Passive pulse (current-controlled) The sens3 applies a current supply to the input. This can be set to 1 mA, 2 mA, 5 mA, 10 mA, or 20 mA. The counter increments on an active low input signal. For this, an external switch can be connected.
- Page 62 The input is scanned in 5 ms intervals. The collected scans are debounced and only if 3 consecutive scans are stable will the recognized level be changed. The following image shows the debouncing process. Peaks for the time from one or two scans are filtered out. Manual econ sens3 Version 3.0...
- Page 63 Operation and parameterization Analog output Figure 50: Analog output Through setting of the interface as analog output, the sens3 supplies the output with a current between 4 and 20 mA. This current cannot drive any inductive loads or relays. Different functions are available for this:...
- Page 64 External Source External source IOGND Voltage The voltage on the input contact is measured in V. There are two selectable operating ranges, 0 to 10 V and 0 to 30 V. VIPtrak5 sens3 IO1..4 IOGND Manual econ sens3 Version 3.0...
-
Page 65: Events Submenu (Pro Version)
Figure 52: User-defined settings in the Events submenu (PRO version) Over an optional activation key (option key, see Options in Chapter 8.10) the econ sens3 can be expanded to the PRO version. The limiting values for the event recording are executed in this table (Figure 52). - Page 66 The measuring voltages of the 3 phases are checked for total harmonic distortions of voltage over 8%. Harmonics up to the 15th are detected. A waveform for this event is saved. The default value is 8%. Manual econ sens3 Version 3.0...
- Page 67 With this function, snapshots (see Measurement submenu in Chapter 8.3) are saved and displayed in the events list. Low consumption trigger With this function, phases of low energy consumption can be defined. In this process, the time restriction as well as a value limit can be set. Manual econ sens3 Version 3.0...
- Page 68 Maximum Maximum Duration [ms] harmonic harmonic harmonic distortion L1 distortion L2 distortion L3 Harmonic current Time difference Change to internal clock time Energy Duration of low energy consumption consumption limit [kWh] Low consumption trigger [min] Manual econ sens3 Version 3.0...
-
Page 69: Modbus Submenu
Port number for Modbus over TCP/ IP. Default value: 502. Other values are possible. Modbus TCP delay This parameter is only used if the econ sens3 is used as Modbus gateway. Values: 0 to 3600000 ms Modbus RS 485 time-out This parameter is only used if the econ sens3 is used as Modbus gateway. - Page 70 L2-L3 u(L3) 1022 Voltage (current value) L3-L1 un(L1) 1024 Voltage (current value) L1-N un(L2) 1026 Voltage (current value) L2-N un(L3) 1028 Voltage (current value) L3-N i(L1) 1030 Current (current value) i(L2) 1032 Current (current value) Manual econ sens3 Version 3.0...
- Page 71 1104 kvarh status) Reactive power, feed-back (counter Q- L2 1106 kvarh status) Reactive power, feed-back (counter Q- L3 1108 kvarh status) U (N) 1110 Voltage (current value) Modbus register – current values/counter statuses Part 1 Manual econ sens3 Version 3.0...
- Page 72 The following list contains all of the statuses that can be read over the Modbus. Each event has a unique bit (flag). When the event commences, the bit (flag) is set by the econ sens3. The event flag remains set at least for the minimum activity time and at the most until the end of the event. The commands “Read Coils”...
- Page 73 Events measurement register Short term flicker strength (Pst) is measured over a time interval of ten minutes (variable). Long term flicker strength (Pt) is calculated from a sequence of 12 Pst values over a 2-hour interval. Manual econ sens3 Version 3.0...
- Page 74 Long term flicker strength Plt L3 Table - Modbus events measurement register Modbus TCP If the econ sens3 is used as Modbus slave over TCP/IP, the Modbus TCP specification suggests the port number 502 for use. Other values are possible. Modbus RTU If the econ sens3 is used as Modbus slave over RS485, the serial interface parameters are required.
-
Page 75: Language / Measurement Details Submenu
Operation and parameterization Language / Measurement Details submenu Various basic settings for the sens3 can be made in the language / measurement details submenu, as explained in the table below: Function Description Language Sets the language displayed in the sens3 web... - Page 76 Operation and parameterization The FTP server must be defined in order to use the function. Figure 55: Alarms submenu Manual econ sens3 Version 3.0...
-
Page 77: Autosave Submenu
The files to be saved are first selected; this is performed analogously to the export function (see Export submenu in Chapter 8.6). Additionally, determination is made to save to the SD card or the FTP server. The FTP server must be defined accordingly. Figure 56: Autosave submenu Manual econ sens3 Version 3.0... -
Page 78: Password Submenu
Enter the old user name and the old password within 60 s. When you click on Accept the new name and, if applicable, the user name will be saved. You will be directed automatically to the Config start page and can log in by entering the new user name and password. Manual econ sens3 Version 3.0... -
Page 79: Settings File Submenu
Operation and parameterization Settings File submenu The settings of the sens3 instrument can be saved in an XML file with the button “Write settings to file.” The XML configuration file can be selected through “Browse” and uploaded again into the sens3 instrument with “Load file settings.”... -
Page 80: Options Submenu
Operation and parameterization Reset work meter This resets the total counter of the active power of the sens3 and the instrument can be used at a different location. Restart instrument Restarts the econ sens3 (not a reset). Options submenu In the options submenu, the option keys can be used to enable the PRO or LOG expanded versions. -
Page 81: Maintenance And Service
Use only a dry, lint-free cloth to clean the components. Firmware update The econ sens3 Multifunctional Measuring Instrument supports the updating of firmware (firmware update). See the Update submenu in Chapter 8.10 for information on installing updates. Like all write access, the update function can be password-protected. -
Page 82: Reset
Maintenance and Service Reset The econ sens3 has a four-stage reset logic. If the reset button on the instrument is pressed and held, the LED of the IO 1 begins to flash and sequences consecutively through the other LEDs. Each LED has its own reset functionality that can be seen in the following table. -
Page 83: Troubleshooting
In case of an instrument defect, please complete the RMA form (see http://static.econ- sens.com/de/RMA-Formular.pdf) and send it, together with the faulty instrument, to econ solutions. Before doing this, please review the FAQ (see Chapter 10.1) and contact econ solutions (see Chapter 10.2) if necessary. Manual econ sens3... -
Page 84: Technical Data
-25°C to +70°C Temperature 0 to 90% RH Relative humidity Ambient operating conditions The econ sens3 power meter is intended for weather-protected, stationary operation in enclosed areas. -10°C to +55°C Nominal temperature range 0 to 75% (non condensing) Relative humidity max. - Page 85 Min/max AWG conductor cross sections Stripping length Min/max tightening torque [Nm] Current measurement interface Only for connection to alternating current systems via the Rogowski coils ("econ coils") included with delivery Plug connector: RJ12 (6P6C) Measuring range Dependent on the connected coil Dissolution [A] Rel.
- Page 86 Fine-wire with ferrule without plastic collar [mm²] 0.25 Fine-wire with ferrule with plastic collar [mm²] Fine-wire with TWIN ferrule with plastic collar [mm²] Min/max AWG conductor cross sections Stripping length 0.22 0.25 Min/max tightening torque [Nm] Manual econ sens3 Version 3.0...
- Page 87 Min/max AWG conductor cross sections Stripping length 0.22 0.25 Min/max tightening torque [Nm] DC supply voltage Protection of the supply voltage (fuse) Nominal range 12 to 28V +-10% of nominal range Operating range Power consumption max. 6W Manual econ sens3 Version 3.0...
- Page 88 Technical Data Dimensions in mm Figure 63: Dimensions Figure 64: Distance to neighboring devices Manual econ sens3 Version 3.0...
-
Page 89: Econ Sens3 Measuring Coils
39 days. The 15-minute values are calculated dynamically from the 1- minute values. 11.4 Factory settings Network The econ sens3 normally looks for a DHCP server; if no DCHP server is available in the network, the following applies: IP address: 169.254.1.1 Subnet mask: 255.255.0.0... -
Page 90: Appendix
L3 maximum voltage L3 U THD avg L3 voltage average harmonic distortion L3 Irmsavg L3 average current L3 Irms min L3 minimum current L3 Irmsmax L3 maximum current L3 I THD avg L3 current average harmonic distortion Manual econ sens3 Version 3.0... -
Page 91: Revision History
N Urms min Minimum neutral conductor voltage N Urmsmax Maximum neutral conductor voltage 12.2 Revision History Revision Date Changes May 2016 Various changes and additions; description of new functions for firmware of 5.0.3.21 and later Manual econ sens3 Version 3.0...
Need help?
Do you have a question about the sens3 and is the answer not in the manual?
Questions and answers