Advertisement
Quick Links
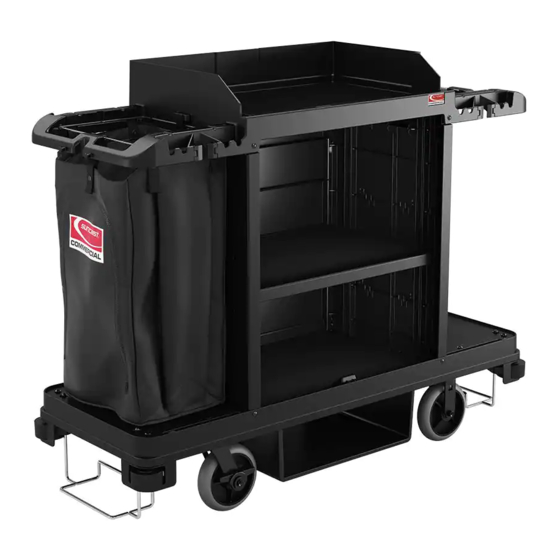
ITEM NUMBER: HKC1000
PARTS
R
x2
B
H
Bag sold
Separately
O
x2
P
x2
TOOLS NEEDED
7/16"
9/16"
© 2017 Suncast Corporation, Batavia, IL
To learn about other Suncast products, please call
1-800-846-2345 or 1-630-879-2050.
Product Feedback? Go To: Suncastcommercial.com/feedback
OR email us at: feedback@suncastcommercial.com
F
K
E
D
C
A
J
x4
N
x2
G
x2
x2
OO
I
*
See pages
4,5,7,11,&12
Tip #2&3
0361415A
Advertisement

Related Manuals for Suncast HKC1000


Summary of Contents for Suncast HKC1000
- Page 1 To learn about other Suncast products, please call 1-800-846-2345 or 1-630-879-2050. Product Feedback? Go To: Suncastcommercial.com/feedback OR email us at: feedback@suncastcommercial.com ITEM NUMBER: HKC1000 PARTS Bag sold Separately TOOLS NEEDED See pages 7/16" 4,5,7,11,&12 Tip #2&3 9/16" © 2017 Suncast Corporation, Batavia, IL...
-
Page 2: Before You Begin
This kit contains parts that can be damaged if assembled incorrectly or in the wrong sequence. • Please follow instructions. Suncast is not responsible for replacing parts lost or damaged due to incorrect assembly. • Assistance is required during parts of the assembly. - Page 3 0480435 Continued HARDWARE 0480435 (Continued) 0671176 0671177 0631536 0631462 1/4" x 1/2" 1/4" x 1" screw Bolt 0631456 0631457 1/4" x 1 1/2" 1/4" x 2" Bolt Bolt 0631508 0631454 3/8"-16 0480412A 3/8" x 2 1/2" acorn nut Bolt 0480434 0671178 0671179 0671180...
- Page 4 ASSEMBLY Bumper EN: Insert both washer (KK) and nut (JJ) into slot inside bumper then attach to bottom (A) using bolt (AA). Repeat with other bumpers. Make sure nut is inserted all the way to allow bolt to thread through nut. EN: Insert vacuum rim (o) through inside holes on bumpers and through bottom (A).
- Page 5 (Continued) ASSEMBLY EN: Attach front/back casters (P and N) to under side of cart using sixteen bolts (FF) and sixteen nuts (JJ). Attach braking casters (P) to the front. Attach fixed casters (N) to the back. Note: Use supplied wrench * EN: Attach dish rack (G) to bottom of the cart (A) using six screws (HH).
- Page 6 (Continued) ASSEMBLY EN: Insert back left panel (C) into left side panel (B) until secure. Insert back right panel (D) into right side panel (E) until secure. EN: Insert Left back panel tabs (B/C) into slots on right back panel (D/E) on an angle and push together.
- Page 7 (Continued) ASSEMBLY EN: Lower assembled panel down onto top of cart (A). Place in center rectangular area. EN: Attach sides to cart in four corners using five screws (CC /DD /& EE) and five nuts (MM). Note: Use supplied wrench *...
-
Page 8: Left Side
(Continued) ASSEMBLY Inside Back Left Side Right Side EN: Attach left side panel (B) using one screw (GG). Attach back panels (C) and (D) using two screws (GG). Attach right panel (E) using one screw (GG). - Page 9 (Continued) ASSEMBLY 8 11 EN: Insert shelf (I) into cart at an angle in one of three positions. Tabs EN: Push down till sides of shelf engage with tabs on sides of cart. Attach shelf to sides using two screws (RR). Repeat other side.
- Page 10 (Continued) ASSEMBLY 8 13 EN: Insert tube (oo) into pocket in (B) and attach using three screws (HH) and three caps (NN). Repeat on right side. Use a mallet to attach caps (NN). Attach (oo) to bottom using two screws (HH) and two caps (NN). Repeat on right side. Note: Do Not attach top of tube (oo) to lid until after step (15).
- Page 11 (Continued) ASSEMBLY EN: Lower top (F) to top of cart. Left Side EN: To attach lid (F) insert screw (EE / DD) through lid and attach nut (MM) from underneath lid. Note: Use supplied wrench *...
- Page 12 ASSEMBLY (Continued) EN: Attach tube (oo) top top using two screws (HH) and two caps (NN). Repeat right side. Use a mallet to attach caps (NN).
- Page 13 ASSEMBLY (Continued) Assembly EN: Lower garbage bag (H) through frame of cart. Unsnap and feed through the six slots on frame. Re-snap the bag once strap is through each slot. Note: Bag can be switched to other side if necessary.
- Page 14 ASSEMBLY (Continued) EN: Lower garbage bag rim (R) and insert into two center slots provided. Guide rim into position. Repeat with right rim. Note: Rims can be put on both sides.
- Page 15 ASSEMBLY (Continued) EN: Attach rubber strap (K) over two knobs on side of cart to secure vacuum cleaner. Vacuum cleaner is not included.
Need help?
Do you have a question about the HKC1000 and is the answer not in the manual?
Questions and answers