
Subscribe to Our Youtube Channel
Related Manuals for Renson Fixvent Mono AK EVO


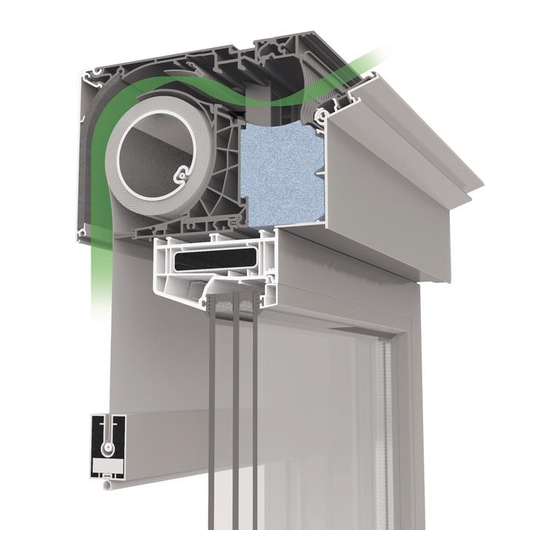
Summary of Contents for Renson Fixvent Mono AK EVO
- Page 1 Fixvent Mono AK/UT ® Fixscreen Mono AK ® Montageanleitung Assembly instructions...
-
Page 2: Table Of Contents
Index 1 • Allgemeines ....................... 4 1.1 • Mitgelieferte Teile ....................4 1.2 • Mitgelieferte Dokumente und Markierungen ............5 1.3 • Benötigtes Werkzeug (nicht von Renson mitgeliefert) ..........5 ® 2 • Vorbereitung der Kassette .................... 8 3 • Kontrolle vorab ......................10 4 •... - Page 3 Fixvent Mono AK/UT • Fixscreen Mono AK ® ® 8.1.2.4 • Anschlussplan: PARALLEL GESCHALTET Elektrisch bediente Lüftungsklappe (0-10V) ............26 8.1.2.5 • Anschlussplan: PARALLEL GESCHALTET Elektrisch bediente Lüftungsklappe (On/Off) ............27 8.2 • Bedienung der Screens ..................28 8.2.1 • Manuelle Bedienung (Kurbelstange) ............28 8.2.2 •...
-
Page 4: Allgemeines
Fixvent Mono AK/UT • Fixscreen Mono AK ® ® 1 • Allgemeines 1.1 • Mitgelieferte Teile • für Fixvent Mono AK/UT und Fixscreen Mono AK o PVC-Kassette mit Innen- und Außenprofilen aus Aluminium und direkt herausnehmbarer Tuchrolle inkl. Seitenführungen Innenprofil Fixscreen Innenprofil Fixvent Mono AK Mono AK... -
Page 5: Mitgelieferte Dokumente Und Markierungen
• Drahtzange: zum Schneiden des schwarzen Kabels des Motorausgangs: bei einem ferngesteuerten (RTS-) oder IO-Home-Motor wird das schwarze Kabel abgetrennt! • Schraubanker (können bei Renson bestellt werden): die Fixscreen Mono AK & Fixvent Mono AK/UT haben auf der Oberseite der Kassette einen Dübelschlitz, sodass die Befestigung am Rohbau mithilfe von Schraubankern einfach und schnell erfolgen kann. - Page 6 Fixvent Mono AK/UT • Fixscreen Mono AK ® ® Die Fixscreen Mono AK und die Fixvent Mono AK/UT sind in 5 verschiedenen Kassettentie- fen erhältlich, die jeweils mit einer unterschiedlichen Rahmenprofildicke kompatibel sind: Fixvent Mono AK/UT Small Medium Large (50-94 mm) (95- 124 mm) (125 –...
- Page 7 Fixvent Mono AK/UT • Fixscreen Mono AK ® ® Fixscreen Mono AK Small Medium Large (50-94 mm) (95- 124 mm) (125 – 154 mm) X-large XX-large (155-184 mm) (185-215 mm)
-
Page 8: Vorbereitung Der Kassette
Fixvent Mono AK/UT • Fixscreen Mono AK ® ® 2 • Vorbereitung der Kassette • Nehmen Sie die Kassette ➊ mit aufgerolltem Tuch und Montageprofil aus der Verpackung und legen Sie sie auf eine Werkbank oder auf Arbeitsböcke. • Nehmen Sie das Montage- profil aus der Kassette (ist ➋... - Page 9 Fixvent Mono AK/UT • Fixscreen Mono AK ® ® Nur bei manueller Bedienung des Screens: • Schrauben Sie zuerst den Wickelmechanismus des Innenprofils los (sowohl an der Ober- als auch der Unterseite) • Nehmen Sie das Innenprofil von der Kassette ab •...
-
Page 10: Kontrolle Vorab
Land Fixvent Mono AK/UT • Fixscreen Mono AK ® ® Kontakt Tel. 3 • Kontrolle vorab • Sorgen Sie für Stromzufuhr bis an die Kassette, je nach Art der Durchführung: F (standard- mäßig), K, W & B. utomatisierung) Position und Durchführung ety First (Kabeldurchfuhr in (Kabeldurchfuhr in... -
Page 11: Montage Des Feststehenden Teils Der Seitenführung
Fixvent Mono AK/UT • Fixscreen Mono AK ® ® 4 • Montage des feststehenden Teils der Seitenführung 4.1 • Vorbohren und Sichern des feststehenden Teils der Seitenführung Das erste Bohrloch wird in einem Abstand von 125 mm zur Oberseite angebracht. Die nächsten Löcher folgen in einem Abstand von jeweils 250 mm. -
Page 12: Montage Der Kassette
Fixvent Mono AK/UT • Fixscreen Mono AK ® ® 5 • Montage der Kassette 5.1 • Befestigung des Montageprofils • Positionieren Sie das Montageprofil in der Mitte der Ober- seite des Rahmens, mit der Anschlagrippe an der Außenseite des Rahmenprofils und der Bürste zur Außenseite des Rahmens. -
Page 13: Befestigung Der Kassette
Fixvent Mono AK/UT • Fixscreen Mono AK ® ® 5.2 • Befestigung der Kassette 5.2.1 • Befestigung der Kassette • Arbeiten Sie von innen heraus. • Positionieren Sie die Kassette etwas schräg nach hinten gekippt am Rahmen. Die Endschiene liegt dabei über dem Rahmen und hängt an der Außenseite. -
Page 14: Horizontales Sichern Der Kassette
Fixvent Mono AK/UT • Fixscreen Mono AK ® ® 5.2.3 • Horizontales Sichern der Kassette • Schrauben Sie die Kassette an den vorgebohrten Posi- tionen des Basisprofils an das Montageprofil. Verwen- den Sie dafür die mitgelie- ferten Schrauben vom Typ DIN 7981 3.9 x 38. -
Page 15: Kontrolle
Fixvent Mono AK/UT • Fixscreen Mono AK ® ® 5.2.5 • Kontrolle ➊ Überprüfen Sie die Rechts- händigkeit und kontrollieren Sie, ob die Diagonalen (D1 und D2) und die Parallelen (H1 und H2) möglichst gleich sind, damit das Tuch gut abrollen kann (bevor Sie den Motor starten). -
Page 16: Montage Des Abnehmbaren Teils Der Seitenführung
Fixvent Mono AK/UT • Fixscreen Mono AK ® ® 6 • Montage des abnehmbaren Teils der Seitenführung 6.1 • Anbringung der PVC-Seitenführungen • Schieben Sie die PVC- Seitenführungen über den Reißverschluss am Tuch (1) und setzen Sie sie links und rechts wieder in den festen Teil der Seitenführungen (2). -
Page 17: Montage Des Abnehmbaren Teils Der Seitenführung
Fixvent Mono AK/UT • Fixscreen Mono AK ® ® 6.2 • Montage des abnehmbaren Teils der Seitenführung • Den abnehmbaren Teil der Seitenführung wieder einset- zen und mit den mitgeliefer- ten Schrauben und einem Innensechskantschlüssel am festen Teil der Seitenführung festschrauben. -
Page 18: Schraubanker
Fixvent Mono AK/UT • Fixscreen Mono AK ® ® 7.1 • Schraubanker An der Fixvent Mono AK/UT / Fixscreen Mono AK ist an der Oberseite der Kassette ein Dübelschlitz angebracht, um die Befestigung am Rohbau mithilfe von Schraubankern (nicht im Lie- ferumfang enthalten, separat zu bestellen) mühelos und schnell zu gestalten. - Page 19 Fixvent Mono AK/UT • Fixscreen Mono AK ® ® HINWEIS: Es ist wichtig, die Fixvent Mono AK/UT und die Fixscreen Mono AK –Kassette rundum mit Montageschaum oder Fugenkitt abzudichten. Verwenden Sie einen gut füllen- den, aber nicht zu stark expandierenden PUR-Schaum mit hoher Formstabilität (ohne Schrumpfung oder Ausdehnung), damit sich die Kassette nicht verformt.
-
Page 20: Ausarbeitung Oben
Fixvent Mono AK/UT • Fixscreen Mono AK ® ® 7.2 • Ausarbeitung oben 7.2.1 Ausarbeitung oben mit MDF- oder Gipsplatte Dieses Produkt wurde entwickelt, um eine makellose Endbearbeitung zu ermöglichen. Oben auf der Kassette ist eine Aussparung für Gips- oder MDF-Platten bis zu 10 mm vorgesehen, damit der Verputzer das Produkt nahtlos in den Putz integrieren kann. -
Page 21: Ausgleichsprofil
Fixvent Mono AK/UT • Fixscreen Mono AK ® ® 7.4 • Ausgleichsprofil Wenn man für die Fixvent Mono AK/UT oder die Fixscreen Mono AK eine tiefere Kassettengröße bzgl. der standardmäßigen Rahmengruppe installiert (z. B. für einen besseren U-Wert oder Akustikwert ohne Volumenverlust), kann für die Endbearbeitung der Unterseite der Kassette ein optionales, zusätzliches Ausgleichsprofil bestellt werden. - Page 22 Fixvent Mono AK/UT • Fixscreen Mono AK ® ® HINWEIS: Bei der Installation von Seitenführungen mit Austiefprofil ist auch eine horizontale Stütze an der Fixvent Mono AK/UT und Fixscreen Mono AK –Kassette erforderlich (z. B. mit dem optional erhältlichen Gahäuse). Die Fixvent Mono AK/UT und Fixscreen Mono AK –...
-
Page 23: Bedienungsoptionen
8.1.1 • Manuelle Bedienung Die Lüftungsklappe der Fixvent Mono AK/UT wird manuell bedient, ggf. mithilfe einer Stange. Renson bietet eine Stange an, die auf zweierlei Weise verwendet werden kann: Entweder klicken Sie die Stange an den Clip, wodurch die Stange hängen bleibt oder Sie hängen sie an den Clip und bedienen sie so. -
Page 24: Anschlussplan
Fixvent Mono AK/UT • Fixscreen Mono AK ® ® 8.1.2.2 • Anschlussplan: Elektrisch bediente Lüftungsklappe (0 - 10V) Eingang für Gebäudeautomatisierung 0V (=schließen) ... 10V (=öffnen) Achtung: • Motoren können parallel geschaltet werden Einstellen Voltage input 0...10Vdc +/-10% referenced to GND Max. -
Page 25: Anschlussplan
Fixvent Mono AK/UT • Fixscreen Mono AK ® ® 8.1.2.3 • Anschlussplan: Elektrisch bediente Lüftungsklappe (On/Off) L: +24Vdc 1: zu öffnen 2: zu schliessen Achtung: • Motoren können parallel geschaltet werden +/-10% peak Die Installation und der elektrische Anschluß der verschiedenen Bauteile darf laut den geltenden Sicherheitsregelnnur von befugtem Personal vorgenommen werden. -
Page 26: Elektrisch Bediente Lüftungsklappe (0-10V)
Fixvent Mono AK/UT • Fixscreen Mono AK ® ® 8.1.2.4 • Anschlussplan: PARALLEL GESCHALTET Elektrisch bediente Lüftungsklappe (0-10V) 2 ... max.6 Einstellen Voltage input 0...10Vdc referenced to GND Max. input rimple 50m Vac Vent = 2... max. 6 C: Eingang +/-10% (vents)x60 peak... -
Page 27: Elektrisch Bediente Lüftungsklappe (On/Off)
Fixvent Mono AK/UT • Fixscreen Mono AK ® ® 8.1.2.5 • Anschlussplan: PARALLEL GESCHALTET Elektrisch bediente Lüftungsklappe (On/Off) 2 ... max.6 C: Eingang Vent = 2..max. 6 1: zu öffnen 2: zu schliessen +/-10% (vents)x60 peak Achtung: • Motoren können parallel geschal- tet werden 7 lüftungsklappe Die Installation und der elektrische Anschluß... -
Page 28: Bedienung Der Screens
Fixvent Mono AK/UT • Fixscreen Mono AK ® ® 8.2 • Bedienung der Screens 8.2.1 • Manuelle Bedienung (Kurbelstange) Die Screens von Fixvent Mono AK/UT oder Fixscreen Mono AK werden Standard mit Motor bedient. Alternativ ist manuelle Bedienung oder Bedienung mit Kurbel möglich (fest oder abnehmbar). -
Page 29: Anschluss Des Kabels Mit Uv-Beständiger Ummantelung (Rr-F/Rn-F)
Fixvent Mono AK/UT • Fixscreen Mono AK ® ® 8.2.2.3 • Anschluss des Kabels mit UV-beständiger Ummantelung (RR-F/RN-F) Motor Typ Motor Typ Mechanisch (MSM) Funkgesteuert (RTS) Electronisch (MSE) Bei einem ferngesteuerten (RTS-) oder IO-Home-Motor wird das schwarze Kabel abgetrennt (der schwarze Draht ist bei diesen Motortypen ohne Funktion). -
Page 30: Endeinstellung Der Endpunkte Des Motors
/Fixscreen Mono -Screens) sind teilweise eingestellt. 9.1 • Einstellung des oberen Endpunktes Der obere Endpunkt ist bereits von Renson eingestellt. Bei dieser Einstellung schließt die Endschiene so dicht wie möglich an die Kassette an. 9.2 • Einstellung des unteren Endpunktes Der untere Endpunkt hat die Werkseinstellung (= ca.400 mm von der Unterseite der Kassette). -
Page 31: Wartung
Fixvent Mono AK/UT • Fixscreen Mono AK ® ® 10 • Wartung Eine Fixvent Mono AK/UT / Fixscreen Mono AK erfordert nur einen geringen Pflegeauf- wand, doch damit Sie viele Jahre Freude an Ihrem Produkt haben, empfehlen wir Folgendes: • Wenn das Tuch bei einem unerwarteten Schauer nass wird, können Sie den Schirm ruhig aufrollen und ihn später, bei besserem Wetter zum Trocknen wieder ausrollen. -
Page 32: Tuch Oder Motor Austauschen
Fixvent Mono AK/UT • Fixscreen Mono AK ® ® 11 • Tuch oder Motor austauschen 11.1 • Vorbereitung • Nehmen Sie den • Bei der Fixvent Mono AK/ • Klicken Sie das Innenprofil abnehmbaren Teil der ist das Innenprofil heraus. Seitenführung auf beiden an beiden Enden der Seiten ab... -
Page 33: Clips Lösen
Fixvent Mono AK/UT • Fixscreen Mono AK ® ® 11.2 • Clips lösen • Lösen Sie die Drehclips: • Schrauben Sie das Basisprofil los. Entgegen dem Uhrzeiger- sinn bis in die horizontale Position drehen und Dreh- clips herausnehmen. • Markieren Sie alle 100 mm die linke Seite der Drehclips am Basisprofil. -
Page 34: Demontage Der Tuchrolle (Click & Safe ® )
Fixvent Mono AK/UT • Fixscreen Mono AK ® ® 11.3 • Demontage der Tuchrolle (Click & Safe ® ➊ Bei manueller Be- dienung des Screens: • Auf beiden Seiten des Tuchwellenpakets befin- det sich in der Nähe der Seitenführung ein Clip. Klicken Sie diese Clips heraus, bevor Sie die Tuchwelle demontieren. - Page 35 Fixvent Mono AK/UT • Fixscreen Mono AK ® ®...
- Page 36 Index 1 • General ........................38 1.1 • Parts included ....................38 1.2 • Documents and markings included..............39 1.3 • Required tools and materials (not supplied by Renson ) ........39 ® 2 • Preparing the box ....................42 3 •...
- Page 37 Fixvent Mono AK/UT • Fixscreen Mono AK ® ® 8.1.2.4 • Electrical wiring: PARALLEL - CONNECTED Motorised flap (0-10V)..................60 8.1.2.5 • Electrical wiring: PARALLEL - CONNECTED Motorised flap (On/Off) .................. 61 8.2 • Screen control ....................62 8.2.1 • Manual control (crank) ................. 62 8.2.2 •...
- Page 38 Fixvent Mono AK/UT • Fixscreen Mono AK ® ® 1 • General 1.1 • Parts included • for Fixvent Mono AK/UT and Fixscreen Mono AK o uPVC box with aluminium interior and exterior profile, and directly removable roller, inclu- ding side channels Interior profile Fixscreen Interior profile Fixvent Mono AK...
- Page 39 The black cable needs cutting when there is a wireless controlled (RTS) or IO home motor! • Screw-in anchors (ordered via Renson) – the Fixscreen Mono AK & Fixvent Mono AK/UT have fixing strips at the topside of the box to facilitate quick and easy mounting on the basic structure, using screw-in anchors.
- Page 40 Fixvent Mono AK/UT • Fixscreen Mono AK ® ® The Fixscreen Mono AK and Fixvent Mono AK/UT are available in five different box depths, each compatible with a different window profile thickness. Fixvent Mono AK/UT Small Medium Large (50-94 mm) (95- 124 mm) (125 –...
- Page 41 Fixvent Mono AK/UT • Fixscreen Mono AK ® ® Fixscreen Mono AK Small Medium Large (50-94 mm) (95- 124 mm) (125 – 154 mm) X-large XX-large (155-184 mm) (185-215 mm)
- Page 42 Fixvent Mono AK/UT • Fixscreen Mono AK ® ® 2 • Preparing the box • Unpack the box, with the ➊ rolled up fabric and moun- ting profile and put the box on a workbench or trestle system. • Take the mounting profile out of the box (included ➋...
- Page 43 Fixvent Mono AK/UT • Fixscreen Mono AK ® ® For manual screen control only: • First, unscrew the winding mechanism from the interior profile (on top as well as at the bot- tom) • Remove the interior profile from the box. •...
- Page 44 Postal code City Country Fixvent Mono AK/UT • Fixscreen Mono AK ® ® Contact Tel. 3 • Control • Provide a power supply in accordance with the type of lead-through: F (standard), K, W & B. mation) Feed type and position ety First (cable feed in side channel) (cable feed in side channel)
- Page 45 Fixvent Mono AK/UT • Fixscreen Mono AK ® ® 4 • Mounting the fixed part of the side channel 4.1 • Pre-drilling and securing the fixed part of the side channel The first hole must be drilled 125 mm from the topside.
- Page 46 Fixvent Mono AK/UT • Fixscreen Mono AK ® ® 5 • Assembling the box 5.1 • Securing the mounting profile • Position the mounting profile centrally on top of the window, with the stop rib against the outside of the window profile, and the brush against the external side of the window.
- Page 47 Fixvent Mono AK/UT • Fixscreen Mono AK ® ® 5.2 • Securing the box 5.2.1 • Installing the box • Work outwards from the inside. • Place the box on the window, slightly angled to the rear – the bottom bar must therefore be placed over the window and suspended on the outside.
- Page 48 Fixvent Mono AK/UT • Fixscreen Mono AK ® ® 5.2.3 • Securing the box horizontally • Using the pre-drilled posi- tions on the base profile, fix the box to the mounting profile. Use the supplied screws (DIN 7981 3.9 x 38).
- Page 49 Fixvent Mono AK/UT • Fixscreen Mono AK ® ® 5.2.5 • Checks ➊ Check that it is straight and the diagonals (D1 and D2) and parallels (H1 and H2) are as equal as possible (before starting the motor), to ensure a perfect unrolling of the fabric.
- Page 50 Fixvent Mono AK/UT • Fixscreen Mono AK ® ® 6 • Assembling the removable part of the side channel 6.1 • Installing the uPVC zip channels • Slide the uPVC zip channels over the zip on the screen fabric (1) and then put them back into the fixed part of the side channels on the left and right (2).
- Page 51 Fixvent Mono AK/UT • Fixscreen Mono AK ® ® 6.2 • Installing the removable part of the side channel • Put the removable part of the side channel back in place and screw it tight to the fixed part, using the supplied screws and a hex key.
- Page 52 Fixvent Mono AK/UT • Fixscreen Mono AK ® ® 7.1 • Screw-in anchors The Fixvent Mono AK/UT / Fixscreen Mono AK have a fixing strip at the topside of the box to facilitate quick and easy mounting on the basic structure using screw-in anchors (not included but available separately).
- Page 53 Fixvent Mono AK/UT • Fixscreen Mono AK ® ® ATTENTION: It is important to seal around the Fixvent Mono AK/UT and Fixscreen Mono – using PU foam or a sealant. To avoid deforming the box, use a PU foam that fills well and does not expand greatly, with good shape stability (i.e.
- Page 54 Fixvent Mono AK/UT • Fixscreen Mono AK ® ® 7.2 • Finish on top 7.2.1 MDF- or plasterboard finish on top This product is made with a view to guarantee a perfect finish. For this purpose, there is a recess at the top for plasterboard or MDF panels up to 10 mm so that the plasterer can work the product seamlessly into the plasterwork.
- Page 55 Fixvent Mono AK/UT • Fixscreen Mono AK ® ® 7.4 • Extension profile When you opt for installing the Fixvent Mono AK/UT and Fixscreen Mono AK , with a dee- per box size compared to the standard window frame group (e.g. for a better U-value or acoustic value without loss of flow), you can order an optional, additional extension profile to finish the bottom of the box.
- Page 56 Fixvent Mono AK/UT • Fixscreen Mono AK ® ® ATTENTION: If installing side channels with an in-depth profile, you will also need a horizontal support at the bottom of the Fixvent Mono AK/UT and Fixscreen Mono AK – box (e.g. with the optional tube profile).
- Page 57 Renson provides one type of rod that can be used in two different ways – either click the rod into the clips so that the rod remains suspended, or you suspend the rod on the clips and it is free to operate separately.
- Page 58 Fixvent Mono AK/UT • Fixscreen Mono AK ® ® 8.1.2.2 • Electrical wiring : Modular motorised flap (0-10V) Entrance for domotics 0V (=close) ... 10V (=open) Remarks : • Motors can be parallel con- nected Adjust Voltage input 0...10Vdc +/-10% referenced to GND Max.
- Page 59 Fixvent Mono AK/UT • Fixscreen Mono AK ® ® 8.1.2.3 • Electrical wiring : Motorised flap (on/off) L: +24Vdc 1: to open 2: to close Remarks : • Motors can be parallel con- nected +/-10% peak The installation and electric wiring of the different components may only be executed by qualified personnel in accordance with the valid safety measures.
- Page 60 Fixvent Mono AK/UT • Fixscreen Mono AK ® ® 8.1.2.4 • Electrical wiring: PARALLEL - CONNECTED Motorised flap (0-10V) 2 ... max.6 Adjust Voltage input 0...10Vdc referenced to GND Max. input rimple 50m Vac Vent = 2... max. 6 C: Input +/-10% (vents)x60 peak...
- Page 61 Fixvent Mono AK/UT • Fixscreen Mono AK ® ® 8.1.2.5 • Electrical wiring: PARALLEL - CONNECTED Motorised flap (On/Off) 2 ... max.6 C: input Vent = 2..max. 6 1: to open 2: to close +/-10% (vents)x60 peak Remarks: • Motors can be parallel-connected up to 7 vents The installation and electric wiring of the different components may only be executed by qualified personnel in accordance with the valid safety measures.
- Page 62 Fixvent Mono AK/UT • Fixscreen Mono AK ® ® 8.2 • Screen control 8.2.1 • Manual control (crank) The Fixvent Mono AK/UT or Fixscreen Mono AK screen is by default motor-controlled, but can optionally also be operated manually using a fixed or removable crank. Removable crank Fixed crank 8.2.2 •...
- Page 63 Fixvent Mono AK/UT • Fixscreen Mono AK ® ® 8.2.2.3 • Connecting the cable with UV-resistant sheathing (RR-F/RN-F) Motor type Motor type Mechanical (MSM) Radio-controlled (RTS) Electronic (MSE) IO home When using a radio-controlled motor (RTS) or I/O Home motor, you must cut off the black cable (the black wire does not have a working function with these types of motor).
- Page 64 9.1 • Adjusting the upper endpoint Renson has already adjusted the upper endpoint. During adjustment, the bottom bar is as near as possible to the box. 9.2 • Adjusting the lower endpoint The lower endpoint is set to the factory settings (approx. 400 mm from the bottom of the box). The installer should adjust the lower endpoint (see the supplied manual on adjusting motors for vertical screens).
- Page 65 Fixvent Mono AK/UT • Fixscreen Mono AK ® ® 10 • Maintenance A Fixvent Mono AK/UT / Fixscreen Mono AK requires little maintenance, but to enjoy your system for many years, we recommend the following measures: • If the screen fabric gets wet in an unexpected shower, you can safely roll it up and roll it down again to dry when the weather has improved.
- Page 66 Fixvent Mono AK/UT • Fixscreen Mono AK ® ® 11 • Replacing the screen fabric or motor 11.1 • Preparation • Remove the removable • On the Fixvent Mono AK/ • Click the inner profile part of the side channel , the inner profile loose.
- Page 67 Fixvent Mono AK/UT • Fixscreen Mono AK ® ® 11.2 • Releasing the clips • Release the rotating • Unscrew the base profile clips – turn them in anti- clockwise direction until they are horizontal and remove them. • Mark the left side of the rotating clips on the base profile every 100 mm.
- Page 68 Fixvent Mono AK/UT • Fixscreen Mono AK ® ® 11.3 • Removing the (Click & Safe ) fabric roller barrel ® ➊ With manual screen operation: • There are clips on both sides of the fabric roller barrel package, at the height of the side chan- nel.
- Page 69 Fixvent Mono AK/UT • Fixscreen Mono AK ® ®...
- Page 70 Fixvent Mono AK/UT • Fixscreen Mono AK ® ®...
- Page 71 Fixvent Mono AK/UT • Fixscreen Mono AK ® ®...
- Page 72 Recht vor, technische Änderungen an den im Folgenden behandelten Produkten ® vorzunehmen. Die meist aktuelle Version dieser Broschüre kann aufgeladen werden von w w w.renson.eu Renson reserves the right to make technical changes to the products shown.
Need help?
Do you have a question about the Fixvent Mono AK EVO and is the answer not in the manual?
Questions and answers