Table of Contents
Advertisement
Quick Links
Advertisement
Table of Contents

Related Manuals for IBM LCM8


Summary of Contents for IBM LCM8
- Page 1 CONSOLE MANAGER LCM8 AND LCM16 LOCAL INSTALLATION AND USER’S GUIDE...
- Page 3 Local Console Manager LCM8 and LCM16 Installation and User’s Guide...
-
Page 5: Table Of Contents
Reduce cable bulk ........................1 KVM switching capabilities......................1 Virtual media and smart card support ..................2 Access the LCM8 or LCM16 switch using a standard TCP/IP network ........2 Local and remote user interfaces ....................2 Chapter 2: Installation ..................... 5 LCM8/LCM16 switch connectivity .................... - Page 6 Local Console Manager LCM8 and LCM16 Installation and User’s Guide Navigating the OSCAR interface ....................18 Connecting local virtual media ....................19 Setup dialog box functions ....................... 20 Changing the display behavior....................20 Controlling the status flag ......................21 Setting the keyboard country code.................... 22 Configuring network settings....................
- Page 7 Table of Contents Managing LCM8/LCM16 switch configuration files..............41 Managing user databases ......................42 Installing a Web Certificate ......................43 Chapter 5: Terminal operations ..................47 The Console menu..........................47 Network configuration ........................47 Other Console Main Menu options....................48 Firmware Management ......................
- Page 8 Local Console Manager LCM8 and LCM16 Installation and User’s Guide...
-
Page 9: List Of Figures
Figure 2.2: Vertical rack mount assembly..................9 Figure 2.3: Horizontal rack mount assembly .................. 10 Figure 2.4: Typical LCM8/LCM16 switch firewall configuration ..........13 Figure 3.1: OSCAR interface Main dialog box ................15 Figure 4.1: LCM8/LCM16 switch Explorer window............... 30 Figure 4.2: Disconnect Session Status window ................ - Page 10 Local Console Manager LCM8 and LCM16 Installation and User’s Guide...
-
Page 11: List Of Tables
Table 1.1: Descriptions for Figure 1.1 ....................3 Table 2.1: Descriptions for Figure 2.1 ....................7 Table 2.2: TCP ports and functions for the LCM8/LCM16 switch ..........12 Table 2.3: Descriptions for Figure 2.4 .................... 13 Table 3.1: Main dialog box functions ....................16 Table 3.2: OSCAR interface status symbols .................. - Page 12 Local Console Manager LCM8 and LCM16 Installation and User’s Guide...
-
Page 13: Chapter 1: Product Overview
The IBM Local Console Manager LCM8 and LCM16 switches combine analog keyboard, video, and mouse (KVM) switching technology that provides users with a significant reduction of cable volume to the switch. The following is a list of LCM8 and LCM16 switch family features and options. -
Page 14: Virtual Media And Smart Card Support
Internet browser. No special software or drivers are required on the attached servers or client. Local and remote user interfaces You can use the local user interface (local UI) to manage the LCM8 or LCM16 switch by connecting directly to the local port. You can also use the remote On-board Web Interface (OBWI) to manage your switch. -
Page 15: Figure 1.1: Example Switch Configuration (Lcm16 Switch Shown)
Chapter 1: Product overview Figure 1.1: Example switch configuration (LCM16 switch shown) Table 1.1: Descriptions for Figure 1.1 Number Description Number Description UTP connection Network KVM connection to the switch Digital user (computer with Internet browser) ® Remote IP connection Analog user (OSCAR graphical user interface) LCM16 switch... - Page 16 Local Console Manager LCM8 and LCM16 Installation and User’s Guide...
-
Page 17: Chapter 2: Installation
Ethernet. For the best system performance, use a dedicated, switched 100BaseT network. You can also use 10BaseT Ethernet. Installation overview The general procedure for setting up and installing an LCM8/LCM16 switch is as follows: • Unpack the switch and verify that all components are present and in good condition. -
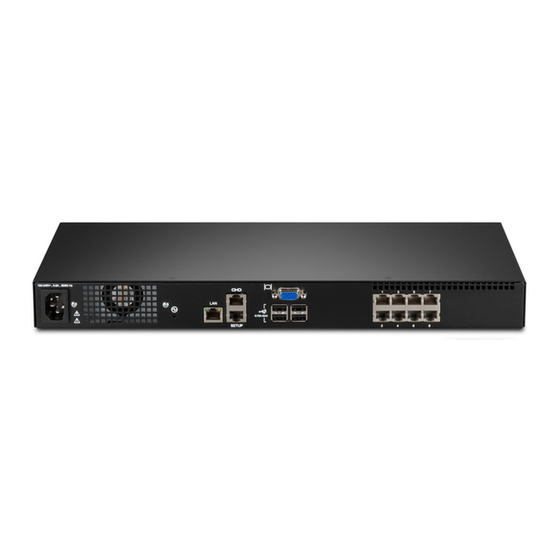
Page 18: Figure 2.1: Basic Lcm8/Lcm16 Switch Configuration
Local Console Manager LCM8 and LCM16 Installation and User’s Guide Figure 2.1 illustrates a basic configuration for the LCM8/LCM16 switch. Descriptions follow in Table 2.1. Figure 2.1: Basic LCM8/LCM16 switch configuration... -
Page 19: Getting Started
CO cables (KCO, UCO, VCO, and VCO2) are available Power cord Getting started Before installing your LCM8/LCM16 switch, refer to the following lists to ensure you have all items that shipped with the switch, as well as other items necessary for proper installation. Supplied with the LCM8/LCM16 switch •... -
Page 20: Safety Precautions
Local Console Manager LCM8 and LCM16 Installation and User’s Guide Safety precautions DANGER Electrical current from power, telephone, and communication cables is hazardous. To avoid a shock hazard: • Do not connect or disconnect any cables or perform installation, maintenance, or reconfiguration of this product during an electrical storm. -
Page 21: Figure 2.2: Vertical Rack Mount Assembly
Chapter 2: Installation • Elevated operating ambient temperature – If the equipment is installed in a closed or multi-unit rack assembly, the operating ambient temperature of the rack environment might be greater than room ambient temperature. Install the equipment in an environment compatible with the operating temperature. -
Page 22: Connecting The Lcm8/Lcm16 Switch Hardware
Connecting the LCM8/LCM16 switch hardware To connect and turn on your LCM8/LCM16 switch: NOTE: You must turn off all target devices that will be part of your LCM8/LCM16 switching system. Wait until step 6 to turn on your LCM8/LCM16 switch. - Page 23 AC wall outlet. NOTE: To avoid potential video and/or keyboard problems when using IBM products: If the building has 3- phase AC power, ensure that the computer and monitor are on the same phase. For best results, they should be on the same circuit.
-
Page 24: Connecting To The Obwi Through A Firewall
Connecting to the OBWI through a firewall For LCM8/LCM16 switch installations that use the OBWI for access, two ports must be opened in a firewall if outside access is desired. Table 2.2: TCP ports and functions for the LCM8/LCM16 switch... -
Page 25: Verifying The Connections
Consult the manual for your firewall for specific port forwarding instructions. To connect to the LCM8/LCM16 switch OBWI from outside the firewall: Open a web browser and enter the external IP address of the firewall. The LCM8/LCM16 Explorer window will open and prompt you to login. -
Page 26: Co Cables
Repeat step 1 for all additional cascaded LCM8/LCM16 switches. NOTE: The system will automatically “merge” the two switches together as one. All target devices connected to the cascaded LCM8/LCM16 switch will display on the main LCM8/LCM16 switch target device list in the OSCAR interface. -
Page 27: Chapter 3: Local Port Operation
CHAPTER Local port operation You can use the OSCAR interface OSD or the OBWI to access devices that are attached to the switch. For information on the OBWI, see Chapter 4. Basic operations Main dialog box functions To access the OSCAR interface Main dialog box: Press Print Screen to launch the OSCAR interface. -
Page 28: Viewing And Selecting Ports And Devices
The Port column indicates the port to which a device is connected. Selecting a device Use the Main dialog box to select a device. When you select a device, the LCM8/LCM16 switch reconfigures the local keyboard and mouse to the settings for the selected device. -
Page 29: Soft Switching
(yellow circle) The designated CO cable is being upgraded. When this symbol displays, do not cycle power to the LCM8/LCM16 switch or connected devices and do not disconnect CO cables. Doing so may render the module permanently inoperable and require the CO cable to be returned to the factory for repair. -
Page 30: Navigating The Oscar Interface
Local Console Manager LCM8 and LCM16 Installation and User’s Guide Navigating the OSCAR interface The following table describes how to navigate the OSCAR interface using the keyboard and mouse. Table 3.3: OSCAR interface navigation basics Keystroke Function <Print Screen>, Ctrl+Ctrl, OSCAR interface activation sequence. -
Page 31: Connecting Local Virtual Media
Chapter 3: Local port operation Table 3.3: OSCAR interface navigation basics (continued) Keystroke Function Delete Deletes current selection in the Scan list or characters in a text box. Shift-Del Deletes from the current selection to the end of the list when editing a Scan list. Numbers Type from the keyboard or keypad. -
Page 32: Setup Dialog Box Functions
Local Console Manager LCM8 and LCM16 Installation and User’s Guide Setup dialog box functions You can configure your LCM8/LCM16 switching system from the Setup dialog box within the OSCAR interface. Select the Names button when initially setting up your LCM8/LCM16 switching system to identify devices by unique names. -
Page 33: Controlling The Status Flag
Chapter 3: Local port operation -or- Select Port to display devices numerically by port number. Click OK. Depending on the display method selected, the corresponding button will be depressed in the Main dialog box. To change how the OSCAR interface is invoked: Select the check box next to one of the listed methods. -
Page 34: Setting The Keyboard Country Code
Click X to exit without saving changes. Setting the keyboard country code NOTE: Using a keyboard code that supports a language different from that of your LCM8/LCM16 switch firmware will cause incorrect keyboard mapping. By default, the LCM8/LCM16 switch sends the US keyboard country code to USB modules attached to devices, and the code is applied to the devices when they are turned on or rebooted. -
Page 35: Assigning Device Types
LCM8/LCM16 port only to [LCM8/LCM16 port]-[switch port] to accommodate each device under that switch. For example, if a switch is connected to LCM8/LCM16 port 6, each device connected to it would be numbered sequentially. The device using LCM8/LCM16 port 6, switch port 1, would be 06-01, the device using LCM8/LCM16 port 6, switch port 2, would be 06-02, and so on. -
Page 36: Commands Dialog Box Functions
Local Console Manager LCM8 and LCM16 Installation and User’s Guide NOTE: If new CO cables are discovered by the LCM8/LCM16 switch, the on-screen list will be automatically updated. The mouse cursor will change into an hourglass during the update. No mouse or keyboard input will be accepted until the list update is complete. -
Page 37: Selecting Devices For Scan Mode
Chapter 3: Local port operation Selecting devices for Scan mode The Scan dialog box allows the local user to define a custom list of devices to include while in Scan mode and the number of seconds to display each device. The creation of the Scan list does not start Scan mode. -
Page 38: Viewing And Disconnecting User Connections
Local Console Manager LCM8 and LCM16 Installation and User’s Guide Viewing and disconnecting user connections You can view and disconnect users through the User Status dialog box. The username (U) and device (S) will always be displayed when connected to a device (local or remote). You can display either the device name or eID number to which a user is connected. -
Page 39: Resetting The Ps/2 Keyboard And Mouse On A Device Or Local Port
LCM8/LCM16 switch after a firmware upgrade. CO cables that have already been discovered but which are not attached to the LCM8/LCM16 switch during the firmware upgrade must be upgraded manually. The CO Upgrade dialog box is displayed. Click OK to initiate the upgrade and return to the CO Status dialog box. - Page 40 Local Console Manager LCM8 and LCM16 Installation and User’s Guide...
-
Page 41: Chapter 4: Web Interface Operations
To log in to the LCM8/LCM16 switch OBWI: Launch a web browser. In the address field of the browser, enter the IP address or host name assigned to the LCM8/ LCM16 switch you wish to access. Use https://xxx.xx.xx.xx or https://hostname as the format. -
Page 42: Lcm8/Lcm16 Explorer Window
LCM8/LCM16 Explorer window When a user has been logged in and authenticated, the LCM8/LCM16 Explorer window appears. From the LCM8/LCM16 Explorer window, users may view, access, and manage their LCM8/ LCM16 switch, specify system settings, and change profile settings. Figure 4.1 shows the LCM8/ LCM16 Explorer window areas. -
Page 43: Managing The Lcm8/Lcm16 Switch Obwi
NOTE: The appropriate level of access is required to disconnect a user. If you do not have permission to disconnect a user, the check box next to that user will be disabled. Managing the LCM8/LCM16 switch OBWI The LCM8/LCM16 switch OBWI provides several configuration options to tailor the switch to your specific application. -
Page 44: Managing Users
When you select the User category, the OBWI will retrieve and display a list of usernames from the LCM8/LCM16 switch. From here, you can add, modify, or delete users. The Appliance Administrator can set up preemptions, configure network and global settings (security mode, time- out, Simple Network Management Protocol), Reboot, Flash upgrade, administer user accounts, and monitor server status. -
Page 45: Figure 4.3: Users Window
Chapter 4: Web interface operations Figure 4.3: Users window Click the Add User button on the right side of the window to add a new user. -or- Click a username listed in the Users column to modify an existing user. The Add/Modify User window appears. - Page 46 Local Console Manager LCM8 and LCM16 Installation and User’s Guide To change a user password or access level: Click the Configure tab in the OBWI, then click the User category in the left column. Click the username you want to modify.
-
Page 47: Managing Device Properties
The Sessions sub-category allows you to apply controls to your video sessions. Enabling Network Time Protocol (NTP) functionality NTP settings can be configured for your LCM8/LCM16 switch. The switch must have access to the current time to verify that certificates have not expired, and you can configure the switch to request time updates from the network time server (NTP). -
Page 48: Viewing And Resynchronizing Server Connections
Local Console Manager LCM8 and LCM16 Installation and User’s Guide Viewing and resynchronizing server connections The Servers category retrieves and displays the servers in the LCM8/LCM16 switch database as well as information on how the servers are connected to the selected switch. -
Page 49: Viewing The Co Cables
When you select the Version sub-category, the OBWI will retrieve the firmware versions from the selected LCM8/LCM16 switch. This read-only information displays the version information for the unit itself. The CO Versions sub-category allows you to view and upgrade all of the CO cables in... -
Page 50: Figure 4.6: Cos Window
The CO Versions sub-category allows you to view and upgrade all of the CO cables in the system. On occasions when a cascaded switch is not recognized by the LCM8/LCM16 switch, it may be necessary to reset the CO cable which connects the cascaded switch to the LCM8/LCM16 switch. -
Page 51: Figure 4.7: Co Versions Window
Click the eID of the CO cable for which you want to view the firmware version. NOTE: The LCM8/LCM16 switch supports KCO, UCO, VCO, and VCO2 cables. NOTE: Resetting a CO that is connected directly to a server (not a cascaded switch) may cause the mouse/ keyboard to fail. -
Page 52: Upgrading Firmware
Local Console Manager LCM8 and LCM16 Installation and User’s Guide Upgrading firmware You can upgrade the firmware for either the switch or the CO cables. The CO cables can be upgraded individually or simultaneously. When an appliance upgrade is initiated, you will see a progress bar. -
Page 53: Rebooting Your Switch
Chapter 4: Web interface operations Rebooting your switch Periodically, such as after an upgrade, you may need to reboot the LCM8/LCM16 switch. You can reboot the LCM8/LCM16 switch through the Tools tab in the OBWI. When clicked, Reboot Switch will broadcast a disconnect message to any active users, then log out the current user and immediately reboot the LCM8/LCM16 switch. -
Page 54: Managing User Databases
Managing user databases User database files contain all user accounts assigned in an LCM8/LCM16 switch. You can save your user account database file and use it to configure users on multiple LCM8/LCM16 switches by writing the user account file to the new switch. -
Page 55: Installing A Web Certificate
Installing a Web Certificate A web certificate allows you to access the OBWI without having to acknowledge the LCM8/ LCM16 switch as a trusted web server each time you access it. Using the Install Web Certificate window, you can create a self-signed openssl certificate. -
Page 56: Figure 4.11: Install Web Server Certificate Window
Local Console Manager LCM8 and LCM16 Installation and User’s Guide Click the Install Web Server Certificate button. Figure 4.11: Install Web Server Certificate window Select the Fields radio button, and enter the following fields: • Public Key Length: the number of bits you want the certificate to be. - Page 57 Chapter 4: Web interface operations When prompted, click to view the certificate and follow the instructions to import the certificate into the Root Certificate Authority folder. After the certificate is stored, the user should not see the certificate warning.
- Page 58 Local Console Manager LCM8 and LCM16 Installation and User’s Guide...
-
Page 59: Chapter 5: Terminal Operations
Using a DB-9 M/F serial adapter, connect a terminal or a computer that is running terminal emulation software (such as HyperTerminal) to the 10101 port on the back panel of the LCM8/ LCM16 switch. The terminal settings are 9600 bits per second (bps), 8 bits, 1 stop bit, no parity, and no flow control. -
Page 60: Other Console Main Menu Options
This menu option allows you to execute a soft reset of the LCM8/LCM16 switch. Set Web Interface Ports The LCM8/LCM16 switch uses ports 80 and 443 for HTTP and HTTPS port numbers, respectively. The user can modify or specify alternate ports. -
Page 61: Input Web Server Certificate
Chapter 5: Terminal operations Input Web Server Certificate This menu option allows the user to utilize the User Defined Web Certificate, Import, or Export Web Certificate options. Exit This menu selection will return you to the ready prompt. If the Console menu interface password is enabled, you must exit the Console Main menu so that the next user will be prompted with the Username and Password login screen. - Page 62 Local Console Manager LCM8 and LCM16 Installation and User’s Guide...
-
Page 63: Appendixes
Using a DB-9 M/F serial adapter, connect a terminal or computer running terminal emulation software (such as HyperTerminal) to the SETUP, CONSOLE, or 10101 port on the back panel of the LCM8/LCM16 switch. The terminal should be set to 9600 bps, 8 bits, 1 stop bit, no par- ity, and no flow control. - Page 64 TFTP root directory of the TFTP server: • CMN-1082.fl Attach a cross-over CAT 5 cable to the LCM8/LCM16 switch for this process instead of a standard CAT 5 cable. If the LCM8/LCM16 switch is not on, turn it on now.
-
Page 65: Appendix B: Utp Cabling
Appendixes Appendix B: UTP cabling This appendix discusses various aspects of connection media. The performance of an LCM8/ LCM16 switching system depends on high quality connections. Poor quality or poorly installed or maintained cabling can diminish LCM8/LCM16 switching system performance. LCM8/LCM16 switching systems utilize UTP cabling. - Page 66 Local Console Manager LCM8 and LCM16 Installation and User’s Guide Cabling installation, maintenance, and safety tips The following is a list of important safety considerations that should be reviewed prior to installing or maintaining your cables: • Keep all UTP runs to a maximum of 100 feet each.
-
Page 67: Appendix C: Technical Specifications
Appendixes Appendix C: Technical specifications Table C.1: LCM8/LCM16 switch product specifications Server ports LCM8 switch: 8 Number LCM16 switch: 16 Type PS/2, USB, and Serial Connectors 8-pin modular Sync types Separate horizontal and vertical Plug and play DDC2B Standard screen... - Page 68 Local Console Manager LCM8 and LCM16 Installation and User’s Guide Table C.1: LCM8/LCM16 switch product specifications (Continued) Network Connection Number Type 10/100 Ethernet Connector 8-pin modular Local port Number Type PS/2, USB, and VGA USB device port Number Type USB 1.1...
-
Page 69: Appendix D: Getting Help And Technical Assistance
If you need help, service, or technical assistance or just want more information about IBM® prod- ucts, you will find a wide variety of sources available from IBM to assist you. This section contains information about where to go for additional information about IBM and IBM products, what to do if you experience a problem with your system, and whom to call for service, if it is necessary. - Page 70 You can receive hardware service through your IBM reseller or IBM Services. To locate a reseller authorized by IBM to provide warranty service, go to http://www.ibm.com/partnerworld/ and click Find Business Partners on the right side of the page. For IBM support telephone numbers, see http:/ /www.ibm.com/planetwide/. In the U.S. and Canada, call 1-800-IBM-SERV (1-800-426-7378).
-
Page 71: Appendix E: Notices
Web sites. The materials at those Web sites are not part of the materials for this IBM product, and use of those Web sites is at your own risk. IBM may use or distribute any of the information you supply in any way it believes appropriate without incurring any obligation to you. - Page 72 Local Console Manager LCM8 and LCM16 Installation and User’s Guide time this information was published. Such trademarks may also be registered or common law trademarks in other countries. A current list of IBM trademarks is available on the Web at "Copyright and trademark information" at http://www.ibm.com/legal/copytrade.shtml.
- Page 73 If IBM determines that the levels of particulates or gases in your environment have caused damage to the device, IBM may condition provision of repair or replacement of devices or parts on implementation of appropriate remedial measures to mitigate such environmen- tal contamination.
- Page 74 Properly shielded and grounded cables and connectors must be used in order to meet FCC emission limits. IBM is not responsible for any radio or television interference caused by using other than recommended cables and connectors or by unauthorized changes or modifications to this equipment.
- Page 75 Mitgliedsstaaten und hält die Grenzwerte der EN 55022 Klasse A ein. Um dieses sicherzustellen, sind die Geräte wie in den Handbüchern beschrieben zu installieren und zu betreiben. Des Weiteren dürfen auch nur von der IBM empfohlene Kabel angeschlossen werden. IBM übernimmt keine Verantwortung für die Einhaltung der Schutzanforderungen, wenn das Produkt ohne Zustimmung der IBM verändert bzw.
- Page 76 Local Console Manager LCM8 and LCM16 Installation and User’s Guide Verantwortlich für die Einhaltung der EMV Vorschriften ist der Hersteller: • International Business Machines Corp. • New Orchard Road • Armonk, New York 10504 • 914-499-1900 Der verantwortliche Ansprechpartner des Herstellers in der EU ist: •...
- Page 77 Appendixes Russia Electromagnetic Interference (EMI) Class A statement People's Republic of China Class A electronic emission statement Taiwan Class A compliance statement...
- Page 78 Local Console Manager LCM8 and LCM16 Installation and User’s Guide...
- Page 80 46M4171 590-992-501A...
Need help?
Do you have a question about the LCM8 and is the answer not in the manual?
Questions and answers