Kyocera FS-820 Printer Operation Manual
Fs-820 printer operation guide
Hide thumbs
Also See for FS-820 Printer:
- Service manual (128 pages) ,
- User manual (127 pages) ,
- Brochure & specs (4 pages)
Table of Contents
Advertisement
Advertisement
Table of Contents

Related Manuals for Kyocera FS-820 Printer


Summary of Contents for Kyocera FS-820 Printer
- Page 1 FS-820 FS-920 Operation Guide...
-
Page 3: Table Of Contents
Prolonged Non-Use and Moving the Printer ........ - Page 4 OPERATION GUIDE...
-
Page 5: Precautions For Use
FCC statement (for users in the United States) Precautions for Use OPERATION GUIDE Legal and Safety Information This device complies with Part 15 of the FCC Rules. Operation is subject to the following two conditions: • This device may not cause harmful interference •... -
Page 6: Interface Connectors
This printer is certified in the U.S. to conform to the requirements of DHHS 21 CFR, Chapter I, Subchapter for Class I (1) laser products, and elsewhere is certified as a Class I laser product conforming to the requirements of IEC 825. -
Page 7: Caution Labels
Caution Labels Label on the printer’s rear panel European/ Asian/Pacific countries U.S.A./Canada CDRH Regulations OPERATION GUIDE Label inside the printer (Laser radiation warning) NOTE: Do not remove these labels. The Center for Devices and Radiological Health (CDRH) of the U.S. Food and Drug Administration implemented regulations for laser products on August 2, 1976. -
Page 8: Important Safeguards
The printers generate ozone gas (O of installation and cause an unpleasant smell. To minimize concentration of ozone gas to less than 0.1 ppm, we recommend the printer is not located in a confined area where ventilation may be blocked. - Page 9 Kyocera Mita Corporation, Tamaki Plant Manufacturer’s address: 704-19 Nojino, Tamaki-Cho, Watarai-Gun, Mie Ken 519-0497, Japan Declares that the product: Product name: Page Printer Model number: FS-820 / FS-920 Conforms to the following product specifications: EN 55 022:1998 Class B EN 61 000-3-2:2000...
- Page 10 Page Printer Model number: FS-820 / FS-920 Description of device: This Page Printer Model FS-820 is the 16 ppm (FS-920 is the 18 ppm); A4 size and utilized plain paper; laser; dry toner etc. Conforms to the following product specifications.
- Page 11 Declaration of Conformity (U.S.A.) Disclaimer OPERATION GUIDE Model Number: Laser Printer FS-820 / FS-920 Trade Name: Kyocera Responsible Party: Kyocera Mita America Inc. Address: 225 Sand Road PO Box 40008 Fairfield, New Jersey 07004-0008, U.S.A. Telephone number: (973) 808-8444 Fax number: (973) 882-6000 Manufacturer’s name:...
-
Page 12: Energy Star Program
This printer is equipped with a sleep timer function that conforms with the standards of the ENERGY STAR Program. This function makes it possible to reduce the amount of electrical power consumed by the printer. For maximum power savings, turn off the printer's power supply when not using the printer for extended periods of time. - Page 13 Agfa Monotype License Agreement OPERATION GUIDE This product uses PeerlessPrintXL to provide the HP LaserJet compatible PCL 6 language emulation. PeerlessPrintXL is a trademark of The Peerless Group, Redondo Beach, CA 90278, U.S.A. This product was developed using the Tornado™ Real Time Operating System and Tools from Wind River Systems.
- Page 14 Agfa Japan warrants that for ninety (90) days after delivery, the Software will perform in accordance with Agfa Japan-published specifications, and the diskette will be free from defects in material and workmanship. Agfa Japan does not warrant that the Software is free from all bugs, errors and omissions.
- Page 15 IBM PROGRAM LICENSE AGREEMENT OPERATION GUIDE THE DEVICE YOU HAVE PURCHASED CONTAINS ONE OR MORE SOFTWARE PROGRAMS ("PROGRAMS") WHICH BELONG TO INTERNATIONAL BUSINESS MACHINES CORPORATION ("IBM"). THIS DOCUMENT DEFINES THE TERMS AND CONDITIONS UNDER WHICH THE SOFTWARE IS BEING LICENSED TO YOU BY IBM. IF YOU DO NOT AGREE WITH THE TERMS AND CONDITIONS OF THIS LICENSE, THEN WITHIN 14 DAYS AFTER YOUR ACQUISITION OF THE DEVICE YOU MAY RETURN THE DEVICE FOR A FULL REFUND.
- Page 16 Limitation of Remedies IBM’s entire liability under this license is the following; • For any claim (including fundamental breach), in any form, related in any way to this license, IBM's liability will be for actual damages only and will be limited to the greater of: the equivalent of U.S.$25,000 in your local currency;...
-
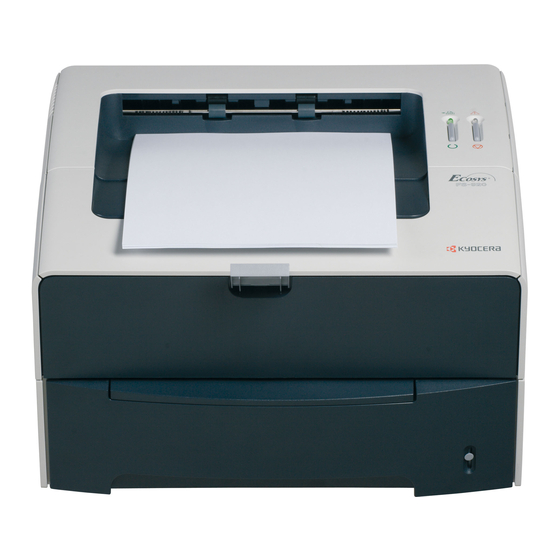
Page 17: Machine Overview
1 Machine Overview Indicators Go Key Cancel Key Output Tray Top Cover Rear Cover Paper Stopper Power Switch Paper Cassette Manual Feed Tray Parallel Interface USB Interface Power Cord OPERATION GUIDE... -
Page 18: Indicators
There are two indicators located on the top right of the printer. The indicators are used to identify the status of the printer at any time. To identify the printer status, check the indicators on the printer and then refer to the table below. -
Page 19: Loading Paper
Manual Feed Tray 1 sheet 60 to 163 g/m A4, B5 (JIS), A5, Letter, Legal, Folio, Oficio II, Statement, Executive, A6, B6, B5 (ISO), Envelope #10, Envelope #9, Envelope Monarch, Envelope #6, Envelope C5, Envelope DL and 16K Paper Specifications Weight Thickness Dimensional Accuracy... -
Page 20: Prepare The Paper
Ensure paper is not stapled and clips are removed. Pull the cassette completely out of the printer. IMPORTANT: When pulling the cassette out of the printer, ensure it is supported and does not fall Lo297001 3BT/TT3o a Cassette OPERATION GUIDE... - Page 21 Do not load paper above the triangle mark located on the width guide. Ensure the side to be printed is facing down and the paper is not folded, curled, or damaged. Push the cassette back into the printer until it stops.
-
Page 22: Manual Feed Tray
Paper placed on the Manual Feed Tray is automatically fed and overrides the paper cassette. Pull out the cassette to access the Manual Feed Tray. Pull the Manual Feed Tray up and out. Pull out the front of the Manual Feed Tray. Push the cassette back into the printer. OPERATION GUIDE... - Page 23 OPERATION GUIDE Adjust the paper width guides and slide the paper into the tray as far as it will go. The side to be printed should be face up. Ensure the paper width guides are flush against the edge of the paper.
- Page 24 Loading Paper OPERATION GUIDE...
-
Page 25: Connections
The connection cable should be shielded and no longer than 3 meters (10 feet) long. Close the clips on both sides to fix the connector in place. Connect the other end of the printer cable to the computer’s parallel interface connector. Power Switch... -
Page 26: Connecting To Usb Interface
Connect the other end of the USB cable to the computer’s USB interface connector. Install the printer close to an AC wall outlet. If an extension cord is used, the total length of the power cord plus extension should be 5 meters (16 feet) or less. - Page 27 IMPORTANT: If you install the Toner Container and switch on the power, two indicators will start fast flashing. When the printer is first switched on after toner installation, there will be a delay of approximately 15 minutes before the printer gets ready to print. Once the Ready indicator lights, printer installation is complete.
- Page 28 Connections OPERATION GUIDE...
-
Page 29: Loading Software
OPERATION GUIDE 4 Loading Software Ensure the printer is plugged in and connected to the computer’s parallel or USB port before installing software from the CD-ROM. Switch on the PC and activate Windows. NOTE: If the Welcome to the Found New Hardware Wizard dialog box displays, select Cancel. - Page 30 Loading Software OPERATION GUIDE...
-
Page 31: Printing
Ensure the paper required is loaded in the printer. From the application File menu, select Print. The Print dialog box displays. Select the drop down list of printer names. All the printers installed are listed. Select the FS-820 or FS-920. -
Page 32: Manual Duplex
NOTE: Nothing will be printed on the instruction sheet. If the paper is curled, straighten it out before loading the paper in the cassette. -
Page 33: Maintenance
Cleaning Tasks The printer should be cleaned on a regular basis to ensure optimum performance. Use a clean, lint free cloth to clean dust and dirt from the printer. Developer Unit The developer unit should be removed to allow for cleaning tasks every time the toner container is replaced. -
Page 34: Toner Container
Toner Container To replace the Toner Container use the instructions below. CAUTION: Do not attempt to incinerate the Toner Container. Dangerous sparks may cause burns. Do not attempt to force open or destroy the Toner Container. Open the Top Cover. Turn Lock Lever A to the unlock position, push Lock Lever B to the right and pull out the Toner... - Page 35 Toner Container Capacity OPERATION GUIDE Install the new Toner Container in the printer. Push firmly on the top of the container at the positions marked PUSH HERE, until you hear a click. Turn Lock Lever A to the lock position and close the Top Cover.
-
Page 36: Cleaning The Printer
Cleaning the Printer To avoid print quality problems, the interior of the printer must be cleaned with every Toner Container replacement. Open the Top Cover. Lift the Developer Unit together with the Toner Container out of the printer. Using the green handles lift the Drum Unit out of the machine. - Page 37 When cleaning is complete, return the Drum Unit to its position, aligning the guides at both ends with the slots in the printer. Insert the Developer Unit together with the Toner Container, back into the machine.
-
Page 38: Prolonged Non-Use And Moving The Printer
Prolonged Non-Use and Moving the Printer Prolonged Non-use Moving the Printer If you ever leave the printer unused for a long period of time, remove the power cord from the wall outlet. We recommend you consult with your dealer about the additional actions you should take to avoid possible damage that may occur when the printer is used next time. -
Page 39: Troubleshooting
OPERATION GUIDE 7 Troubleshooting There are a number of printer problems which can be corrected by a user. Use the table below to identify a problem and perform the corrective action. Check Items Check the indicators Check if a status page can be printed. -
Page 40: Print Quality Problems
Dirt on the top edge or back of the paper The printer will stop when a paper jam occurs in the printer or if paper is misfed. The printer will go offline and the Attention Indicator will fast flash. Follow the instructions provided here to clear the jam. If paper jams occur frequently, try using a different type of paper, replace the paper using a new ream, or turn the paper over. -
Page 41: Paper Cassette
Rear Cover and remove the jammed paper by pulling it out. Open and close the Top Cover to clear the error. The printer warms up and resumes printing. Pull out the cassette. Remove any partially fed paper. Check to see if paper is loaded correctly. - Page 42 Open the top cover and lift the Developer Unit together with the Toner Container out of the printer. Using the green handles lift the Drum Unit out of the machine. NOTE: The Drum Unit is sensitive to light.
- Page 43 Toner Container, back into the machine. Close the Top Cover. Reload the Manual Feed Tray. The printer warms up and resumes printing. Open the top cover and lift the Developer Unit together with the Toner Container out of the printer.
- Page 44 Return the Drum Unit to its position, aligning the guides at both ends with the slots in the printer. Insert the Developer Unit together with the Toner Container, back into the machine. Close the Top Cover. The printer warms up and resumes printing. OPERATION GUIDE...
-
Page 45: Options
Service Technician. To install the DIMM and Memory Card, switch off the printer’s power, unplug the power cable and disconnect the printer from the PC. Hook the finger to the concave portion and lift the side cover to release the latch hook . - Page 46 Options OPERATION GUIDE...
-
Page 47: Specifications
Item Printing Method Printing Speed Paper Sizes Cassette Manual Feed Tray Paper Types Cassette Manual Feed Tray Paper Feed Source Capacity Cassette Manual Feed Tray Output Tray Capacity Warm-up Time First Print Resolution Monthly Duty Controller OPERATION GUIDE 9 Specifications NOTE: Specifications are subject to change without notice. - Page 48 Item Memory Standard Additional Memory Interfaces Parallel Operating Environment Temperature Relative Humidity Altitude Illumination Dimensions (W) × (H) × (D) Weight Operating noise (in accordance with ISO 7779 [Bystander Position, sound pressure level at the front]) Description FS-820: 16 MB FS-920: 32 MB FS-820: 272 MB FS-920: 288 MB...
- Page 49 MEMO...
Need help?
Do you have a question about the FS-820 Printer and is the answer not in the manual?
Questions and answers