Advertisement
Quick Links
Advertisement

Related Manuals for Kedacom NVR2821


Summary of Contents for Kedacom NVR2821
- Page 1 NVR2821 Installation Guide...
- Page 3 NVR2821-04032B/8HI Preparations 1 Unpacking Perform the following steps to unpack the NVR2821 (hereinafter referred to as the device): 1) Inspect the package to make sure that it has not been damaged. If you find damage, contact us. 2) Open the package and check whether any item on the packing list is missing.
- Page 4 2.2 EMI To shield electromagnetic interference (EMI), you should observe the following guidelines: Keep the ground system of the device away from that of the power supply system or lightning protection system. Place the device away from high-frequency devices, such as radio or radar stations. When necessary, deploy EMI shielding devices.
- Page 5 3.2 Equipment Cleanliness Table 3 Mapping between the particle diameter range and number of particles per cubic meter Particle Diameter Range Number of Particles per Cubic Meter [0, 0.5] 1.4×10 [0.6,1] 7×10 [1.1,3.0] 2.4×10 1.3×10 [3.1,5.0] You must install the device in an environment as free from dust and foreign conductive material (such as metal flakes from construction activities) as is possible.
-
Page 6: Panel Description
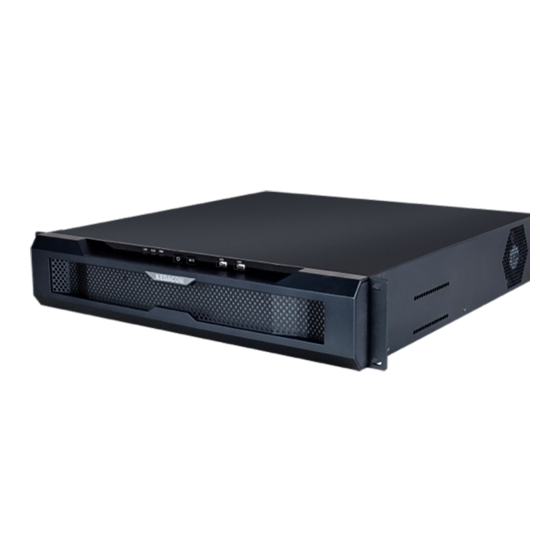
Panel Description 1 Front Panel Power indicator Power button Alarm indicator Mute button, which is used to mute the beeper LAN indicator Two USB ports MUTE Figure 1 Front panel of the device Table 5 Indicator description Indicator State Description The device has a network connection. - Page 7 GLAN0: 192.168.1.100 Serial ports Ÿ Left: RS-232 GLAN1: 172.26.1.100 Ÿ Right: RS-485 GLAN2: 10.26.1.100 Ÿ Ground VGA port KEDACOM Audio in Audio out PICKUP Power port AC 100-240 V 50-60 Hz, 4-1.5 A Figure 2 Rear panel of the device...
- Page 8 Installing the Device 1 Installing HDDs You are advised to install an HDD before using the device. If you do not install an HDD: You cannot use the recording function. When the device starts operating and detects that no HDD is installed, the beeper will go off and an alarm will be generated.
- Page 9 4. Install the upper-layer disk support back to the device. Support holders You should put the upper- layer disk support on these holders. 5. Connect a SATA power cable and a SATA data cable to each HDD. 6. Before installing the lid back to the device, ensure that no dust or particle is left inside the device.
- Page 10 4. Fasten the hangers on the left and right sides of the device to the rack with screws provided by the rack manufacturer through the four holes in the hangers. Rack tray 5. Connect the ground wire to the ground bolt of the device. 6.
- Page 11 Typical Network Topology Display PMC and CU of the VMS Network Network Camera NVR2821 Storage unit Network NVR Web or vStation...
- Page 12 Activation and Initial Configuration To activate the device through the Internet Explorer: 1. Connect a network cable to the network port on the front panel (default IP of GLAN0: 192.168.1.100) of the device. 2. Add an IP address from the 192.168.1.X network segment with the subnet mask being 255.255.255.0 to your PC.
- Page 13 To initially configure the device on the NVR Web: Configure the time settings. Configure the network settings. Add cameras. 1) ONVIF cameras 2) VSIP cameras 3) RTSP cameras 4) SIP cameras Initialize HDDs. Scheduling recordings. Enabling the Cloud Service, which allows you to view camera videos of the device on your mobile phone.
- Page 14 This page is intentionally left blank.
- Page 16 V1 20190125...
Need help?
Do you have a question about the NVR2821 and is the answer not in the manual?
Questions and answers