
Subscribe to Our Youtube Channel
Related Manuals for Power Dynamics PDA-C804A


Summary of Contents for Power Dynamics PDA-C804A
- Page 1 171.156 171.158 PDA-C804A 4 Channel PDA-C808A 8 Channel USER MANUAL MANUAL DE INSTRUCCIONES V1.2...
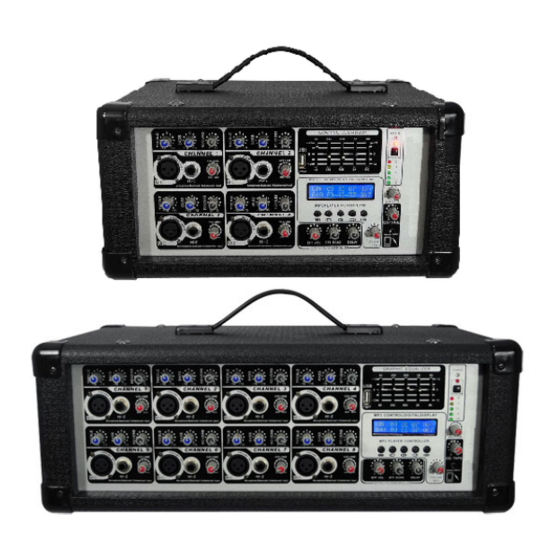
- Page 2 ENGLISH A. FRONT PANEL SECTION FEATURES 1. BALANCED Mic INPUT Electronic Balanced inputs acceptable a standard XLR male connector. It is designed to accept a balanced low impedance input signal, Phantom power (15 volts) for condenser microphones is always on and available. It has an input impedance of 1K ohm. The connector is wired as: Pin= shield; Pin3= negative (cold). 2. BALANCE INPUT(LINE) Electronic Balanced inputs accepts a standard ¼” jacks connector. It is designed to accept a balanced high impedance input signal. 3. VOLUME This is function to adjust the volume of a signal connection into each channel and adjust the volume of output, together with the master fader. 4. TREBLE This control gives you up to 15 db of boost or cut at 10 kHz and above, and it is also flat at the detent. Use it to add sizzle to cymbals, and an overall sense of transparency or edge to key‐boards, vocals, guitar, and bacon frying. Turn it down a little to reduce sibilance, or to hide tape hiss. 5. LOW This control gives you up to 15 dB boost or cut at 100Hz and below. This circuit is flat (no boost or cut) at the center detent position. This frequency represents the punch in bass drums, bass guitar, fat synth patches, and some really serious male singers. 6. EFF This is a send control to the reverb bus. It controls the amount of reverberation added to the input signals. ...
- Page 3 7. USB PORT Connect USB disk with MP3 files. 8 . GRAPHIC EQUALIZER 5‐band equalizer is provided for sound control over each frequency, and for precise high quality sound by final tone control (60,250,1K,2K,8KHz shelving at +/‐12dB). 9 . LCD DISPLAY( There are three states show) a. LCD display screen information shows trademarks of the products, USB version, and initial system info. b. The second message is to remind the screen insert USB, or disk is not MP3 format. c. The third message is the total number of songs in the USB disk, songs of the total play time ,play time at present, play/pause/ stop sign, symbol cycle, File Format(M refers to the MP3 file format, W refers to the WMA file format), as well as the EQ. 10 . TOUCH BUTTON Five touch keys, which are single cycle / circle of the total, up, play /pause / stop, down, EQ option. All of the touch button of this machine are conventional key and compound key. a. Symbol cycle (A total of 6 cycle model). They are All cycle, random play, song cycle , End the end of the single player , cycle by a player and players here. b. Down. This is a complex bond, In the state of play, press the button, Will play on a song; In the state to suspend or stop, press the button, the current song will be re‐broadcast; Press the button for a long time, can adjust the LCD backlight brightness. c. Play /Pause/ Stop. This is a conventional bond, the press is a player, next it is time to pause, then it is stop, while the corresponding LCD display signs. Press for a long time to null and void. d. Up. While audio is playing, if you press the button, the next song will play; Press the button for a long time to adjust the LCD backlight brightness. e. EQ. Press to cycle through the 11 EQ settings: Natural, Rock, Pop, Class, Jazz, Blue, Hall, Bass, Soft, Country, and Opera. 11 . POWER LED It lights when the power switch turns on. 12 . PHANTOM LED The LED +15V will be turned on when start working. 13 . PHANTOM POWER SWITCH When you press the switch the XLR input will have 15V. 14 . OUTPUT LEVEL INDICATOR This is a level meter which shows output levels. 15 . MASTER VOLUME Use this control, you can adjust signal level of main channel. ...
- Page 4 16 . AUX This controls the level of the playback inputs(RCA) jack. 17. iPhone INPUT Portable device input interface, such as iPhone. 18 . MP3 Use this control to adjust MP3 signal level sent to main channel. 19 . EFF ECTS DELAY Use this control to adjust the delay time interval of echo repeat. 20 . EFF ECTS REPEAT Use this control to adjust reverberating deepness. 21 . EFF ECTS LEVEL Use this control to adjust signal levels of echo output. B.BACK PANEL SECTION FEATURES 1. SPEAKER JACK These are 2 conductor 1/4” speaker outputs. Each one is rated at 8 ohm minimum impedance. Total minimum load for the amplifier is 4 ohms. You may connect either 1‐4 ohm,1‐8 ohm or 2‐8 ohm speaker cabinets. Do not go below rated minimum impedance. 2. SEND/RETURN Use a stereo ¼” plug to send and return a preamp signal to a sound processor 3‐4.TAPE IN AND REC OUT The TAPE IN allows cassette recorders or CD players to be added to the Main output. The RECORD OUTPUT, with TAPE RCA jacks, provides signal output to a cassettedeck or Home audio equipment. The impedance is 1K ohms @ ‐10dBv. ...
- Page 5 5. FAN In order to prevent rising the inside temperature, the inside heat is emitted outside. 6. POWER SWITCH Turns the unit ON or OFF. Always turn level controls down before turning on the unit. 7. Earth Lift 8. AC POWER CORD/FUSE HOLDERS For selecting the proper voltage (115/230AC) to match the power supply in your area. Note: To avoid damage to your unit, always make sure this switch is set to the correct supply voltage. Damage caused by improper use is not covered by the warranty C . CONNECTIONS You will need a lot of cables for different purposes – see the following figures to make sure you have got the right cables. Unbalanced equipment may be connected to a balanced inputs/outputs. Either use mono 1/4"plugs or connect ring and sleeve of TRS plugs. ...
- Page 6 Speaker connections One or more speakers (2, 4, or 8‐Ohm) speakers can be connected to the amplifier with or without transformers. However, before you connect any speaker to the amplifier, the total speaker impedance must be calculated in order to avoid damage to the amplifier. A total speaker impedance greater than 16 Ohms or less than 4 Ohms can damage your equipment. To begin with, in order to ensure equal volume from each speaker, all connected speakers should have the same impedance. System 1: Single speaker system System 2: Two(or more) speakers in series ...
-
Page 7: Specification
SPECIFICATION Specification PDM-C804A PDM-C808A Ref. No. 171.156 171.158 4 Ohm Power (RMS) 1 x 200 Watts 8 Ohm Power (RMS) 2 x 150 Watts Channel 4 Channel 8 Channel Bandwidth: 20Hz to 20kHz±1dB Input Impedance: Lo-Z Mic: 1K Ohms Hi-Z: 33K Ohms Mic/Line/Tape/Playback: 10K Ohms... -
Page 8: Face Avant
FRANÇAIS A. FACE AVANT 1. ENTREE SYMETRIQUE MIC Pour prises XLR mâle. Pour des signaux d'entrée symétrique basse impédance ; une alimentation fantôme (15 V) pour microphones à condensateur est toujours disponible. Impédance d'entrée : 1 kΩ. configuration connecteur : pin : blindage, pin 3 : négatif (froid) 2. ENTREE SYMETRIQUE LIGNE Entrées symétriques acceptant une prise jack 635. Pour un signal d'entrée symétrique haute impédance. 3. VOLUME Réglage du volume dans chaque canal et réglage du volume de sortie avec le fader master. 4. AIGUS Plage d'augmentation de 15 dB ou de baisse à 10 kHz. Pour ajouter à des cymbales de l'éclat et une certaine transparence aux claviers, voix, guitare ; tournez‐le vers la gauche pour réduire les sifflements 5. GRAVES Plage d'augmentation de 15 dB ou de baisse à 100 Hz. Circuit sans modification en position centrale. La fréquence représente une d'augmentation dans les batteries, guitares basses, et pour quelques voix d'hommes 6. EFF Réglage envoyé au bus Reverb ; contrôle la quantité de réverb ajoutée aux signaux d'entrée. ... - Page 9 7. PORT USB Reliez un disque USB avec fichiers MP3 8. EGALISEUR GRAPHIQUE L'égaliseur 5 bandes est prévu pour une gestion du son dans chaque plage de fréquences et pour une haute qualité du son, avec un réglage précis (60,250,1K,2K,8KHz à +/‐12dB). 9. Affichage LCD) a. L'affichage indique la version USB, la marque des produits et une information sur le système.. b. Le second message est un rappel pur inséré une support USB ou si le disque n'est pas au format MP3. c. Troisième message : nombre totale de chansons sur le disque USB, chansons pur la durée totale, durée de lecture, symboles lecture / pause / arrêt, format fichier (M se réfère au format MP3, W au format WMA) et égaliseur. 10. Touches TOUCH 5 touches décrites ci‐après. a. Symbole cycle (6 modèles de cycle en tout). Tous les cycles, lecture aléatoire, lecture unique, cycle par un lecteur et tous. b. Down. Pendant la lecture, appuyez sur la touche, l'appareil lit une chanson : pour suspendre ou arrêter, appuyez, la chanson est lue à nouveau ; appuyez sur la touche plus longuement pour régler la luminosité de l'affichage LCD. c. Play /Pause/ Stop. A chaque pression, vous commutez entre lecture, pause, arrêt. L'affichage indique la fonction. Appuyez sur la touche plus longuement pour annuler. d. Up. Pendant la lecture, si vous appuyez sur la touche, la chanson suivante est lue ; par une longue pression, vous pouvez régler la luminosité de l'affichage LCD. e. EQ. Appuyez pour commuter entre les 11 réglages d'égaliseur : Natural, Rock, Pop, Class, Jazz, Blue, Hall, Bass, Soft, Country, et Opera. 11. LED POWER Brille lorsque l'interrupteur Power est activé 12. LED PHANTOM La LED +15V brille au démarrage 13. INTERRUPTEUR POWER FANTOM Si vous activez l'interrupteur, l'entée XLR a une tension de 15 V. 14. VU‐mètre VU‐mètre des niveaux de sortie. 15. VOLUME MASTER Réglage du niveau de signal du canal principal. 16. TAPE Réglage du niveau des prises d'entrée Lecture (RCA) ...
-
Page 10: Face Arriere
17. Entrée iPhone Interface d'entrée pour un appareil portable, par exemple iPhone 18. MP3 Réglage pour le niveau de signal MP3 envoyé au canal principal. 19. EFF ECTS DELAY Réglage de la durée de temporisation des répétitions d'écho. 20. EFF ECTS REPEAT Réglage de la profondeur des effets de réverbération. 21. EFF ECTS LEVEL Réglage des niveaux de signal de la sortie Echo B. FACE ARRIERE 1. PRISES HAUT‐PARLEUR Deux prises HP, chacune pour une impédance minimale de 8 Ω. La charge totale minimale de l'amplificateur est de 4 Ω. Vous pouvez brancher des enceintes soit 1‐4 Ω, 1‐8 Ω, 2‐8 Ω. Ne descendez jamais sous l'impédance minimale. 2. SEND/RETURN Utilisez une prise jack stéréo 6,35 pour envoyer et retourner un signal Preampli à un processeur de son. 3‐4.TAPE IN ET REC OUT Tape IN : pour brancher des magnétophones ou lecteurs CD à ajouter à l'entrée Main. La sortie RECORD avec prises RCA TAPE, délivre un signal de sortie vers un magnétophone ou une installation audio. L'impédance est 1K ohms @ ‐10dBv. 5. VENTILATEUR Pour assurer un bon refroidissement de l'appareil ... - Page 11 6. Interrupteur POWER Pour allumer et éteindre l'appareil. Mettez toujours les réglages sur le minimum avant d'allumer. 7. Interrupteur CHANGE‐OVER Sélecteur de la tension d'alimentation : 110/220 V. 8. CORDON SCTEUR / PORTE FUSIBLE Veillez à sélectionner la tension d'alimentation (115/230AC) correspondant à celle en vigueur dans votre pays. Remarque : pour éviter tout dommage sur l'appareil, assurez‐vous que le réglage est bien sur la tension adéquate. Tout dommage causé par une utilisation incorrecte ne sera pas couvert par la garantie. C . BRANCHEMENTS Selon les applications, vous aurez besoin de différentes types de cordons : reportez‐vous aux schémas ci‐après. Un équipement asymétrique peut être branché à des entrées / sorties symétriques. Utilisez soit une prise 6,35 soit reliez l'anneau et le blindage à des prises TRS. ...
- Page 12 Branchement enceintes Vous pouvez brancher un ou plusieurs enceintes (2, 4 ou 8 Ω) à l'amplificateur avec ou sans transformateurs. Cependant, avant de brancher une enceinte à l'amplificateur il faut calculer l'impédance totale des enceintes pour éviter d'endommager l'amplificateur. Système 1: Une seule enceinte Système 2: deux (ou plus) enceintes en série ...
- Page 13 CARACTERISTIQUES TECHNIQUES PDM-C804A PDM-C808A Ref. No. 171.156 171.158 Puissance stéréo 4 Ω (RMS) 2 x 200 Watts Puissance stéréo 8 Ω (RMS) 2 x 150 Watts Canaux 4 canaux 8 canaux Largeur bande 20 Hz à 20 kHz ±1 dB Impédance entrée Lo-Z Mic 1 kΩ...
- Page 14 CE Declaration of Conformity Importer: TRONIOS BV Bedrijvenpark Twente 415 7602 KM ‐ ALMELO Tel : 0031546589299 Fax : 0031546589298 The Netherlands Product number: 171.156 / 171.158 Product Description: PowerDynamics PDM‐C804A Powered Mixer PowerDynamics PDM‐C808A Powered Mixer Regulatory Requirement: EN 60065 EN 55013 EN 55020 EN 61000‐3‐2/‐3‐3 The product met the requirements stated in the above mentioned Declaration(s). ALMELO, 17-02-2011 Signature: ...
Need help?
Do you have a question about the PDA-C804A and is the answer not in the manual?
Questions and answers