Table of Contents
Advertisement
Available languages
Available languages
Quick Links
C124
AC / DC TRMS CLAMP METER
con Data logger & Mobile APP
Manuale d'uso
ITALIANO: Si prega di leggere questo manuale
prima di accendere l'apparecchio.
Informazioni importanti sulla sicurezza interna
.
ENGLISH: Please read this manual before turning on
the appliance.
Important information on internal security
.
Advertisement
Chapters
Table of Contents

Subscribe to Our Youtube Channel
Related Manuals for Uniks C124


Summary of Contents for Uniks C124
- Page 1 C124 AC / DC TRMS CLAMP METER con Data logger & Mobile APP Manuale d'uso ITALIANO: Si prega di leggere questo manuale prima di accendere l'apparecchio. Informazioni importanti sulla sicurezza interna ENGLISH: Please read this manual before turning on the appliance.
- Page 3 REGISTRA IL TUO PRODOTTO SU www.uniks.it La registrazione dei tuoi prodotti ti permetterà di rimanere sempre informato sulle novità, usufruire di vantaggiosi sconti dedicati a te per l'acquisto di accessori e prodotti per il tuo lavoro quotidiano. La registrazione è gratuita.
-
Page 4: Table Of Contents
Sommario INTRODUZIONE ..........5 INIZIARE ............6 2.1. DURANTE L'UTILIZZO ..........7 2.2. DOPO L'USO ............. 7 INIZIARE ............7 3.1. CONTROLLI INIZIALI ..........7 3.2. ALIMENTAZIONE DELLO STRUMENTO ....7 3.3. CONSERVAZIONE ............ 8 DESCRIZIONE ........... 8 4.1. Descrizione dello strumento ........8 4.2. -
Page 5: Introduzione
MANUALE Uniks C124 1. INTRODUZIONE Nel seguito del manuale con la parola “strumento” si intende genericamente il modello C120 salvo diversamente specificato. Lo strumento è progettato in conformità alla direttiva IEC/EN61010-1, relativa agli strumenti di misura elettronici. Per la Sua sicurezza e per evitare di danneggiare lo... -
Page 6: Iniziare
MANUALE Uniks C124 2. INIZIARE • Questo strumento è stato progettato per un utilizzo in un ambiente con livello di inquinamento 2. • Può essere utilizzato per misure di TENSIONE AC\DC e CORRENTE AC su installazioni in CAT IV 600V, CAT III 1000V •... -
Page 7: Durante L'utilizzo
MANUALE Uniks C124 2.1. DURANTE L'UTILIZZO Si prega di leggere attentamente le seguenti raccomandazioni e le istruzioni: ATTENZIONE La mancata osservazione delle Avvertenze e/o Istruzioni può danneggiare lo strumento e/o i suoi componenti o essere fonte di pericolo per l’operatore. -
Page 8: Conservazione
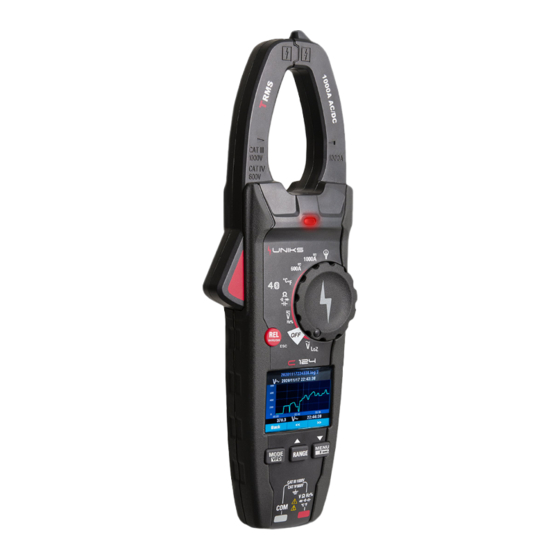
MANUALE Uniks C124 3.3. CONSERVAZIONE Per garantire misure precise, dopo un lungo periodo di conservazione, attendere che lo strumento ritorni alle condizioni normali. 4. DESCRIZIONE 4.1. Descrizione dello strumento 1. Toroide 8. Tasto MENU 2. Indicatore di 9. Selettore rotativo di... -
Page 9: Descrizione Display
MANUALE Uniks C124 4.2. Descrizione Display 1. Indicazione della Funzione di spegnimento automatico 2. Indicazione Tasto Funzione beep 3. Indicatore funzione Bluetooth 4. Indicazione modalità automatica / modalità manuale 5. Indicazione del orario di sistema 6. Indicazione carica della batteria 7. -
Page 10: Operazioni
MANUALE Uniks C124 5. Operazioni NOTE: Leggere e comprendere tutte le istruzioni di Avvertenza e Attenzione di questo manuale prima di usare lo strumento NOTE: Impostare il selettore rotativo nella posizione OFF quando lo strumento non è in uso. 5.1. -
Page 11: Misure Di Corrente Di Spunto (Inrush)
MANUALE Uniks C124 5.2. Misure di corrente di spunto (INRUSH) Impostare il selettore sulla posizione 600A o 1000A Tenere premuto per 2 secondi il pulsante REL/INRUSH il display indicherà “Inrush”. Poi display di misura visualizzerà “----”. Pinzare il cavo del motore Avviare e/o aspettare l’avvio del motore. -
Page 12: Misura Di Tensione Ac + Dc
MANUALE Uniks C124 5.4. Misura di Tensione AC + DC ATTENZIONE: Non misurare la tensione AC / DC se un motore sul circuito viene acceso o spento. Potrebbero verificarsi forti picchi di tensione che possono danneggiare lo strumento. Impostare il selettore nella posizione V AC / DC Inserire il puntale nero a banana nella presa negativa COM. -
Page 13: Misure Tensione Ac Loz
MANUALE C124 5.7. Misure tensione AC LoZ AVVERTIMENTO: Rischio di elettrocuzione. Le punte delle sonde potrebbero non essere abbastanza lunghe da contattare le parti sotto tensione all'interno di prese a 240 V per apparecchi perché i contatti sono incassati nelle prese. -
Page 14: Controllo Continuità
MANUALE C124 5.9. Controllo continuità AVVERTIMENTO: Per evitare scosse elettriche, scollegare l'unità in prova e scaricare tutti i condensatori prima di effettuare misurazioni di resistenza. Rimuovere le batterie e scollegare i cavi della linea. 1. Impostare il selettore sulla posizione. -
Page 15: Misure Di Capacità
MANUALE C124 5.11. Misure di capacità AVVERTIMENTO: Per evitare scosse elettriche, scollegare l'unità in prova e scaricare tutti i condensatori prima di effettuare misurazioni di resistenza. Rimuovere le batterie e scollegare i cavi della linea 1. Impostare il selettore sulla ... -
Page 16: Misure Con Pinza Flex
MANUALE C124 5.13. Misure con Pinza Flex 1. Impostare il selettore sulla posizione Flex ( ) 2. Inserire il puntale nero a banana nella presa negativa COM. Inserire il puntale a banana rosso nella presa positiva V. 3. Leggere la corrente sul display 4. -
Page 17: Modalità Hold
MANUALE C124 5.15. Modalità HOLD • Per bloccare la visualizzazione per qualsiasi funzione, premere il tasto HOLD. E di nuovo premere il tasto HOLD per rilasciare il blocco. • Premere il tasto funzione Salva per memorizzare la misurazione in memoria. -
Page 18: Funzionamento Del Menu
MANUALE C124 6. Funzionamento del MENU • Premere il pulsante MENU per accedere al menu dello strumento, come mostrato di seguito • Premere il tasto funzione Su / Giù per selezionare la voce di menu o modificare la voce di messa a fuoco corrente. -
Page 19: Dettagli Di Misura (Measurement)
MANUALE C124 6.3. Dettagli di misura (Measurement) • Premere il tasto funzione Su / Giù per selezionare la voce Measurement, quindi premere il tasto funzione Enter per accedere al menu • Recall Measurements: Richiama la misura in memoria • Delete Measurements: Eliminerà tutti i dati in memoria fig è... - Page 20 MANUALE C124 Nel menu di Recording. Premere il tasto Su / Giù per selezionare la voce Start Recording, quindi premere il tasto funzione Enter per avviare una nuova registrazione Nel menu di Recording. Premere il tasto Su / Giù per selezionare la voce Recall Recording, quindi premere il tasto funzione Enter per richiamare la registrazione in memori.
-
Page 21: Dettagli Dello Strumento (Meter Info)
MANUALE C124 6.5. Dettagli dello strumento (Meter Info) • Premere il tasto Su / Giù per selezionare la voce Meter Info dal menu principale e premere il tasto funzione Enter per visualizzare le informazioni. • Questo menu contiene la versione del software, la versione di hardware e la % di memoria libera 6.6. -
Page 22: Specifiche
MANUALE C124 8. SPECIFICHE 8.1. Specificazione Precisione calcolata come [lettura% + (num.diditd * risoluzione)] a 18 a 28 ° C <75% HR Funzione Range Risoluzione Precisione 600.0mV 0.1mV ± (0.5% + 8digits) 6.000V 0,001 V Tensione ± (1.5% + 5digits) 60.00V... - Page 23 MANUALE C124 Risoluzione Funzione Range Precisione Resistenza ± (1.0% + 10digits) 600.0 0.1 e Test di 6.000K 0.001k continuità ± (1.5% + 5digits) 60.00k 0.01k 600.0k 0,1K ± 2,5% (+ 5digits) 6.000M 0.001M ± (3,5% + 10digit) 60.00M 0.01M Buzzer <50; Protezione contro sovraccarico: 1000VDC / ACRMS Corrente di prova <1,5 mA...
-
Page 24: Specifiche Generali
MANUALE C124 8.2. Specifiche generali Apertura toroide 34 millimetri (1.3" ) ca. Dysplay 6000 conta TFT LCD a colori Corrente di prova di 0,3 mA tipico; Tensione circuito aperto test diodi <3.3 tipica Soglia 50Ω; Corrente di prova Controllo continuità... -
Page 25: Assistenza
MANUALE C124 9. ASSISTENZA 9.1 CONDIZIONI DI GARANZIA Questo strumento è garantito contro difetti di materiale e di fabbricazione, in conformità con le condizioni generali. Durante il periodo di garanzia, le parti difettose possono essere sostituite, ma il costruttore si riserva il diritto di riparare o sostituire il prodotto. - Page 26 MANUALE C124 Summary INTRODUCTION ..........27 GETTING STARTED .........28 2.1. DURING USE ............7 2.2. AFTER USE ............... 7 GETTING STARTED .......... 7 3.1. INITIAL CHECKS ............7 3.2. POWER TOOL ............7 3.3. STORAGE ..............8 DESCRIPTION ........... 8 4.1.
-
Page 27: Introduction
MANUAL Uniks C124 1. INTRODUCTION In the following pages with the word "instrument" means generically the C120 model unless otherwise stated. The instrument is designed to comply with IEC / EN61010-1 Directive relating to electronic measuring instruments. For your safety and to avoid damaging the instrument,... -
Page 28: Getting Started
MANUAL Uniks C124 2. GETTING STARTED • This tool is designed for use in an environment with pollution level 2. • It can be used for measurements of AC VOLTAGE \ DC and AC CURRENT of installations in CAT IV 600V, CAT III 1000V •... -
Page 29: During Use
MANUAL Uniks C124 2.1. DURING USE Please read carefully the following recommendations and instructions: CAUTION Failure to follow the warnings and / or instructions may damage the instrument and / or its components or be dangerous to the operator. Before operating the selector switch, disconnect the test leads from the circuit under test. -
Page 30: Storage
MANUAL Uniks C124 3.3. STORAGE To ensure accurate measurements, after a long period of storage, wait until the instrument returns to normal. 4. DESCRIPTION 4.1. Clamp Meter Description 1. Current Clamp 8. MENU Button 2. Non-Contact AC Voltage Indicator 9. Rotary Function switch Light 10. -
Page 31: Symbols Used On Lcd Display
MANUAL Uniks C124 4.2. Symbols Used on LCD Display 11. Indication of Auto Power Off Function 12. Indication Key Beeper Function 13. Indication Bluetooth Function 14. Indication of Automatic/Manual Mode 15. Indication of the System’s Time 16. Indication Battery Capacity 17. -
Page 32: Operation
MANUAL Uniks C124 5. Operation NOTES: Read and understand all Warming and Caution statements in this operation manual prior to using this meter NOTES: Set the function select switch to the OFF position when the meter is not in use. -
Page 33: Inrush Current Measurement
MANUAL Uniks C124 5.2. Inrush Current Measurement Set the function switch to the 600A or 1000A position Press the INRUSH button (Enter key 2 second) to indicate “Inrush” on the display. Then measurement display “----“. Clamp the cable to be motor The motor start. -
Page 34: Frequency Measurements
MANUAL Uniks C124 5.4. AC+DC Voltage Measurements CAUTION: Do not measure DC voltage if a motor on the circuit is being switched ON or OFF. Large voltage surges may occur that can damage the meter Set the function switch to the V AC/DC position Insert the black test lead banana plug into the negative COM jack. -
Page 35: Loz Ac Voltage Measurements
MANUAL Uniks C124 5.7. LoZ AC Voltage Measurements WARNING: Risk of Electrocution. The probe tips may not be long enough to contact the live parts inside sone 240V outlets for appliances because the contacts are recessed deep in the outlets. As a result, the reading may show 0 volts when the outlet actually has voltage on it. -
Page 36: Continuity Check
MANUAL Uniks C124 5.9. Continuity Check WARNING: To avoid electric shock, disconnect power to the unit under test and discharge all capacitors before taking any resistance measurements. Remove the batteries and unplug the line cords 5. Set the function switch to the ... -
Page 37: Capacitance Measurements
MANUAL Uniks C124 5.11. Capacitance Measurements WARNING: To avoid electric shock, disconnect power to the unit under test and discharge all capacitors before taking any resistance measurements. Remove the batteries and unplug the line cords 5. Set the function switch to the ... -
Page 38: Flexible Coil Current Measurements
MANUAL Uniks C124 5.13. Flexible Coil Current Measurements 5. Set the function switch to the Flexible coil position ( ) 6. Insert the black test lead banana plug into the negative COM jack. Insert the red test lead banana plug into the positive V jack. -
Page 39: Hold Mode
MANUAL Uniks C124 5.15. Hold Mode • To freeze the display for any function, press key HOLD. And again press key HOLD to release freeze • Press soft key Save will store the measurement to memory. 5.16. Capturing Minimum and Maximum Value •... -
Page 40: Menu Operation
MANUAL Uniks C124 6. Menu Operation • Press Menu button to open the Meter, As show below • Press soft key Up/Down to select menu item or change of current focus item. • Press soft key Enter to enter the submenu or set focus on the current selected item. -
Page 41: Recording Details
MANUAL Uniks C124 • Recall Measurement Item can Recall store measurement in Memory • Delete Measurements item will Delete all data in Memory • Recall measurement fig is below: 6.4. Recording Details Press soft key Up/Down to select Recording item at main menu, and press soft key Enter to enter Recording Function. -
Page 42: Meter Info Details
MANUAL Uniks C124 In Record Menu. Press soft key Up/Down to select Start recording Item, and press soft key Enter to start one new recording In record Menu. Press soft key Up/Down to select Recall recording Item, and press soft key Enter to enter recall recording in memory. -
Page 43: Factory Set Details
MANUAL Uniks C124 6.6. Factory Set Details • Press soft key Up/Down to select Factory set item at main menu, And Press soft key Enter to enter Factory set interface. • Select “YES” button, System setting will be reset. Fig is below: 7. -
Page 44: Specification
MANUAL Uniks C124 8. SPECIFICATION 8.1. Specification Accuracy calculated as [%reading+(num.diditd*resolution)] at 18 to 28°C <75%HR Function Range Resolution Accuracy 600.0mV 0.1mV ±(0.5%+8digits) 6.000V 0.001V DC Voltage ±(1.5%+5digits) 60.00V 0.01V 600.0V 0.1V 1000V Input impedance >10M; Protection against overcharge: 1000VDC/ACrms... - Page 45 MANUAL Uniks C124 Function Range Resolution Accuracy Resistance ±(1.0%+10digits) 600.0 0.1 6.000k 0.001k Continuity ±(1.5%+5digits) 60.00k 0.01k Test 600.0k 0.1k ±(2.5%+5digits) 6.000M 0.001M ±(3.5%+10digit) 60.00M 0.01M Buzzer <50; Protection against overcharge: 1000VDC/ACrms Test Current <1.5mA Diode Test Max voltage with open circuit:3.3VDC 9.999Hz –...
-
Page 46: General Specifications
MANUAL Uniks C124 8.2. General Specifications Clamp Jaw Opening 34mm (1.3") approx Display 6000 counts TFT Color LCD Test current of 0.3mA typical; Diode Test Open Circuit voltage <3.3 typical Threshold 50Ω; Test current Continuity Check <0.5mA Low Battery indication... -
Page 47: Assistance
MANUAL Uniks C124 10. ASSISTANCE 9.3 WARRANTY CONDITIONS This instrument is warranted against defects in materials and workmanship, in accordance with the general terms and conditions. During the warranty period, defective parts can be replaced, but the manufacturer reserves the right to repair or replace the product. - Page 48 MANUAL Uniks C124 http://www.uniks.it info@uniks.it Uniks Srl Via Vittori 57 48018 Faenza (RA), Italy 0546.623002 0546.623691 Rev. U052019...
Need help?
Do you have a question about the C124 and is the answer not in the manual?
Questions and answers