JVC DX-T5 Instructions Manual
Compact component system
Hide thumbs
Also See for DX-T5:
- Service manual (62 pages) ,
- Service manual (170 pages) ,
- Service manual (16 pages)

Related Manuals for JVC DX-T5


Summary of Contents for JVC DX-T5
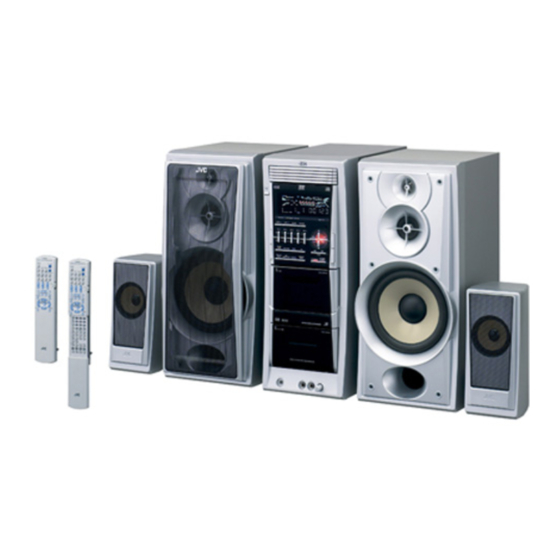
- Page 1 COMPACT COMPONENT SYSTEM DX-T5 —Consists of CA-DXT5, SP-XT5 and SP-XST5 SP-XT5 SP-XST5 CA-DXT5 INSTRUCTIONS GVT0146-001A [US, UN]...
- Page 2 Caution–– button! Disconnect the mains plug to shut the power off completely. button in any position does not disconnect the mains line. The power can be remote controlled. CAUTION To reduce the risk of electrical shocks, fire, etc.: 1. Do not remove screws, covers or cabinet. 2.
- Page 3 Caution: Proper Ventilation To avoid risk of electric shock and fire, and to prevent damage, locate the apparatus as follows: 1. Front: No obstructions and open spacing. 2. Sides/Top/Back: No obstructions should be placed in the areas shown by the dimensions below. 3.
-
Page 4: Important For Laser Products
IMPORTANT FOR LASER PRODUCTS 1. CLASS 1 LASER PRODUCT 2. CAUTION: Do not open the top cover. There are no user serviceable parts inside the unit; leave all servicing to qualified service personnel. 3. CAUTION: Visible and invisible laser radiation when open and interlock failed or defeated. -
Page 5: Table Of Contents
Precautions Installation • Install the System in a location with adequate ventilation to prevent internal heat buildup in the System. DO NOT install the System in a location near heat sources, or in a place subject to direct sunlight, excessive dust or vibration. •... -
Page 6: Playable Disc Types
Playable Disc Types DIGITAL VIDEO DVD Logo is a trademark of DVD Format/Logo Licensing Corporation. • CD-R/-RW: Recorded in the Audio CD/Video CD/ SVCD formats and MP3/WMA/JPEG files. • DVD-R: Recorded in the DVD Video format. • DVD-RW: Recorded in the DVD Video format or the Video Recording (DVD-VR) format. -
Page 7: Connections
Do not connect the AC power cord until all other connections have been made. • Connect VIDEO OUT directly to the video input of your TV. Connecting VIDEO OUT to a TV via a VCR may interfere with your viewing when playing back a copy- protected disc. - Page 8 TV/monitor Composite video cord (supplied) S video cord (not supplied) Green Component video cord (not supplied) • To select progressive scanning mode (see page 14), use COMPONENT jacks. • Connect the VIDEO jack, S-VIDEO jack, or COMPONENT jacks whichever you want to use. Ÿ...
-
Page 9: Preparing The Remote Control
Front main speakers and matrix surround speakers • When connecting the speaker cords, match their polarity with that of the speaker terminals: red/white to (+) and black to (–). From right front main speaker From left matrix From right matrix surround speaker surround speaker •... -
Page 10: Display Indication
The indications on the display teach you a lot of things while you are operating the System, Before operating the System, be familiar with when and how the indicator illuminates on the display. 1 PROGRESSIVE indicator • Lights when the progressive scanning mode is selected. 2 Karaoke operation indicators (see pages 31 to 33) •... -
Page 11: Daily Operations-Playback
Daily Operations In this manual, the operation using the remote control is mainly explained; however, you can use the buttons and controls on the main unit if they have the same (or similar) name and marks. DISC 1 – DISC 5 TOP MENU GROUP/TITLE AUDIO... -
Page 12: Listening To The Radio
Listening to the Radio To select the AM tuner interval spacing Some countries space AM stations 9 kHz apart, and other countries use 10 kHz spacing. Select “AM,” then turn off (stand by) the System. Select the AM tuner interval spacing. To select 9 kHz: (holding then...) To select 10 kHz:... -
Page 13: Playing Back A Disc
Select a preset number. Examples: To select preset number 5, press 5. To select preset number 15, press +10, then 5. To select preset number 30, press +10, +10, then 10. • You can also use 4/¢ buttons on the remote control or PRESET +/–... - Page 14 To locate a particular portion While playing a disc except MP3/WMA... • No sound comes out while searching on DVD Video/ SVCD/VCD. To return to normal playback, press DVD/CD 3. Remote ONLY To select an item directly You can select a title/chapter/track directly and start playback.
-
Page 15: Playing Back A Tape
Playing Back a Tape To insert a tape You can play back type I tapes. • The use of C-120 or longer tape is not recommended. Push Insert Close To start: To stop: TAPE-A TAPE-B To rewind tape: To change the tape running direction 3 (forward) TAPE-A TAPE-B... -
Page 16: Daily Operations-Sound&Other Adjustments
Daily Operations Remote Control DVD LEVEL ACTIVE BASS EX. RHYTHM AX CLOCK/TIMER SLEEP Main unit ACTIVE BASS SOUND MODE DVD LEVEL —Sound&Other Adjustments Adjusting the Volume The volume level can be adjusted in 32 steps (VOLUME MIN, VOLUME 1 – VOLUME 30, and VOLUME MAX). Remote control: AUDIO AUDIO VOL... -
Page 17: Selecting The Sound Modes
Selecting the Sound Modes You can select one of the preset Sound Modes. SEA Modes SOUND ROCK CLASSIC MODE STADIUM HALL DANCE MULTI Surround Modes* SEA (Sound Effect Amplifier) Modes ROCK Boosts low and high frequency. Good for acoustic music (initial setting). Good for vocal music. -
Page 18: Creating 3-Dimensional Sound Field-3D Phonic
Creating 3-dimensional Sound Field—3D Phonic Remote ONLY While playing a disc... 3D PHONIC ACTION 3D PHONIC 3D PHONIC 3D PHONIC 3D PHONIC On the TV screen 3D ACTION Suitable for action movies and sports programs. 3D DRAMA Creates natural and warm sound. Enjoy movies in a relaxed mood. -
Page 19: Changing The Display Brightness
Select a preset picture tone. NORMAL USER2 NORMAL Normally select this. CINEMA Suitable for a movie source. USER1/USER2 You can adjust parameters and can store the settings (see below). To adjust the picture tone Select “USER1” or “USER2.” • Follow steps 1 and 2 explained on the previous page. Select a parameter you want to adjust. -
Page 20: Unique Dvd/Vcd Operations
Unique DVD/VCD Operations Remote Control DVD/CD 3 GLANCE BACK AUDIO SUB TITLE ANGLE ZOOM PAGE Selecting the Sound Track For DVD Video: While playing back a chapter containing audio languages, you can select the language to listen to. For DVD Audio: While playing back a track containing audio channels, you can select the audio channel to listen to. -
Page 21: Selecting The Subtitle Language
Selecting the Subtitle Language For DVD Video: While playing back a chapter containing subtitles in different languages, you can select the subtitle language to display on the TV screen. For DVD-VR: While playing, you can turn on or off the subtitle. -
Page 22: Playing Back Bonus Group
Playing Back Bonus Group For DVD Audio only: Some DVD Audios have a special group called “bonus group” whose contents are not open to the public. • To play back a bonus group, you have to enter the specific “key number” (a kind of password) for the bonus group. The way of getting the key number depends on the disc. -
Page 23: Advanced Disc Operations
Advanced Disc Operations Remote Control DVD/CD 3 REPEAT CANCEL Main unit DVD/CD DISC 1 0 Programming the Playing Order —Program Play You can arrange the playing order of the tracks (up to 99) before you start playback. Before starting playback, activate Program Play. AUDIO PLAY MODE 10 keys... -
Page 24: Playing At Random-Random Play
To skip a track: To pause: FM MODE To release, press DVD/CD 3. * Resume does not work for Program Play. To check the programmed contents Before or after playback... in the reverse order in the programmed order To modify the program Before or after playback... -
Page 25: Playing Repeatedly-Repeat Play
Playing Repeatedly—Repeat Play You can repeat playback. • You can also select the repeat mode using the on-screen bar (see page 23). • The indicator(s) lights on the display as follows to indicate the current repeat mode. • For DVD Video: While playing... -
Page 26: On-Screen Disc Operations
On-Screen Disc Operations Remote control DVD/CD 3 ZOOM REPEAT On-screen Bar Information You can check the information on disc (except for MP3/ WMA/JPEG disc) and use some functions through the on- screen bar. On-screen bars AUDIO DVD Video Dolby D DVD-VIDEO 3/2.1ch TIME... -
Page 27: Operations Using The On-Screen Bar
1 Disc type 2 Playback information Indication Meanings Dolby D/ Audio format PPCM 3/2.1 ch/ Channel number 2.0/0 ch Current disc DISC Current title TITLE Current chapter CHAP Current group GROUP Current track TRACK Current title Current play list Time indications 1:25:58 TOTAL 3 Playback conditions... - Page 28 To change the time information You can change the time information in the on-screen bar and the display window on the main unit. 1 Display the on-screen bar with the pull-down menu. Dolby D DISC 1 TITLE TITLE 2 CHAP CHAP 3 DVD-VIDEO 3/2.1ch...
-
Page 29: Time Search
A-B Repeat 1 While playing, display the on-screen bar with the pull- down menu. 2 Select 3 Display the pop-up window. Dolby D DISC 1 TITLE TITLE 2 CHAP CHAP 3 DVD-VIDEO 3/2.1ch TIME TIME CHAP. 4 Select “A-B”. Dolby D DISC 1 TITLE TITLE 2... -
Page 30: Operations On The Control Screen
To erase the control screen for DVD-VR, press ENTER. Remote ONLY INFO To select the Play List: MENU/PL itle 19:00 JVC DVD World 2004 10:30 17:00 Music Festival 13:19 children 001 22:00 8:23 children 002... - Page 31 Control screen for MP3/WMA/JPEG disc The control screen automatically appears on the TV screen when you load an MP3, WMA, or JPEG disc. Ex.: When the MP3 disc is loaded. REPEAT TRACK Group : 2 / 3 Track : 5 / 14 (Total 41) Blue Cloudy.mp3 Fair.mp3...
- Page 32 To stop playback To repeat title/play list for DVD-VR While playing or before starting playback... For Original Program REPEAT 1 REPEAT REPEAT CHAP) Canceled REPEAT ALL DISC OFF) For Play List REPEAT 1 REPEAT CHAP) Canceled REPEAT ALL DISC OFF) REPEAT 1* Repeats the current chapter.
-
Page 33: Recording Operations
Recording Operations Main unit TAPE-A / TAPE-B DISC 1–5 3 DISC REC START START/STOP IMPORTANT It may be unlawful to record or play back copyrighted material without the consent of the copyright owner. Recording on a Tape You can use type I tapes for recording. FM/AM DVD/CD •... -
Page 34: Dubbing Tapes
Start playing the source—“FM,” “AM,” “DVD/CD,” “TAPE-A” or “AUX.” • When recording a disc, you can also use “Synchronized Disc Recording” (see the right column). • When recording from deck A, you can also use “Dubbing” (see below). Start recording. To stop recording Dubbing Tapes Main Unit... -
Page 35: Enjoying Karaoke
Enjoying Karaoke Remote control KARAOKE SCORING Source buttons 10 keys V.MASKING ECHO MIC MIX CANCEL Main unit Source buttons The functions described in this section are not available for DVD Audio/DVD-VR. IMPORTANT • Always set MIC LEVEL to MIN when connecting or disconnecting the microphone. -
Page 36: Reducing The Lead Vocal-Vocal Masking
To apply an echo to your voice While the Mic Mixing Mode is activated... ECHO ECHO 1 ECHO 2 ECHO 0 ECHO 4 (Canceled) • As the number increases, echo level also increases. To adjust the Key (disc playback only) While playing back... -
Page 37: Reserving Karaoke Songs-Karaoke Program Play
Remote To turn on/off the fanfare ONLY 1 Enter the fanfare setting mode. LR BALANCE SETTING FANFARE 2 Select the fanfare setting. BALANCE Reserving Karaoke Songs —Karaoke Program Play You can determine the playback order of the titles or tracks on the disc player. -
Page 38: Timer Operations
Remote control AUDIO CANCEL CLOCK/ TIMER Timer Operations Setting the Timer Using Daily Timer, you can wake up with your favorite song. On the other hand, with Recording Timer, you can make a tape of a radio broadcast automatically. • You cannot activate Daily Timer and Recording Timer at a AUDIO time. -
Page 39: Timer Priority
Turn off the System (on standby) if you have set the timer with the System turned on. AUDIO How Daily Timer actually works Once the Daily Timer has been set, the timer ( indicator and DAILY indicator are lit on the display. Daily Timer is activated at the same time everyday until the timer is turned off manually (see the next column). -
Page 40: Setup Menu Operations
Setup Menu Operations Remote Control SET UP LANGUAGE menu Item MENU LANGUAGE You can select the initial menu language of DVD Video (see page 43). AUDIO LANGUAGE You can select the initial audio language of DVD Video (see page 43). SUBTITLE You can select the initial subtitle language of DVD Video (see page 43). -
Page 41: Audio Menu
AUDIO menu Item DIGITAL AUDIO OUTPUT Set this item correctly when using the OPTICAL DIGITAL OUTPUT terminal on the rear. PCM ONLY: When connecting to audio equipment which can decode only linear PCM signals. DOLBY DIGITAL/PCM: When connecting to a Dolby Digital decoder or an amplifier with a built- in Dolby Digital decoder. -
Page 42: Operating The Tv
Sharp Sony Toshiba Zenith Operating the TV Operating TV You can operate the JVC’s or other manufacturers’ TV using this remote control. Slide the AUDIO/TV selector to “TV.” AUDIO AUDIO Press and hold until the following steps are complete. ENTER... -
Page 43: Additional Information
Additional Information Learning More about This System Introduction (see pages 1 to 2) Playable Disc Types: • About audio format – Linear PCM: Uncompressed digital audio, the same format used for CDs and most studio masters. – Dolby Digital: Compressed digital audio, developed by Dolby Laboratories, which enables multi-channel encode to create the realistic surround sound. - Page 44 Special Picture Playback: • During slow-motion playback, no sound will be reproduced. • You cannot use frame-by-frame playback for DVD-VR. • While zoomed in, the picture may look coarse. Advanced Disc Operations (see pages 19 to 21) Programming the Playing Order—Program Play: •...
- Page 45 Enjoying Karaoke (see pages 31 to 33) Reducing the Lead Vocal—Vocal Masking: • The Vocal Masking Mode setting is not applied to the optical digital output signals through the OPTICAL DIGITAL OUTPUT terminal. • When playing a Karaoke disc in the Vocal Masking Mode, the vocal may not be reduced or the volume may be lower.
-
Page 46: Troubleshooting
Handling cassette tapes • If the tape is loose in its cassette, take up the slack by inserting a pencil in one of the reels and rotate it. – If the tape is loose, it may get stretched, cut, or caught in the cassette. -
Page 47: Tape Operations
MP3 groups and tracks are not played back as you expect. ] The playing order is determined when the disc was recorded. It depends on the writing application. MP3/WMA or JPEG files are not played back. ] The inserted disc may include both type of tracks (MP3/ WMA files and JPEG files). -
Page 48: Specifications
Specifications Amplifier section Output Power: MAIN SPEAKERS: 150 W per channel, min. RMS, driven into 4 Ω at 1 kHz with no more than 10% total harmonic distortion. Digital output: OPTICAL DIGITAL OUTPUT: –21 dBm to –15 dBm (660 nm ±30 nm) Audio input sensitivity/Impedance (Measured at 1 kHz, with tape recording signal 300 mV) AUX:... -
Page 49: Optical Digital Output Signals
OPTICAL DIGITAL OUTPUT Signals DIGITAL AUDIO OUTPUT Playback disc DVD Video with 48 kHz, 16/20/24 bit Linear with 96 kHz, Linear PCM with Dolby Digital with DTS DVD Audio* with 48/96/192 kHz, 16/20/24 bit Linear PCM with 44.1/88.2/176.4 kHz, 16/20/ 24 bit Linear PCM with Dolby Digital with DTS... -
Page 50: Parts Index
Remote control Button Page Button AUDIO KARAOKE SCORING 7 7 7 7 9 – 11, 20 KEY # ¡ / 1 ¡ ¡ ¡ 9 Q 8, 10, 11, 18 ¢ ¢ / 4 ¢ ¢ 7 . 9, 10 L / R BALANCE 8 8 8 8... - Page 51 使用前注意事项 安装 • 将本机安放在通风良好之处,以防内热积聚在机内。 切勿将本机安装在靠近热源,受到阳光直射, 灰尘多或有震动的地方。 • 将本机安放在平坦,干爽且温度不过于炎热或寒冷的地方— 5°C 35°C 介于 和 之间。 • 使本机与电视机之间保留足够的距离。 • 使扬声器远离电视机,以防对电视机造成干扰。 电源 • 在将本机自墙壁插座拔出时,请务必拔插头,而不要拔交流 电源线。 切勿用湿手握交流电源线。 水蒸汽结露 在下列情况下,本机内部的镜头上可能会凝结水蒸汽: • 打开房间内的取暖设备后 • 在潮湿的房间内 • 将本机直接从一寒冷处移动到温暖处。 如果出现结露,本机可能发生故障。遇此情况,可将本机启 动数小时,待结露蒸发掉后拔出交流电源线,然后再重新插 回。 内热 • 确保本机周围有良好的通风环境。通风不良会导致热度过高 而损坏本机。 – 本机的内部安装了一个冷却扇,用以防止机内热量积聚。 切勿堵住通风口或通风孔。如果被报纸或布等 堵住,热量可能无法散出。...
- Page 52 可以播放的碟片类型 中 DIGITAL VIDEO 标志是 格式/标识许可公司的商标。 文 • CD-R/-RW :以音频 片及 MP3/WMA/JPEG 文件。 • DVD-R :以 视频格式录制的碟片。 • DVD-RW :以 视频格式或视频记录 ( 格式录制的碟片。 • DVD-RAM :以视频记录 ( 片。 除上述碟片之外,本机还可以播放录制在文字 (图表 )和特版 里的音频数据。 • 不能播放下列碟片: DVD+R , DVD+RW , CD-I 等。 播放这些碟片会产生噪音并损坏扬声器。...
-
Page 53: 使用前注意事项 安装 连接
切勿在所有其他连接完成之前连接交流电源线。 将 直接连接至电视机的视频输入。在播放拷 • VIDEO OUT 贝保护的碟片时,通过 将 VIDEO OUT 可能会影响观赏效果。将 VIDEO OUT 制式可能会影响观赏效果。 自电视机/显示器的视频输入 参阅第 页。 自数码音频组件的数码输入,如: 参阅第 页。 自外接组件的模拟音频输出 ( 参阅第 页。 AM/FM 自 天线 参阅第 页。 自主前置/距阵环绕声扬声器 参阅第 页。 自加强型超重低音扬声器 参阅第 页。 电压选择器 插上电源之前,确认电压选择器指向的位置。 参阅第 页。 接至墙壁插座 只有在所有的连接工作完成之后才可以插上交流... - Page 54 电视机/显示器 复合视频导线 ( 附带 ) 中 视频导线 ( 不附带 ) 文 绿 分量视频导线 ( 不附带 ) • 想要选择逐行扫描模式 (参阅第 COMPONENT 插孔。 • VIDEO S-VIDEO 连接 插孔, 孔中任何一个您想使用的插孔。 数码音频组件 保护盖 • 根据连接的数码音频设备,正确设定 “音频”菜单中的 “数 码音频输出” (参阅第 页)。如果设定不正确,可能会产 生很响的噪音,损坏扬声器。 外接组件 红 立体声音频导线 ( 不附带...
- Page 55 主前置扬声器和距阵环绕声扬声器 • 在连接扬声器导线时,请对准扬声器端子的电极:红色/白 色与 ( )相连接,黑色与 ( – )相连接。 自右前置主扬声器 自左置距阵环绕声扬声 自右置距阵环绕声扬 器 声器 • 只能使用主机后面板扬声器端子所标示阻抗的扬声器。 • 前置主扬声器受磁场屏蔽以避免电视机的颜色失真。然而, 如果安装不当,可能会引起颜色失真。因此,安装扬声器时 请注意下列事项。 – 将电视机放置在电视机附近时,关闭电视机主电源开关或 在安装扬声器前拔去电源插头。 然后等至少 分钟再打开电视机主电源开关。 尽管您遵循了上述说明,有的电视机仍会受到影响。如果此 种情况发生,将扬声器移至远离电视机的地方。 切勿在每个端子上连接一只以上的扬声器。 • 切勿推或拉扬声器因为这样会损坏扬声器底 • 部的地脚。 如何取下主扬声器格子窗 加强型超重低音扬声器 自左前置主扬声器 自加强型超重低音扬声器 ( 不附带 ) 如何调整电压选择器 电压标记...
-
Page 56: 信息显示
在操作本机的过程中,显示屏上会出现许多指导性信息显示。 在操作本机之前,请首先弄清显示屏上的指示灯是在何时并 如何点亮。 中 文 PROGRESSIVE 指示灯 • 选择逐行扫描模式时点亮。 卡拉 操作模式指示灯 (参阅第 • :麦克风混频模式启动时点亮;使用打分功能时 闪烁。 • MIC :麦克风混频模式启动时点亮;使用打分功能时闪 烁。 • ECHO :回音功能启动时点亮。 • V.MASKING :原唱掩蔽模式启动时点亮。 播放源信号指示灯 • DTS :播放源信号为 • DIGITAL :播放源信号为杜比数码时点亮。 • DVD :检测出是 视频时点亮。 • DVD AUDIO :检测出是 •... -
Page 57: 日常操作-播放
本手册主要讲解如何使用遥控器进行操作;但如果主机上存 在相同 (或相似)名称和符号的按键和控制旋钮,也可以 使用它们进行操作。 DISC 1 – DISC 5 TOP MENU GROUP/TITLE AUDIO DVD/CD TAPE-A TAPE-B AUDIO VOL 日常操作 —播放 启动电源。 主机上的 STANDBY • 不用按 放源选择键,本机便会自动启动。 选择播放源。 如果选择的播放源已经准备就绪可以播放,播放会自动开 始。 AUDIO • 如果按 调整音量。 按照后面的说明操作播放源。 如何关闭本机 (使本机进入待机状态) FM MODE / MENU / / / / AUDIO ENTER... -
Page 58: 收听广播
收听广播 如何选择 调谐器的间隔距离 某些国家将 电台设定成 10 kHz 用 间隔。 中 选择 “ ” ,然后关闭本机 (使本机进入待机状态) 。 文 选择 调谐器间隔距离。 9 kHz 想要选择 时: ( 按住该键然后按 想要选择 10 kHz 时: (按住该键然后按 如何选择波段 ( FM/AM FM/AM 如何调收电台 当选择 或 时 递增频率。 递减频率。 频率开始在显示屏上变换。... -
Page 59: 播放碟片
选择一个预设号码。 例: 想要选择预设号码 想要选择预设号码 后按 。 想要选择预设号码 ,然后按 • 您也可以使用遥控器上的 4 /¢ 键或主机上的 PRESET +/– 播放碟片 在操作碟片之前,首先了解碟片是如何录制的。 • DVD 视频由 “标题”构成,标题内含有 “章节” , /MP3/WMA 音频 由 “组”构成,组内含有 “曲目” , JPEG 由 “组”构成,组内含有 “文件” , 而 只由 “曲目”构成。 • JPEG 关于 播放,参阅第... - Page 60 如何搜索特定部位 在播放 MP3/WMA 以外的碟片时 中 • 在 视频 /SVCD/VCD 音。 文 DVD/CD 3 想要返回到标准播放时,按 Remote ONLY 如何直接选择项目 您可以直接选择标题/章节/曲目并开始播放。 • 对应 视频,在开始播放之前可以选择标题,而在开始 播放之后可以选择章节。 例: 想要选择号码 想要选择号码 。 想要选择号码 然后按 如何 使用碟片菜单进行播放 您可以使用碟片菜单来操作碟片。 对应 视频 / DVD 音频 显示碟片菜单。 MENU/PG MENU/PL 或 在碟片菜单上选择项目。...
-
Page 61: 播放磁带
播放磁带 如何插入磁带 您可以播放 型磁带。 • C-120 建议不要使用 或更长的磁带。 推 插入 关闭 想要开始播放时: 想要停止播放时: TAPE-A TAPE-B 想要倒带时: 如何切换走带方向 如何自动转向播放磁带 REVERSE MODE 磁带转向,来回反复播放,直到您令播放停止。 磁带不会转向播放。当前的一面播完后便自动 停止。 磁带转向播放一次。 如何连续播放 舱和 舱—接力播放 当两个舱内都装有磁带时 REVERSE MODE TAPE-A TAPE-B 您可以开始播放 舱或 舱内的磁带。 中 文... -
Page 62: 调整音量
遥控器 中 文 DVD LEVEL ACTIVE BASS EX. RHYTHM AX CLOCK/TIMER SLEEP 主机 ACTIVE BASS SOUND MODE DVD LEVEL 日常操作 —调整声音和其他项目 调整音量 音量水平可以在 – VOLUME 30 遥控器: AUDIO AUDIO VOL +/– / / / / ENTER 增强低音 如何渐次调整低音水平— 您可以在水平 平。 VFP / 遥控器:... -
Page 63: 选择声音模式
选择声音模式 您可以选择一种预设的声音模式。 模式 SOUND ROCK CLASSIC MODE STADIUM HALL DANCE MULTI 环绕声模式 (声音效果放大器)模式 ROCK 增强低频和高频。适于原声音乐 (初始设 定) 。 适于声乐。 CLASSIC 适于古典音乐。 用户模式 USER1/2/3 是指储存在记忆体中的个人模式。 参阅下 栏里的 “建立个人声音模式—用户模 式” 。 多模式 MULTI 环绕扬声器的声音输出与主扬声器的声音 输出相同。 环绕声模式 DANCE 增大回音和低音效果。 HALL 增加音色里的深度和明亮度。 STADIUM 增加音色里的清澄度和扩展度,如同身处 露天运动场。... -
Page 64: 创建 3 维声场- 3 维立体声
创建 维声场— 维立体声 在播放碟片的过程中 3D PHONIC 中 3D PHONIC 文 3D PHONIC 在电视屏幕上 动作 适于动作片和体育节目。 舞台 建立自然和温和的声音。使您在欣赏电影 时能够心情放松。 剧院 烘托出一种在大剧院内欣赏到的声音效 果。 预设 自动声音增高水平 有时录制 视频时所用的声音水平会比其他碟片和播放源 低。因此您可以设定当前装载的 这样便不用在更换播放源时调整音量。 DVD LEVEL1 DVD LEVEL DVD LEVEL3 随着数字增大,表示声音水平也在增高。 初始设定为 “ • DVD LEVEL3 Remote 切换颜色制式和扫描模式... -
Page 65: 改变显示屏亮度
选择预设的图像色调。 标准 标准情况下选此项。 影剧院 适于电影播放源。 用户 /用户 您可以调整参数并储存设定内容 (参阅以下说明) 。 如何调整图像色调 选择 “用户 ”或 “用户 ” 。 • 操作上一页说明的步骤 和 。 选择想要调整的参数。 ENTER 背景亮度 自然色过亮或过暗时调整此项。选 定暗点和亮点的亮度 ( 亮度 整体上看图像过亮或过暗时调整此 –8 项 ( 至 ) 。 对比度 远近位置不自然时调整此项 –7 ( 至 )... -
Page 66: Dvd/Vcd 的特殊操作
遥控器 中 DVD/CD 3 文 GLANCE BACK AUDIO SUB TITLE ANGLE ZOOM PAGE DVD/VCD 的特殊操作 选择音频曲目 对应 要听的语言。 对应 要听的音频声道。 对应 选择想要播放的音频声道。 AUDIO • 您也可以使用屏幕条窗来选择音频曲目 (参阅第 在播放 AUDIO / / / / 例 : ENTER 数字键 在播放 ST1/ST2/ST L1/L2/L R1/R2/R •... -
Page 67: 选择字幕语言
Remote 选择字幕语言 ONLY 对应 视频:在播放含有多种语言字幕的章节时,您可以 选择想让其在电视屏幕上显示的字幕语言 对应 DVD-VR :在播放过程中,您可以打开或关闭字幕语 言。 对应 :在播放过程中,尽管碟片上未录制字幕,您也 SVCD 可以进行选择。 • 您也可以使用屏幕条窗来选择字幕语言 (参阅第 在播放 视频过程中 显示字幕选择窗。 SUB TITLE 选择字幕语言。 例 : 在播放 DVD-VR 的过程中 SUB TITLE 在播放 SVCD 的过程中 SUB TITLE 选择观赏角度 仅对应 视频:在播放含有多制式观赏角度的章节时,您 。 可以从不同的角度来观赏同一个画面。 •... -
Page 68: 播放赠送组
Remote 播放赠送组 ONLY 仅对应 音频:某些 组”的特殊组,组的内容不对众公开。 • 想要播放赠送组时,必须为其输入指定的 “开组码” (一种 密码) 。获得开组码的方法根据碟片而不同。 选择赠送组。 中 • 赠送组一般情况下录在最后 (例如当碟片上包括赠送组 在内共录有 个组时, “组 文 • 关于如何选择组,参阅第 输入开组码。 ENTER 根据电视屏幕上出现的交互性指示进行操作。 想要取消开组码输入模式时,按 特殊的图像播放方法 静止图像播放 在播放中 FM MODE 静止图像播放开始。 DVD/CD 3 想要恢复标准播放时,按 逐帧播放 在播放中 FM MODE 静止图像播放开始。... -
Page 69: 高级碟片操作
遥控器 DVD/CD 3 REPEAT CANCEL 主机 DVD/CD DISC 1 0 高级碟片操作 编排播放顺序—程序播放 在开始播放之前,您可以编排曲目的播放顺序 (最多达 曲) 。 在开始播放之前启动程序播放模式。 AUDIO 数字键 PLAY MODE 选择用于程序播放的章节或曲目。 选择碟片号码。 选择标题号或组号。 选择章节号或曲目号。 想要输入号码时: 重复上述步骤 开始播放。 DVD/CD Remote INFO ONLY 在显示屏上 Disc Group/Title Track/Chapter 在电视屏幕上 例: 想要输入号码 ,按 。... -
Page 70: 按任意顺序播放-随机播放
想要跳播曲目时: 想要暂停播放 时: FM MODE 中 想要解除暂停 时,按 DVD/CD 3 文 记忆播放对程序播放不起作用。 如何确认编排的内容 在播放前或播放后 按与编排时相反的顺序 按编排顺序 如何修改程序 在播放前或播放后 想要删除最后一步编排的项 目时: CANCEL 想要往程序里增加项目时: 重复第 页的步骤 。 如何退出程序播放模式 在播放前或播放后 想要停止播放时 : 按任意顺序播放—随机播放 您可以随机播放所置入碟片的内容。 • 某些 在开始播放之前,首先启动随机播放模式。 键。 Remote ONLY 开始播放。 想要跳播曲目时: 想要暂停播放 想要删除整个程序时:... -
Page 71: 重复地播放-重复播放
Remote 重复地播放— 重复播放 ONLY 您可以重复地进行播放。 • 您也可以使用屏幕条窗来选择重复模式 (参阅第 • 显示屏上的指示灯按如下所示点亮以说明当前的重复模式。 • 对应 视频: 在播放中 REPEAT REPEAT 1 REPEAT 取消 REPEAT ALL DISC • 对应 音频: 在播放中或播放前 REPEAT REPEAT 1 REPEAT 取消 REPEAT ALL DISC • MP3/WMA 对应 : 在播放中或播放前 REPEAT REPEAT 1 REPEAT 取消... -
Page 72: 在屏幕上操作碟片
遥控器 中 DVD/CD 3 文 ZOOM REPEAT 在屏幕上操作碟片 关于屏幕条窗 您可以通过屏幕条窗来确认碟片信息 ( 片除外)以及使用某些功能。 屏幕条窗 AUDIO DVD-VIDEO TIME / / / / ENTER ON SCREEN DVD-AUDIO TIME 数字键 DVD-VR DVD-VR TIME SVCD TIME TIME TIME MP3/WMA/JPEG 视频 Dolby D DISC 1 TITLE 2 CHAP 3 3/2.1ch CHAP. -
Page 73: 使用屏幕条窗进行操作
碟片类型 播放信息 信息 含义 Dolby D/ 音频格式 PPCM 3/2.1 ch/ 声道数 2.0/0 ch DISC 当前的碟片 TITLE 当前的标题 当前的章节 CHAP GROUP 当前的组 当前的曲目 TRACK 当前的标题 当前的播放清单 时间信息 TOTAL 1:25:58 播放状态 信息 含义 播放 前进/倒退搜索 前进/倒退播放慢动作 暂停 停止 操作图标 (在下拉菜单上) 信息 含义 想要改变时间信息时选此项... - Page 74 切换时间信息 您可以切换屏幕条窗和主机显示窗中的时间信息。 显示带有下拉菜单的屏幕条窗。 Dolby D DISC 1 TITLE DVD-VIDEO 3/2.1ch TIME CHAP. TIME 中 确保选择 (点亮)的是 切换时间信息。 文 ENTER TOTAL 碟片已经播放过的时间。 T.REM 碟片上剩余的播放时间。 TIME * 当前的章节/曲目已经播放过的时间。 REM * 当前的章节/曲目上剩余的播放时间。 对应 DVD-VR 不起作用。 想要清除屏幕条窗时 SCREEN 重复播放 • 另请参阅第 TITLE 2 CHAP 3 TOTAL TOTAL 1:01:58 1:25:58...
- Page 75 重复 在播放的过程中,显示带有下拉菜单的屏幕条窗。 选择 。 显示弹跳窗。 选择 “ ” 。 Dolby D DISC 1 TITLE TITLE 2 CHAP CHAP 3 DVD-VIDEO 3/2.1ch TIME TIME CHAP. A–B 选择开始点 ( ) 。 Dolby D ENTER DVD-VIDEO 3/2.1ch TIME TIME ¡ • 选择开始点 ( )后,可以使用...
-
Page 76: 在控制屏幕上进行操作
格式录制的 )或播放清单 ( )显示时,控制屏会 想要选择播放清单时: MENU/PG MENU/PL ORIGINAL PROGRAM No Date itle 1 25/04/04 4ch 19:00 JVC DVD World 2004 2 17/05/04 8ch 10:30 3 22/05/04 8ch 17:00 Music Festival 4 26/05/04 L-1 13:19 children 001 5 20/06/04 4ch 22:00... - Page 77 MP3/WMA/JPEG 碟片的控制屏 置入 , 或 JPEG 碟片时,控制屏自动出现在电视 机屏幕上。 例:当装载的是 碟片时。 REPEAT TRACK Group : 2 / 3 Track : 5 / 14 (Total 41) Blue Cloudy.mp3 Fair.mp3 Green Fog.mp3 Hail.mp3 Indian summer.mp3 Track Information Rain.mp3 Shower.mp3 Title Snow.mp3 Rain Thunder.mp3 Artist Typhoon.mp3 Album...
- Page 78 如何停止播放 想要重复播放 DVD-VR 的标题/播放清单时 在播放的过程中或播放开始前 中 对应原始程序 REPEAT 1 文 REPEAT CHAP) 取消 OFF) 对应播放清单 REPEAT 1 REPEAT CHAP) 取消 OFF) REPEAT 1* 重复播放当前的章节。 REPEAT* 重复播放当前的标题/播放清单。 REPEAT 1 重复播放当前碟片的所有标题。 DISC* REPEAT 重复播放所有置入的碟片。 ALL DISC 播放开始前不适用。 JPEG 如何为 重复进行幻灯式播放 在播放的过程中或播放开始前 REPEAT REPEAT GROUP) 取消...
-
Page 79: 录音的操作
主机 TAPE-A / TAPE-B DISC 1–5 3 DISC REC START START/STOP 录音的操作 重要说明 未经版权所有者同意而擅自复录或播放版权产品可能会构 成非法行为。 用磁带录音 Main Unit ONLY 可以使用 型磁带进行录音。 FM/AM • DVD/CD 关于如何播放磁带,参阅第 在 舱内插入一盒可以录音的盒式磁带。 REVERSE 按 MODE DUBBING 舱 舱 在显示屏上确认磁带的走带方向以及转向模式的设定状 态。 转向模式指示灯 当前的播放源 如何变更走带方向 根据需要变更转向模式 INFO 页。... - Page 80 开始播放播放源— “ ” , “ “ TAPE-A ”或 “ ” 。 在复录碟片时,还可以使用 “同步复录碟片”功能 (参 • 阅右栏) 。 • 在从 舱复录时,还可以使用 “复制”功能 (参阅下 栏) 。 开始录音。 中 文 如何停止录音 或 复制磁带 Main Unit ONLY TAPE 将播放源切换成 。 在 舱内插入播放源用磁带,在 带。 在显示屏上确认磁带的走带方向以及转向模式的设定状 态。...
-
Page 81: 欣赏卡拉 Ok
遥控器 KARAOKE SCORING 播放源键 V.MASKING ECHO MIC MIX CANCEL 主机 播放源键 欣赏卡拉 本章节描述的功能对应 重要事项 在连接或卸下麦克风时,请务必将 • 。 • MIC LEVEL 的两只麦克风均有效。 AUDIO 在不使用的时候切勿让麦克风一直保持连接 状态。 AUDIO VOL +/– 跟随唱 ( 卡拉 使用两只麦克风您便可以欣赏跟随唱 (卡拉 • REC START/STOP 按 MIC LEVEL 将 数字键 将麦克风... -
Page 82: 消除原唱-原唱掩蔽
如何在您的声音里增添回音效果 麦克风混频模式启动时 ECHO ECHO 1 ECHO 0 (取消) 中 • 随着数字增大,表示回音水平也在增高。 文 如何调整音调 (仅限于碟片播放) 在播放的过程中 KEY # 如何取消音调控制 KEY # –6 在显示屏上 • 关闭麦克风混频模式或选择其它曲目或碟片也会取消音调控 制。 消除原唱—原唱掩蔽 如果您想消除 (任何播放源,除音频 的)原唱,您可以使用原唱掩蔽模式。 V. MASKING V.MASK1 V.MASK1 取消立体声播放源上的原唱。 V.MASK2 取消右音频声道。 想要通过麦克风唱,启动麦克风混频模式 (按照第 骤 至 以及步骤... -
Page 83: 预定卡拉 Ok 歌曲-卡拉 Ok 程序播放
Remote 如何打开/关闭奏乐声 ONLY 进入奏乐声设定模式。 LR BALANCE SETTING FANFARE 选择奏乐声设定。 BALANCE 预定卡拉 歌曲 Remote ONLY —卡拉 程序播放 您可以决定视盘机上标题或曲目的播放顺序。最多可以编排 个程序项目。 将播放源切换成 “ DVD/CD ” 。 DVD/CD 启动卡拉 程序播放模式。 RESERVE Disc Gr/Tt 在电视屏幕上 • PROGRAM 在此模式下 指示灯会闪烁。 选择想用于卡拉 程序播放的歌曲。 依照下列顺序按数字键选择歌曲。 选择碟片。 选择标题/组。 选择章节/曲目。 例:... -
Page 84: 定时器的操作
遥控器 AUDIO 中 文 CANCEL CLOCK/ TIMER 定时器的操作 设定定时器 通过使用日常定时器,您可以被自己喜欢的歌声唤醒。而通 过使用录音定时器,您可以让收音机节目自动录到磁带上。 • 您不能同时启动日常定时器和录音定时器。 (启动任意一个 定时器便关闭另一个定时器。 ) AUDIO • 在操作的过程中想要修正误输入时,按 以退回到上一步骤。 Remote ONLY CANCEL 选择一种定时器设定模式— 对应日常定时器或录音定 时器。 根据所需进行定时器设定。 BALANCE 按下列顺序重复进行程序操作,直到完成设定: 设定定时器启动时间的小时值,然后分钟值。 设定定时器关闭时间的小时值,然后分钟值。 对应录音定时器:选择播放源— “ “ TUNER-AM ” 。 对应日常定时器:选择播放源— “ TUNER-AM DISC “... - Page 85 如果是在本机启动状态下设定的定时器,须关闭本机 (使 本机进入待机状态) 。 AUDIO 日常定时器如何实际工作 日常定时器一经设定,定时器 ( )指示灯 示灯便会在显示屏上点亮。如果不去手动关闭定时器 (参 阅下栏) ,该日常定时器每天都会在相同的时间启动。 • 只有当本机关闭 (进入待机状态)时,日常定时器才开 始工作。 当启动时间到来时 本机自动启动,调收指定的电台或者开始播放指定的播放 源,并将音量设定成预设水平。 当关闭时间到来时 本机会停止播放并自动关机 (进入待机状态) 。 • 定时器的设定内容会保存在记忆体中,直到您将其改变。 录音定时器如何实际工作 录音定时器一经设定,定时器 ( )指示灯和 示灯便会在显示屏上点亮。录音定时器只工作一次。 • 只有当本机关闭 (进入待机状态)时,录音定时器才开 始工作。 当启动时间到来时 本机自动启动,调收指定的电台,将音量设定成预设水 平,并开始录音。 当关闭时间到来时 本机停止录音并自动关机 (进入待机状态) 。 •...
-
Page 86: 设置菜单操作
遥控器 中 文 SET UP 语言菜单 项目 菜单语言 声音语言 字幕语言 画面表示语言 图像菜单 项目 屏幕类型 16:9 图像来源 映像储存器 文件类型 设置菜单操作 初始设定 在播放过程中,菜单中某些项目不能改变。 按 AUDIO 按 按 / / / / 按 ENTER 按 想要清除预置显示屏 按 SET UP 您可以选择 视频的初始菜单语言 (参阅第 您可以选择 视频的初始声音语言... - Page 87 音频菜单 项目 数码音频输出 使用本机后部的 :当连接只能解码线性 DOLBY DIGITAL/PCM 光束 /PCM 根据您的数码音频连接,适当地设定本项,播放 下行混合 • 此项设定仅对应音频输出在 “数码音频输出”设定为 “ 杜比环绕:当连接 环绕声解码器时选择此项。 立体声:当连接立体声接收机, 在中低音量水平聆听以杜比数码格式录制的 动态范围控制 自动:您可以欣赏力度强劲的音响。 通:如果 为清晰。 其他菜单 项目 记忆播放 您可以选择记忆播放功能。 通:如果碟片仍在碟片托盘中,本机从播放停止处继续播放。 断:记忆播放功能关闭。 屏幕指南 利用此菜单您可以启动或关闭屏幕指南。 通: 启动屏幕指南。 断:关闭屏幕指南。 内容 OPTICAL DIGITAL OUTPUT (光纤数码输出) 端子时正确设置此项。 信号的音频设备时。...
-
Page 88: 操作电视机
遥控器 中 TV/VIDEO 文 TV VOL +/– CHANNEL +/– 厂商代码 厂商 Hitachi Magnavox Mitsubishi Panasonic Philips Samsung Sanyo Sharp Sony Toshiba Zenith 操作电视机 操作电视机 您可以使用本机的遥控器操作 AUDIO ENTER 数字键 代码 如何操作电视机 想要启动或关 闭电视机时: 04,11 13, 14 想要选择电视频道时: 牌或其他厂家的电视机。 AUDIO/TV 将 选择器滑动至 “ ”... -
Page 89: 附加信息
进一步掌握本机的性能 简介 (参阅第 至 页) 可以播放的碟片类型: 关于音频格式 • – 线性 :是非压缩式数码音频格式,该格式与 大多数演播室主盘所用的格式相同。 杜比数码:是由杜比实验室公司开发的一种压缩式数码音 – 频格式,该格式可以通过多频道编码方法来建立虚拟环绕 声。 – DTS (数码影院系统) :是由数码影院系统公司开发的一 种压缩式数码音频格式,该格式可以像杜比数码一样再生 多频道软件。但因为其压缩率较杜比数码低,因此可提供 更宽的动态范围和更好的分离效果。 • 如果您使用盒式 DVD-RAM ,置入碟片前将其从盒中取 出。 日常操作—播放 (参阅第 至 收听广播: • 如果将一个新电台储存到一个已存有电台的号码里,原来储 存在那里的电台会被清除。 • 在拔下交流电 源线或者发生断电时,预设的电台 将于数日内 被清除。发生此种情况时,请重新预设电台。 播放碟片:... - Page 90 特殊的图像播放方法: • 在进行慢动作播放的过程中听不到声音。 对应 不能使用逐帧播放。 • DVD-VR • 在放大播放的过程中,图像可能看起来粗糙。 高级碟片操作 (参阅第 编排播放顺序—程序播放: 中 • 在编排程序项目的过程中 – 如果您试图编排的项目号码在碟片上不存在 (比如碟片上 只有 首曲目,而您却选择曲目 文 输入无效。 对于非当前碟片托盘中装载的 – 会提示要求输入组号码,但在播放的过程中这些输入会被 忽略。 • 您不能将程序播放模式和随机播放模式用于 碟片。 JPEG • 保留编排程序的内容直到您清除它们。 • 当 PROGRAM 指示灯点亮时,不能切换播放的碟片。 (遥 控器上的 DISC 1 – 5 键和主机上的...
- Page 91 欣赏卡拉 (参阅第 至 页) 消除原唱—原唱掩蔽: • 原声掩蔽模式可用于通过 OPTICAL DIGITAL OUTPUT (光纤数码输出)端子输出的光纤数码信号。 • 在原声掩蔽模式下播放卡拉 碟片时,原声可能不被消除 或音量可能降低。 • 对于某些音乐,原声掩蔽模式无法达到恰当的效果。 给您的卡拉 技巧打分: ¢ /4 • 打分功能启动前,您可以按 ( 视频和带 功能的 SVCD/VCD ¢ /4 • 如果在打分过程中按 键,播放停止且打分功能取 消 (但不会跳过曲目) 。 • 如果启动打分功能时,播放停止且处于记忆播放功能状态, 播放将从停止处开始。 • 您也可以在播放的过程中启动打分功能。在此情况下,从启 动打分功能的该点开始打分。...
-
Page 92: 故障排除
保养磁带 • 如果磁带盒中的带条松弛,可将铅笔插入到其中一个卷带筒 内,通过卷绕的方法将松弛的带条卷紧。 – 如果带条松弛,可能会拉长,扯断或卡在磁带盒里。 • 小心不要触摸磁带的表面。 • 避免将磁带存放在下列场所—有灰尘的地方,受阳光直射或 放热的地方,潮湿的地方,电视机或扬声器的上面,或者靠 中 近磁场的地方。 如何保持最佳录音状态和播放的声音质量 文 • 使用棉棒沾上酒精来清洁磁头,卷带轮和压带轮。 • 使用磁头去磁器 (可到电器或音响商店购买)来为磁头去 磁 (在本机关机状态下) 。 如何保护录音内容 盒式磁带的背面有两个小的防抹防录片,用 来防止误抹或再录。 想要保护录音内容时,除去这些小片。 想再用防录磁带录音时, 用胶带将小孔盖 上。 清洁本机 • 可用软布擦去脏点。如果本机脏污严重,可用布沾上以水稀 释后的中性洗涤剂彻底擦拭,然后用干布擦干净。 • 因为本机可能发生质量退化,引起破损或脱漆,因此要注意 下列事项: 切勿用硬布擦拭。 – 切勿用力擦拭。 –... - Page 93 组和曲目无法按意愿播放。 播放顺序是在录制碟片时决定的。取决于写入时用的应用 程序。 无法播放 MP3/WMA 或 JPEG 文件。 插入的碟片里可能同时含有两种类型的曲目 ( 文件和 JPEG 文件) 。发生此种情况时,通过进行 “文件类型”设定,可以只播放被选类型的文件 (参阅 第 页) 。 您可能是在插入碟片之后才变更 “文件类型”的设定。在 此种情况下,可重新装载碟片。 碟片声音不连贯。 碟片有划痕或脏污。 碟片播出的声音很奇怪。 取消音调控制模式 (参阅第 页) 。 尽管您已经选择了初始字幕语言,但显示屏上不出现字幕。 有些 的录制程序决定不总是事先显示字幕。想要显 示字幕时,须在开始播放之后按 SUB TITLE 第 页) 。 声音语言与您选作初始声音语言者不一样。 有些 的录制程序决定不总是事先使用原始语言。想...
- Page 94 规格 功率放大器部分 输出功率: 主扬声器: 每频道 150 W Ω ,总谐波失真不超过 数码输出: 中 OPTICAL DIGITAL OUTPUT –21 dBm 音频输入灵敏度/ 阻抗 文 (测量时频率为 1 kHz ,磁带录音信号为 : 300 mV/47 k Ω MIC 1/2 : 3.0 mV/50 k Ω VIDEO OUT : 颜色制式: NTSC/PAL VIDEO (复合)...
- Page 95 OPTICAL DIGITAL OUTPUT (光纤数码输出)信号 数码音频输出 可播放的碟片 视频 kHz, 16/20/24 bit 以 线性 信号编码 以 , 线性 信号编码 96 kHz 以杜比数码信号编码 以 信号编码 音频 以 48/96/192 kHz, 16/20/24 bit 线性 信号编码 44.1/88.2/176.4 kHz, 16/20/ 以 24 bit 线性 信号编码 以杜比数码信号编码 以 信号编码...
-
Page 96: 部件索引
遥控器 按键 页码 AUDIO 7 7 7 7 9 – 11, 20 ¡ / 1 ¡ ¡ ¡ 8, 10, 11, 18 中 ¢ ¢ / 4 ¢ ¢ 9, 10 8 8 8 8 9, 18 5 5 5 5 / ∞ ∞ ∞ ∞ / 3 3 3 3 / 2 2 2 2 / 10, 15, 17, 18, 文... - Page 97 MEMO...
- Page 98 MEMO...
- Page 99 MEMO...
- Page 100 Mains (AC) Line Instruction (not applicable for Europe, U.S.A., Canada, and U.K.) CAUTION for mains (AC) line BEFORE PLUGGING IN, do check that your mains (AC) line voltage corresponds with the position of the voltage selector switch provided on the outside of this equipment and, if different, reset the voltage selector switch, to prevent from a damage or risk of fire/electric shock.
Need help?
Do you have a question about the DX-T5 and is the answer not in the manual?
Questions and answers