Table of Contents
Advertisement
Quick Links
Advertisement
Table of Contents

Related Manuals for Cando 10-0709


Summary of Contents for Cando 10-0709
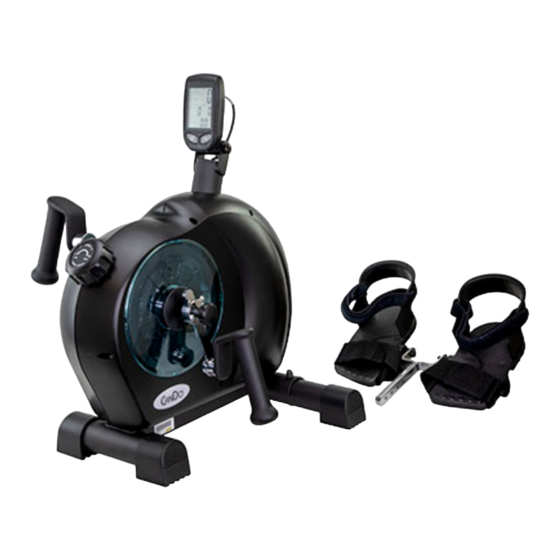
- Page 1 Premium Upper and Lower Body Exerciser INSTRUCTION MANUAL 10-0709...
-
Page 2: Safety Precautions
Read all instructions carefully before operating this machine. Retain this Owner’s Manual for future reference. Thank you for your purchase of the Premium UBE Trainer At CanDo®, our goal is to provide high-quality and affordable products for Health, Wellness, Fitness & Active Aging. The... -
Page 3: Assembly Overview
Assembly Overview: When you receive your new Premium UBE Trainer, some assembly is required. Assembly consists of attaching the support tubes, pedals/handles, and display. The following instructions explain the assembly. There are also detailed instructions on the display. Please Note: All of the parts and screws needed for assembly are already in place on the unit. -
Page 4: Exploded Drawing
EXPLODED DRAWING... -
Page 5: Parts List
PARTS LIST Description Description Frame Magnetically flywheel Nut trim -PU, black (with M8 Nut-3/8-26x5t nut) Screw cap - M8 Screw-flywheel Plastic Cover - left cover - Idler Black Plastic Cover - Right cover - Bearing Black Mid-circle cover - Blue Plate Crank hole cover - soft PVC Screw round head hexagon -M6 x... - Page 6 NOTE All of the parts and screws needed for assembly are already in place on the unit. TOOL SET: Screwdriver 1 pc 4mm Allen Key 1 pc...
- Page 7 ASSEMBLY Step 1 – installing the front tube 1. Use carriage screws (NO.11) and place the front tube set (NO.9) to be assembled with frame (NO.1). 1. Insert two AAA batteries into the back of the Step 2 – installation of console display meter.
- Page 8 ASSEMBLY Step 3 – installation of adjustable hand 1. Install handles (NO.46) on the left and right sides crank set (L and R as indicated). 2. Pull the (NO.42) knob outwards and tighten with the (NO.39) screw. 3. Confirm that the (NO.42) adjustable knob is properly installed and tightened.
-
Page 9: Computer Instructions
COMPUTER INSTRUCTIONS 1. MAIN DISPLAY 2. CONSOLE SPECIFICATION CADENCE BAR GRAPHIC: 0 - 199 rpm per bar RPM : 0 - 199 RPM SPEED : 0 - 99 KM/H PULSE : 30 - 240 BPM Time : Count down setting range 1 - 99 Minutes Count up range 00:01 - 99:59 IMPORTANT SAFETY INSTRUCTIONS WARNING... -
Page 10: Battery Installation
Battery Installation: 1. Remove the battery cover from the back of the computer. 2. Insert 2 AAA batteries into the battery compartment and reinstall the battery cover. 3. When battery working voltage is low, the ‘Low Battery’ indicator will show up on the console display. DISPLAY WINDOW TIME “Time”... -
Page 11: Alarm Setting
rate will be automatically shown after 3 seconds if the console cannot detect the current heart rate. QUICK Start In Power Saving Mode, press any Key to bring the CONSOLE to ‘QUICK START’ active state. Power Saving Mode QUICK START Mode MODE SELECT Press ‘MODE’... -
Page 12: Timer Setting
Resetting all measured values To clear all the measured values, press and hold ‘SET’ key under the TIME Mode for 3 seconds. All the measured values for AVG SPEED, AVG PULSE, TIME, DIST, KCAL will reset to zero. TIMER Setting The TIMER displays the user’s exercise time. -
Page 13: Troubleshooting
Press the ‘SET’ key to increase maximum heart rate limit. After setting the maximum heart rate, press the MODE key to adjust the minimum heart rate limit. PERSONAL DATA SETTING Accurate personal data will make the calories burned more accurate. Under SPEED or DISTANCE MODE, hold the ‘SET’... - Page 14 Use of any caustic cleaning solutions will void the warranty. 3. The console is NOT waterproof; only water resistant. Any excessive exposure to water will void the warranty. CanDo is a trademark of Goldberg. © 2021 FEI, all rights reserved. rev1121...
Need help?
Do you have a question about the 10-0709 and is the answer not in the manual?
Questions and answers