
Related Manuals for Cando 10-0716


Summary of Contents for Cando 10-0716
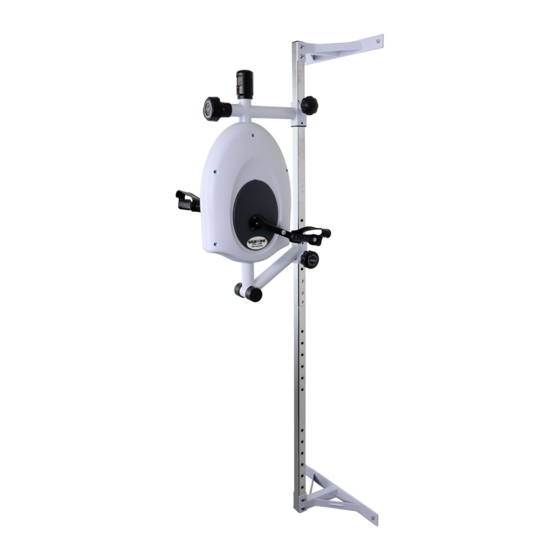
- Page 1 Exer II Owner’s Manual PT21000 The specification of this product may vary from this photo, subject to change without notice.
-
Page 2: Table Of Contents
TABLE OF CONTENTS Safety Instructions ....2-3 Assembly Parts & Hardware Pack ..4 Assembly ....5-7 Parts List . -
Page 3: Safety Instructions
SAFETY INSTRUCTIONS Safety always comes first. Please keep the following points in mind at all times. Read and follow this instruction guide completely before using your upper/lower body exerciser. Keep this guide in a safe place and make sure everyone who uses the machine also reads this guide. - Page 4 CAUTION ● Warm up before any exercise programs with 8 minutes of aerobic activity. ● Wear comfortable clothes that allow freedom of movement and are not tight or restricting. ● Wear comfortable shoes with good support and nonslip soles. ● Breathe naturally, and never hold your breath during an exercise. ●...
-
Page 5: Assembly Parts & Hardware Pack
ASSEMBLY PARTS Main Unit Lower Upright Tube Main Frame Mounting Pedals HARDWARE PACK Hex head screw (1/4 x 2) 4pcs Double Open End Wrench Head Screw 2pcs Socket Head Screw (M8x50L) 4pcs Flat Washer (φ1/4xφ14x1.0t) 4pcs Open End Wrench Allen wrench Flat Washer (φ8.5xφ16x1.5t) 4pcs Wall mount 4pcs Nylon nut (M8) 4pcs... -
Page 6: Assembly
ASSEMBLY STEP 1. Attach Quick Release Knob (#06) and Quick Release Pop Knob (#07) and tighten. Insert the Lower Upright Tube (#09) into the Upper Upright Tube (#08) and secure it with two Head screws (#12). - Page 7 STEP 2. Attach the Main Unit to the Main Frame Mounting (#11). Then secure it with four M8x50L Socket screws (#13), four Flat washers (#14) and four M8 Nylon nut (#15). 15 14...
- Page 8 STEP 3. Secure the Main Unit to a level wall, board with four Hex Head screw (#16), four Flat washers (#17) and four Wall mounts (#18). Attach the Pedals (#20) to the Crank (#03) and tighten them.
-
Page 9: Parts List
PARTS LIST DESCRIPTIONS Q’TY Main Unit Decoration Plate Crank Electronic Monitor Resistance Control Knob Knob Pop Knob Upper Upright Tube Lower Upright Tube Square Plug Main Frame Mounting Pedal... -
Page 10: Assembly Diagram
ASSEMBLY DIAGRAM... -
Page 11: Electronic Monitor
ELECTRONIC MONITOR FUNCTION BUTTON MODE/RESET PRESS TO SELECT FUNCTIONS RESET, OR HOLD ON CAN BE TOTAL RESET FOR ALL FUNCTION VALUES. FUNCTIONS STOP WHEN STOP PEDALING, “STOP” DISPLAYS ON LCD. STRIDES/MIN DISPLAYS NUMBERS EXERCISER STRIDES EVERY MINUTE. SCAN AUTOMATICALLY SCAN THROUGH EACH FUNCTION IN SEQUENCE. -
Page 12: Operating Instruction
OPERATION INSTRUCTION Upper Body Exercise : Put your hands on the Pedals (#20), then exercise forward or backward. Lower Body Exercise : Put your feet on the Pedals (#20), then exercise forward or backward. Before using your Exer II, please adjust the height of the Main Unit to a proper height. #05 Resistance Control Knob #06 Knob #07 Pop Knob...
Need help?
Do you have a question about the 10-0716 and is the answer not in the manual?
Questions and answers
Hello, I purchased one of these machines (10-0716) and I was wondering what distance each stride is worth. Is there a way to measure distance on the machine using strides? Thank you