Advertisement
Available languages
Available languages
Quick Links
Read all instructions BEFORE
assembly and USE of product.
KEEP INSTRUCTIONS FOR
FUTURE USE.
Lea todas las instrucciones ANTES
de armar y USAR este producto.
CONSERVE LAS INSTRUCCIONES
PARA USO FUTURO.
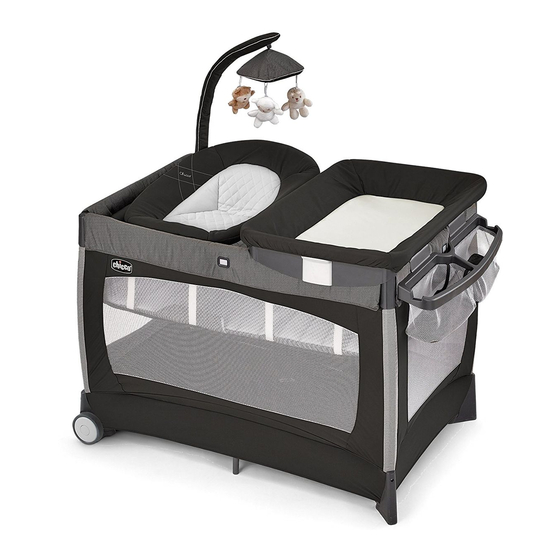
Lullaby
®
Baby
3-Stage Portable Playard
Owner's Manual
Manual del propietario
IS0111.ES
©2013 Artsana USA, INC. 11/13
Advertisement

Related Manuals for Chicco Lullaby Baby


Summary of Contents for Chicco Lullaby Baby
- Page 1 Read all instructions BEFORE assembly and USE of product. KEEP INSTRUCTIONS FOR FUTURE USE. Lea todas las instrucciones ANTES de armar y USAR este producto. CONSERVE LAS INSTRUCCIONES PARA USO FUTURO. Lullaby ® Baby 3-Stage Portable Playard Owner's Manual Manual del propietario IS0111.ES ©2013 Artsana USA, INC.
- Page 2 Failure to follow these warnings and the instructions could result in serious injury or death or other surfaces. with this Chicco Lullaby Baby Playard. SUPERVISION NECESSARY FOR your child reaches 25lbs (11.4 kg). with all top rails and center floor hub fabric.
- Page 3 Failure to follow these warnings and the instructions could result in serious injury or death any side lowered. Be sure all sides NOT place items with a string around are raised and locked in position bassinet or playard. intended for that purpose. They can window where cords from blinds or cause suffocation.
- Page 4 Asegúrese de que los seguros Lullaby Baby de Chicco. hasta que las barandas superiores y la base central del piso estén trabadas en la posición correcta y la almohadilla para el piso esté...
- Page 5 El incumplimiento de estas advertencias e instrucciones puede ocasionar lesiones graves o la muerte. juguete grande y otros objetos que ponerse de pie. utilice sólo una hoja de corral para ajuste perfecto con al menos 2 "(5cm) en todos los lados del colchón. rodillas o alcance las 15 libras La hoja debe permitir el uso correcto de las correas de retención del...
- Page 6 El incumplimiento de estas advertencias e instrucciones puede ocasionar lesiones graves o la muerte. corralito. de persianas o cortinas puedan los pediatras recomiendan colocar a los bebés sanos de espaldas para indique lo contrario. cuna o el corralito. se podría lesionar.
- Page 7 Parts List Lista de las piezas...
- Page 8 Parts List Lista de las piezas cambiador dormir la siesta la siesta...
- Page 9 Parts List Lista de las piezas...
- Page 10 Setting Up the Playard Instalación del corralito WARNING ADVERTENCIA any plastic bags and keep them danger of suffocation. Failure to follow these warnings and El incumplimiento de estas instructions could result in serious and center floor hub are locked and Asegúrese de que las barandas secure before use.
- Page 11 Setting Up the Playard Instalación del corralito the Carry Bag. 1. Saque la estructura de Lullaby Baby de la bolsa de almacenamiento.
- Page 12 Setting Up the Playard Instalación del corralito apart as shown. hub release strap to lift the floor. 2. Ponga la estructura de Lullaby Baby esquinas como se muestra. correa de liberación de la base central...
- Page 13 Setting Up the Playard Instalación del corralito 3. The center floor hub must be pulled up to allow the top rails to lock. with the 4 corners. Pull up on the top rail center joint to "Click" lock them into their open position. Both sides of the center joint must lock for the top rail to stay open.
- Page 14 Setting Up the Playard Instalación del corralito 4. Push down on the center floor hub until the bottom of the playard is flat. 4. Empuje la base central del piso hacia abajo hasta que la base del corralito esté plana.
- Page 15 Setting Up the Playard Instalación del corralito hook and loop strap underneath acolchado hacia arriba. No utilice el corralito sin la colchoneta y asegúrese de plegar las correas sujetadoras debajo de la colchoneta.
- Page 16 Setting Up the Playard Instalación del corralito on the floor of the playard. Thread the 4 hook and loop straps through to the floor of the playard as shown. correas de la colchoneta en el piso del corralito. Pase las 4 correas corralito como se muestra.
- Page 17 Setting Up the Playard Instalación del corralito 7. Turn the playard on its side and pull the straps through the floor of the playard. Thread the straps through the slot on the playard foot as shown. Pull hook and loop strap tight and then attach together to secure mattress corners.
- Page 18 Setting Up the Bassinet Instalación del la cuna 8. Undo the hook and loop straps Pad from playard. 8. Afloje las correas sujetadoras de colchoneta del corralito.
- Page 19 Setting Up the Bassinet Instalación del la cuna 9A. Unfold the Bassinet sides as shown. 9A. Abra los lados de la cuna como se muestra.
- Page 20 Setting Up the Bassinet Instalación del la cuna the playard frame. Fit the 4 corners Bassinet Supports on the Lullaby playard as shown 9C. Once the Bassinet is resting on the supports push down on the center joints on the will secure the Bassinet into place.
- Page 21 Setting Up the Bassinet Instalación del la cuna WARNING ADVERTENCIA No coloque la cuna en la unidad si hay que el corralito esté completamente playard is fully assembled. armado. it towards the side opposite of you. corners before inserting the end is fully inserted on the bottom push it the fabric.
- Page 22 Attaching Parent Organizer Cómo fijar el organizador para padres side top rail of the playard as shown. we recommend the side nearest to the changing table latches. baranda lateral del corralito como se muestra. cambiador.
- Page 23 Changing Table Warnings Advertencias para el cambiador WARNING ADVERTENCIA FALL HAZARD - To prevent RIESGO DE CAÍDAS: para evitar death or serious injury, always la muerte o lesiones graves, keep child within arm's reach. mantenga siempre al niño al alcance de la mano. when your child reaches 25lbs (11.4kg).
- Page 24 Assembling Changing Table Cómo armar el cambiador 12. Slide the end of the Changing the Changing Table Frame End unti it on the inside when assembling. Repeat for the other Changing Table Frame Side as shown. changer frame assembly. de la estructura del cambiador en la ranura del extremo de la estructura del cambiador hasta que se trabe en su lugar con un clic.
- Page 25 Assembling Changing Table Cómo armar el cambiador 13. Insert the Changing Table Frame Sides into the openings on the back of the Changing Pad and slide up. Attach the Changing Table Frame End to the Changing Table Frame Sides as shown making sure it clicks into place.
- Page 26 Assembling Changing Table Cómo armar el cambiador 14. Locate the fabric tabs along the outside of the Changing Pad. Thread the fabric tabs through the corresponding openings on the frame and pull the fabric tabs through. Flatten the fabric tabs out to secure them into place.
- Page 27 Assembling Changing Table Cómo armar el cambiador can only be attached to one end of the playard. Locate the changing table receptacles on the side of the playard. Assemble the changing table by lining up the corners of the changing table frame with the corners of the playard.
- Page 28 Storing Changing Table Cómo guardar el cambiador pushing in on the release buttons and lifting up. The changing table can be stored by hanging on the Parent los botones de desbloqueo y tire hacia arriba. El cambiador se puede...
- Page 29 Assembling Napper Cómo armar la estructura para dormir la siesta WARNING ADVERTENCIA FALL HAZARD RIESGO DE CAÍDAS: para evitar using this product when: caídas, deje de utilizar este producto en los siguientes casos: edge of the product or toque el extremo superior del pro lbs or ducto o de 15 lb (7 kg) o...
- Page 30 Assembling Napper Cómo armar la estructura para dormir la siesta 17. Unfold the Napper Frame and extend the Napper Frame Leg as shown. 17. Abra la estructura para dormir la siesta y extienda la pata de la...
- Page 31 Assembling Napper Cómo armar la estructura para dormir la siesta 18. On the back of the Napper Pad Slide the Napper Frame into the Napper Pad making sure the opening on the top of the Napper Pad. Fold the fabric around the Napper colchoneta de la estructura para dormir la siesta ubique el cierre y dormir la siesta en la...
- Page 32 Assembling Napper Cómo armar la estructura para dormir la siesta be used with the Bassinet attached. Bassinet. Install the Napper by lining up the attachment clip with the side of the playard and pressing the attachment clip down around the side of the playard.
- Page 33 Storing Napper Cómo guardar la estructura para dormir la siesta bar back and then fold the Napper in half. estructura para dormir la siesta por la mitad.
- Page 34 Assembling Toy Mobile Cómo armar el soporte para juguetes del móvil 21. Slide the Toy strap through the opening on one of the sides of the Toy together to secure the toy. Repeat step for the remaining 2 Toys. de la abertura en uno de los extremos del soporte colgante para juguetes del juguete.
- Page 35 Assembling Toy Mobile Cómo armar el soporte para juguetes del móvil the base down into any of the slots in the Bassinet corners. shown. 22. Enganche el soporte para en cualquiera de las ranuras de los extremos de la cuna. puede ajustar como se muestra.
- Page 36 Packing Up the Playard Cómo guardar el corralito the center floor hub release strap and lift the center hub up as far as possible. estructura para dormir la siesta y la colchoneta. Tire de la correa de liberación de la base central del piso y que sea posible.
- Page 37 Packing Up the Playard Cómo guardar el corralito Release all of the Top Rail locks on all 4 sides. If the Top Rail does not unlock pull up on the center hub to release the floor locks. Center floor hub must liberación del centro de las barandas superiores y luego presione hacia abajo.
- Page 38 Packing Up the Playard Cómo guardar el corralito 25. Pull up on the center floor hub release strap and pull the playard legs towards the center. 25. Tire de la correa de liberación de patas del corralito hacia el centro.
- Page 39 Packing Up the Playard Cómo guardar el corralito side of the mattress pad is facing up. Then place the folded playard into other accessories. la bolsa de transporte. Asegúrese de que el lado acolchado de la colchoneta esté hacia arriba. Luego coloque el corralito plegado dentro de la colchoneta.
- Page 40 Packing Up the Playard Cómo guardar el corralito 27. Pull up the sides of the Carry Bag almacenamiento y cierre el cierre.
- Page 41 Packing Up the Playard Cómo guardar el corralito 28. To keep instructions for future use: Place the manual in the storage para usarlas en el futuro: Coloque el manual en el bolsillo de almacenamiento ubicado en la parte inferior de la colchoneta.
-
Page 42: Troubleshooting Guide
Playard top rails must be fully upright and locked. Playard floor must be flat. LULLABY BABY MOBILE DOES NOT FIT INTO CORNER SLOT: Make sure fabric is not covering the slot in the bassient corner. The mobile will fit onto... - Page 43 Las barandas superiores del corralito deben estar completamente rectas y trabadas. El piso del corralito debe estar plano. EL MÓVIL LULLABY BABY NO ENCAJA EN LA RANURA DE LA ESQUINA: Asegúrese de que la tela no cubra la ranura en la esquina de la cuna. El móvil encaja en...
-
Page 44: Cleaning And Maintenance
MAINTENANCE Replace or repair the parts as needed. Use only Chicco replacement parts. Keep the playard in a dry place. If playard becomes wet open playard and allow to dry completely. Prolonged exposure to direct sunlight may cause the fabric to fade... -
Page 45: Limpieza Y Mantenimiento
Limpieza y mantenimiento quitan las tablas del piso. Ubique el cierre en la funda póngalas a un lado. No sumerja las tablas de madera del piso en agua. Límpielas con un trapo húmedo y LIMPIEZA No planchar. No limpiar en seco. contacto con agua. - Page 46 For More Information Más información parts please do not return this product to the store. Contact us in one of the following ways: medios: info.usa@artsana.com www.chiccousa.com...
- Page 48 www.chiccousa.com...
Need help?
Do you have a question about the Lullaby Baby and is the answer not in the manual?
Questions and answers