Chapters
Table of Contents

Subscribe to Our Youtube Channel
Related Manuals for Klein Tools Hydra-Cool 2214


Summary of Contents for Klein Tools Hydra-Cool 2214
- Page 1 Instructions for Proper Use, Assembly and Care of Klein Hydra-Cool Climber Pads ™ Model # 2214 ENGLISH Español pg. 9 Français pg. 17 1.800.561.8187 information@itm.com www. .com...
-
Page 2: Table Of Contents
Instructions for Proper Use, Assembly and Care of Klein Hydra-Cool Climber Pads ™ Model # 2214 INTrOduCTION This instruction manual explains how to properly use, assemble WArNING: Save these instructions. This equipment must and maintain Hydra-Cool™ Climber Pads. All individuals who NOT be used by anyone who has not read, understood use Pole and Tree Climbers must be instructed in how to use and followed the instructions and inspection procedures... -
Page 3: Hydra-Cool™ Climber Pad Construction Details
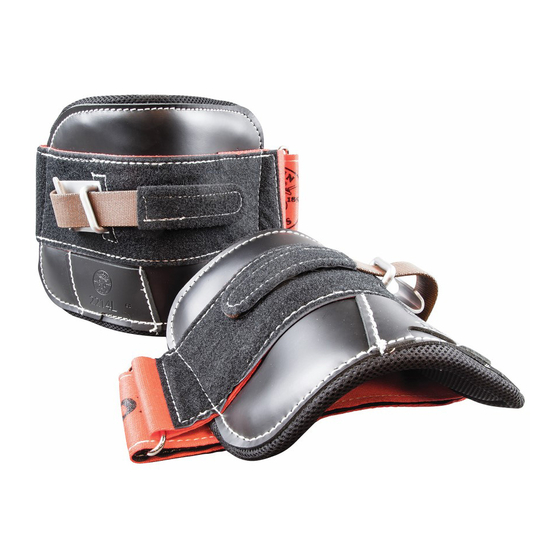
1. HydrA-COOL™ CLIMBEr PAd CONSTruCTION dETAILS FIGURE 1 FIGURE 2 FIGURE 3 A. Webbing and Velcro construction H. Free end of pad L. Metal insert ® B. Warning Label I. Metal cinch loop M. Retaining bar C. Klein Kord climber retaining strap with Velcro hook end J. -
Page 4: Contents Of The Hydra-Cool™ Climber Pads
2. CONTENTS OF HydrA-COOL™ CLIMBEr PAdS • Hydra-Cool™ Climber Pads Model No. 2214 (1 each) Left & Right Pads • (1 each) Left & Right Metal Inserts • • Instructions for the Proper Use, Assembly, Care and Maintenance 3. ASSEMBLING THE HydrA-COOL™ PAdS TO THE CLIMBErS AFTEr rEMOVING OLd PAdS Or BEFOrE AddING PAdS TO A NEW SET OF CLIMBErS, FOLLOW THESE STEPS. -
Page 5: Donning The Assembled Hydra-Cool™ Pad And Climber To Your Leg
Insert top shank of the climber with sleeve into tunnel slot opening Pull the retaining strap completely through the sleeve loop at the bottom edge of the pad. NOTE: Squeezing the tunnel from and retaining bar. Secure the Velcro hook end to the Velcro ®... - Page 6 Pull the free end of the pad until it is snug and wrap it Insert the free end of the pad through the metal cinch loop. around your leg. Webbing must pass through metal cinch loop. Webbing must not be twisted Continue to pull the webbing until the MINIMuM WrAP WArNING label is through the metal cinch loop.
-
Page 7: Specific Procedures For Inspecting Hydra-Cool™ Climber Pads
Check metal insert and retaining bar. Retaining bar should 5. SPECIFIC PrOCEdurES FOr INSPECTING be staked and free of cracks and/or deformation. Metal insert HydrA-COOL™ CLIMBEr PAdS should be free of cracks, sharp edges and/or deformation. Carefully inspect the entire climber before each use. remove from service if any of the following conditions are found: •... -
Page 8: Warnings: Klein Climbers And Pads
• use climbing equipment only for the specific purpose for result in serious injury or death. Klein Tools will supply which it was designed and intended. additional instructional materials, warning tags, or will •... - Page 9 Instrucciones para usar, ensamblar y cuidar correctamente las almohadillas del escalador Klein Hydra-Cool ™ modelo n.º 2214 ESPAÑOL 1.800.561.8187 information@itm.com www. .com...
- Page 10 Instrucciones para usar, ensamblar y cuidar correctamente las almohadillas del escalador Klein Hydra-Cool ™ modelo n.º 2214 INTrOduCCIóN Este manual de instrucciones explica cómo usar, ensamblar AdVErTENCIA: Guarde estas instrucciones. Este equipo y mantener las almohadillas del escalador Hydra-Cool™ NO debe ser utilizado por ninguna persona que no haya correctamente.
-
Page 11: Detalles Sobre La Construcción De Las Almohadillas
1. dETALLES SOBrE LA CONSTruCCIóN dE LAS ALMOHAdILLAS dEL ESCALAdOr HydrA-COOL™ FIGURA 1 FIGURA 2 FIGURA 3 A. Construcción de correa entretejida y Velcro H. Extremo libre de la almohadilla L. Inserto metálico ® B. Etiqueta de advertencia I. Lazo de cincha metálica M. -
Page 12: Contenido De Las Almohadillas Del Escalador Hydra-Cool
2. CONTENIdO dE LAS ALMOHAdILLAS dEL ESCALAdOr HydrA-COOL™ • Almohadillas del escalador Hydra-Cool™ modelo n.º 2214 Almohadillas izquierda y derecha (1 de cada una) • Insertos metálicos izquierdo y derecho (1 de cada uno) • • Instrucciones para el correcto uso, ensamble, cuidado y mantenimiento 3. -
Page 13: Colocación De La Almohadilla Hydra-Cool™ Y El Escalador Ensamblados A La Pierna
Inserte la barra superior del escalador con camisa en la abertura Pase completamente la correa de retención por la presilla ranurada tipo túnel que se encuentra en el borde inferior de la de la camisa y la barra de retención. Asegure el extremo de almohadilla. - Page 14 Tire del extremo libre de la almohadilla hasta que se ajuste Pase el extremo libre de la almohadilla a través del lazo de y envuelva alrededor de la pierna. cincha metálico. La correa entretejida debe pasar por el lazo de cincha metálico. No se debe torcer la correa entretejida Tire de la correa entretejida hasta que la etiqueta de AdVErTENCIA dE ENVOLTurA MÍNIMA atraviese el lazo...
-
Page 15: Procedimientos Específicos De Inspección
Verifique el inserto metálico y la barra de retención. La 5. PrOCEdIMIENTOS ESPECÍFICOS dE INSPECCIóN barra de retención debe estar sujeta y no debe tener grietas dE LAS ALMOHAdILLAS dEL ESCALAdOr ni deformaciones. El inserto metálico no debe tener grietas, HydrA-COOL™... -
Page 16: Advertencias: Escaladores Y Almohadillas Klein
• Klein Tools recomienda un peso combinado entre cuerpo, prendas y herramientas de 300 libras o menos al utilizar los escaladores de postes y árboles. - Page 17 Instructions pour l’utilisation, l’assemblage et l’entretien appropriés des coussinets protecteurs Hydra-Cool ™ de Klein, modèle n 2214 FrANÇAIS 1.800.561.8187 information@itm.com www. .com...
- Page 18 Instructions pour l’utilisation, l’assemblage et l’entretien appropriés des coussinets protecteurs Hydra-Cool ™ de Klein, modèle n 2214 PrÉSENTATION Le présent manuel d’utilisation explique comment utiliser, AVErTISSEMENT : Conservez ces instructions. Cet assembler et entretenir les coussinets protecteurs pour griffes équipement ne doit PAS être utilisé par quiconque n’ayant Hydra-Cool™.
-
Page 19: Détails De Fabrication Des Coussinets Protecteurs Hydra-Cool
1. dÉTAILS dE FABrICATION dES COuSSINETS PrOTECTEurS HydrA-COOL™ FIGURE 1 FIGURE 2 FIGURE 3 A. Sangle et construction en Velcro H. Extrémité libre du coussinet L. Insert en métal ® B. Étiquette d’avertissement I. Boucle serrante en métal M. Barre de retenue C. -
Page 20: Contenu Des Coussinets Protecteurs Hydra-Cool
2. CONTENu dES COuSSINETS PrOTECTEurS HydrA-COOL™ • Coussinets protecteurs Hydra-Cool™ pour griffe, numéro de modèle 2214 (1 chaque) Coussinets protecteurs gauche et droit • (1 chaque) Inserts en métal gauche et droit • • Instructions pour l’utilisation, l’assemblage et l’entretien appropriés 3. -
Page 21: Enfilage Du Coussinet Protecteur Hydra-Cool™ Et De La Griffe Sur Votre Jambe
Insérez la tige supérieure de griffe avec manchon dans Tirez la sangle de retenue complètement par la boucle l’ouverture du passant tunnel sur le bord inférieur du coussinet. du manchon et la barre de retenue. Sécurisez l’extrémité rEMArQuE : Serrer le tunnel à partir des côtés aide à pousser Velcro rugueuse à... - Page 22 Tirez l’extrémité libre du coussinet jusqu’à ce que le Insérez l’extrémité libre du coussinet dans la boucle serrante en métal. La sangle doit passer dans la boucle serrante coussinet soit serré et qu’il enveloppe votre jambe. en métal. La sangle ne doit pas être tordue. Continuez de tirer la sangle jusqu’à...
-
Page 23: Procédures Précises Pour L'inspection Des Coussinets Protecteurs Hydra-Cool™ Pour Griffe
Vérifiez l’insert en métal et la barre de retenue. La barre 5. PrOCÉdurES PrÉCISES POur L’INSPECTION de retenue devrait être fixée solidement et exempte de dES COuSSINETS PrOTECTEurS HydrA-COOL™ fissures et/ou de déformation. L’insert en métal doit être POur GrIFFE exempt de fissures, bords tranchants et/ou déformation. -
Page 24: Avertissements : Griffes Et Coussinets Protecteurs Klein
été conçu et fabriqué. ou répondra aux questions sur n’importe quelle pièce • Klein Tools recommande un poids combiné total de 300 lb d’équipement de protection professionnel Klein sans aucun ou moins pour le corps, les vêtements et les outils, lors de l’utilisation de ses griffes de monteur de lignes et/ou d’élagueur.
Need help?
Do you have a question about the Hydra-Cool 2214 and is the answer not in the manual?
Questions and answers