Table of Contents
Advertisement
Quick Links
INSTRUCTION MANUAL
INFRARED HEATER
MODEL: IPH-01S
Thank you for purchasing your new heater.
These operating instructions will help you use it properly and safely.
We recommend that you spend some time reading this instruction manual in order that you fully
understand all the operational features it offers.
Read all the safety instructions carefully before use and keep this instruction manual for future
reference
Facebook: #5sundayliving
Message: #5sundayliving
Email: service_5sundayliving@outlook.com
Advertisement
Table of Contents

Related Manuals for Sunday Living IPH-01S


Summary of Contents for Sunday Living IPH-01S
- Page 1 INSTRUCTION MANUAL INFRARED HEATER MODEL: IPH-01S Thank you for purchasing your new heater. These operating instructions will help you use it properly and safely. We recommend that you spend some time reading this instruction manual in order that you fully understand all the operational features it offers.
-
Page 2: Safety Warnings
SAFETY WARNINGS READ ALL INSTRUCTIONS BEFORE ATTEMPTING TO OPERATE THIS UNIT. KEEP THE ASSEMBLY INSTRUCTIONS FOR FUTURE REFERENCE. KEEP THE ORIGINAL PACKAGING FOR USE WHEN STORING THE HEATER DURING EXTENDED PERIODS OF NON-USE. Read ALL instructions before using this unit. CAUTION: Risk of Electric Shock. -
Page 3: Specification
21. DO NOT attempt to repair or adjust any electrical or mechanical functions on this unit. Doing so will void your warranty. The inside of the unit contains no user serviceable parts. Qualified personnel should perform all servicing only. 22. Save these instructions. SPECIFICATION Voltage Rating 120 V (60Hz) -
Page 4: Product Diagram
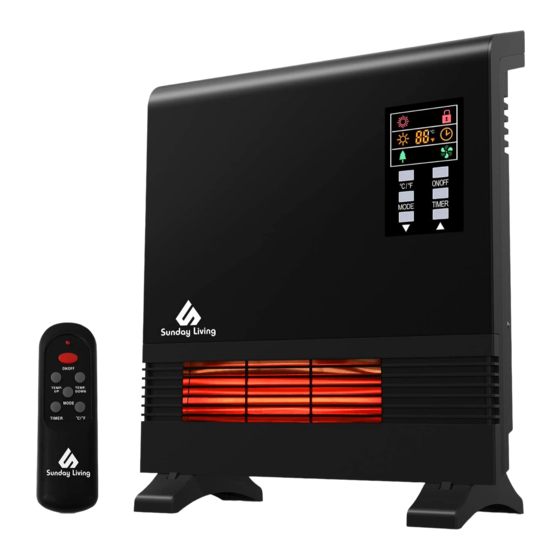
PRODUCT DIAGRAM Remote Control Air Intake Control Panel Front Panel Air Outlet Power Switch Front Back Email: service_5sundayliving@outlook.com Facebook: #5sundayliving... - Page 5 Control Panel Digital display:Indicate temperature or time. High Mode indicator light: Will be lit when High Heat mode is engaged.. Low Mode indicator light: Will be lit when Low Heat mode is engaged. Energy-saving mode indicator: Will be lit when energy-saving mode is engaged. ℃/℉Button : Alternates between Fahrenheit and Celsius.
- Page 6 Remote Control Temp up button: to increase temperature ON/OFF button: Power on/ off Temp down button: to lower temperature Mode button:to select modes ℃/℉ button: Button for alternating between Fahrenheit and Celsius Timer button: to set timer function NOTE: Please feel free to contact Service Team for help if the remote control is missing or damaged.
-
Page 7: Installation Instruction
Leakage protection plug operating instructions Insert the plug in the socket, the “Reset” button is in pop-up position. Press power switch, the indicator light stays off , which indicates that there is no current output in plug. Then press the “Reset” button, the indicator light turns on, ... - Page 8 (3) 1、Using the 45mm screws and wall plugs supplied fit the Upper Brackets,as illustrated above. 2、Hook the heater into position. 3、If the heater is wall mounted it must be at least 1000mm(39.4inch) off the ceiling to provide enough air intake. If the heater is wall mounted it must be at least 1000mm(39.4inch) off the floor to avoid overheat at the ceiling.
- Page 9 OPERATING INSTRUCTION 1、Start and select working mode Turn the heater on by pressing the ON/OFF button on the control panel or by pressing the Power button on the supplied remote control. Once power is off, heating element will stop working at first. Fan will prolong working for 3 min to emit plenty of heat inside.
-
Page 10: Maintenance
5、Setting electro lock The Electro Lock can help avoid the heater from being accidentally engaged by children. The locking mechanism can be set in both the ON and OFF modes. Press Temp Up and Temp Down buttons at the same time for 3 seconds. Locking is complete when you hear a beep. -
Page 11: Troubleshooting
TROUBLESHOOTING If the heater will not operate, please check the following before seeking repair advice: 1. Check if the power cord is plugged into an electrical outlet, if not, plug in. 2. Check if electricity to the main power switch (in the beside) is working. 3.
Need help?
Do you have a question about the IPH-01S and is the answer not in the manual?
Questions and answers