
Related Manuals for Hypertherm HyPrecision 50S


Summary of Contents for Hypertherm HyPrecision 50S
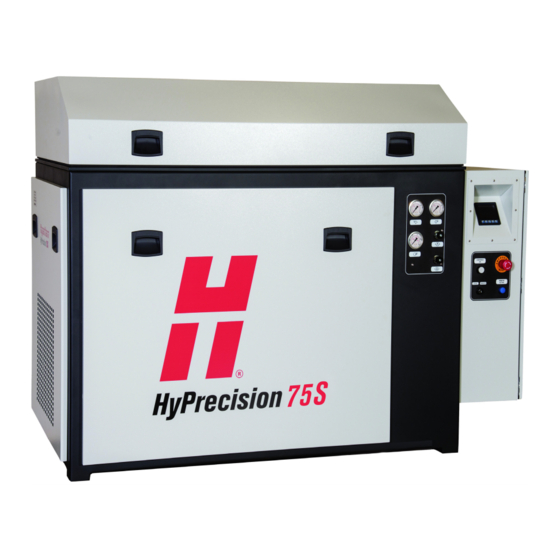
- Page 1 HyPrecision 50S/60S/75S ™ Waterjet Pump Operator Manual 808690 | Revision 2 | English...
- Page 2 All other trademarks are the property of their respective holders. One of Hypertherm's long-standing core values is a focus on minimizing our impact on the environment. Doing so is critical to our, and our customers', success. We are always striving to become better environmental stewards; it is a process we care deeply about.
- Page 3 HyPrecision 50S/60S/75S Operator Manual 808690 Revision 2 English Original Instructions August 2016 Hypertherm Inc. Hanover, NH 03755 USA www.hypertherm.com...
- Page 4 México, D.F. C.P. 01780 (Technical Service Email) 52 55 5681 8109 Tel 52 55 5683 2127 Fax South America & Central America: Hypertherm Brasil Ltda. Soporte.Tecnico@hypertherm.com (Technical Service Email) Rua Bras Cubas, 231 – Jardim Maia Guarulhos, SP – Brasil...
-
Page 5: Table Of Contents
Operate the pump ..................................49 Operate the pump remotely ..............................66 Stop the pump ....................................67 Emergency stop ..................................67 Routine stop during operation ............................67 Turn off the pump at the end of the day ........................... 67 HyPrecision 50S/60S/75S Operator Manual 808690... - Page 6 Repair the bleed-down valve ............................130 Install the bleed-down valve .............................. 140 Bleed-down valve parts ..............................143 Start the pump after preventive maintenance ........................144 Recycling and end of product life ............................146 Preventive maintenance records .............................. 147 HyPrecision 50S/60S/75S Operator Manual 808690...
- Page 7 Noisy operation ....................................171 8 Pump specifications .........................173 All models ......................................174 Hydraulic fluid ..................................174 Operating conditions ................................174 Cooling requirements .................................174 HyPrecision 50S ..................................175 HyPrecision 60S ..................................177 HyPrecision 75S ..................................179 Torque values ....................................181 Fasteners ....................................181 Fittings ....................................182 HyPrecision 50S/60S/75S Operator Manual 808690...
- Page 8 Connect the electrical power ..............................196 Do the first startup ..................................197 Do a preoperation inspection ............................197 Turn on the utilities ................................198 Change the system configuration on the operator interface ..................198 Start the pump ..................................199 HyPrecision 50S/60S/75S Operator Manual 808690...
-
Page 9: Pump Information
The serial number is on the data plate, which is found above the connection panel on the back of the pump. System schematic drawing number The system schematic drawing number is inside the electrical enclosure door on a green label and on the data plate. Purchase date Distributor Installation date Installed by Notes HyPrecision 50S/60S/75S Operator Manual 808690... - Page 10 HyPrecision 50S/60S/75S Operator Manual 808690...
-
Page 11: Warranty
600 hours of operation with the use of a thimble filter and compliance with Diamond orifices Hypertherm’s water quality requirements Consumable parts are not covered by this warranty. Consumable parts include, but are not limited to high-pressure water seals, check valves, cylinders, bleed-down valves, low-pressure seals, high-pressure tubing, and filters. - Page 12 Warranty SC-12 Safety and compliance...
-
Page 13: Product Stewardship
Once the product has left the Hypertherm factory, the certification test marks are invalid if any of these events occurs: ... - Page 14 Roosendaal, Nederland 31 165 596907 To see the signed Declaration of Conformity in English: 1. Go to www.hypertherm.com. 2. Search for documents library. 3. Select Waterjet Family from the All dropdown list under Product/Product type. 4. Select Regulatory from the All Categories dropdown list.
- Page 15 CE mark on the data plate. Countries that require a CE mark or have compulsory electromagnetic compatibility regulations must use CE versions of Hypertherm products with the CE mark on the data plate. These may include, but are not limited to: ...
- Page 16 Product stewardship SC-16 Safety and compliance...
-
Page 17: Environmental Stewardship
Environmental stewardship Proper disposal of Hypertherm products Hypertherm waterjet cutting equipment, like all products with electronics, can contain materials or parts, such as printed circuit boards, that can not be discarded with ordinary waste. It is your responsibility to dispose of Hypertherm product or part in an environmentally suitable manner and in compliance with national and local codes. - Page 18 Particle emission and wastewater quality Hypertherm does not manufacture or supply the materials that are cut and has no knowledge whether the particles released from materials that are cut will pose a physical hazard or health risk. Please consult with your supplier or other technical advisor if you need guidance concerning the properties of the material you will cut using a Hypertherm product.
-
Page 19: Safety
All subcategories dropdown list. These navigation instructions can change without notice. The safety precautions in this manual are general and can not anticipate every situation. Hypertherm Inc. acknowledges that unforeseen situations such as equipment failure, site variability, insufficient maintenance, failure of control equipment, and other events can cause equipment damage, injuries, or death. -
Page 20: User Qualification And Training
Safety User qualification and training All users must read and understand these instructions before installing, operating, or doing maintenance on this equipment. Do not permit an untrained person to operate this equipment. Operators must be qualified to operate and maintain this equipment. Training should include this information: ... -
Page 21: Symbols And Marks
Symbols and marks Information and hazard symbols Before operating any Hypertherm equipment, read the safety instructions in your product's manual Failure to follow safety instructions can result in personal injury or in damage to equipment. WARNING Some symbols in this table can apply to other products. -
Page 22: Symbols And Marks Found On The Data Plate And The Equipment
Symbols and marks Prolonged exposure to noise can cause permanent hearing loss. Wear approved ear protection and control exposure time when operating or working near this equipment. High-pressure water can cause severe cuts or lacerations, abrasions, and punctures. Wear approved hand protection when operating or working near this equipment. Precision parts have sharp corners or edges. - Page 23 Symbols and marks The Conformité Européene (CE) mark shows that a product complies with standards to the product to which the mark is affixed. The CE mark signifies the manufacturer’s declaration of conformity to applicable European directives and standards. Only those versions of products with a CE mark found on or near the data plate have been tested for compliance with the European Low Voltage Directive, the European Electromagnetic Compatibility Directive, the Pressure Equipment Directive, and the Machinery Directive.
- Page 24 Symbols and marks SC-24 Safety and compliance...
-
Page 25: Terminology
Air-cooled system: Hydraulic fluid that is sent to an external air cooler cooling water Low-pressure water that circulates through the heat exchanger in water-cooled systems to cool the hydraulic fluid, refer to COOLING IN COOLING OUT HyPrecision 50S/60S/75S Operator Manual 808690... - Page 26 The maximum instantaneous current that a motor draws when it is first turned on, also called input surge current or switch-on surge The International Organization for Standardization (ISO), an independent membership organization that develops voluntary standards HyPrecision 50S/60S/75S Operator Manual 808690...
- Page 27 Pound-force per square inch (PSI) is a unit of pressure: 1 psi equals 0.07 bar or 6.89 kPa or 6,895 N/m reverse osmosis A method for treating water by forcing it through a semipermeable membrane to remove impurities that can damage high-pressure parts HyPrecision 50S/60S/75S Operator Manual 808690...
- Page 28 A device used to control the rate of flow in a pipe or a tube WASTEWATER OUT Water from the bleed-down valve or the low-pressure system that goes to a drain weep hole A small hole that is drilled into high-pressure fittings to let leaking water escape HyPrecision 50S/60S/75S Operator Manual 808690...
-
Page 29: Product Description
These systems are not independent of each other. Color is used throughout the manual to identify the different systems. In the section, which begins on page 69, color is used to highlight referenced parts. Preventive maintenance HyPrecision 50S/60S/75S Operator Manual 808690... -
Page 30: Pump Exterior
210 bar × 20 = 4,200 bar Example: 20,650 kPa × 20 = 41,300 kPa 3,000 psi × 20 = 60,000 psi Pierce-pressure control knob This knob changes the water pressure from the intensifier for piercing. HyPrecision 50S/60S/75S Operator Manual 808690... - Page 31 This is low-pressure water from a heat exchanger that goes to a drain or returns to a chiller. Air-cooled system This is hydraulic fluid that is sent to an external air cooler. WASTEWATER OUT This line carries water from the bleed-down valve and the low-pressure system to a drain. HyPrecision 50S/60S/75S Operator Manual 808690...
- Page 32 Air-cooled system COOLING OUT COOLING IN External air cooler Hydraulic fluid goes to Hydraulic fluid returns an air cooler from an air cooler HyPrecision 50S/60S/75S Operator Manual 808690...
-
Page 33: Major Systems
Gear pump Shaft access cover Primary hydraulic pump Primary motor The primary motor drives the primary hydraulic pump that moves hydraulic fluid through the intensifier. A gear pump moves hydraulic fluid through the cooling loop. HyPrecision 50S/60S/75S Operator Manual 808690... - Page 34 Motor starter HyPrecision 50S, 60S, and 75S pumps use a soft starter to gradually increase the output of the electric motor. The only maintenance required for the soft starter is to make sure that the fan vents are clean.
-
Page 35: Hydraulic System
A temperature sensor and a level sensor monitor the hydraulic fluid. A sight gauge permits observation of the hydraulic fluid level and quality. Suction strainers prevent contaminants from entering the primary pump and the gear pump. HyPrecision 50S/60S/75S Operator Manual 808690... - Page 36 Ceramic plungers connected to each side of the piston extend into the left and right high-pressure ends. Hydraulic fluid pushes the piston to 1 side while low-pressure supply water fills the empty cylinder. The plunger on the opposite side of the cylinder compresses the water for piercing or cutting. HyPrecision 50S/60S/75S Operator Manual 808690...
- Page 37 This solenoid puts the pump in pierce pressure mode when it is on and cut-pressure mode when it is off. Hydraulic accumulator This equalizes hydraulic fluid pressure for the hydraulic gauge. Bleed-down valve solenoid This solenoid opens and closes the bleed-down valve. HyPrecision 50S/60S/75S Operator Manual 808690...
- Page 38 45°C (113°F) after 10 minutes, the fan turns off. If the hydraulic fluid temperature is higher than 45°C (113°F) after 10 minutes, the fan continues running. Hydraulic fluid from the air cooler goes through a filter and then returns to the hydraulic fluid tank. HyPrecision 50S/60S/75S Operator Manual 808690...
-
Page 39: Low-Pressure Water System
When the primary motor is running, low-pressure supply water or water from a chiller circulates through a heat exchanger. Water from the heat exchanger goes to a drain or returns to the chiller. The water-modulating valve adjusts the cooling water flow rate automatically to control the temperature of the hydraulic fluid. HyPrecision 50S/60S/75S Operator Manual 808690... -
Page 40: High-Pressure Water System
High-pressure water This water has been pressurized by the intensifier for piercing or cutting. It is also called CUTTING WATER OUT HyPrecision 50S/60S/75S Operator Manual 808690... -
Page 41: Options
Section 3 Options HyPrecision 50S, 60S, and 75S pumps are available with these optional features. Voltage Refer to the data plate or the system schematic drawing for the voltage of the pump. 50 Hz 60 Hz 460 V 400 V... - Page 42 3 – Options HyPrecision 50S/60S/75S Operator Manual 808690...
-
Page 43: Operation
Fittings can get hot, especially when they are not tightened properly. WARNING If a water line, fitting, or valve might be frozen, do not operate the pump. Thaw the equipment until water moves freely through the entire water circuit. CAUTION HyPrecision 50S/60S/75S Operator Manual 808690... - Page 44 Examine and clean the equipment regularly. Make repairs immediately. Keep the work area clean and free of fluid spills. Hypertherm products are designed and manufactured with a commitment to continuous quality control and safety. Contact a Hypertherm Technical Service Associate for information and support regarding the installation, operation, maintenance, and repair of this equipment.
-
Page 45: Overview
The operator interface is the standard controller for this pump. Some original equipment manufacturers (OEMs) or system integrators might change the controller. In these cases, refer to the documentation provided by the OEM or system integrator for operation instructions. HyPrecision 50S/60S/75S Operator Manual 808690... - Page 46 The bleed-down valve opens and discharges water from the system. The CONTROLS ON button indicator light turns off. Primary breaker disconnect lever The primary breaker disconnect lever disconnects electricity to the pump motor and controls. HyPrecision 50S/60S/75S Operator Manual 808690...
-
Page 47: Inspect The Equipment Before Operation
2. Turn the cut-pressure control knob anticlockwise until it stops. This extends the life of the high-pressure seals and other high-pressure parts. 3. Touch the symbol on the operator interface to turn ON the pump in cooling mode. Pressure in the system increases until it reaches the setpoint. HyPrecision 50S/60S/75S Operator Manual 808690... - Page 48 1. Make sure that the key switch is set to LOCAL. 2. Push the CONTROLS ON button. 3. Turn the key switch to REMOTE. 4. Refer to the OEM’s instructions for turning the pump on. HyPrecision 50S/60S/75S Operator Manual 808690...
-
Page 49: Operate The Pump
When an original equipment manufacturer (OEM) or a system integrator makes a cutting system by combining Hypertherm equipment with other equipment, the end-use customer and the OEM or the system integrator are responsible for providing protection against hazardous moving parts. - Page 50 Touch this symbol to turn ON the primary motor and to enable the intensifier. Pressure in the system increases until it reaches the setpoint. When the pump is on, the primary screen shows a stroking intensifier. HyPrecision 50S/60S/75S Operator Manual 808690...
- Page 51 If the cut-pressure mode setpoint is less than the pierce-pressure mode setpoint, the pump operates at the lower pressure. When turning off the pump, turn the cut-pressure control knob anticlockwise until it stops. This extends the life of the high-pressure seals and other high-pressure parts. HyPrecision 50S/60S/75S Operator Manual 808690...
- Page 52 Intensifier 1 stroke rate to the left Intensifier 1 stroke rate to the right Intensifier and pump status indicators show the status of each pump and intensifier. Green shows enabled status. Red shows disabled status. HyPrecision 50S/60S/75S Operator Manual 808690...
- Page 53 A yellow bar shows that the stroke rate is at the limit of the allowable range. A red bar shows that the intensifier is overstroking. For troubleshooting, refer to the section, which Stroking problems begins on page 159. Touch the status indicator to open the intensifier settings screen. HyPrecision 50S/60S/75S Operator Manual 808690...
- Page 54 Intensifier settings screen Pump settings screen Date and time settings screen Micro SD card screen Settings screen Date and time Intensifier settings Micro SD card settings System Model Pressure adjustment settings configuration Pierce-pressure Cut-pressure mode mode HyPrecision 50S/60S/75S Operator Manual 808690...
- Page 55 1. Touch the overstroke % field to open a numeric keypad. 2. Use the numeric keypad to change the overstroke percentage. Do not set the value higher than 20%. 3. Touch Enter to accept the change. HyPrecision 50S/60S/75S Operator Manual 808690...
- Page 56 3. Use the up and down arrows to increase or decrease the number. 4. Touch Enter to accept the change. 5. Use the same procedure to change the date. Touch the date field to change the way the date is shown. Options are day/month/year or month/day/year. HyPrecision 50S/60S/75S Operator Manual 808690...
- Page 57 When enabled, fault monitoring alerts the operator to a boost pump fault. Boost Fault Monitor When enabled, fault monitoring alerts the operator to a fan motor fault. Fan Fault Monitor This is for air-cooled systems. HyPrecision 50S/60S/75S Operator Manual 808690...
- Page 58 This is only applicable for pumps with a proportional control valve. Set the time between steps during ramping down when adjusting the pressure manually on the operator interface. Dec Interval (.1 sec) This is only applicable for pumps with a proportional control valve. HyPrecision 50S/60S/75S Operator Manual 808690...
- Page 59 The default value is 500 psi. Set how quickly the pump ramps up to the specified pressure. The higher the value, the faster the pump ramps up. Real Ramp Setpoint The default value is 10 seconds. HyPrecision 50S/60S/75S Operator Manual 808690...
- Page 60 IP Address This information is required to use a computer network for remote operation of the Net Mask pump. Contact a Hypertherm Technical Service Associate for assistance. Gateway The model configuration screen shows the current pump setup information. The pressure adjustment screen permits the user of a pump with a proportional control valve to enter the setpoints for pierce-pressure mode and cut-pressure mode that the pump ramps up to when it is turned on.
- Page 61 SD card. If the screen shows Removable Media in red, the micro SD card is missing or damaged. For more information about the micro SD card, contact a Hypertherm Technical Service Associate for assistance. HyPrecision 50S/60S/75S Operator Manual 808690...
- Page 62 Pumps without a redundant intensifier do not have the option to move the rear intensifier. Maintenance log Touch the applicable area on the image of the pump. Select the area where maintenance was performed. Select each item and the reason for the maintenance. HyPrecision 50S/60S/75S Operator Manual 808690...
- Page 63 This information transfers to the maintenance log and is saved as a .CSV file on the SD card. Alarm log The alarm log shows recent alarms and when they occurred. This can be helpful for troubleshooting. HyPrecision 50S/60S/75S Operator Manual 808690...
- Page 64 Rear intensifier right proximity switch Not used Control on Remote mode active Remote pump on Remote pump off Remote cooling on Remote pierce-pressure enable Primary motor fault Primary motor run Boost pump run Air cooler fan run HyPrecision 50S/60S/75S Operator Manual 808690...
- Page 65 Alarm screens When the controller detects a fault condition, an alarm screen shows information about the problem and the stack light blinks. If this occurs, refer to the section, which begins on page 158. Alarm screens HyPrecision 50S/60S/75S Operator Manual 808690...
-
Page 66: Operate The Pump Remotely
If the pump is off, this turns on the primary motor and the cooling water or the cooling fan. If the pump is connected to a remote source and is using the remote CONTROLS ON function, refer to the remote source manufacturer’s instructions for an emergency stop reset. HyPrecision 50S/60S/75S Operator Manual 808690... -
Page 67: Stop The Pump
5. Turn OFF the primary breaker disconnect lever on the electrical enclosure door. 6. Turn OFF the water to the pump. 7. Clean all water and hydraulic fluid off of the top and bottom decks. HyPrecision 50S/60S/75S Operator Manual 808690... - Page 68 4 – Operation HyPrecision 50S/60S/75S Operator Manual 808690...
-
Page 69: Preventive Maintenance
Section 5 Preventive maintenance Hypertherm products are designed and manufactured with a commitment to continuous quality control and safety. Contact a Hypertherm Technical Service Associate for information and support regarding the installation, operation, maintenance, and repair of this equipment. Hypertherm Inc. recommends preventive and scheduled maintenance for HyPrecision pumps. High-quality equipment that is serviced on a schedule lasts longer than equipment that is not maintained regularly. -
Page 70: Safety
Prolonged exposure to noise can cause permanent hearing loss. Wear approved ear protection and control exposure time when operating or working near this equipment. Precision parts have sharp corners or edges. Wear protective gloves when handling parts. HyPrecision 50S/60S/75S Operator Manual 808690... - Page 71 Keep accurate maintenance records. Keep parts available so that they are ready when required. Follow local protocols for recycling or disposal of parts and materials. Refer to Recycling and end of product on page 146. life HyPrecision 50S/60S/75S Operator Manual 808690...
-
Page 72: Preventive Maintenance Schedule
Low-pressure water system (page 88) Check the low-pressure water pressure gauges page 88 Measure the air pressure in the water accumulator page 89 tank Replace the water filters page 91 Test the low-pressure water TDS level page 94 HyPrecision 50S/60S/75S Operator Manual 808690... - Page 73 High-pressure water system: Intensifier (page 96) These procedures require disassembling the intensifier (page 97). To reduce downtime, Hypertherm recommends doing preventive maintenance on both ends of the intensifier at the same time. Repair the check valves and the low-pressure...
-
Page 74: Tools
Seal installation tools (included in the 12084 HyPrecision standard tool kit) Sleeve Spacer Push tool Locator Refer to the on page 156 for all of the Complete list of preventive maintenance kits, parts, tools, and materials tools needed for preventive maintenance on this equipment. HyPrecision 50S/60S/75S Operator Manual 808690... -
Page 75: General
Identify the source of a leak and correct the problem. Refer to on page 163. Leaks Output adapter weep hole Static seal leak point High-pressure seat weep hole Dynamic seal housing weep hole HyPrecision 50S/60S/75S Operator Manual 808690... -
Page 76: Electrical System
Do this task when the pump is not running. 1. Examine electrical cords for kinks or damage to the insulation. 2. Examine electrical plugs and other electrical connectors for corrosion or damage. HyPrecision 50S/60S/75S Operator Manual 808690... -
Page 77: Hydraulic System
Do this task when the pump is running at operating temperature. Replace the filter after every 1,500 hours of operation or when the white indicator bar stays in the red zone while the pump is running at operating temperature. Refer to page 83 for instructions. HyPrecision 50S/60S/75S Operator Manual 808690... -
Page 78: Check The Hydraulic Fluid Level
19 liters (5 gallons) to fill the hoses and the air cooler. Required parts, tools, and materials Antiwear (AW) mineral oil or synthetic hydraulic fluid, ISO viscosity grade (VG) 32 or 46 Recommended materials Clean funnel HyPrecision 50S/60S/75S Operator Manual 808690... - Page 79 2. Remove the filler-breather cap on top of the tank. 3. Fill the tank with hydraulic fluid until the fluid is at the top mark on the sight gauge. Do not overfill the hydraulic fluid tank. 4. Install the original filler-breather cap. HyPrecision 50S/60S/75S Operator Manual 808690...
-
Page 80: Check The Hydraulic Fluid Quality
2. Look through the sight gauge to see the color of the hydraulic fluid. Good hydraulic fluid is almost transparent. 3. Remove the filler-breather cap on top of the tank. 4. Smell the hydraulic fluid. Good hydraulic fluid has almost no odor. Refer to page 84 for instructions for replacing the hydraulic fluid. HyPrecision 50S/60S/75S Operator Manual 808690... -
Page 81: Measure The Hydraulic Fluid Temperature
The optimum operating temperature for hydraulic fluid in this system is 40.6°C (105°F) to 46.1°C (115°F). If the temperature is outside of this range, adjust the hydraulic fluid temperature. Refer to page 82 for instructions. HyPrecision 50S/60S/75S Operator Manual 808690... - Page 82 4. Repeat this procedure until the temperature is in range. Air-cooled system The temperature of an air-cooled system is not adjustable. If the hydraulic fluid temperature is out of range, refer to the section on page 166 High temperature HyPrecision 50S/60S/75S Operator Manual 808690...
-
Page 83: Replace The Hydraulic Filter
Use a piece of cardboard or other solid material to check for leaks when the pump is on. Do not use hands, cloth, paper, or towels. WARNING 6. Check the hydraulic fluid level. Add hydraulic fluid if necessary. Refer to page 78 for instructions. HyPrecision 50S/60S/75S Operator Manual 808690... -
Page 84: Replace The Hydraulic Fluid, The Hydraulic Filter, The Filler-Breather Cap, And The Suction Strainers
Replace the hydraulic filter After every 1,500 hours of operation Replace the hydraulic fluid and the suction strainers After every 3,000 hours of operation Filler-breather cap Hydraulic filter Sight gauge Access cover Drain valve plug and lever HyPrecision 50S/60S/75S Operator Manual 808690... - Page 85 Drain valve lever 3. Disconnect the lower ends of the hydraulic hoses to drain them. 4. Install a new hydraulic filter. Refer to page 83 for instructions. 5. Remove the access cover on the tank. HyPrecision 50S/60S/75S Operator Manual 808690...
- Page 86 14. Fill the tank with hydraulic fluid. Make sure that the hydraulic fluid level is at the top mark on the sight gauge. Do not overfill the hydraulic fluid tank. 15. Install the new filler-breather cap. 16. Discard the used parts. HyPrecision 50S/60S/75S Operator Manual 808690...
- Page 87 18. Add hydraulic fluid. Fill the tank until the fluid is at the top mark on the sight gauge. Repeat this process as needed. 19. Run the pump in pierce-pressure mode for 15 to 20 minutes. If air enters the hydraulic system, the pump becomes noisy during operation. Refer to Noisy operation page 171. HyPrecision 50S/60S/75S Operator Manual 808690...
-
Page 88: Low-Pressure Water System
Subtract the value shown on the postfilter water pressure from the value shown on the prefilter water pressure. Replace the filters if the difference between the values on the pre- and the postfilter water-pressure gauges is higher than 0.69 bar or 68.95 kPa (10 psi). HyPrecision 50S/60S/75S Operator Manual 808690... -
Page 89: Measure The Air Pressure In The Water Accumulator Tank
3. Remove the valve stem cap from the water accumulator tank. 4. Use an air pressure gauge to measure the pressure in the tank. The optimum air pressure is 2.07 bar or 206.84 kPa (30 psi). HyPrecision 50S/60S/75S Operator Manual 808690... - Page 90 6. Repeat this procedure until the pressure is 2.07 bar or 206.84 kPa (30 psi). 7. Install the original valve stem cap. 8. Close the water valve. Water valve in the closed position 9. Turn ON the water to the pump. HyPrecision 50S/60S/75S Operator Manual 808690...
-
Page 91: Replace The Water Filters
Replace the water filters water-pressure gauges is higher than 0.69 bar or 69 kPa (10 psi) Hypertherm HyPrecision 50S, 60S, and 75S pumps have 3 filters that remove contaminants from the supply water. Required parts, tools, and materials 11105 Water filter cartridge, 0.45 micron, 10 inch 11106 Water filter cartridge, 1.0 micron, 10 inch... - Page 92 10. Use a filter wrench to tighten each of the filter housings. 11. Close the water valve. Water valve in the closed position 12. Turn ON the water to the pump. 13. Turn ON the pump in cooling mode. HyPrecision 50S/60S/75S Operator Manual 808690...
- Page 93 Do not attempt to repair a leak with pressure in the system. WARNING Use a piece of cardboard or other solid material to check for leaks when the pump is on. Do not use hands, cloth, paper, or towels. WARNING HyPrecision 50S/60S/75S Operator Manual 808690...
-
Page 94: Test The Low-Pressure Water Tds Level
2. Let the water run for 30 seconds. 3. Take a sample from the wastewater outlet. If the wastewater outlet is not accessible, take a sample of the supply water going into the pump. COOLING IN WASTEWATER OUT CUTTING WATER IN HyPrecision 50S/60S/75S Operator Manual 808690... - Page 95 5. Wait approximately 20 seconds for the reading to become stable. 6. Compare the reading to the TDS table on page 189 in the section of this manual. Installation 7. Rinse the meter in clean, deionized water or filtered water after use. HyPrecision 50S/60S/75S Operator Manual 808690...
-
Page 96: High-Pressure Water System: Intensifier
High-pressure water system: Intensifier Preventive maintenance on the intensifier involves accessing various assemblies at specified intervals. To reduce downtime, Hypertherm recommends doing preventive maintenance on both ends of the intensifier at the same time. High-pressure end cap and stud nuts... -
Page 97: Prepare To Service The Intensifier
13/16-inch open-ended wrench or socket (high-pressure water fitting) 7/8-inch open-ended wrench (low-pressure water fitting) 1-inch open-ended wrench (output adapter) 1-1/6-inch open-ended wrench (high-pressure water fitting) Do this task when the pump is running in cooling mode. HyPrecision 50S/60S/75S Operator Manual 808690... - Page 98 4. Turn OFF the pump. 5. Turn OFF power from the primary utility source. Use standard lock out–tag out procedures. Refer to page 97 for more information. 6. Turn OFF the water to the pump. HyPrecision 50S/60S/75S Operator Manual 808690...
- Page 99 Water valve in the open position Prefilter water pressure Postfilter water pressure 8. Disconnect the high-pressure water line from the intensifier. 9. Disconnect the hose from the low-pressure water fitting on the high-pressure end cap. HyPrecision 50S/60S/75S Operator Manual 808690...
-
Page 100: Disassemble The Intensifier
3. Clean each part with a lint-free towel and isopropyl alcohol. Examine all parts for deterioration, corrosion, or damage. Do not use soap, detergent, or solvents. HyPrecision 50S/60S/75S Operator Manual 808690... - Page 101 1. Remove the stud nuts. 2. Pull the high-pressure end cap off. 3. Clean each part with a lint-free towel and isopropyl alcohol. Examine all parts for deterioration, corrosion, or damage. Do not use soap, detergent, or solvents. HyPrecision 50S/60S/75S Operator Manual 808690...
-
Page 102: Repair The Check Valves And The Low-Pressure Poppets
High-pressure water seals High-pressure cylinder Low-pressure poppet Required parts, tools, and materials Clean, lint-free towels Isopropyl alcohol Seal installation tools (included in the HyPrecision standard tool kit; refer to on page 74) Tools Rubber mallet HyPrecision 50S/60S/75S Operator Manual 808690... - Page 103 8. Slide the spacer tube out of the cylinder. 9. Disassemble all of the parts. 10. Clean each part with a lint-free towel and isopropyl alcohol. Examine all parts for deterioration, corrosion, or damage. Do not use soap, detergent, or solvents. HyPrecision 50S/60S/75S Operator Manual 808690...
- Page 104 Seal housing removal tool (included in the HyPrecision standard tool kit; refer to on page 74) Tools 1/8-inch hex wrench (seal housing removal tool) Two 8-32 × 2-inch (or longer) socket-head cap screws (plunger bearing) Recommended materials Dental pick (or similar tool) HyPrecision 50S/60S/75S Operator Manual 808690...
- Page 105 6. Remove the plunger bearing from the plunger. 7. Clean each part with a lint-free towel and isopropyl alcohol. Examine all parts for deterioration, corrosion, or damage. Do not use soap, detergent, or solvents. HyPrecision 50S/60S/75S Operator Manual 808690...
-
Page 106: Replace The Indicator Pin Spring
5. Remove the indicator pin from the indicator pin hole in the hydraulic end cap. 6. Clean each part with a lint-free towel and isopropyl alcohol. Examine all parts for deterioration, corrosion, or damage. Do not use soap, detergent, or solvents. HyPrecision 50S/60S/75S Operator Manual 808690... -
Page 107: Repair The Check Valves And The Low-Pressure Poppets
2. Put the check valve or poppet face flat on the lapping paper and slide it back and forth. Apply light pressure. Rocking the part or using too much pressure can damage the part face. CAUTION HyPrecision 50S/60S/75S Operator Manual 808690... - Page 108 4. Repeat this procedure until the face is smooth and flat and has a nearly mirrored finish. 5. Clean each part with a lint-free towel and isopropyl alcohol. Do not use soap, detergent, or solvents. HyPrecision 50S/60S/75S Operator Manual 808690...
-
Page 109: Repair The High-Pressure Cylinders
Push evenly on the pad while rolling the cylinder forward and backward. Nonstick scouring pad 5. Fold or cut the lapping paper to make 2 pieces, each approximately 3 cm (1-1/4 inches) wide by 8 cm (3-1/4 inches) long. HyPrecision 50S/60S/75S Operator Manual 808690... - Page 110 8. Clean the inside of the cylinder with a lint-free towel and isopropyl alcohol. Debris left in the cylinder can cause the seals or the poppets to fail. CAUTION Do not use soap, detergent, or solvents. HyPrecision 50S/60S/75S Operator Manual 808690...
-
Page 111: Assemble The Intensifier
The hydraulic center section includes the pistons, the plungers, the hydraulic cylinder, the hydraulic end caps, the low-pressure seals, and the proximity switches. Preventive maintenance on these parts requires special tools. Contact a Hypertherm Technical Service Associate for information and support regarding the installation, operation, maintenance, and repair of this equipment. - Page 112 2. Put the spring on the indicator pin. 3. Put the O-ring backup on the indicator pin cap. 4. Put a small quantity of hydraulic fluid on the O-ring. 5. Put the O-ring on the indicator pin cap. HyPrecision 50S/60S/75S Operator Manual 808690...
- Page 113 6. Put the indicator pin cap into the hydraulic end cap. 7. Put antiseize bolt lubricant (white lithium grease) on the cap screws. 8. Put the lock washers on the cap screws. Torque the cap screws to 10 N∙m (8 lbf∙ft). HyPrecision 50S/60S/75S Operator Manual 808690...
-
Page 114: Replace The Seal Housings
Required parts, tools, and materials 15563 HyPrecision premium high-pressure seal repair kit 11608 Plunger bearing 11609 Seal housing 13969 Petroleum-based O-ring lubricant Antiwear (AW) mineral oil or synthetic hydraulic fluid, ISO viscosity grade (VG) 32 or 46 HyPrecision 50S/60S/75S Operator Manual 808690... - Page 115 5. Put a small quantity of clean hydraulic fluid on the inside and the outside of the rod seal. 6. Put the rod seal onto the plunger with the wider side toward the hydraulic end cap. Do not push the rod seal into the hydraulic end cap. HyPrecision 50S/60S/75S Operator Manual 808690...
- Page 116 13. Put the high-pressure seal backup on the plunger and push it against the seal housing. 14. Make sure that the bottom weep holes are aligned. 15. If the proximity switch was removed for this procedure, reinstall it. HyPrecision 50S/60S/75S Operator Manual 808690...
- Page 117 After every 3,000 hours of operation or if the cylinder is Replace the high-pressure cylinders chipped or cracked Replace the spacer tubes After every 12,000 hours of operation Check valve Low-pressure poppet basket High-pressure hoops Spacer tube High-pressure water seals High-pressure cylinder Low-pressure poppet HyPrecision 50S/60S/75S Operator Manual 808690...
- Page 118 2. Put the high-pressure cylinder over the spacer tool so that the tool fits in the cylinder bore. 3. Put the low-pressure poppet into the low-pressure poppet basket. Keep the poppet and the poppet basket clean. Grease can cause the poppet to stick. Make sure that the poppet moves freely. HyPrecision 50S/60S/75S Operator Manual 808690...
- Page 119 7. Put the seal installation sleeve in the locator tool with the flat opening toward the cylinder. The beveled opening faces up. 8. Put a small quantity of high-vacuum grease on the red O-ring. HyPrecision 50S/60S/75S Operator Manual 808690...
- Page 120 11. Put the push tool into the insertion sleeve with the stepped end up. Apply even pressure while holding the sleeve tightly against the cylinder. 12. Remove the push tool from the insertion sleeve. 13. Make sure that the seal is installed in the cylinder correctly. HyPrecision 50S/60S/75S Operator Manual 808690...
- Page 121 20. Use the same procedure to install the second seal and the hoop in the high-pressure cylinder. 21. Slide the cylinder and the check valve on to the plunger by pushing on the end of the check valve until the cylinder is touching the seal housing. HyPrecision 50S/60S/75S Operator Manual 808690...
- Page 122 7/8-inch open-ended wrench 12091 Torque wrench, 3/4-inch drive, 60 lbf∙ft to 300 lbf∙ft (included in the 12084 HyPrecision standard tool kit) Square drive socket, 1-1/2 inch × 3/4 inch (included in the 12084 HyPrecision standard tool kit) HyPrecision 50S/60S/75S Operator Manual 808690...
- Page 123 Tighten each nut in 68 N∙m (50 lbf∙ft) increments using a repeating cross pattern until the recommended torque is reached. 5. Connect the low-pressure water line. 6. Torque the low-pressure water fitting to 31 N∙m to 41 N∙m (25 lbf∙ft to 30 lbf∙ft). HyPrecision 50S/60S/75S Operator Manual 808690...
-
Page 124: Replace The Output Adapters
15563 HyPrecision premium high-pressure seal repair kit 15568 HyPrecision S- and D-series poppet repair kit 11530 Output adapter High-pressure antiseize lubricant such as Blue Goop or AccuGoop 1-inch crowfoot wrench or socket 13/16-inch open-ended wrench or socket Torque wrench HyPrecision 50S/60S/75S Operator Manual 808690... - Page 125 10 mm (3/8 inch) and no threads are visible. If the gap is larger CAUTION or threads are visible, make sure that the poppet parts have not moved. 8. Torque the output adapter to 41 N∙m to 47 N∙m (30 lbf∙ft to 35 lbf∙ft). HyPrecision 50S/60S/75S Operator Manual 808690...
- Page 126 10. Connect the high-pressure water line. Make sure that a few of the threads on the high-pressure tubing are visible. 11. Torque the high-pressure water fitting to 41 N∙m to 47 N∙m (30 lbf∙ft to 35 lbf∙ft). HyPrecision 50S/60S/75S Operator Manual 808690...
-
Page 127: Intensifier Parts
11447 High-vacuum grease, 5 oz. 15568 HyPrecision S- and D-series poppet repair kit Part number Description Quantity 11526 Low-pressure poppet 11015 High-pressure poppet seat 11014 High-pressure poppet 11126 High-pressure poppet spring 15564 6-inch cotton-tipped applicators HyPrecision 50S/60S/75S Operator Manual 808690... - Page 128 Other parts Part number Description 11210-30 Lapping paper, 30 micron 11518 Indicator pin 11609 Seal housing 11608 Plunger bearing 11520 Low-pressure poppet basket 11523 Check valve assembly 11521 Spacer tube 11522 High-pressure cylinder 11530 Output adapter HyPrecision 50S/60S/75S Operator Manual 808690...
-
Page 129: High-Pressure Water System: Bleed-Down Valve
Do not attempt to repair a leak with pressure in the system. WARNING Use a piece of cardboard or other solid material to check for leaks when the pump is on. Do not use hands, cloth, paper, or towels. WARNING HyPrecision 50S/60S/75S Operator Manual 808690... -
Page 130: Repair The Bleed-Down Valve
Needle bushing SAE O-ring 10 Seal hoop Hydraulic piston High-pressure seal Piston O-ring 12 Valve body Piston O-ring backup 13 High-pressure poppet seat Actuator housing 14 Flow reducer Seal backup screw 15 Outlet adapter Needle HyPrecision 50S/60S/75S Operator Manual 808690... - Page 131 3. Use 2 wrenches to remove the hydraulic hose from the hydraulic hose fitting. 4. Use 2 wrenches to remove the high-pressure water fitting from the valve body. 5. Use 2 wrenches to remove the output adapter from the 3/8-inch gland nut. HyPrecision 50S/60S/75S Operator Manual 808690...
- Page 132 The SAE O-ring and the piston O-ring look almost the same. The SAE O-ring is thinner than the hydraulic piston O-ring. SAE O-ring Hydraulic piston O-ring 3. Use 2 wrenches to remove the actuator housing from the valve body. HyPrecision 50S/60S/75S Operator Manual 808690...
- Page 133 O-ring fits into the concave groove on the piston O-ring backup. The SAE O-ring and the piston O-ring look almost the same. The SAE O-ring is thinner than the hydraulic piston O-ring. SAE O-ring Hydraulic piston O-ring HyPrecision 50S/60S/75S Operator Manual 808690...
- Page 134 10. Push the hydraulic piston into position with a wooden dowel. 11. Use 2 wrenches to remove the outlet adapter from the valve body. 12. Remove the high-pressure poppet seat and the flow reducer from the outlet adapter. HyPrecision 50S/60S/75S Operator Manual 808690...
- Page 135 15. Clean each part with a lint-free towel and isopropyl alcohol. Examine all parts for deterioration, corrosion, or damage. Do not use soap, detergent, or solvents. 16. Discard the used parts. 17. Put high-vacuum grease on the new needle. HyPrecision 50S/60S/75S Operator Manual 808690...
- Page 136 20. Put the seal hoop on the high-pressure seal. The tapered edge is toward the high-pressure seal. Tapered edge 21. Put the high-pressure seal assembly on the needle. The hoop goes toward the needle bushing. 22. Put high-vacuum grease on the outside of the needle assembly. HyPrecision 50S/60S/75S Operator Manual 808690...
- Page 137 24. Push on the seal backup screw until it stops. 25. Remove the seal backup screw. Put high-pressure antiseize lubricant on the threads. 26. Use a socket wrench to tighten the seal backup screw in the valve body. HyPrecision 50S/60S/75S Operator Manual 808690...
- Page 138 29. Put the poppet seat in the seat cavity of the outlet adapter. 30. Put high-pressure antiseize lubricant on the surface of the poppet seat. 31. Turn the outlet adapter into the valve body until it is hand tight. HyPrecision 50S/60S/75S Operator Manual 808690...
- Page 139 33. Use 2 wrenches to tighten the outlet adapter and the actuator housing into the valve body. 34. Use 2 wrenches to tighten the O-ring boss adapter in the actuator housing. 35. Install the bleed-down valve. Refer to , which begins on page 140. Install the bleed-down valve HyPrecision 50S/60S/75S Operator Manual 808690...
-
Page 140: Install The Bleed-Down Valve
12880-912 Hydraulic fitting SAE O-ring (from 12981 Bleed-down valve II repair kit) 13969 Petroleum-based O-ring lubricant Full set of standard open-ended wrenches Adjustable wrench Torque wrench High-pressure antiseize lubricant such as Blue Goop or AccuGoop HyPrecision 50S/60S/75S Operator Manual 808690... - Page 141 4. Use 2 wrenches to tighten the high-pressure water fitting in the valve body. 5. Replace the hydraulic fitting SAE O-ring on the hydraulic hose fitting. Put O-ring lubricant on the O-ring. 6. Use 2 wrenches to tighten the hydraulic hose fitting in the O-ring boss adapter. HyPrecision 50S/60S/75S Operator Manual 808690...
- Page 142 Do not attempt to repair a leak with pressure in the system. WARNING Use a piece of cardboard or other solid material to check for leaks when the pump is on. Do not use hands, cloth, paper, or towels. WARNING HyPrecision 50S/60S/75S Operator Manual 808690...
-
Page 143: Bleed-Down Valve Parts
11447 High-vacuum grease, 5 oz. Other parts Part number Description 11796 O-ring boss adapter 11778 Hydraulic piston 11779 Actuator housing 12945 Seal backup screw 12943 Bleed-down valve body 12944 Outlet adapter 13969 Petroleum-based O-ring lubricant HyPrecision 50S/60S/75S Operator Manual 808690... -
Page 144: Start The Pump After Preventive Maintenance
The operator interface is the primary point of control. 5. Push the CONTROLS ON button to turn ON the control circuit inside the pump. The pump can not be turned on until the control circuit is on. HyPrecision 50S/60S/75S Operator Manual 808690... - Page 145 15. Log maintenance activities. Open the maintenance screen to log and track all maintenance performed on the pump and the intensifier. a. Touch the applicable area on the image of the pump. Select the area where maintenance was performed. HyPrecision 50S/60S/75S Operator Manual 808690...
-
Page 146: Recycling And End Of Product Life
Make sure that hazardous substances are disposed of safely and that the correct personal protective equipment is used. The safety specifications must be in accordance with the current local regulations at all times. HyPrecision 50S/60S/75S Operator Manual 808690... -
Page 147: Preventive Maintenance Records
5 – Preventive maintenance Preventive maintenance records Problem found and work done Date Hours Initials Date Hours Initials Date Hours Initials Date Hours Initials Date Hours Initials Date Hours Initials Date Hours Initials Date Hours Initials HyPrecision 50S/60S/75S Operator Manual 808690... - Page 148 5 – Preventive maintenance Problem found and work done Date Hours Initials Date Hours Initials Date Hours Initials Date Hours Initials Date Hours Initials Date Hours Initials Date Hours Initials Date Hours Initials Date Hours Initials HyPrecision 50S/60S/75S Operator Manual 808690...
-
Page 149: Parts Lists
Genuine Hypertherm parts are the factory-recommended replacement parts for this pump. The Hypertherm warranty might not cover damage caused by using nongenuine Hypertherm parts. To order parts, contact the original equipment manufacturer (OEM) or Hypertherm Inc. with the part numbers and quantities. -
Page 150: Tools
Torque wrench, 3/4-inch drive, 60 lbf∙ft to 300 lbf∙ft 13972 Filter wrench 13281 Granite lapping block, 22.86 cm × 30.48 cm × 5.08 cm (9 inch × 12 inch × 2 inch) 11210-12 Lapping paper, 12 micron 11210-15 Lapping paper, 15 micron HyPrecision 50S/60S/75S Operator Manual 808690... -
Page 151: Preventive Maintenance Repair Kits
Seal housing O-ring backup, -035 15568 HyPrecision S- and D-series poppet repair kit Part number Description Quantity 11014 High-pressure poppet 11126 High-pressure poppet spring 11015 High-pressure poppet seat 11526 Low-pressure poppet 15564 6-inch cotton-tipped applicator HyPrecision 50S/60S/75S Operator Manual 808690... - Page 152 Seal hoop 11324 Needle bushing 12880-908 Hydraulic fitting SAE O-ring 12880-912 Hydraulic fitting SAE O-ring 11679-114 Piston O-ring, -114 11680-114 Piston O-ring backup, -114 11743 Flow reducer 16123 Wooden dowel 11447 High-vacuum grease, 5 oz. HyPrecision 50S/60S/75S Operator Manual 808690...
-
Page 153: Other Parts
Switch, temperature and fluid level 11956 Pressure gauge, 5,000 psi, 1/4 NPT 11733 Shift valve and pilot assembly, 24 VDC 11805 Control manifold assembly 11954 Relief valve, high pressure 11955 Relief valve, low pressure 11964 Return diffuser, 2 inch HyPrecision 50S/60S/75S Operator Manual 808690... - Page 154 Sheathing end cover, 3/8-inch high-pressure tubing Intensifier high-pressure ends 11523 Check valve assembly 11520 Low-pressure poppet basket 11530 Output adapter 11522 High-pressure cylinder 11609 Seal housing 11521 Spacer tube 11608 Plunger bearing 11210-30 Lapping paper, 30 micron HyPrecision 50S/60S/75S Operator Manual 808690...
- Page 155 Intensifier hydraulic center section 11508 Piston 11673 Piston seal 11674 Wear ring 11593 Plunger retainer 11675 T-seal plunger coupler 11672 Nut, grade 8, 1 inch, -14 11310 Retaining ring 11502 Hydraulic cylinder 11554 Nut, threaded HyPrecision 50S/60S/75S Operator Manual 808690...
-
Page 156: Complete List Of Preventive Maintenance Kits, Parts, Tools, And Materials
Hose or pipe for draining hydraulic fluid Clean, deionized water or filtered water Clean funnel (recommended) Antiwear (AW) mineral oil or synthetic hydraulic Bucket or pail (recommended) fluid, ISO viscosity grade (VG) 32 or 46 HyPrecision 50S/60S/75S Operator Manual 808690... -
Page 157: Troubleshooting
Failure to correct the cause of a leak can cause damage to the water fittings. CAUTION Hypertherm products are designed and manufactured with a commitment to continuous quality control and safety. Contact a Hypertherm Technical Service Associate for information and support regarding the installation, operation, maintenance, and repair of this equipment. -
Page 158: Alarm Screens
The cut-pressure control knob is turned anticlockwise too much. The pressure-enable valve has failed. A motor overload relay has tripped. A fuse in the electrical enclosure has blown. The pressure-relief valve on the primary hydraulic manifold has failed. HyPrecision 50S/60S/75S Operator Manual 808690... -
Page 159: Intensifier
While the pump is in cooling mode, touch the box on the operator interface that matches the side the of the intensifier stall. If the intensifier strokes to the opposite side, the problem is electrical. If the intensifier does not move, the problem is mechanical. HyPrecision 50S/60S/75S Operator Manual 808690... - Page 160 157. Troubleshooting The hydraulic piston seals are worn. Contact a Hypertherm Technical Service Associate for assistance. If a high-pressure cylinder is hot, disassemble it and look for flaws, deterioration, erosion marks, or cracks in the parts, including the check valve and piston seal.
- Page 161 The low-pressure water relief valve is venting water to the drain. Contact a Hypertherm Technical Service Associate for assistance. If the difference between the values on the pre- and The postfilter water-pressure gauge shows that the postfilter water-pressure gauges is higher low-pressure water is at less than 2.76 bar...
- Page 162 Overstroking to the right means that there is a failure the seat. of the high-pressure poppet on the left side of the intensifier. Instructions about how to disassemble the intensifier and how to repair or replace parts start on page 97. HyPrecision 50S/60S/75S Operator Manual 808690...
-
Page 163: Leaks
Make sure that the weep holes are free of debris. Look for leaks at both ends of the high-pressure cylinder. Output adapter weep hole Static seal leak point High-pressure seat weep hole Dynamic seal housing weep hole HyPrecision 50S/60S/75S Operator Manual 808690... - Page 164 In water-cooled systems, water can enter the hydraulic system through the heat exchanger. If this is suspected to be the case, contact a Hypertherm Technical Service Associate for assistance. Replace the hydraulic fluid and examine all of the parts, including the inside of the hydraulic fluid tank, the hydraulic hoses, and the seals.
-
Page 165: Short Seal Life
Check the air pressure in the water accumulator tank. Refer to page 89 for instructions. Replace the high-pressure cylinder. If the high-pressure seal backups have a short life, make sure that the plunger bearing is not worn. HyPrecision 50S/60S/75S Operator Manual 808690... -
Page 166: Hydraulic Fluid
Fluid that is too hot is thin, which accelerates wear on the parts, increases the formation of sludge, degrades the fluid, and decreases lubrication and protective qualities. HyPrecision 50S/60S/75S Operator Manual 808690... - Page 167 • Adjust the hydraulic fluid temperature. Refer to page 81 for instructions. Air-cooled systems Do not adjust the setting on the thermal overload or the fan motor starter unless instructed to do so by a Hypertherm Technical Service Associate. CAUTION Consider supplemental cooling. The ambient temperature is too high.
-
Page 168: Water Pressure
1. Turn ON the pump in cooling mode. 2. Push the water filter purge buttons until water comes out from under each button. Water isn’t flowing through the water filters. The relief valve on the pump manifold has failed. Replace the valve. HyPrecision 50S/60S/75S Operator Manual 808690... - Page 169 • Look through the bell housing to make sure that the coupler is turning. The boost pump is not operating. • In rare cases, the boost pump motor requires replacement. Contact a Hypertherm Technical Service Associate for assistance. HyPrecision 50S/60S/75S Operator Manual 808690...
-
Page 170: Water Pressure Is Too High
If the value on either water-pressure gauge is more than 8.62 bar or 861.84 kPA (125 psi), contact a Hypertherm Technical Service Associate for assistance. The pump's low-pressure water parts are rated for a maximum pressure of 8.62 bar or 861.84 kPA (125 psi). In environments with high supply water pressure, the boost pump can increase the water pressure to more than the maximum. -
Page 171: Motor Fault
The manufacturer recommends tightening the hose clamps to a maximum of 30 N∙m (22 lbf∙ft). If the pump is still noisy after tightening the hose clamps, contact a Hypertherm Technical Service Associate. HyPrecision 50S/60S/75S Operator Manual 808690... - Page 172 7 – Troubleshooting HyPrecision 50S/60S/75S Operator Manual 808690...
-
Page 173: Pump Specifications
This section includes details about the pump, including this information: Power and water specifications and orifice sizes for each pump model Physical qualities such as dimensions, weight, and capacity Recommended operating conditions Information about fasteners and fittings HyPrecision 50S/60S/75S Operator Manual 808690... -
Page 174: All Models
Refrigeration tons is the heat transfer required at 0°C (32°F) to make 1 short ton (2,000 lb) of ice in 24 hours. 3.5 kW = 1 refrigeration ton = 12,000 Btu/hour Using a chiller with a water-glycol solution reduces the efficiency of the heat exchanger. HyPrecision 50S/60S/75S Operator Manual 808690... -
Page 175: Hyprecision 50S
Piercing water pressure 137,895 kPa — factory setpoint (20,000 psi) COOLING IN and COOLING OUT 11.4 L/minute — Flow (3 gallons/minute) 2.76 bar or 275.79 kPa 7.93 bar or 792.90 kPa Pressure (40 psi) (115 psi) HyPrecision 50S/60S/75S Operator Manual 808690... - Page 176 8 – Pump specifications This model supports these orifice sizes. Number of orifices 0.35 mm (.014 in.) 0.18 mm (.007 in.) 0.25 mm (.010 in.) 0.15 mm (.006 in.) 0.20 mm (.008 in.) 0.13 mm (.005 in.) HyPrecision 50S/60S/75S Operator Manual 808690...
-
Page 177: Hyprecision 60S
1,38.95 bar or 137,895 kPa Piercing water pressure — factory setpoint (20,000 psi) COOLING IN and COOLING OUT 11.4 L/minute — Flow (3 gallons/minute) 2.76 bar or 275.79 kPa 7.93 bar or 792.90 kPa Pressure (40 psi) (115 psi) HyPrecision 50S/60S/75S Operator Manual 808690... - Page 178 8 – Pump specifications This model supports these orifice sizes. Number of orifices 0.41 mm (.016 in.) 0.20 mm (.008 in.) 0.28 mm (.011 in.) 0.18 mm (.007 in.) 0.23 mm (.009 in.) 0.15 mm (.006 in.) HyPrecision 50S/60S/75S Operator Manual 808690...
-
Page 179: Hyprecision 75S
1,38.95 bar or 137,895 kPa Piercing water pressure — factory setpoint (20,000 psi) COOLING IN and COOLING OUT 11.4 L/minute Flow — (3 gallons/minute) 2.76 bar or 275.79 kPa 7.93 bar or 792.90 kPa Pressure (40 psi) (115 psi) HyPrecision 50S/60S/75S Operator Manual 808690... - Page 180 8 – Pump specifications This model supports these orifice sizes. Number of orifices 0.43 mm (.017 in.) 0.23 mm (.009 in.) 0.30 mm (.012 in.) 0.20 mm (.008 in.) 0.25 mm (.010 in.) 0.18 mm (.007 in.) HyPrecision 50S/60S/75S Operator Manual 808690...
-
Page 181: Torque Values
Align the flange face to the mating surface. Code 61 grade 8 Code 62 grade 8 1/16-inch dash Bolt size size N∙m lbf∙ft N∙m lbf∙ft 5/16-28 inch 3/8-16 inch 3/8-16 inch 7/16-14 inch 1/2-13 inch HyPrecision 50S/60S/75S Operator Manual 808690... -
Page 182: Fittings
47 to 61 35 to 45 3/8 inch 1-3/16 inch 81 to 102 60 to 75 9/16 inch Use these values when no other torque value is identified. Other torque specifications are included on the technical drawings. HyPrecision 50S/60S/75S Operator Manual 808690... - Page 183 This table shows maximum values. The torque necessary to make a sufficient seal depends on the condition of the pipe threads and can be much lower than the maximum. Hypertherm recommends using thread sealant on all NPT hydraulic fittings. HyPrecision 50S/60S/75S Operator Manual 808690...
- Page 184 N∙m lbf∙ft N∙m lbf∙ft N∙m lbf∙ft N∙m lbf∙ft Lubricate the threads of JIC Do not lubricate brass JIC Do not use thread sealant on steel fittings with hydraulic fittings. SAE hydraulic fittings. fluid. HyPrecision 50S/60S/75S Operator Manual 808690...
-
Page 185: Installation
WARNING Keep the work area clean and free of fluid spills. Hypertherm products are designed and manufactured with a commitment to continuous quality control and safety. Contact a Hypertherm Technical Service Associate for information and support regarding the installation, operation, maintenance, and repair of this equipment. -
Page 186: Buyer Obligations
CAUTION Hypertherm does not always ship the pump with hydraulic fluid in the tank. It is the buyer's responsibility to fill the tank with hydraulic fluid. The buyer is responsible for these obligations: ... -
Page 187: Requirements
Equipment installed in a hot location can require a larger external air cooler. Contact the OEM or a Hypertherm Technical Service Associate for assistance. Ambient temperature has an effect on cooling. Supplementary cooling is usually necessary for a pump confined to a small, high-temperature space. -
Page 188: Water
Reverse osmosis systems are available from Hypertherm. Test the water quality Public utility water and well water quality can change. Hypertherm recommends regular testing. Some TDS meters require calibration before use. For best results, calibrate the meter at 25.0°C (77°F). Refer to the instructions supplied with the TDS meter. - Page 189 (50 ppm to 150 ppm) (150 ppm to 220 ppm) (220 ppm) Use nonmetallic or Consider using a reverse Use a reverse stainless steel — osmosis system to remove osmosis system to fittings. TDS. remove TDS. HyPrecision 50S/60S/75S Operator Manual 808690...
-
Page 190: Receive And Unpack The Equipment
4. Make sure that the delivery and shipping documents match the equipment that was ordered and what was received. Report shortages or damages to the OEM or to Hypertherm Waterjet within 10 days of receipt of the equipment. -
Page 191: Make The Connections For Remote Operation
Controls on indicator 5024C Output Remote controls on If the pump is off, this turns on the primary control relay. Wire number Type of contact 6027, 5024A Momentary, normally open Operation 6027, 5024A Momentary, normally open Status HyPrecision 50S/60S/75S Operator Manual 808690... - Page 192 This input turns on the fan motor and the cooling water or the cooling fan logic, and turns off the intensifier. Wire number Type of contact Input, momentary or maintained, 6030 Emergency stop normally open HyPrecision 50S/60S/75S Operator Manual 808690...
-
Page 193: Install The External Air Cooler
The full load amperes, overload settings, and wire sizes are different, depending on the motor size. For more information, refer to the system schematic drawing. 4. Push the cable through the cord grip connector in the electrical enclosure. 5. Connect the cable to the motor starter–contactor. HyPrecision 50S/60S/75S Operator Manual 808690... -
Page 194: Make The Connections To The Utility Panel Fittings
1-1/2-inch open-ended wrench 5/8-inch open-ended wrench 1/4-inch NPT male connector Two 3/4-inch NPT male connectors 3/8-inch high-pressure female connector Two -16 JIC female connectors (for an air-cooled system) Two 1-inch NPT male connectors (for a water-cooled system) HyPrecision 50S/60S/75S Operator Manual 808690... - Page 195 If the supply water is treated by reverse osmosis, the boost connector CUTTING WATER pump settings can require adjustment. Contact a Hypertherm Technical Service Associate for assistance. Connect this line to the supply water supply or to the chiller. Water-cooled ...
-
Page 196: Add Hydraulic Fluid
16 and less than or equal to 35 more than 35 HyPrecision pumps can leak up to 160 mA. To reduce the effects of a high leakage current, connect the pump to a dedicated supply transformer that has separate windings. HyPrecision 50S/60S/75S Operator Manual 808690... -
Page 197: Do The First Startup
Look for leaks, deterioration, damage, or other conditions that can interfere with operation. Look at the sight gauge on the hydraulic fluid tank. If necessary, add hydraulic fluid. Close all doors and replace all covers, including access covers. HyPrecision 50S/60S/75S Operator Manual 808690... -
Page 198: Turn On The Utilities
Change the system configuration on the operator interface A password-protected system configuration menu permits the operator to change the language and to change between psi and bar on the operator interface. Contact a Hypertherm Technical Service Associate for assistance. HyPrecision 50S/60S/75S Operator Manual 808690... -
Page 199: Start The Pump
Do not do the first startup with a diamond orifice installed. The likelihood of damaging the orifice during the first startup is very high. Hypertherm recommends using a ruby orifice during the first 40 hours of operation. Gear pump Shaft access cover... - Page 200 Use a piece of cardboard or other solid material to check for leaks when the pump is on. Do not use hands, cloth, paper, or towels. WARNING 11. Push the filter purge buttons until water comes out from under each button. HyPrecision 50S/60S/75S Operator Manual 808690...
- Page 201 6. Make sure that the value on the prefilter water-pressure gauge is between 3.45 bar and 7.93 bar or 345 kPa and 793 kPa (50 psi to 115 psi). If the pressure is not in this range, repeat the procedure. 7. Tighten the jam nut on the bypass relief valve. HyPrecision 50S/60S/75S Operator Manual 808690...
- Page 202 4. Make sure that the hydraulic pressure is at or less than 34 bar or 3,447 kPa (500 ). If the pressure is higher than 34 bar or 3,447 kPa (500 psi), contact a Hypertherm Technical Service Associate for assistance.
Need help?
Do you have a question about the HyPrecision 50S and is the answer not in the manual?
Questions and answers
Part#'s, pricing and availability for P50S insifier
Spelling correction ( intensifier )..... Thx