Clayton Power LPS II Series Manual And Safety Instructions
Hide thumbs
Also See for LPS II Series:
- Manual and safety instructions (5 pages) ,
- Manual and safety instructions (16 pages) ,
- Manual and safety instructions (41 pages)
Table of Contents
Advertisement
Quick Links
Advertisement
Table of Contents

Related Manuals for Clayton Power LPS II Series


Summary of Contents for Clayton Power LPS II Series
- Page 1 Manual and safety instructions | English The LPS II range...
-
Page 2: Safety Instructions
Safety instructions The Lithium Power Supply (LPS) is classified as Class 9 dangerous goods according to UN3480, a power source with high energy density and hazardous materials in a sealed metal cabinet. Installation must strictly follow national safety regulations in accordance with the requirements for enclosure, installation, creepage, clearance, marking and segregation requirements for the end- use application. -
Page 3: Table Of Contents
Introduction All information and instructions have been prepared in accordance with current standards, industry guidelines and our many years of experience. Index Safety instructions ..........................2 Introduction ............................3 Index ..............................3 Function list ............................3 In the box ..............................3 Assembly...............................4 Power cable ............................4 Transport ...............................4 Maintenance ............................4 Service ..............................4... -
Page 4: Assembly
Mounting The LPS II must be securely fastened before use. We recommend using Clayton Power LPS II mounting bracket (not supplied as standard) for secure fastening. When installing the LPS II, sufficient space must be left around it to ensure uninterrupted airflow. -
Page 5: Disposal
• 230 V AC input protected with 16 A fuse (non-replaceable) • 230 V AC output protected by residual current circuit breaker 30 mA | 13 A (can be replaced by Clayton Power or an authorised service provider) • DC input protected with 50 A midi fuse (can be replaced by Clayton Power or an authorised service provider) •... -
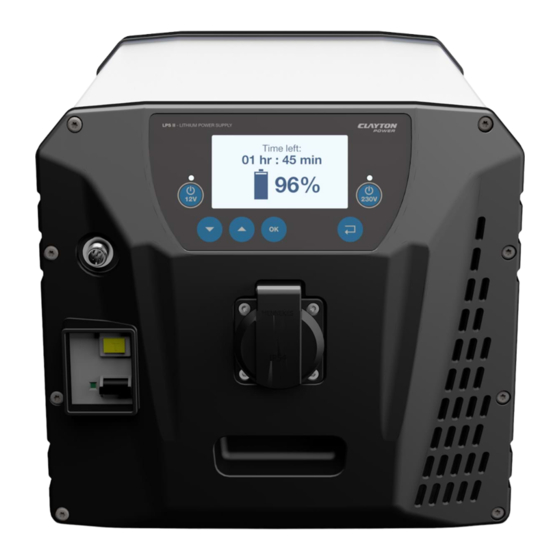
Page 6: Basic Operation
Basic operation Power ON and OFF Press the power button (12VDC/230VAC/both) on the front of the control panel or the power button on the remote to start the device. The green LED indicates power ON for either 12VDC or 230VAC. To turn off the device, press the power button. -
Page 7: Adjustable Ac Charging
Energy saver: Threshold The energy saver threshold is part of the save function, which specifies the power load the LPS II must be below before the timer starts. If the current again exceeds the specified level, the timer will reset and only be activated when the current falls below the level again. Factory setting is 20W. -
Page 8: Adjustable Dc Charging
Menu: 12 VDC Charging Status: Functions: Operation status: On/Off Jumpstart functionality: Active/Inactive Power: (W)att Jumpstart: On/Off Voltage: (V)olt Set Reference Volt: Auto/12V/24V Current: (A)mpere Set Current: (A)mps Selected Voltage: 12V/24V Jumpstart functionalityJumpstart functionality is a safety feature that must be enabled before it is possible to use the jumpstart function. -
Page 9: Adjustable Solar Charging
Menu: Solar Status: Functions: Operation status: On/Off Set Operation: ON/OFF Power: (W)att Self-learning OC Voltage: (V)olt Voltage: (V)olt Self-learning MPPT Voltage: (V)olt Current: (A)mps Self-learning Start Voltage: (V)olt Set Operation The C2 terminal on the LPS II unit is a multifunctional terminal which includes solar charging. You can therefore choose under "Set Operation"... -
Page 10: Error Codes
Self-learning Start Voltage Start Voltage controls when the LPS II starts charging from the connected solar panels. If the setting is not changed, the LPS II unit will find the most optimal setting itself. Press "OK" to go to menu - Select "Solar" - Select "Self-learning Start Voltage" and press "OK". Use the arrows in the Self-learning Start Voltage window to change the maximum number of volts from 0.00V to 50V. - Page 11 Temperature The temperature can be read here for each of the 5 temperature sensors inside the device. Transformer: Degrees Celsius IGBT Module: Degrees Celsius Between Cell 1 and 2: Degrees Celsius Between Cell 2 and 3: Degrees Celsius Between Cell 3 and 4: Degrees Celsius I/O Voltage I/O Voltage shows how many volts are on the 5 terminals.
-
Page 12: Protection Setup
Backlight – Charge You can set the brightness level on the display while the LPS II is charging here. Press "OK" to go to menu - Select "General" - Select "Display" - Select "Backlight - Charge" Use the arrows in the Backlight - Charge window to change the timer or switch the backlight on/ off. - Page 13 Service - QR Code A QR code can be scanned in the Service category that will take you directly to Clayton Power's service page. On the service page, you will find all manuals as well as tips and tricks for different installations and uses.
-
Page 18: Warranty
MAY CAUSE DAMAGE TO OTHER ELECTRICAL EQUIPMENT AND WILL VOID THE WARRANTY. Clayton Power warrants, to the original purchaser only, for a period of 24 months from the date of purchase, that the Clayton Power unit will be in good working order when properly installed and operated as described in this manual. -
Page 19: Copyright
Copyright The information in this document remains the sole property of Clayton Power. No part of this document may be copied or reproduced in any form or by any means, and the information contained herein may not be communicated to third parties without the prior written consent of Clayton Power.
Need help?
Do you have a question about the LPS II Series and is the answer not in the manual?
Questions and answers