Table of Contents
Advertisement
Quick Links
Echoflex Installation Guide
Magnetic Contact Sensor (MC-31)
Overview
The MC-31 is a
battery-operated contact
sensor that monitors the
status of an interior window
or door and provides a reliable
and simple method to detect
occupancy at entry points. The
MC-31 can be configured to
monitor closed-to-open, and/
or open-to-closed transitions,
or the current state of the
device.
The sensor is well suited for
occupancy-based hospitality
applications that require control to power a room or setback temperature
control devices.
The MC-31incorporates features that assist the installer to position the
device without the need for signal strength indicators and configuration
tools.
This document covers installation, testing, and setup of all MC-31 models.
The product package includes the contact sensor, magnet, and battery.
Prepare for Installation
To ensure optimal function, consider the installation environment and the
following guidelines:
• For indoor use only. Operating temperature -25°C to 65°C
(-13°F to 149°F), 5%–92% relative humidity (non-condensing).
• High density construction materials and large metal appliances or
fixtures in the space may disrupt wireless transmissions.
• Install the sensor within range of linked receivers or controllers, 24 m
(80 ft) unobstructed view. Consider adding a repeater to extend the
wireless signal, if required.
Supplies required to install (not provided):
• Four #6 screws, double-sided tape, or Velcro
Corporate Headquarters Middleton, WI, USA
Web
echoflexsolutions.com
© 2021 Echoflex Solutions, Inc. Trademark and patent info:
Echoflex intends this document to be provided in its entirety. Product information and specifications subject to change.
8188M2101 Rev A Released 2021-08
|
Phone +1 608 831 4116
|
Email
info@echoflexsolutions.com
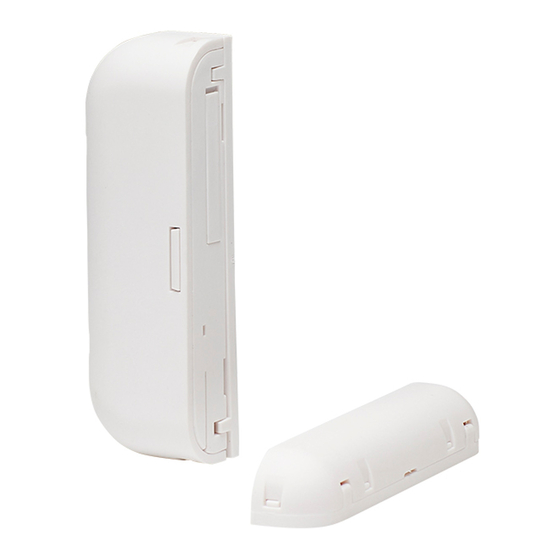
Sensor
Battery Tray
LED
|
Support
service@echoflexsolutions.com
echoflexsolutions.com/ip
Magnet
®
Advertisement
Table of Contents

Related Manuals for echoflex MC-31


Summary of Contents for echoflex MC-31
- Page 1 Phone +1 608 831 4116 echoflexsolutions.com Email info@echoflexsolutions.com Support service@echoflexsolutions.com © 2021 Echoflex Solutions, Inc. Trademark and patent info: echoflexsolutions.com/ip Echoflex intends this document to be provided in its entirety. Product information and specifications subject to change. 8188M2101 Rev A Released 2021-08...
-
Page 2: Installation
Magnetic Contact Sensor Installation The MC-31 sensor has two parts: the contact sensor and the magnet. The sensor should be installed on the casing and the magnet on the moving window or door. The location of the MC-31 directly affects the quality of the controller’s message reception. -
Page 3: Battery Power
3. Deactivate Link mode on the controller. Battery Power A CR2032 battery is included with the MC-31. The battery may be factory installed or packed separately according to shipping regulations. Insert the battery if required or remove the protective plastic tab before installing. - Page 4 The menu times out after two minutes of inactivity. Note: A combination of green, blue, and red LEDs creates a white LED color. The white LED blinks twice to confirm a selection. Magnetic Contact Sensor (MC-31) Page 4 of 12 Echoflex...
-
Page 5: Range Confirmation Test
• When the green LED blinks once, press and hold the [Teach] button until the white LED blinks twice. The MC-31 then flashes all the LEDs and exits the menu. Range Confirmation Test The Range Confirmation Test quantifies the wireless signal strength with a linked controller that has range confirmation capability. -
Page 6: Led Display
2 green blinks Enabled: LED blink on contact (default) 4. Press and hold the [Teach] button until the white LED blinks twice when the target indication displays. The MC-31 saves the setting and then restarts. Magnetic Contact Sensor (MC-31) Page 6 of 12... - Page 7 EEP Select The default EEP setting is configured to work with Echoflex controllers. The MC-31 can be configured to be compatible with controllers that use an alternate profile. 1. Press and hold the [Teach] button until the white LED blinks twice.
-
Page 8: Operating Mode
Echoflex Installation Guide Magnetic Contact Sensor Operating Mode The Operating Mode determines what type of event will trigger the MC-31 to send a message. Minimizing transmissions conserves battery power, which may be a consideration in high-activity installations. 1. Press and hold the [Teach] button until the white LED blinks twice. - Page 9 Every 13.5 minutes 4. Press and hold the [Teach] button until the white LED blinks twice when the target indication displays. The MC-31 saves the setting and then restarts. To exit before time-out, press and hold the [Teach] button until the white LED blinks twice.
- Page 10 5 blue blinks Status message every 8 hours 4. Press and hold the [Teach] button until the white LED blinks twice when the target indication displays. The MC-31 saves the setting and then restarts. Magnetic Contact Sensor (MC-31) Page 10 of 12...
-
Page 11: Restore Defaults
Disable (default) 2 red blinks Enable 4. Press and hold the [Teach] button until the white LED blinks twice when the target indication displays. The MC-31 saves the setting and then restarts. Restore Defaults To restore all the factory default settings: 1. -
Page 12: Fcc Compliance
Echoflex Installation Guide Magnetic Contact Sensor Compliance For complete regulatory compliance information, see the Echoflex Magnetic Contact Sensor datasheet at echoflexsolutions.com. FCC Compliance Echoflex Magnetic Contact Sensor (For any FCC matters): Echoflex Solutions, Inc. 3031 Pleasant View Road Middleton, WI 53562 +1 (608) 831-4116 echoflexsolutions.com...
Need help?
Do you have a question about the MC-31 and is the answer not in the manual?
Questions and answers