Table of Contents
Advertisement
Available languages
Available languages
Quick Links
300 SERIES
ROOF EXHAUST
OPERATION INSTRUCTIONS AND PARTS MANUAL
PLEASE READ AND SAVE THESE INSTRUCTIONS
300 SERIES MODELS: 307, 309, 310, 312, 315, 318
GENERAL SAFETY
Rotating parts, (pulleys, shafts and belts) on fans should not be exposed. Where these components are not protected by ductwork, cabinets
or covers, appropriate guards should be employed to restrict exposure to rotating parts. Access doors should not be opened with the fan
operating to avoid foreign objects being drawn into the system. On initial start-up, a careful inspection should be carried out to ensure no
foreign material is present which could become airborne in the system.
Read installation and operation instructions carefully before attempting to install, operate or service Canarm/Delhi 300 Series. Failure to
comply with instructions could result in personal injury and/or property damage. Retain instructions for future reference.
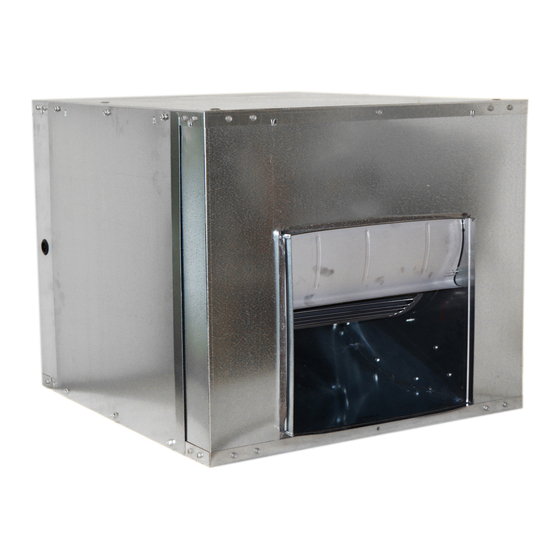
DESCRIPTION
DELHI 300 Series Blowers are designed as a quiet and efficient
outdoor roof exhauster for high-rise apartments, schools, and
commercial industrial applications. These forward curved,
double inlet blowers are enclosed in a sturdy insulated steel
cabinet and c/w a recessed bottom for mounting to an existing
curb, with discharge in any of four positions. These blowers are
belt drive.
Motor, drive installations and servicing may be completed
through a removable top cover.
Prelubricated ball bearings, motor bracket, back draft dampers , motor adjustment hardware and a dynamically balanced wheel are
standard equipment.
BEFORE YOU BEGIN
Inspect unit for damage, report any shipping damage to carrier. Check all fasteners,
re-tighten as required. Rotate the blower wheel by hand to ensure free rotation. If rubbing
occurs, loosen the set screw(s), re-position the wheel to the shaft center, re-tighten set
screws.
INSTALLATION
1. NOTE: Check the interior of the blower housing. It should be clean and free of
debris. Rotate the blower wheel by hand. It should not rub against the housing inlet.
If rubbing occurs, loosen the set screws on the wheel hub and shift the wheel to
obtain clearance. Retighten all set screws.
2. Establish the direction of exhauster discharge. Carefully lift the unit and position over
the existing curb. Confirm the unit is properly seated and secure into positon by
fastening through the 5/16" holes located in the unit's skirt.
3. Insert the exhaust cowl (air direction downward) into the channels provided on either
side of the exhaust port.
300 SERIES_03_11_22
Maximum HP Ratings and Shaft Details
Model Number
Max. H.P.
307
3/4
309
3/4
310
1-1/2
312
2
315
3
318
5
FIGURE 1:
Shaft Diameter
Shaft End
3/4"
keyway
3/4"
keyway
3/4"
keyway
3/4"
keyway
1"
keyway
1"
keyway
Installation Method
Page 1 of 4
Advertisement
Table of Contents

Related Manuals for Canarm DELHI 300 Series


Summary of Contents for Canarm DELHI 300 Series
- Page 1 Read installation and operation instructions carefully before attempting to install, operate or service Canarm/Delhi 300 Series. Failure to comply with instructions could result in personal injury and/or property damage. Retain instructions for future reference.
- Page 2 300 SERIES ROOF EXHAUST MOTOR, PULLEYS & BELTS (See Table below) Mount the blower sheave on the blower shaft and tighten its set screw securely on the key of the shaft,(See Table 1 for Drive Data) Mount the motor sheave on the motor shaft. Leave some clearance between the pulley and the motor end bell. Tighten the set screws on the key of the motor shaft.
-
Page 3: Operation
300 SERIES ROOF EXHAUST FIGURE 2 FIGURE 3 PULLEy ALIGNMENT BEARING REPLACEMENT ELECTRICAL WARNING ENSURE POWER SUPPLy IS DISCONNECTED & LOCkED OUT PRIOR TO MAkING ELECTRICAL CONNECTIONS Before connecting the motor to the electrical supply, check the electrical characteristics and wiring instructions as indicated on the motor nameplate or inside the conduit box cover to ensure proper voltage and phase. -
Page 4: Warranty
WARRANTY Canarm Ltd. Air Moving Products are guaranteed for a period of one year against manufacturing defects in material and workmanship when operating under normal conditions. Liability is limited to the replacement of defective parts. Labour and transportation costs are not included. -
Page 5: Installation
Lisez les instructions d’installation et d’opération attentivement avant d’effectuer l’installation, l’opération ou la maintenance des ventilateurs de la série Canarm/Delhi 200 ou Canarm/Delhi IDB. Le non-respect des instructions peut entraîner des blessures et/ou des dommages matériels. Conservez les instructions pour référence future. - Page 6 SÉRIES 300 ROOF EXHAUST MOTEUR, POULIES & COURROIES (voir table ci-dessous) 1. Montez la poulie du ventilateur sur l’arbre du ventilateur et serrez fermement la vis de réglage sur la clavette de l’arbre. 2. Montez la poulie du moteur sur l’arbre du moteur. Laissez un jeu entre la poulie et la cloche côté moteur. Serrez les vis de réglage sur la clavette de l’arbre du moteur.
-
Page 7: Entretien
SÉRIES 300 ROOF EXHAUST FIGURE 2 FIGURE 3 BELT ALIGNMENT BEARING REPLACEMENT ALIGNEMENT DE LA COURROIE REMPLACEMENT DES ROULEMENTS ROTATION DE L’ARBRE ADÉQUATE INADÉQUAT INADÉQUAT ÉlECTRiQuE MISE EN GARDE ASSUREz-VOUS QUE L’ALIMENTATION ÉLECTRIQUE EST DÉCONNECTÉE ET VERROUILLÉE AVANT D’EFFECTUER LES CONNEXIONS ÉLECTRIQUES. Avant d’effectuer la connexion du moteur à... -
Page 8: Liste Des Pièces
GARAnTiE Les produits de circulation d’air Canarm Ltd sont garantis pour une période d’un an contre les défauts de fabrication dans les matériaux et la fabrication du produit lorsqu’ils fonctionnent dans des conditions normales. La responsabilité est limitée au replacement des pièces défectueuses.