Table of Contents
Advertisement
Quick Links
OWNER'S MANUAL
Serial No.:
Just like your car - a Podiatry Drill will operate best when serviced regularly.
PREVENTATIVE MAINTENANCE:
In consultation with the Manufacturer, Briggate Medical Company
recommend that this appliance be sent to us for inspection every:
Preventative Maintenance scope:
dis-assemble and clean
vacuum motor clean and test
circuit board inspection/clean
handpiece clutch inspection/re-build
handpiece motor testing
handpiece bearing replacement
electrical test and tagging
BAEHR
BAEHR TEC A2000+
Date of Purchase:
18 MONTHS
SERVICE FREQUENCY
®
briggatemedicalcompany
•
•
.r;.
•
Advertisement
Table of Contents

Related Manuals for Baehr TEC A2000


Summary of Contents for Baehr TEC A2000
- Page 1 OWNER'S MANUAL ® BAEHR BAEHR TEC A2000+ Serial No.: Date of Purchase: Just like your car - a Podiatry Drill will operate best when serviced regularly. PREVENTATIVE MAINTENANCE: In consultation with the Manufacturer, Briggate Medical Company recommend that this appliance be sent to us for inspection every:...
-
Page 2: Table Of Contents
BaehrTec A2000 operating instructions Contents Page Contents......................2 Note to users ......................4 Symbols....................5 2.1.1 2.1.1 Symbols in these operating instructions........5 2.1.2 2.1.2 Nameplate with performance figures.......... 6 2.1.3 2.1.3 Symbols on the packaging............7 Foreword..................... 8 General product description and application ..........9 2.3.1 Operator requirements.............. - Page 3 BaehrTec A2000 operating instructions Safety information..................43 Maintenance (disinfection) ................. 44 Guarantee..................... 44 Recycling/disposal..................45 Self-help in the event of malfunctions............46 5.5.1 Changing fuses................48 5.5.2 Cleaning the handpiece button............48 5.5.3 Changing the dampers for the handpiece case ....... 50 Technical specifications..................
-
Page 4: Note To Users
BaehrTec A2000 operating instructions Note to users It is imperative that you read these operating instructions carefully before first use and precisely follow the instructions and directions contained within. These operating instructions form part of the device user agreement. By thoroughly reading them, you will be familiarised fully with the functioning and operation of the device and will therefore be able to recognise and avoid operating errors, dangers and damage. -
Page 5: Symbols
BaehrTec A2000 operating instructions On the basis of the risk assessment already implemented we have noticed that (electro) magnetic fields can lead to interference. Please therefore switch off all devices and equipment (mobile phones, Wi-Fi etc.) that create or are able to create such fields while using the device. -
Page 6: 2.1.2 Nameplate With Performance Figures
BaehrTec A2000 operating instructions 2.1.2 2.1.2 Nameplate with performance figures Fig. 1 BaehrTec A2000 CE sign (Communauté Européenne) with the number of the certification authority. A product bearing this label fulfils the requirements of the corresponding EU guideline (the applicable European Standard). Application part of type B This application part guarantees protection against electric shock due to the compliance of the leakage currents with standards (Type B). -
Page 7: 2.1.3 Symbols On The Packaging
BaehrTec A2000 operating instructions Functional earthing This symbol provides information indicating that the mains adapter is connected to earth (the label can be found directly on the mains adapter). 2.1.3 2.1.3 Symbols on the packaging Transport upright (up = in direction of arrow) Protect from impacts! Protect from wetness! Permitted temperature range: -10°C to +40°C... -
Page 8: Foreword
Directive 93/42 EEC for medical devices. We hope your new device brings you plenty of enjoyment and we wish you every success in operating it. Your Gustav Baehr GmbH Page 8/58 English – V101 - effective 10/13... -
Page 9: General Product Description And Application
BaehrTec A2000 operating instructions General product description and application The BaehrTec A2000 foot care device is intended for use in medical foot care. It must only be used by trained professionals. The BaehrTec A2000 foot care device moves rotating instruments (cutters, grinders etc.). These can be used to strip away hard skin, calluses, nails etc. -
Page 10: Personal And Patient Protection
Personal and patient protection • Only use high-quality rotating instruments with standardised shaft (diameter 2.35 mm) from the Baehr product range. • When using rotating instruments please observe the operating instructions. Above all, observe the manufacturer's information on maximum speeds, cleaning, disinfection and sterilisation. -
Page 11: Information On Electromagnetic Compatibility
BaehrTec A2000 operating instructions 2.3.3 Information on electromagnetic compatibility We would like to point out that due to EN 60601-1 on the electromagnetic compatibility of electromedical devices that: • medical electrical devices are subject to special precautionary measures in terms of electromagnetic compatibility and must therefore be put into operation in accordance with the requirements of these operating instructions. -
Page 12: Before First Use
BaehrTec A2000 operating instructions If you put the handpiece down there is risk of injury when reaching for the handpiece. In the event of injuries from used instruments, this may lead to infections. Therefore, ensure that you put down the handpiece safely and do not injure yourself on it. -
Page 13: What You Must Always Consider Before Every Use
BaehrTec A2000 operating instructions What you must always consider before every use! It is essential that you read this section with the utmost care! It contains important information on protecting yourself, others and the device from damage! The term BaehrTec A2000 used in this section refers both to the controller and the handpiece. - Page 14 BaehrTec A2000 operating instructions Please ensure that the BaehrTec A2000 and the instruments are always in an immaculate hygienic condition, in order that they do put your own health or that of others at risk. Find out more in the section “Care (disinfection)” of the BaehrTec A2000. Rings or jewellery worn while working with the device may cause scratches on the handpiece.
- Page 15 BaehrTec A2000 operating instructions Warning – risk of injury! As shown in the illustration, you should avoid “pulling motions” during your work, as this may cause the instruments to slip out. Whilst working, ensure that you do not apply too much pressure to the instrument (burning of the skin).
-
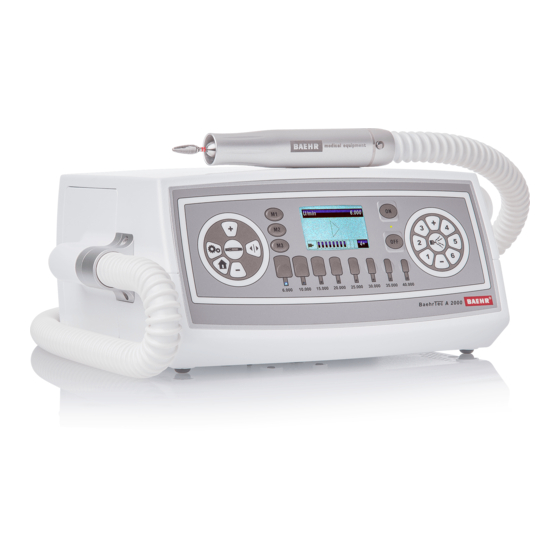
Page 16: Description Of The Device
BaehrTec A2000 operating instructions Description of the device Description of the controller 4.1.1 Front view Fig. 4 (1) Controller housing Main switch: (2) “ON” and (3) “OFF” with corresponding (4) LED (5) – (12) Push buttons for instrument speeds (6,000 – 40,000 rpm) with the corresponding (5a) –... -
Page 17: Side View With Handpiece Holder
BaehrTec A2000 operating instructions 4.1.2 Side view with handpiece holder Fig. 5 (32) Handpiece holder English – V101 - effective10/13 Page 17/58... -
Page 18: Side View With Dust Bag Lid (Closed)
BaehrTec A2000 operating instructions 4.1.3 Side view with dust bag lid (closed) Fig. 6 (33) Dust bag lid with handle (34) Handpiece outlet (35) Screws for handpiece outlet Must only be unfastened by the manufacturer (36) Suction hose Page 18/58 English –... -
Page 19: Side View Without Dust Bag Lid And Turbine Protection Filter
BaehrTec A2000 operating instructions 4.1.4 Side view without dust bag lid and turbine protection filter (open) Fig. 7 (37) 4x magnet holder (38) Filter grille English – V101 - effective10/13 Page 19/58... -
Page 20: Dust Bag Lid (Interior)
BaehrTec A2000 operating instructions 4.1.5 Dust bag lid (interior) Fig. 8 (39) Receptacle for dust bags (40) Mounting bolts for magnet holder (41) Rubber seal for dust bag lid (42) Dust bag Page 20/58 English – V101 - effective 10/13... -
Page 21: Rear View
BaehrTec A2000 operating instructions 4.1.6 Rear view Fig. 9 When working from the case, we recommend removing the storage tray from the case in order that the heat created by the device can escape from the case and to avoid potential head build-up. (43) Filter cassette (44) Knurled screws (45) Fuse clip... -
Page 22: Underside View
BaehrTec A2000 operating instructions 4.1.7 Underside view Fig. 10 (49) Housing screws All housing screws must only be unfastened by the manufacturer. (50) Housing seal As soon as the housing seal is breached or removed, all guarantee claims shall expire. (51) Rubber feet (4x) Page 22/58 English –... -
Page 23: Description Of Handpiece
BaehrTec A2000 operating instructions Description of handpiece Fig. 11 (36) Suction hose (52) Opening for DIN instruments with a shaft diameter of 2.35 mm (for instruments with a maximum diameter of 12 mm) (53) Handpiece case (can be unscrewed) (54) Handpiece cap (55) Push button Page 23/58 English –... - Page 24 BaehrTec A2000 operating instructions Max. instrument diameter no greater than 12 mm Warning: always observe the maximum permissible instrument diameter and the associated maximum permissible speed instrument manufacturer. Ensure that these are never exceeded under any circumstances, as this may lead to severe injuries to the patient and to the operator.
-
Page 25: Description Of Device Connection Cable
BaehrTec A2000 operating instructions Description of device connector cable Fig. 13 (56) Device connector (57) Cable (58) Safety plug Page 25/58 English – V101 - effective 10/13... -
Page 26: Description Of Suction System
BaehrTec A2000 operating instructions Description of suction system In the development of the suction system of the BaehrTec A2000 we have placed a great deal of emphasis on operating safety and operating speed. We would therefore like first and foremost to give you an insight into the operation of the suction system. - Page 27 BaehrTec A2000 operating instructions Here, ready for operation does not necessarily mean that the suction is actually active, as the suction only becomes active when the suction is ready for operation and the handpiece motor is also in operation. If the suction is actually active, this will be indicated on the display by two additional symbols.
-
Page 28: Colour Display
BaehrTec A2000 operating instructions Colour display The BaehrTec A2000 has two operating modes, which are indicated to you on the display: Work mode Set-up mode (options menu) 4.5.1 Work mode As the name suggests, you can operate and work with your device in “Work mode”. As soon as you turn on your device, you will automatically be in “Work mode”. -
Page 29: Set-Up Mode (Options Menu)
BaehrTec A2000 operating instructions For more information, please refer to the previous section. Suction level The suction level you have selected will be shown to you here as text and as a bar graph. In the bar graph, you will also see whether the suction is currently activated or deactivated. - Page 30 BaehrTec A2000 operating instructions The options menu is structured as follows Menu level 1 Menu level 2 Description - German - English - French - Italian Set the desired language here Language - Japanese - Russian - Spanish This is where you can set the sound you Different want to hear when pushing a button or sounds / sounds off...
-
Page 31: Home Function (Button (17))
BaehrTec A2000 operating instructions Home function (button (17)) This button has two functions: By briefly pressing the Home button you will be taken directly from the options menu to the Work mode (see section “Work mode”). By pressing this button for approximately 7 seconds, the base settings made by the factory will be restored: •... -
Page 32: Disconnecting/Connecting The Dust Bag Lid To The Controller
BaehrTec A2000 operating instructions The indication of the memory button will only appear on the display if you select the settings via the memory button. If you (accidentally) make settings that are saved to a memory button, you will not be shown on the display that these settings are already stored on a memory button. -
Page 33: Changing The Filter
BaehrTec A2000 operating instructions Connecting Fig. 15 When changing the dust bag, make sure that the dust bag does not pinch between the controller and the dust bag lid. If this should be the case, remove the dust bag lid once again and make sure that the dust bag is not pinched when closing. -
Page 34: Changing The Dust Bag
BaehrTec A2000 operating instructions filter cassette The filter cassette includes several different fleeces with different properties: • Sound-insulating fleece This fleece ensures that the suction noise is reduced and thus contributes to the comfortable volume of the A2000. • Coarse filter fleece This fleece filters coarser particles from the extracted air •... -
Page 35: Changing The Turbine Protection Filter
BaehrTec A2000 operating instructions For cleaning, we recommend the Baehr cloths Art. No. 11000. Push the dust bag carefully with the opening on the receptacle (39), until the (cardboard) reinforcement of the dust bag locks into the slot on the dust bag lid. -
Page 36: Changing The Filter Cassette
BaehrTec A2000 operating instructions Fig. 16 Place the dust bag lid back on the controller (see section “Disconnecting/connecting the dust bag lid to the controller”). 4.9.3 Changing the filter cassette You must change the turbine protection filter and all other filters if you have installed a new dust bag and the symbol for a dust bag change still lights up. - Page 37 Fig. 17 Remove the filter cassette (43) and clean the exhaust duct on the controller using Baehr cloths Art. No. 11000. Remove the knurled screws from the filter cassette and open it by pulling the filter cassette grille from the base of the filter cassette. Pull the filter cassette grille straight upwards and out, so that the bolts that connect the filter cassette grille with the base of the filter cassette do not break.
- Page 38 BaehrTec A2000 operating instructions Now change the inner fleeces in the order indicated on the outside of the filter cassette and then put them back into the filter cassette. Next, put the filter cassette grille back into the base of the filter cassette. Fig.
-
Page 39: Start-Up
BaehrTec A2000 operating instructions Attach the knurled screws and position the filter cassette on the controller. Turn the knurled screws clockwise until you feel a slight resistance. Fig. 21 Warning! Please do not turn the knurled screws too far or overtighten them. 4.10 Start-up Make sure that there is a dust bag in your BaehrTec A2000. - Page 40 BaehrTec A2000 operating instructions These settings will also be shown to you accordingly on the display. The BaehrTec A2000 is now ready for operation. Now hold the handpiece in one hand and plug an instrument with a shaft diameter of 2.35 mm as far as possible into the opening for DIN-instruments (52).
- Page 41 BaehrTec A2000 operating instructions You can now turn on the handpiece motor using the push button (13) on the controller or the push button (55) on the handpiece. The arrow in the display will now be filled blue. The instrument will now turn clockwise at the speed you have selected. You can now change the motor speed of the handpiece by pressing the push buttons (5) –...
-
Page 42: Accessories
BaehrTec A2000 operating instructions You can turn the handpiece motor on/off using the push button (13) on the controller or the push button (55) on the handpiece. Please note that the suction is automatically switched off as soon as you turn off the handpiece motor. -
Page 43: Service And Maintenance
Only the original Baehr foot pedal may be used with the BaehrTec A2000. No other foot pedals are approved for use with the BaehrTec A2000. Therefore, never connect other foot pedals, as this may cause your device to function incorrectly and you may put yourself and others in danger. -
Page 44: Maintenance (Disinfection)
Never immerse the device in water or any other liquids, as this poses a risk of electric shock. Clean the handpiece daily. To do this, use a small brush or a toothbrush, as well as the Baehr cloths (Art No. 11000). -
Page 45: Recycling/Disposal
BaehrTec A2000 operating instructions Recycling/disposal Waste devices must be disposed of as electronic waste and do not belong in the household waste. Please refer to the country-specific particularities for this. The resulting waste must be recycled or disposed of in a way that is not hazardous to humans or the environment. -
Page 46: Self-Help In The Event Of Malfunctions
BaehrTec A2000 operating instructions Self-help in the event of malfunctions Fault Cause Solution Turn on main switch Main switch off Controller not connected to Connect the device to the mains the mains Connect the device to a Connection socket has no functional socket power... - Page 47 BaehrTec A2000 operating instructions Fault Cause Solution Permitted maximum speed Only work up to the for the instrument in use has maximum permitted speed of been exceeded the instruments used Instrument shaft worn Check the instrument shaft and use a new instrument if ...
-
Page 48: Changing Fuses
BaehrTec A2000 operating instructions 5.5.1 Changing fuses The microfuses are used to protect your device from damage caused by high currents. Warning: only these fuses are permitted for the A2000 device: 2X microfuse, 3.15 A delay (Type H) Switch off your device at the main switch and disconnect the device from the mains. Use a screwdriver to open the fuse compartment on the device socket. - Page 49 Fig. 25 Clean the button pusher and the button housing with a brush. Fig. 26 Fig. 27 Next, wipe the button pusher and button housing with Baehr quick surface disinfectant (Art No. 11015). Fig. 28 Page 49/58 English – V101 - effective 10/13...
-
Page 50: Changing The Dampers For The Handpiece Case
BaehrTec A2000 operating instructions Apply a little oil with a cotton swab to the button pusher and reinsert it into the button housing. Fig. 29 Checker that the functioning is back to normal by pushing the button pusher with your finger. - Page 51 BaehrTec A2000 operating instructions Take the nine dampers for the handpiece case from the slots on the handpiece motor (possibly using a pair of tweezers) and dispose of these properly. Fig. 33 Now reinsert the new dampers for the handpiece case. Make sure that you insert the three black dampers in the middle row.
-
Page 52: Technical Specifications
BaehrTec A2000 operating instructions Technical specifications BaehrTec A2000 Medical device Class 2A in accordance with EC Directive 93/42 Medical devices EMC test Under EN 60601-1 Operating voltage 110 – 240 V AC voltage Frequency 50 – 60 Hz Micromotor speed range 6,000 –... - Page 53 BaehrTec A2000 operating instructions Guidelines and manufacturer declaration – ELECTROMAGNETIC EMISSION The BaehrTec A2000 model is intended for operation in the ELECTROMAGNETIC ENVIRONMENT specified below. The customer or the user N11) of the BaehrTec A2000 model should ensure that it is used in such an environment. Emission measurements Compliance ELECTROMAGNETIC ENVIRONMENT –...
- Page 54 BaehrTec A2000 operating instructions Guidelines and MANUFACTURER declaration – ELECTROMAGNETIC STABILITY The BaehrTec A2000 model is intended for operation in the ELECTROMAGNETIC ENVIRONMENT specified below. The customer or the user N15) of the BaehrTec A2000 model should ensure that it is used in such an environment. STABILITY IEC 60601- COMPLIANCE...
-
Page 55: Spares/Accessories
NOTE 2 These guidelines may not apply in all situations. The distribution of electromagnetic waves is affected by Spares/accessories • Baehr cloths Art No.: 11000 • Baehr cloths refill bag Art No.: 11001 • Baehr quick surface disinfectant Art No.: 11015 •... - Page 56 BaehrTec A2000 operating instructions Notes Page 56/58 English – V101 - effective 10/13...
- Page 57 BaehrTec A2000 operating instructions Notes English – V101 - effective 10/13 Page 57/58...
- Page 60 Gustav Baehr GmbH Max-Eyth-Str. 39 D-71332 Waiblingen Tel.: 07151 95 90 20 Fax: 07151 1 84 44 www.baehrshop.de Page 58/58 English – V101 - effective 10/13...
Need help?
Do you have a question about the TEC A2000 and is the answer not in the manual?
Questions and answers